Connect your data source
Connecting your data source to your application blocks.
Data is the foundation of any web application. Connecting a data source is essential for building robust, interactive, and personalized experiences that update in real time.
When you connect a data source to your Softr app, you can:
-
View and manage data: Display data using forms, tables, lists, charts, and other interactive layouts.
-
2-way sync: Instantly sync changes between your data source and your Softr app without republishing.
-
Enable user interaction: Set up user accounts and permissions, allowing users to log in, edit, and update data, with changes syncing back to the data source.
Choose the data source
Go to the data sources section of your Softr app and choose the platform you want to connect. Softr integrates with many popular platforms, including CRMs, modern spreadsheets, and data platforms, allowing you to connect your app with the data you need seamlessly.
Below, you’ll find a list of supported data sources and their corresponding pricing plans to help you choose the best option for your app.
Authenticate your account
Follow the authentication steps specific to your chosen data source. These might include logging into your account, granting permissions, or generating an API key. For a more detailed guide, check out the specific data source documentation.
Once authenticated, decide which bases, datasets, or documents (depending on your data source’s terminology) you want to use in your app. Ensure the data is structured and organized to match how it will be used in your Softr app.

Connect data to a dynamic block
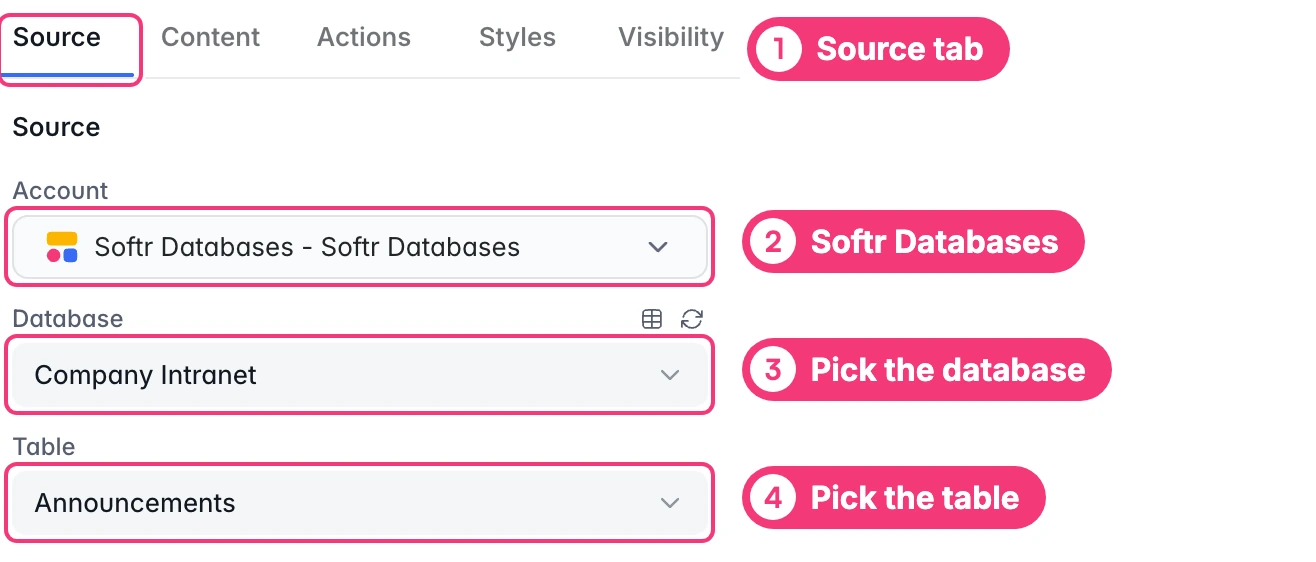
Add dynamic blocks to your Softr app, such as alist, table, or chart. Use the source tab to select the data source you want to show and map fields from that source to the appropriate elements in the block. For example, map a “Task Name” field to a table column.
Example: Select a “Projects” table in your data source to display the project and its status.

Configure data permissions
Use conditional filters or global data restrictions to control who sees what data. These tools let you display specific records based on user details or record fields.
Example: Show only projects with the status Done.

Configure actions
You can define how users interact with your data by adding data actions, such as creating, editing, or deleting records.
Example: Let users create new projects.

Test your connection
Preview your Softr app to ensure the data is displayed correctly. Make a small change, e.g., update the name of your project in your connected data source, and verify that the update is reflected in real-time within your app.

Building an app on top of multiple data sources
One of Softr’s key strengths is its ability to integrate data from multiple sources—like CRMs, project management tools, and external APIs—into a single app. Although you can combine these sources, it’s often best to display each one in its own block to keep information organized and control how it’s presented.
Example: Imagine you’re building a project dashboard that displays customer data from your CRM (e.g., HubSpot) and project status information from your task management tool (e.g., Airtable).
-
Step 1: Connect your data sources
Start by connecting your CRM (HubSpot) and project management tool (Airtable) to your Softr app. Go to the Data Sources section, select each platform, authenticate your accounts, and choose the relevant tables or datasets.
-
Step 2: Add a block for CRM data
Add a List block to your page that will display customer data from HubSpot. In the block settings, map the relevant fields from HubSpot, such as customer name, email, and phone number.
-
Step 3: Add a separate block for project data
Add another list block to your page, pulling project status information from Airtable. Map the project name, status, and deadline fields from Airtable to the new block.
-
Step 4: Display data in separate blocks
You now have two separate blocks on your page:
- The CRM list block displays customer details.
- The project list block shows the project statuses. This ensures each block is dedicated to its own data source, making it clear and easy to manage.