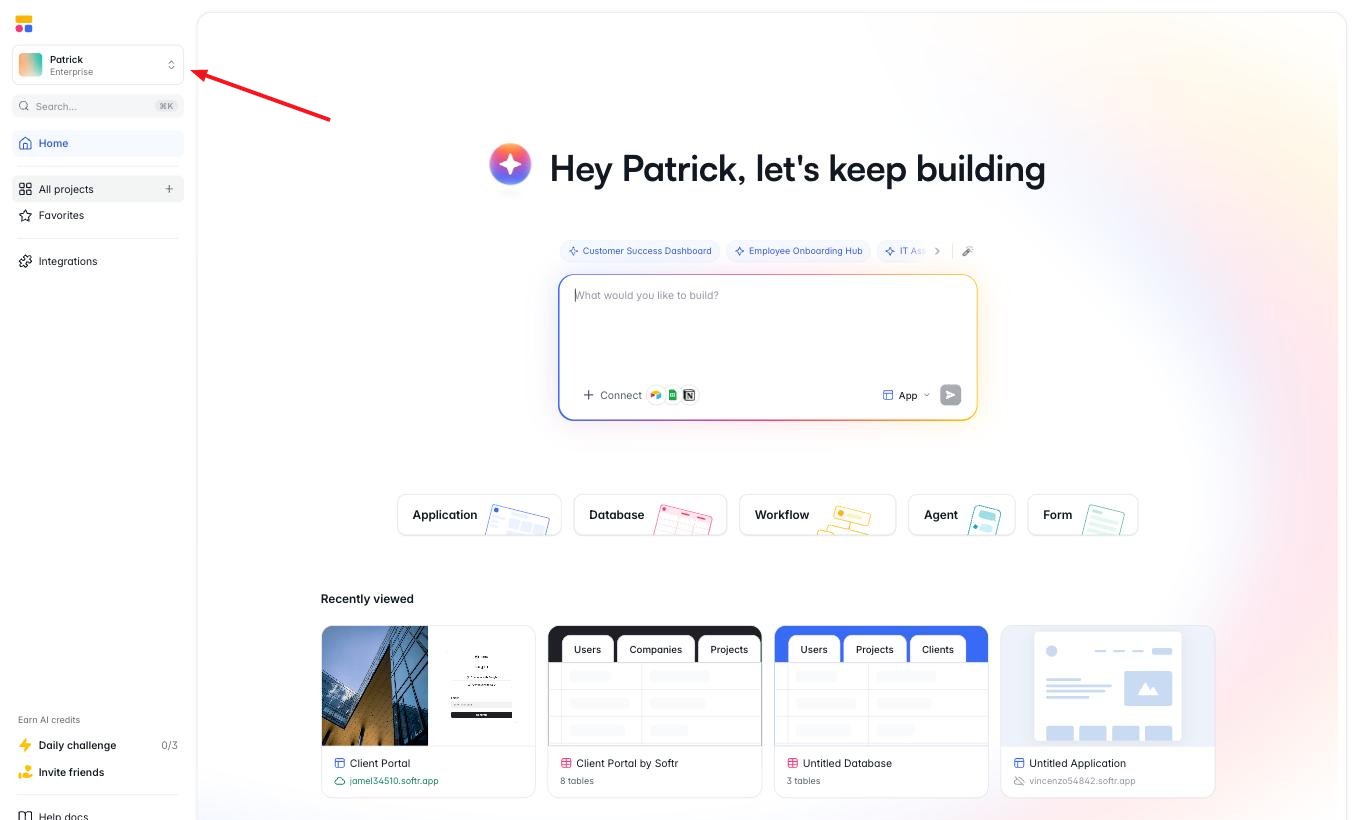
A workspace is where your Softr projects live (apps, databases, workflows, forms and agents) together with the people who build them. Each workspace has its own plan and billing, its own members, and can have teams that keep some projects private to a group. When you log in to Softr Studio, you land on Home in your current workspace. The workspace switcher at the top of the left sidebar shows which workspace you’re in and which plan it’s on.
Softr Studio Home screen with an arrow pointing at the workspace switcher in the top-left corner, which shows the workspace name and its plan

Softr Studio Home. The workspace switcher sits at the top of the left sidebar.

Every project in the workspace is listed under All projects in the left sidebar, with tabs for Apps, Databases, Workflows, Forms, Agents and Integrations.

Create a new workspace

You get one workspace when you sign up. You can create more, for example one per client or one for a side project on its own plan, and other people can invite you into their workspaces.
1

Open Switch workspace

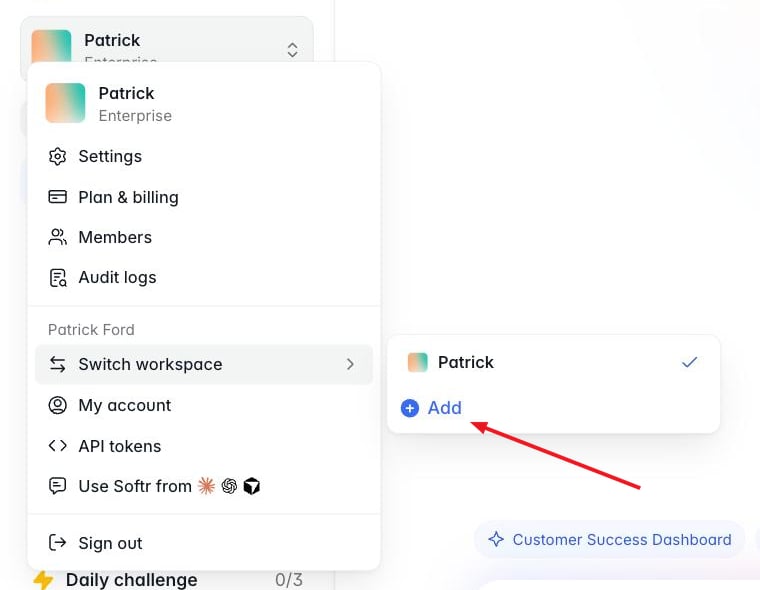
Click the workspace switcher at the top of the left sidebar, hover Switch workspace, and click Add.
Workspace menu open with the Switch workspace submenu showing the current workspace with a check mark and an arrow pointing at Add

Add sits at the bottom of the Switch workspace list.

2

Name the workspace

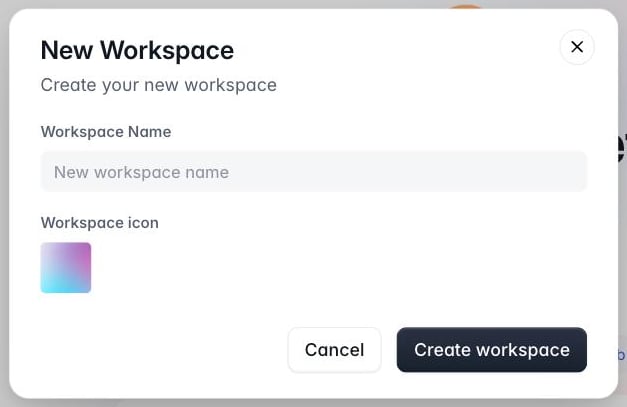
Enter a Workspace Name, choose a Workspace icon if you like, and click Create workspace.
New Workspace dialog with a Workspace Name field, a Workspace icon swatch, and Cancel and Create workspace buttons

The New Workspace dialog.

3

Invite people

Add the people you’ll build with. See Invite members.
To move between workspaces, open the switcher, hover Switch workspace, and pick one. A check mark shows the workspace you’re in.

The workspace menu

Clicking the workspace switcher opens the workspace menu. The top section manages the workspace you’re in; the section below it is for your own account. Show below are options for the current workspace (1) and where to Switch workspaces (2).
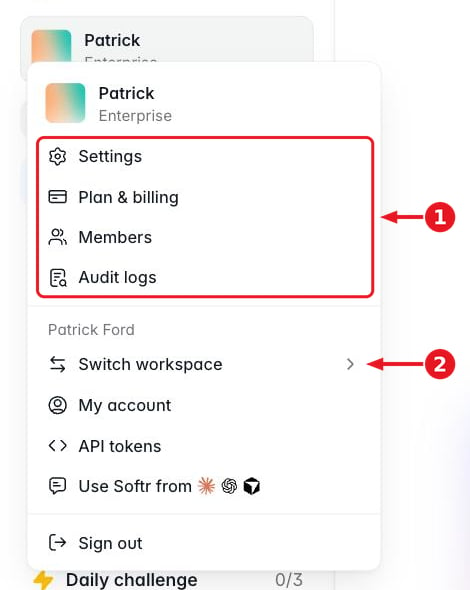
Workspace menu with a box around Settings, Plan & billing, Members and Audit logs marked 1, and an arrow marked 2 pointing at Switch workspace

The workspace menu: options for the current workspace (1) and Switch workspace (2).

  • Settings: the workspace name, icon and ID.
  • Plan & billing: the workspace’s plan, usage, AI credits and payment details.
  • Members: who is in the workspace and their role.
  • Audit logs: a record of activity in the workspace.
  • Switch workspace: move to another workspace or create a new one.
  • My account, API tokens and Use Softr from apply to your own account in every workspace. See Connect your AI assistant for Use Softr from.

Workspace settings

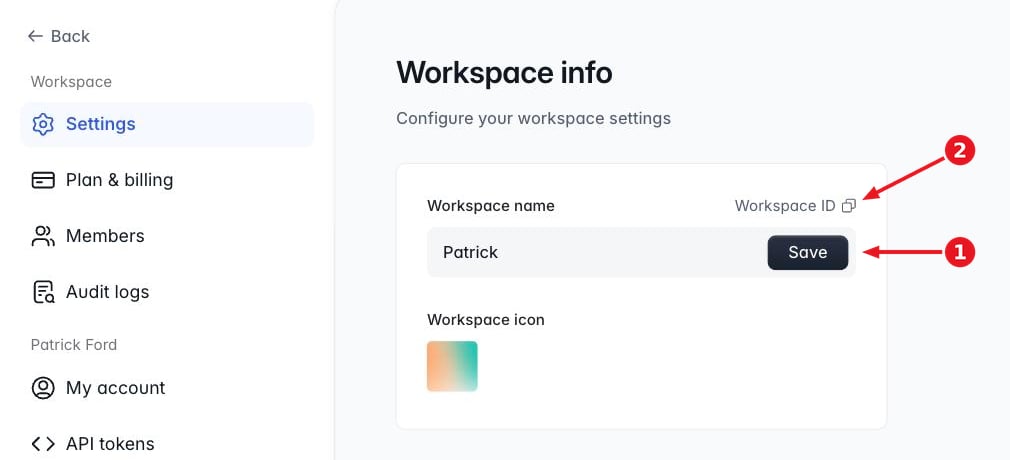
Settings opens Workspace info. Here the workspace owner can:
  1. Rename the workspace: edit Workspace name and click Save.
  2. Copy the Workspace ID, which support and the Softr API may ask for.
You can also change the Workspace icon here.
Workspace info page with an arrow marked 1 pointing at the Workspace name field and its Save button, and an arrow marked 2 pointing at the Workspace ID copy button

Workspace info: the workspace name (1) and the Workspace ID copy button (2).

Invite members

Members lists everyone in the workspace with their role. The workspace owner is marked Workspace owner.

Members page listing the workspace owner with the Owner role, and an arrow pointing at the Invite button

The Members page. Invite is in the top-right corner.

To add someone:
1

Click Invite

On the Members page, click Invite.
2

Enter their email

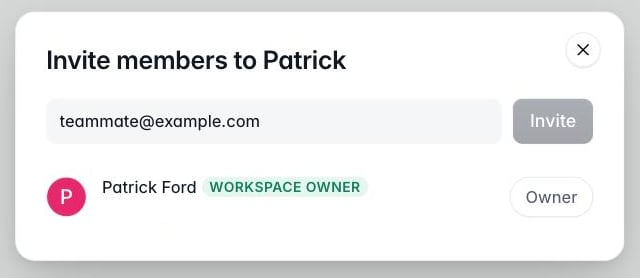
Type the person’s email address and select Add in the suggestion that appears. Repeat for anyone else you want to invite.
3

Send the invite

Click Invite to send the invitations.
Invite members dialog with an email address typed in the field, an Invite button, and the workspace owner listed below

Invite members to the workspace by email.

Members see every project that isn’t inside a team. To give someone access to one project only, share that project instead. See Share a single project.

Share a single project

You can share one app, database or workflow without giving someone the rest of the workspace. This is how you bring in a freelancer, an agency or a client to work on a single project. Open the sharing dialog in either of two ways:
  • On All projects, click the ⋯ menu on the project card and choose Share.
  • Inside the project in Studio, click the Share icon in the top bar, next to Preview and Publish.
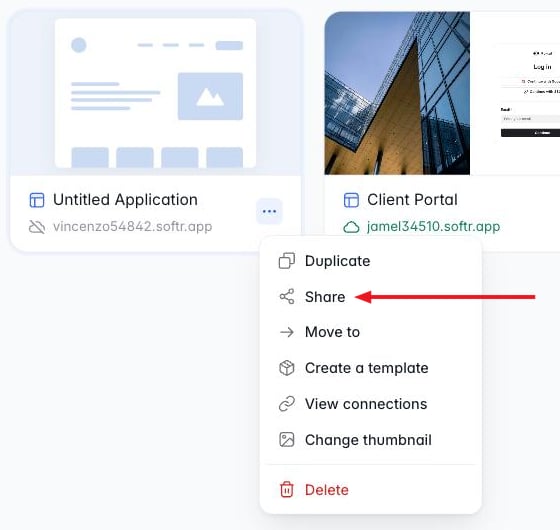
Project card menu open with Duplicate, Share, Move to, Create a template, View connections, Change thumbnail and Delete, and an arrow pointing at Share

Share in a project's menu on All projects.

Softr Studio top bar with an arrow pointing at the Share icon to the left of the Preview and Publish buttons

The Share icon in the Studio top bar.
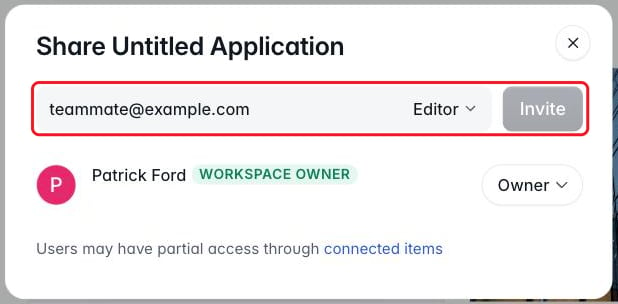
In the dialog, type a name or email, select Add, pick a role, and click Invite.
Share Untitled Application dialog with an email address and the Editor role selected in the invite field, the Invite button, and the project owner listed below

Share a project by email and choose the role they get.

The dialog lists everyone who has access and their role. When you share an app, the people you share it with also get indirect access to the databases and integrations the app is connected to, so they can keep building. The connected items link at the bottom of the dialog shows which ones.

Teams

A team is a private space inside the workspace, with its own projects and its own members. Projects in a team are visible only to the members of that team and the workspace owner. Anything not in a team stays visible to every workspace member under All projects. To create a team, go to All projects, click Add team, enter a name and click Next.
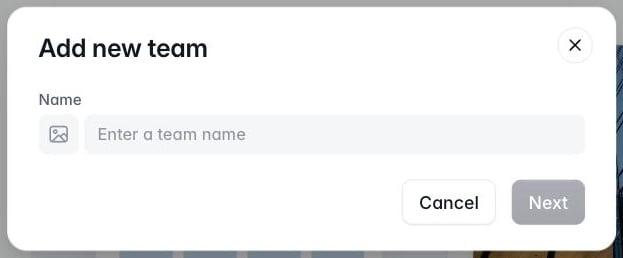
Add new team dialog with a Name field, an icon picker, and Cancel and Next buttons

Create a team from All projects.

How many teams you can create depends on your workspace’s plan. See Pricing and Plans.

Roles and permissions

Access in Softr works at three levels: the workspace, teams, and individual projects.

Workspace roles

Project roles

These are the roles you choose in a project’s Share dialog.
A person’s access is the highest role they hold at any level. Adding someone to a team or sharing a project with them can widen their access, but never narrows access they already have.

Plan and billing

Each workspace is billed on its own, with its own plan. Everyone who works in the workspace uses the features that plan includes. Plan & billing shows:
  • the current plan, and the options to change or downgrade it,
  • usage against your plan’s limits: app users, published apps, custom domains, database records, file storage and workflow actions,
  • your AI credits, with the option to buy more,
  • your payment method, billing details and invoices.
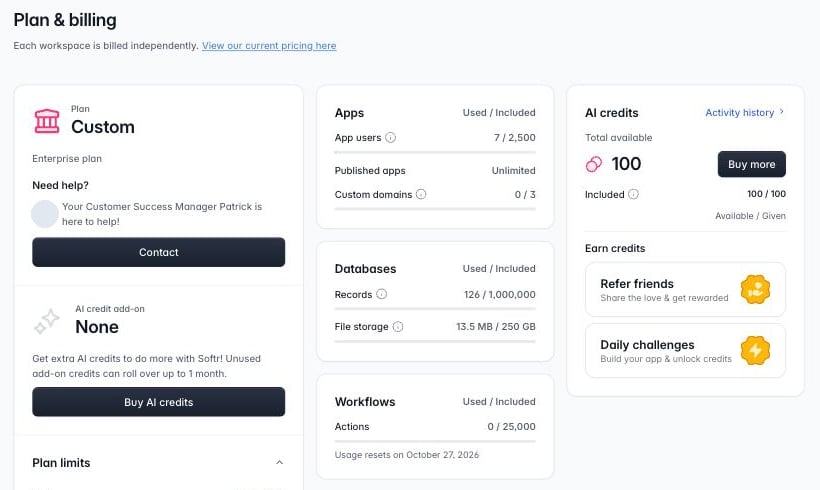
Plan & billing page with the current plan on the left, usage cards for Apps, Databases and Workflows in the middle, and AI credits on the right

Plan & billing shows the plan, usage and AI credits for this workspace.

Only the workspace owner can manage the plan and billing. For details, see Billing, Pricing and Plans and AI Credits.

Move a project

You can move a project to another workspace, or into a team within the same workspace.
1

Open Move to

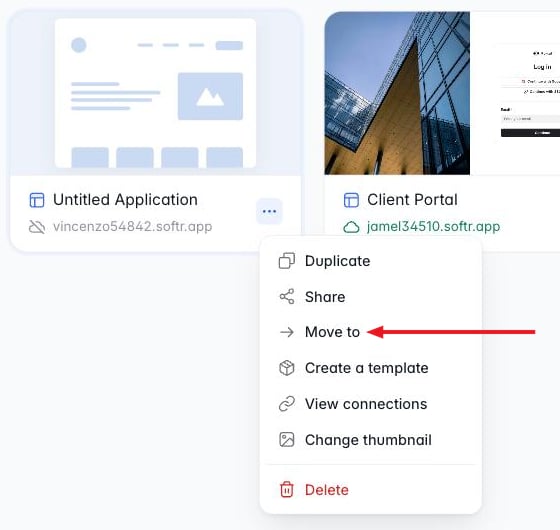
On All projects, click the ⋯ menu on the project card and choose Move to.
Project card menu open with an arrow pointing at Move to

Move to in a project's menu.

2

Choose the destination

Pick the destination workspace from the dropdown, then choose All projects or a team in that workspace, and click Move.
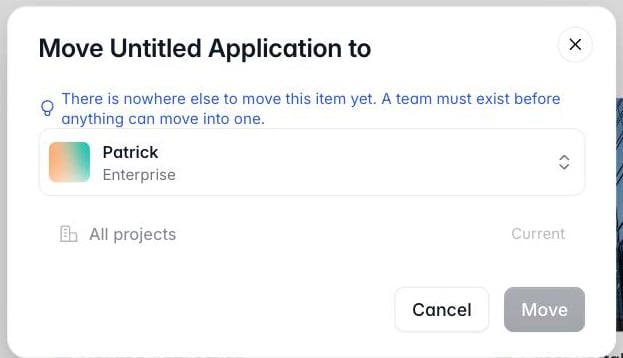
Move Untitled Application to dialog with a workspace dropdown, All projects marked Current, and Cancel and Move buttons

The Move dialog. Here the workspace has no teams yet, so there is nowhere else to move the app.

The destination workspace’s plan needs to support the features the project uses, such as its number of app users or single sign-on. If the project uses data sources connected in the current workspace, you may need to reconnect them after the move.

Duplicate or delete a project

Both options are in the project’s ⋯ menu on All projects.
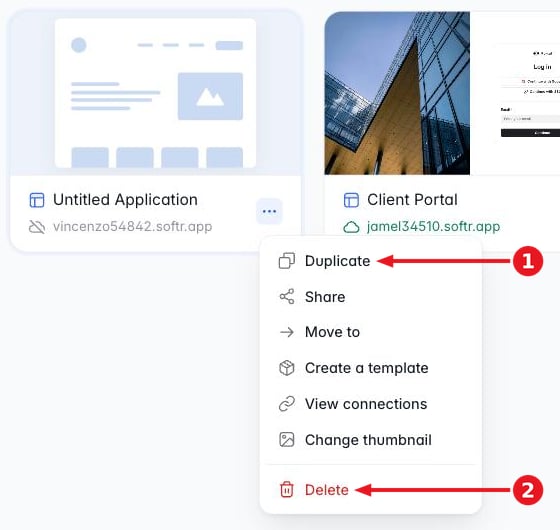
Project card menu with an arrow marked 1 pointing at Duplicate and an arrow marked 2 pointing at Delete

Duplicate (1) and Delete (2) in a project's menu.

  • Duplicate makes a copy of the project in its current state, in the same workspace.
  • Delete removes the project. Confirm in the dialog that follows. Only the project’s owner, or the workspace owner, can delete it.
Deleting a project removes it for everyone who has access to it. If you might need a copy, duplicate it first.

Transfer Workspace Ownership

Hand the workspace over to another member.

Pricing and Plans

What each plan includes.

Billing

Payment methods, invoices and plan changes.

AI Credits

How AI credits work and are billed.