Notion
Using Notion as a data source for your Softr app.
Notion is more than just a note-taking tool. It combines project management and databases, making it a stronger alternative to spreadsheets for organizing and collaborating on data in one place.
By using Notion databases with Softr, you can easily create Client Portals, Internal Tools, and other business apps to:
-
Offer a simple, user-friendly experience
-
Control access to specific data
-
Secure logins without Notion invites
-
Let users submit, edit, and sync data seamlessly
-
Collect forms, feedback, and inputs effortlessly
1. Connect your Notion account
To use Notion in Softr, you must first link your Notion account. Here’s how:
You connect Notion once per workspace. Then you can use it in all your apps.
Open Integrations
-
In the Softr Studio dashboard, click Integrations in the left menu.
-
Click Connect new.

- In the Select an integration window, click Notion.

You can also connect Notion from the Account list in the Source tab of a block.
Start the connection
In the Connect to Notion window, click Connect. Softr opens the Notion authorization page.

Grant access to the Notion databases you want to use
On the Notion authorization page, select the workspace. Then click Select pages to choose the top-level pages that contain the databases you want to connect to Softr.


To finalize the connection, click the Allow access button to grant Softr permission to access your Notion account.
2. Connect your Notion database to your Softr app
Connect your data to a dynamic block
To display your data in the app, connect a dynamic block (e.g. List, Grid, Table) to your Notion database:
-
Open the Source tab of the block.
-
In Account, select your Notion account.
-
In Database, pick the database you want to use.
Each page of that database is a record in your app.

Map Notion columns to item fields
Once the block is connected to your database, open the Content tab. In Item fields, click Add to show a Notion property in each item.

In Notion, properties are essentially the columns in the database, with each property having a predefined type, such as Files, Status, Date, and more. Similarly, Softr offers a variety of field types to choose from when displaying your data. It’s important to select the appropriate field type when mapping fields from Notion to Softr.
For example, in the image below, we’ve mapped a File property from Notion to an Image field type on Softr’s List block to display photos.

Supported fields
Most fields that can be edited in Notion are also editable in Softr. However, there are exceptions. Fields that Notion generates, such as Rollup, Formula, People, Created time, Created by, Last edited time, Last edited by and ID, can be displayed but not edited within Softr.
Why Dates Look Different in Notion and Softr
If dates from Notion show differently in Softr (e.g., “14-05-2025” instead of “15-05-2025”), it’s due to time zone handling in Notion formulas. Here’s why and how to fix it.
What’s Happening?
A Notion formula like format calmaDate(Data, “DD-MM-YYYY”) pulls from a date field, e.g., “2025-05-14T22:00:00.000+00:00” (May 14, 2025, 10:00 PM UTC).
-
Notion: Shows the date in your local time zone (e.g., Italian, UTC+2), where 10:00 PM UTC is midnight May 15, so it displays “15-05-2025”.
-
Softr: Uses UTC from Notion’s data, showing “14-05-2025” for May 14.
This mismatch occurs because the date includes a time (10:00 PM UTC), which shifts the day depending on the time zone.
Why Now?
Your Notion date field may have recently changed to use 10:00 PM UTC instead of midnight UTC, causing the day to shift in different time zones.
How to Fix It
-
Use Midnight UTCSet Notion dates to midnight UTC (e.g., “2025-05-14T00:00:00.000+00:00”).How: In Notion, set dates to 12:00 AM UTC or exclude time.
-
Skip Time AltogetherUse only dates (no times) in Notion for consistent display.How: Set the date field to “Date Only” in Notion.
Best Option?
If times aren’t needed, choose Skip Time Altogether for simplicity. Otherwise, use Midnight UTC.
Database relations
The Relation property in Notion is essential for creating a relational database. It allows you to link records from one database to another, enabling the seamless display of related information across your boards.
For example, if you have two Notion databases (Clients and Projects), you can add a Relation property to Clients to link it with Projects. This lets you easily display all projects associated with a specific client.

Conditional filters based on relation
Conditional filters allow you to display specific records based on set conditions. This feature is handy when showing related records between databases. For example, if you have a “Client Detail” page, you can display a list of projects related to a specific client.


How to show sub-items
If your database includes sub-items, here’s how you can choose what shows up in your Softr blocks.
Show both items and sub-items
When you connect your database to a dynamic block, you’ll automatically see both items and sub-items.

Show only top-level items
To hide sub-items and show only top-level items, in the Source tab, add this condition under Record filters: Parent item - is empty.

Show only sub-items
To show just sub-items (and hide the top-level items), in the Source tab, add this condition under Record filters: Parent item - is not empty.

Show items with sub-items in a detail page
Want users to click an item and see its sub-items on a new page? Here’s how:
-
Filter the list to show only top-level items (
Parent item - is empty). -
In Actions, set Action on click → Open detail page (or create a one).
-
In the detail page, add a list block.
-
Set that block to show sub-items related to the current item:
Parent item - Includes any of → Current record {Primary column name}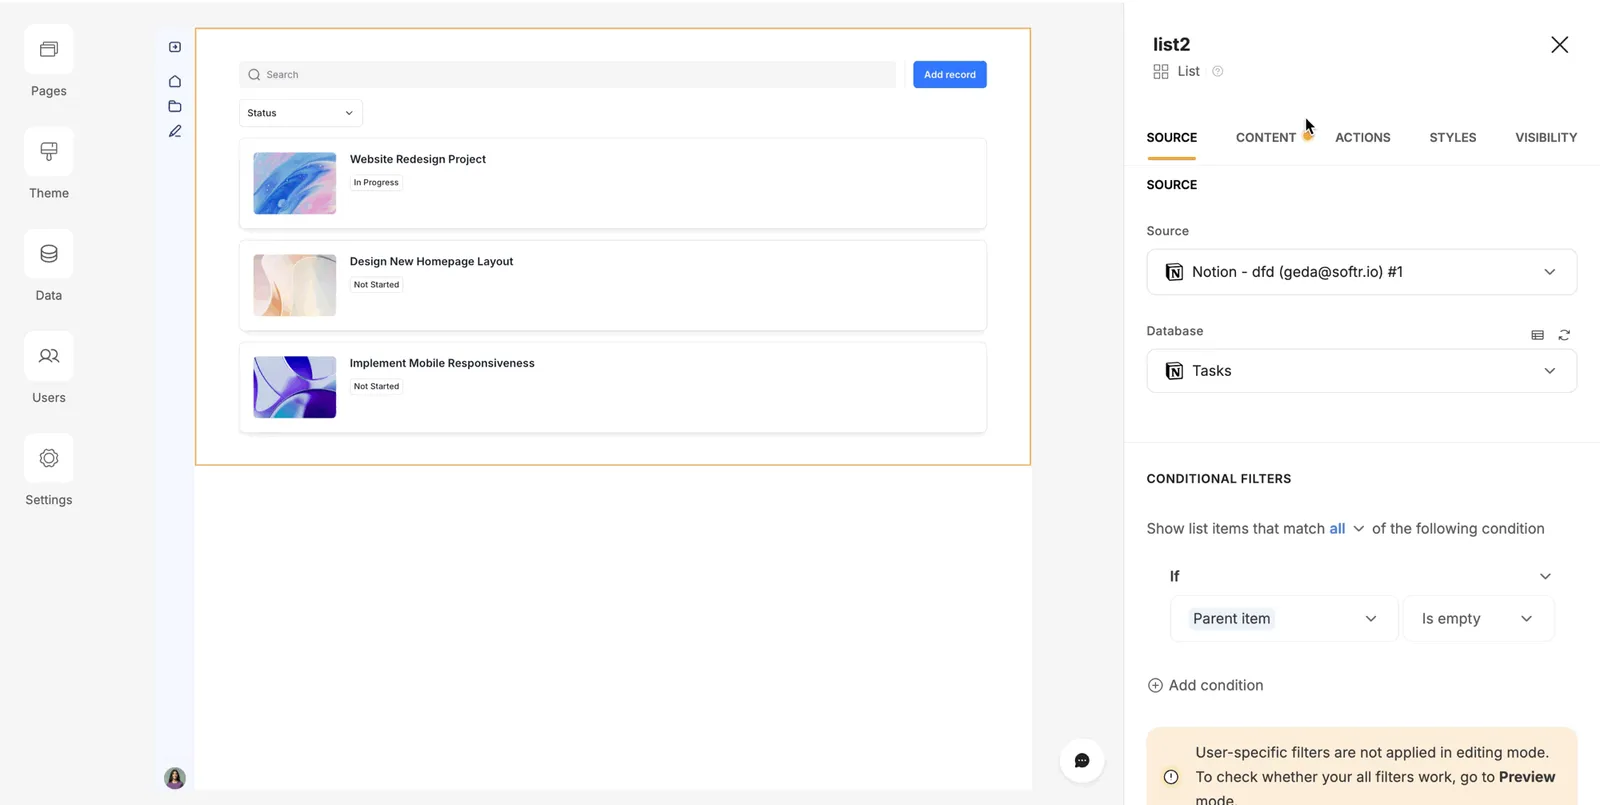

FAQ
My Notion is connected to Softr, but I don’t see the page or database I’m trying to access.
This can happen when you add a page or database to Notion after you have already created the connection to Softr. To fix this, navigate to the page you want to give Softr access to and click on the ellipses icon in the upper right corner. Hover over the Connections, search for Softr and select it.

Notion will ask you to confirm letting Softr access this page. Note that you will need to refresh Softr editor to see the newly connected page or database.

Can I use multiple Notion workspaces in one Softr app?
Yes! You can connect multiple Notion workspaces but need to use separate Softr blocks for each database.
Why do dates look different in Notion and Softr?
If dates from Notion show differently in Softr (e.g., “14-05-2025” instead of “15-05-2025”), it’s due to time zone handling in Notion formulas. Here’s why and how to fix it.
What’s Happening?
A Notion formula like format calmaDate(Data, “DD-MM-YYYY”) pulls from a date field, e.g., “2025-05-14T22:00:00.000+00:00” (May 14, 2025, 10:00 PM UTC).
-
Notion: Shows the date in your local time zone (e.g., Italian, UTC+2), where 10:00 PM UTC is midnight May 15, so it displays “15-05-2025”.
-
Softr: Uses UTC from Notion’s data, showing “14-05-2025” for May 14.
This mismatch occurs because the date includes a time (10:00 PM UTC), which shifts the day depending on the time zone.
Why Now?
Your Notion date field may have recently changed to use 10:00 PM UTC instead of midnight UTC, causing the day to shift in different time zones.
How to Fix It
-
Use Midnight UTCSet Notion dates to midnight UTC (e.g., “2025-05-14T00:00:00.000+00:00”).How: In Notion, set dates to 12:00 AM UTC or exclude time.
-
Skip Time AltogetherUse only dates (no times) in Notion for consistent display.How: Set the date field to “Date Only” in Notion.
Best Option?
If times aren’t needed, choose Skip Time Altogether for simplicity. Otherwise, use Midnight UTC.