Softr now handles most of this for you automatically. As soon as you pick an action, every mappable field from your data source shows up pre-configured. You only need to step in when you want to customize a field, remove one, or collect a value behind the scenes (a hidden input).
When you add an Add record action, Softr auto-maps every eligible column from the connected table. Computed (formula) fields are skipped because they can't be written to.
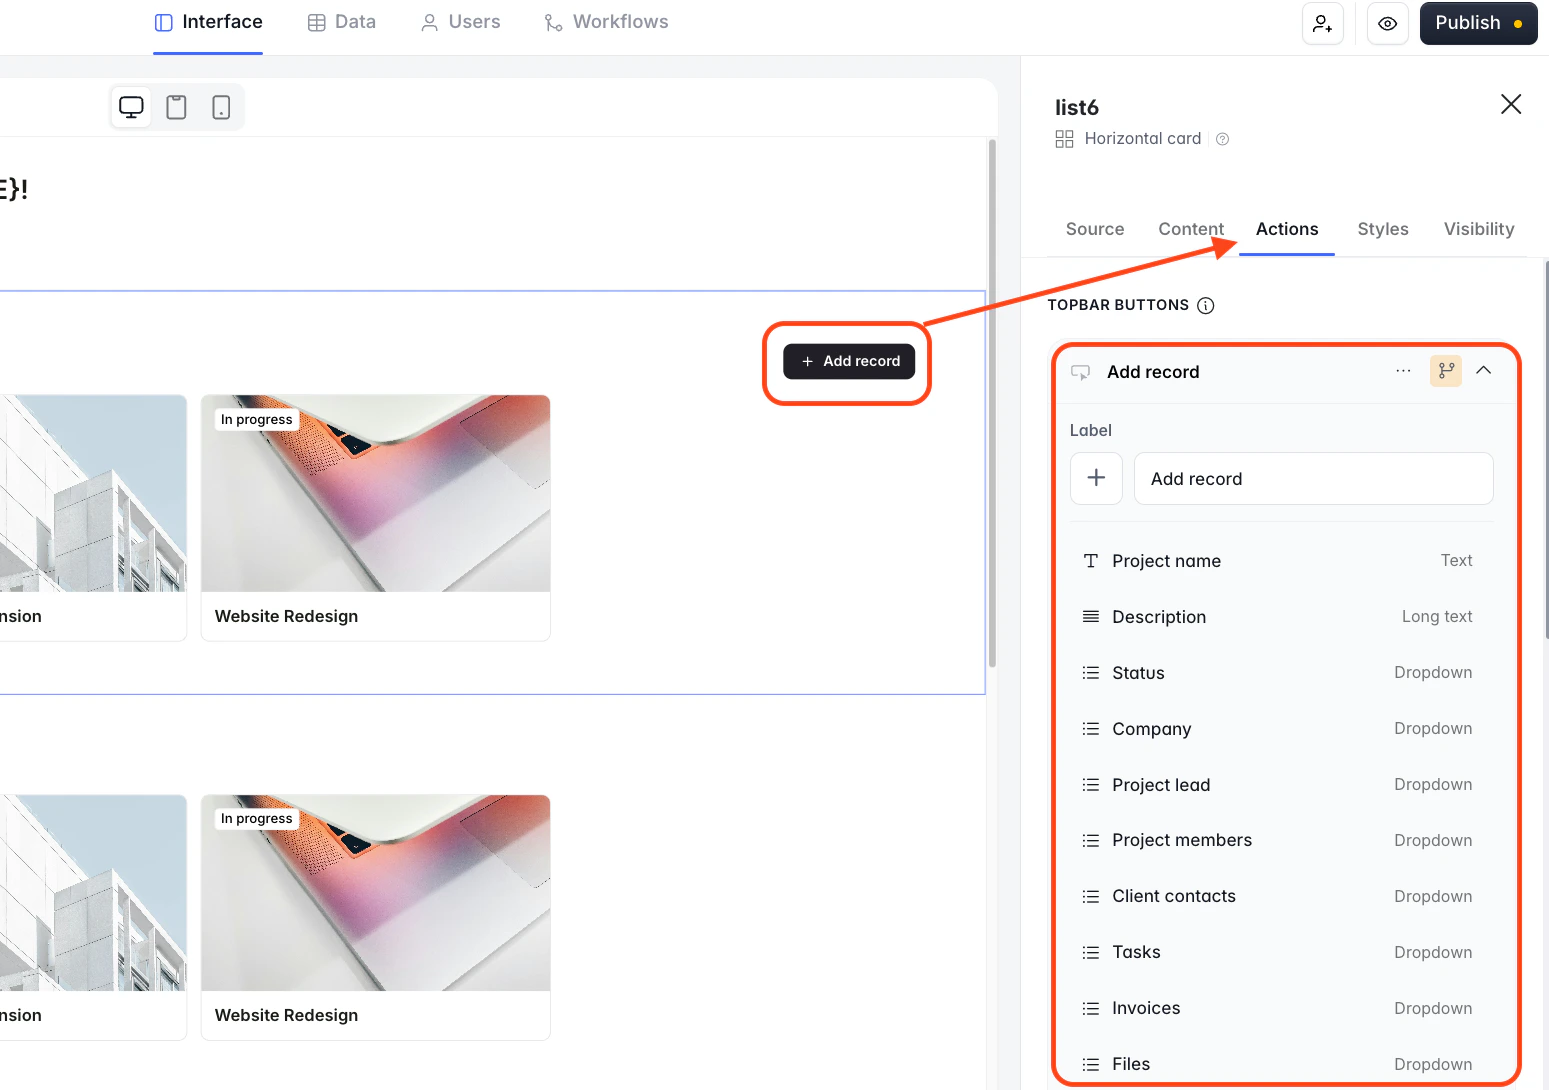
How to add an action button
Open any block that supports actions — lists, tables, grids, item details — then:1
Select the block
Click the block on the canvas to open its settings panel on the right.
2
Open the Actions tab
In the right-hand settings panel, switch to the Actions tab.
3
Add a button
Click + Add topbar button (applies to the whole block, like “Add a new project”) or + Add item button (applies per row, like an Edit button on each card).
4
Choose the action type
Pick from the dropdown — options listed below.

Add record
Creates a new row in a connected table. The most common starting point — field mapping matters a lot here.
Update record
Edits an existing row. Only available as an item button. Same field-mapping UI as Add record.
Run custom workflow
Triggers a Softr workflow. Useful when you need to combine values from multiple sources before writing.
Open page
Navigates to another page in your app.
Open URL
Opens an external URL in a new tab.
Scroll to
Smoothly scrolls to another block on the same page.
Ask AI
Opens an AI chat scoped to the current record or context.
For this guide we’ll focus on Add record and Update record — those are the action types where field mapping applies.
What auto-mapping does (and what you still control)
As soon as you pick Add record or Update record, Softr scans the connected table and creates a field entry for every writable column, with the correct Input type already selected (Text, Long text, Number, Dropdown, Date, Attachment, and so on).Computed / formula fields are skipped
Computed / formula fields are skipped
They’re read-only in the data source, so they can’t be written to from an action.
Lookup and linked-record fields are included
Lookup and linked-record fields are included
They show up as dropdowns or multi-selects, depending on how the underlying table is configured.
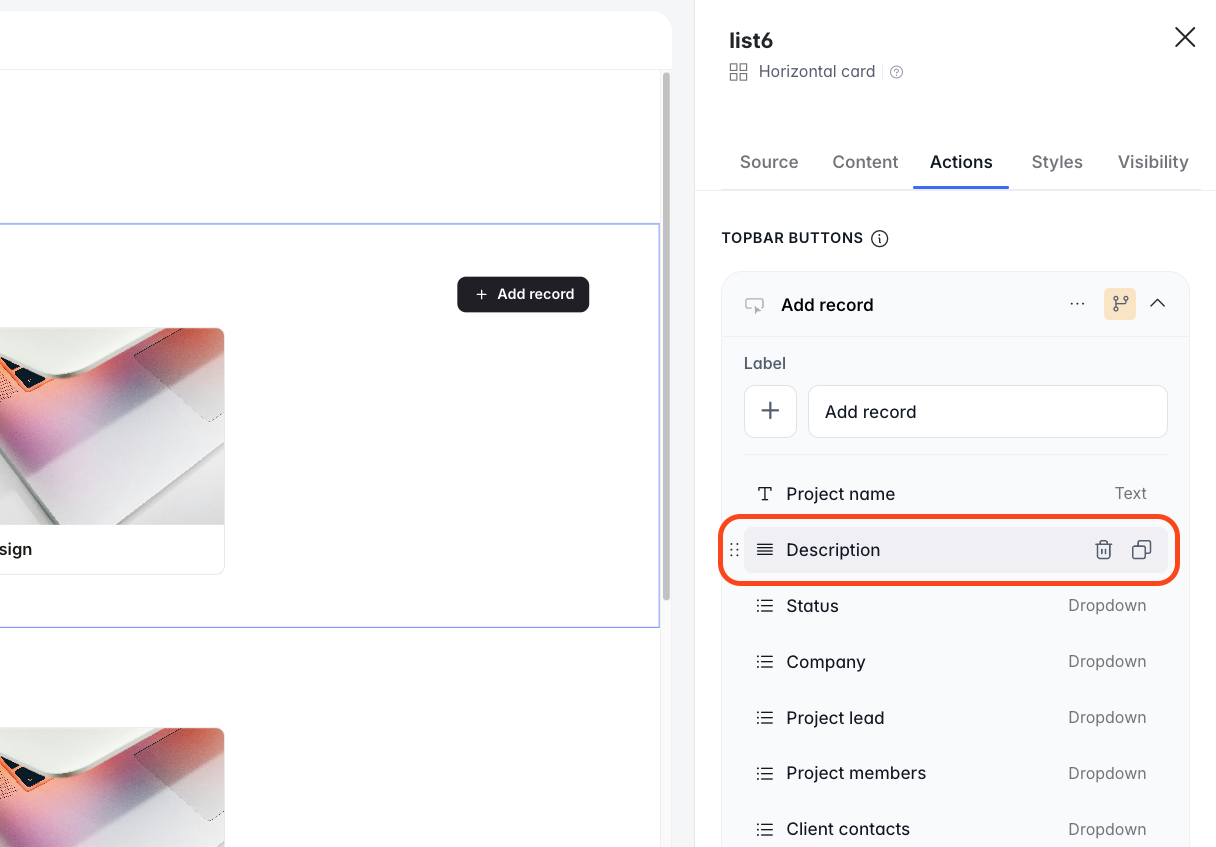
You can remove any field you don't want users to fill in
You can remove any field you don't want users to fill in
Hover the field row and click the trash icon. Removed fields won’t appear in the form.
You can re-add a field later
You can re-add a field later
Click + Add field at the bottom of the list. This also lets you add a field that isn’t yet bound to a column — useful for hidden inputs (see below).
Configuring an individual field
Click any field in the list to open its configuration popover.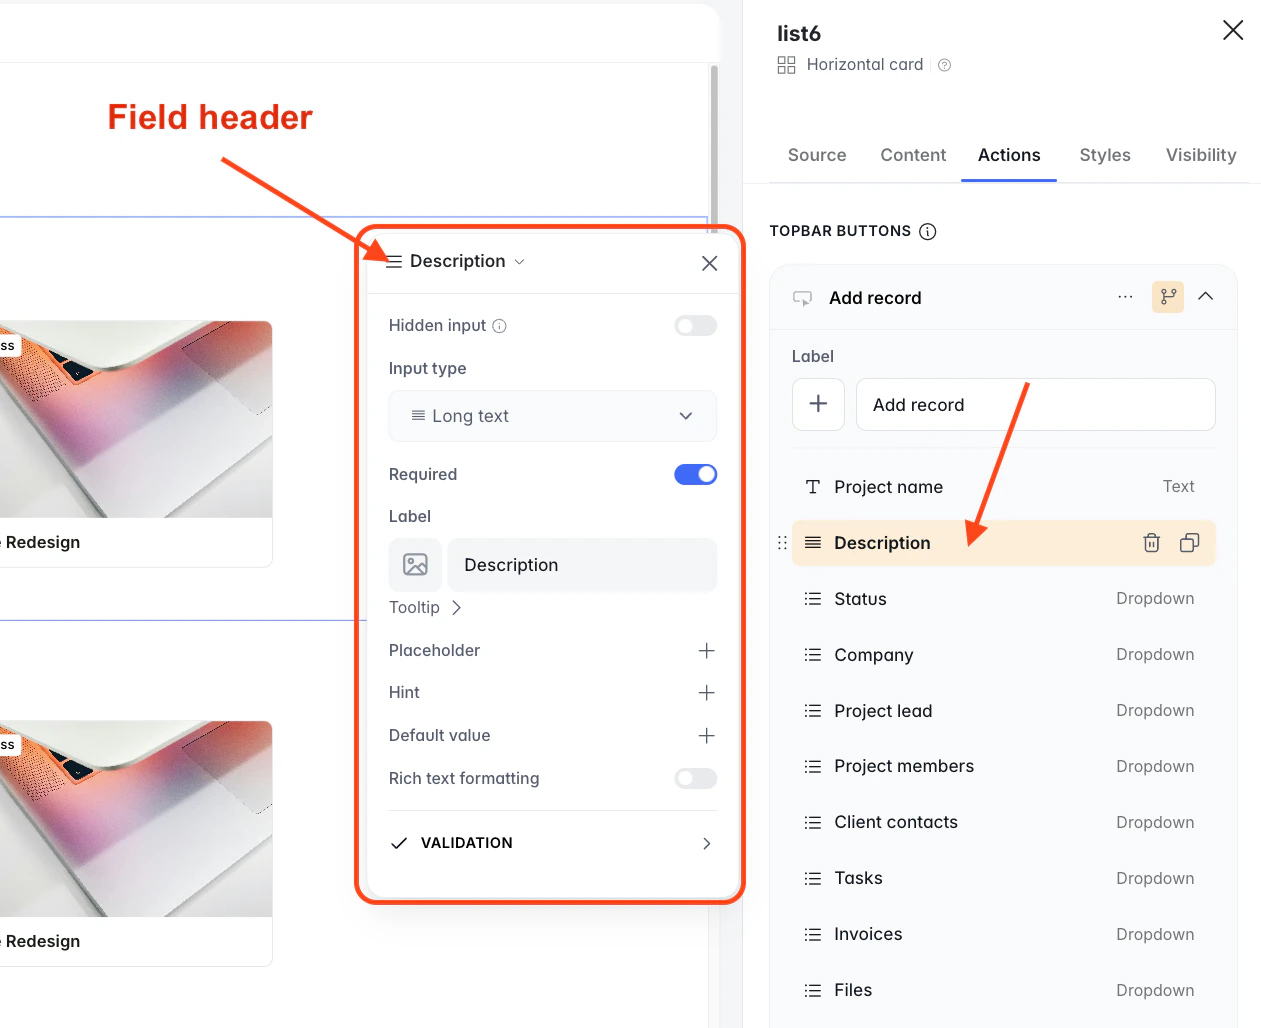
- Field header — shows the column currently mapped to this input. Click the dropdown to remap it to a different column in the same table.
- Hidden input (toggle) — when off, the field shows in the form for the end user to fill in. When on, the field is collected silently — see the Hidden inputs section.
- Input type — usually set correctly by auto-mapping. Override it only if you want a different UI (e.g. render a Text column as an email input with validation).
- Required — forces the user to fill the field before the form can submit. For Add record, this corresponds to a required column in the data source; for Update record, it guards against accidental blanks.
- Label — the text shown above the input. Defaults to the column name.
- Tooltip — a small ”?” next to the label with helper text on hover.
- Placeholder — ghost text inside an empty input.
- Hint — helper text shown below the input.
- Default value — prefills the input. For Add record, this is the value used if the user doesn’t change anything. For Update record, this is overridden by the existing record value.
- Validation — expands to show input-type–specific rules (min/max length, regex pattern, minimum date, file size, and so on).
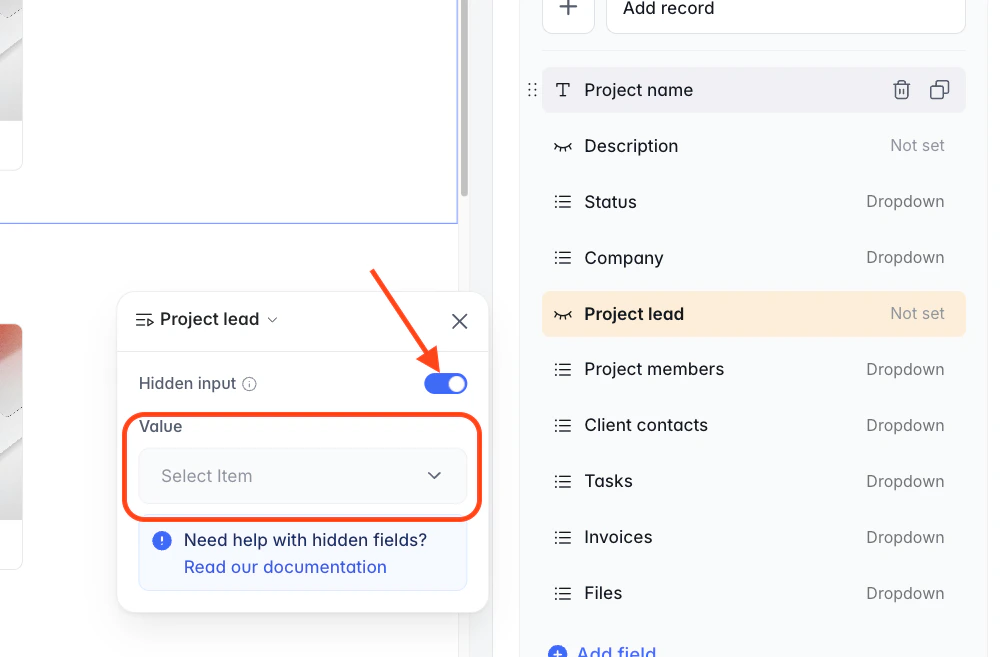
Hidden inputs
A hidden input is a form field the end user never sees — it’s submitted automatically with a value you pick. These are great for automatically saving values to a record without requiring input from the user. For example, you may want to automatically assign the Project Lead as the Logged in User, since the Logged in User is the one creating the new Project record.Change from the old UI. Hidden fields used to live in a separate section at the bottom of the action settings. They’re now a per-field toggle, which means any field in your form — whether Softr auto-mapped it or you added it yourself — can be turned into a hidden input with one click.
1
Open the field
Click the field to open its configuration popover.
2
Turn on Hidden input
Flip the Hidden input toggle.
3
Pick a value source
Choose what to submit from the Value dropdown.
Logged-in user
Pulls any field from the signed-in user’s record in your users table.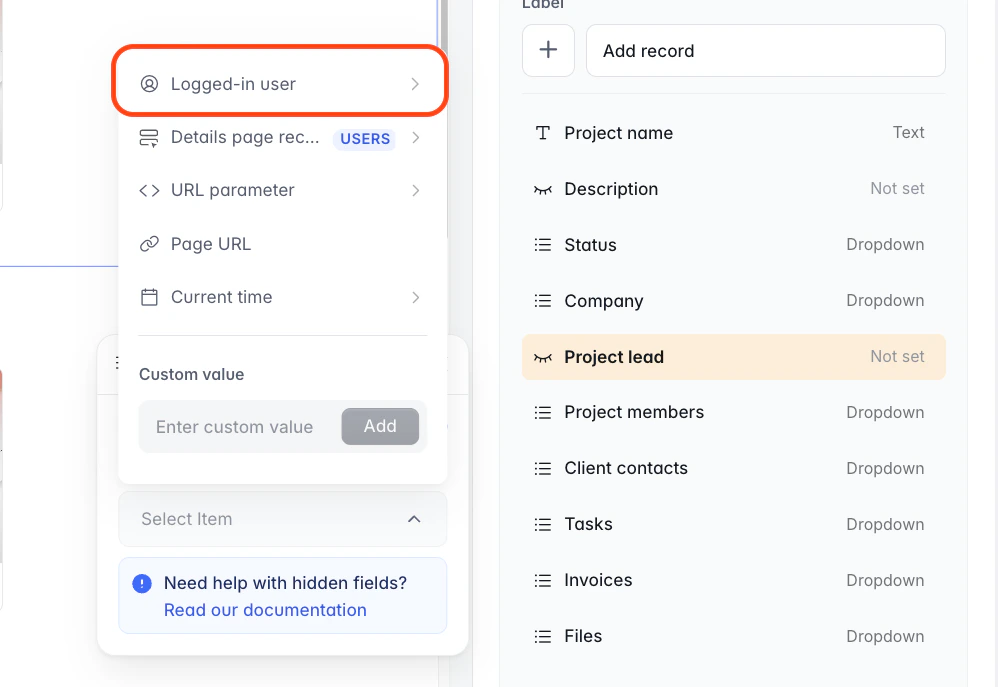
- Email or Name — to stamp a submission with who created it.
- Client company or Client contact of (in Client Portal apps) — to tie a new record to the logged-in user’s organization.
- Record ID — to link the new record to the user’s row via a linked-record field.
Migrating from the old UI? You no longer need the
{LOGGED_IN_USER:'Field name'} custom-value syntax for this. The Logged-in user submenu covers any field directly.Details page record
Available on pages that have a parent record (list-detail pages, Users-scoped pages). Works the same as Logged-in user — you get a submenu of every field on the parent record.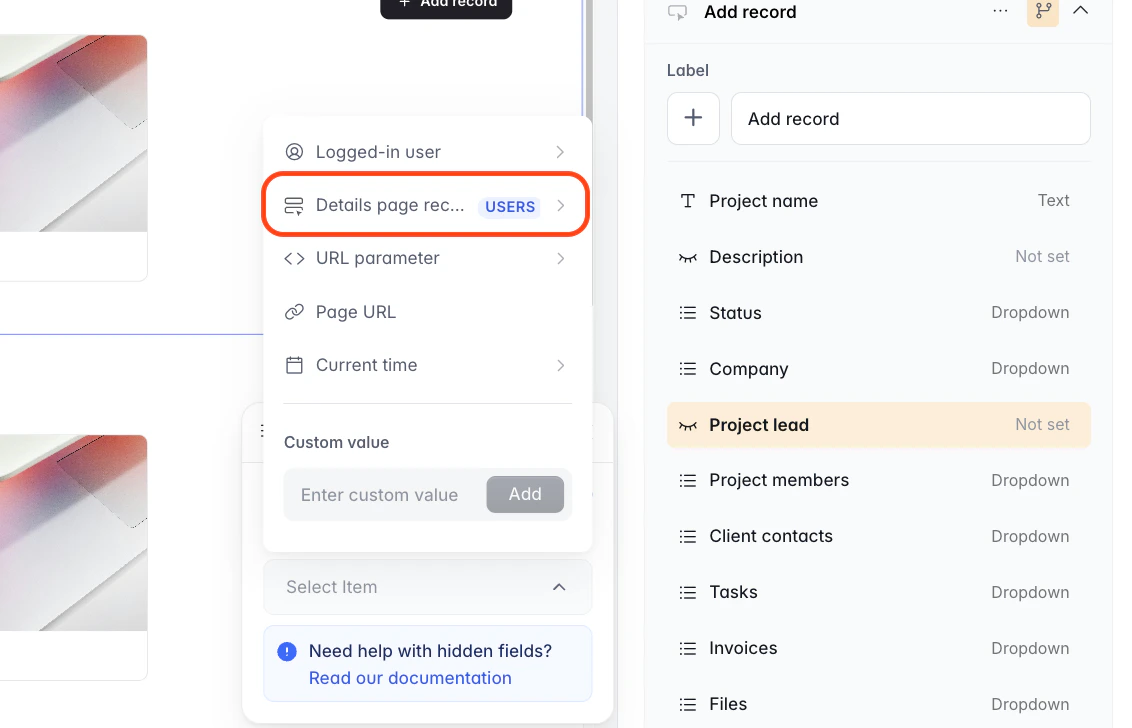
URL parameter
Collects a query-string parameter from the page the button is on. Enter the parameter’s name.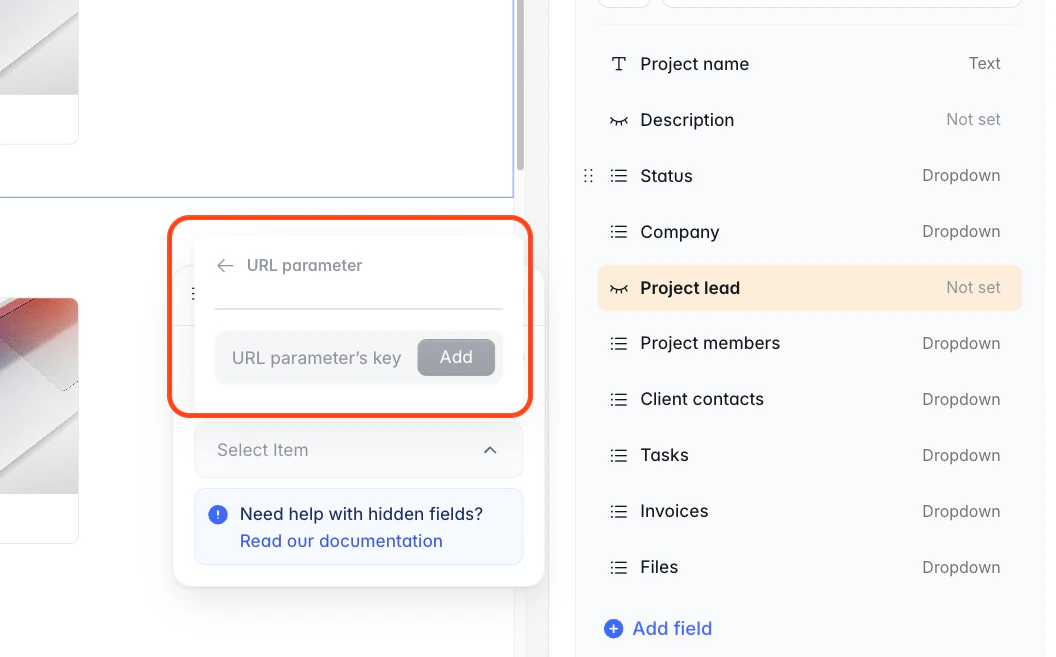
yoursite.com/job-details/senior-product-manager?recordId=rec7HcXAgKmlk8inf. Setting the Value to URL parameter → recordId captures rec7HcXAgKmlk8inf and stamps it onto the submission.
Page URL
Captures the full URL of the current page, including query string. Useful when the same action button lives on multiple pages and you want to know which one was used.Current time
Records a timestamp at the moment of submission. You can pick the format (ISO datetime, date only, Unix timestamp) from the submenu.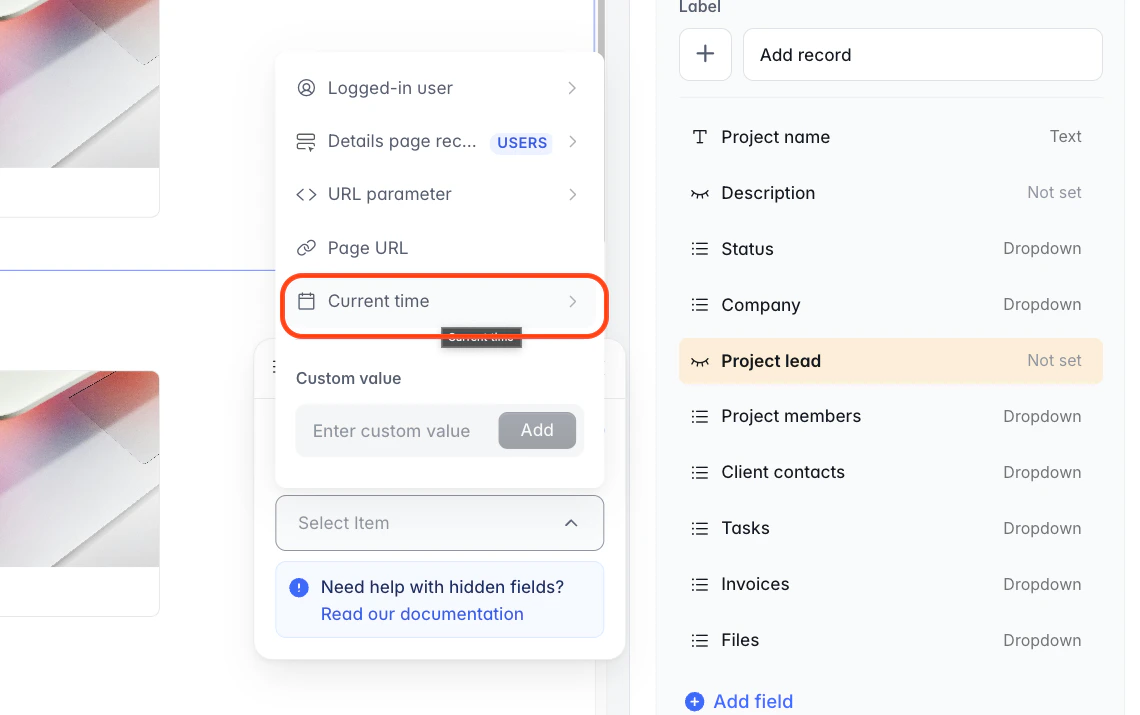
Custom value
A free-text box where you can type any literal value — static text, a fixed tag, a number, a default value. Keep in mind that the value type should match the field type its being mapped to. For example, don’t send a string (letters and symbols) to a pure number field.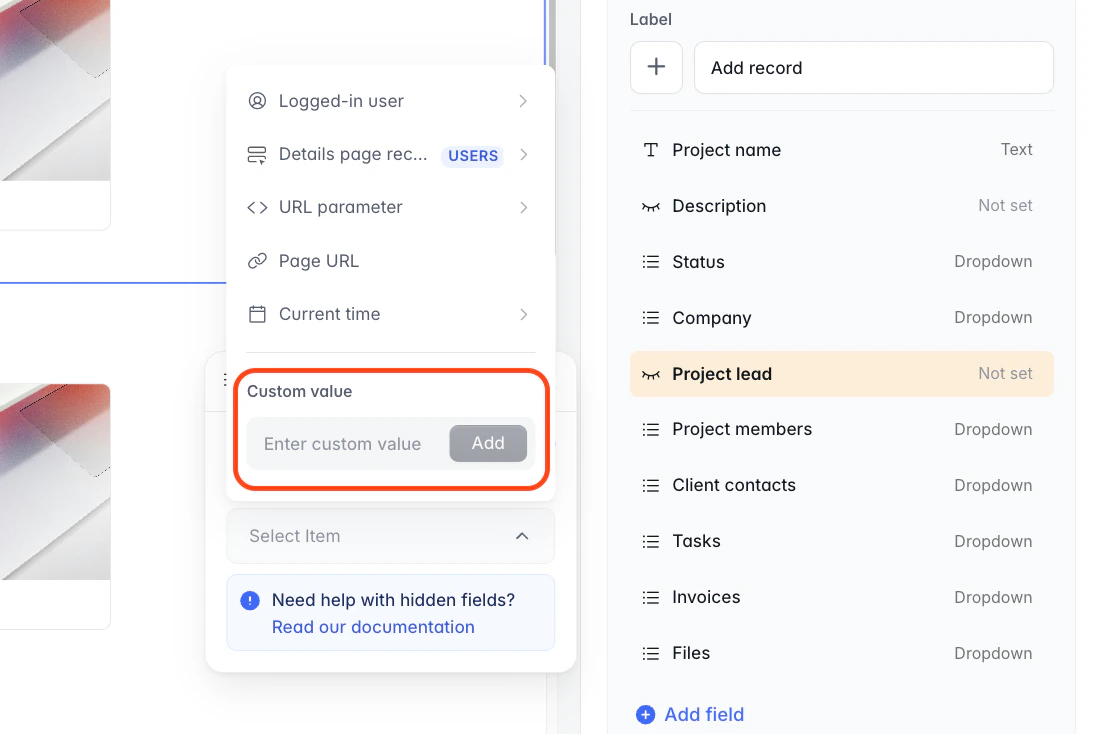
- Tagging all submissions from a specific page (“Source: marketing-landing”).
- Filling a default category that the user shouldn’t change.
- Pulling anything you can express as a literal value.
Update record: what changes
Update record uses the same field-mapping UI as Add record — all the auto-mapping, per-field configuration, and hidden-input behavior work identically. The main differences are operational:Item buttons only
Update record is only available as an item button (per row), because it needs an existing record to operate on.
Form pre-fills
The form pre-fills with the current row’s values. Default value in the field config is ignored if the record already has a value.
Hidden inputs still overwrite
Stamp a
Last edited at column with Current time on every update and that’s exactly what happens.Wiring is identical
Click the block → Actions tab → + Add item button → Update record → tweak fields as needed.
FAQ
Auto-mapping added a field I don't want my users to fill in. Can I hide it?
Auto-mapping added a field I don't want my users to fill in. Can I hide it?
Yes — two options. If the field should be invisible but still written to with a value you control, leave it in the list and turn on Hidden input. If it shouldn’t be touched at all on this action, hover the field row and click the trash icon to remove it.
One of my columns didn't show up in the auto-mapped list. What's going on?
One of my columns didn't show up in the auto-mapped list. What's going on?
The most common reason is that the column is a computed / formula field — those are read-only in the source, so Softr skips them. Other possibilities: the column has an unsupported type for the block’s data source connector, or it was added to the table after the block was configured.Open the Source tab and click the refresh icon next to the Database/Table selector to re-sync the schema.
I'm using the {LOGGED_IN_USER:'Field name'} syntax in an older doc. Does it still work?
I'm using the {LOGGED_IN_USER:'Field name'} syntax in an older doc. Does it still work?
Yes, that syntax is still supported for backwards compatibility — you’ll find it under Custom value. But for new work, use the Logged-in user submenu instead. It’s type-safe, it updates if you rename the column, and it handles escaping correctly.
Last updated: April 2026. If something in this doc looks wrong or out of date, please let our support team know.