- Import real estate listings from Zillow, inventory from Shopify, or invoices from Stripe
- Connect to public APIs (e.g., APIsList, Public APIs, RapidAPI)
- Integrate new CRMs and productivity tools
- Fetch and create data using any standard HTTP REST API
Rest API is available on Business and Enterprise plans.
1. Connect a REST API to Softr
To set up a REST API connection in Softr, follow these steps:Add Rest API as data source
- Log in to Softr and navigate to Data Sources.
-
Click Connect Data Source.
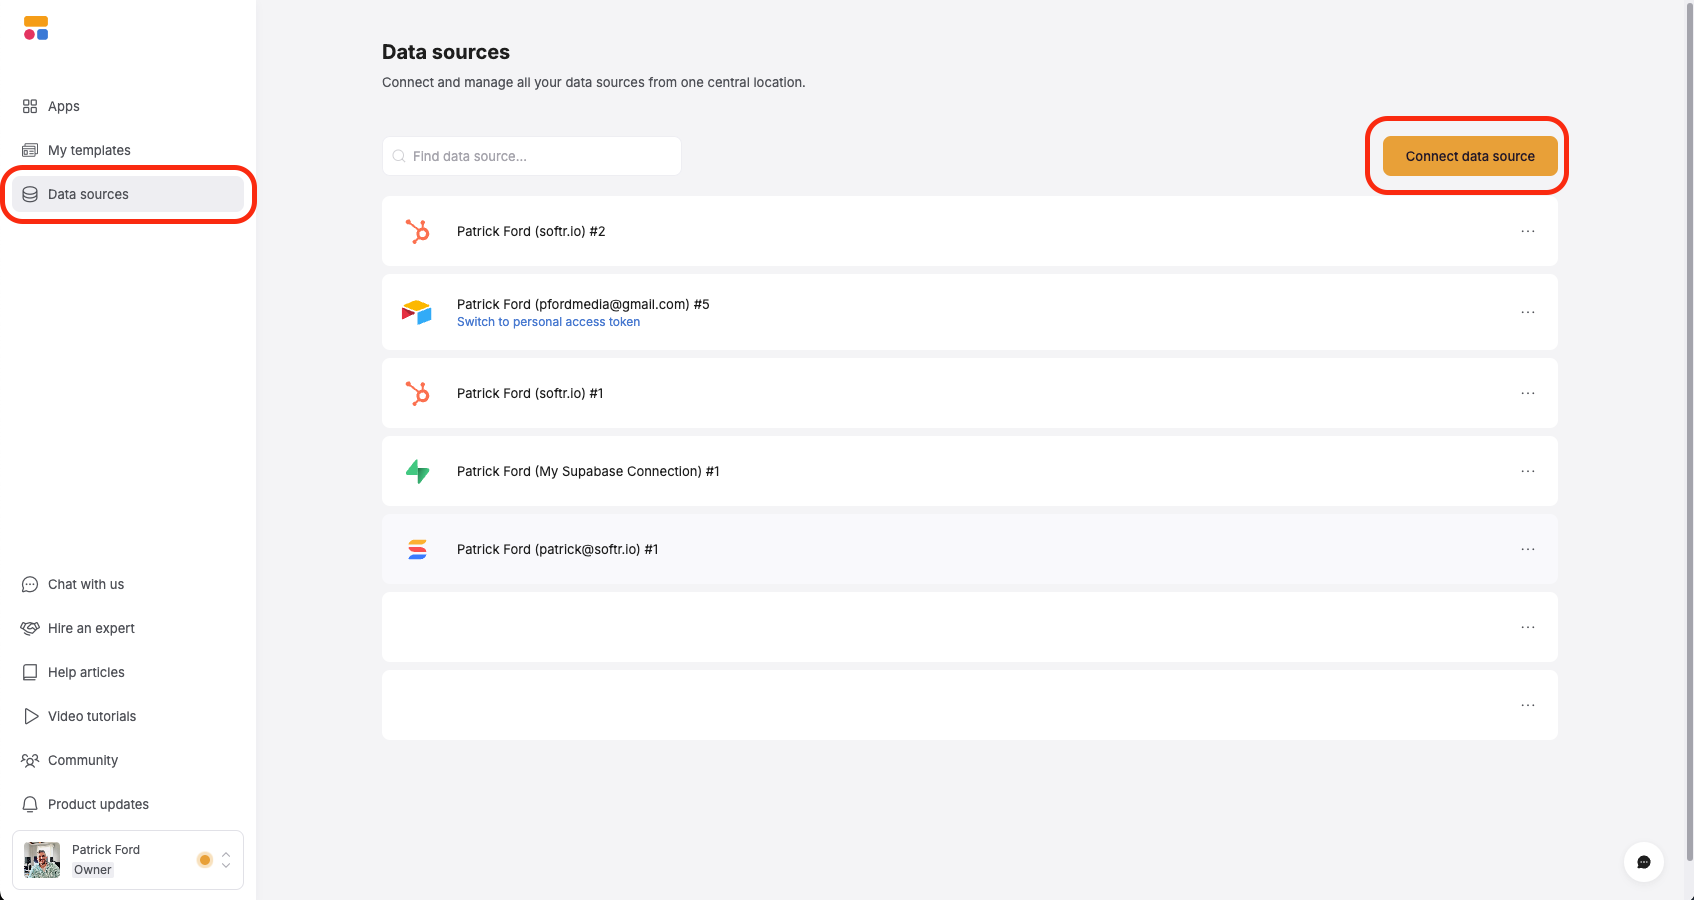
- Choose REST API from the list.
-
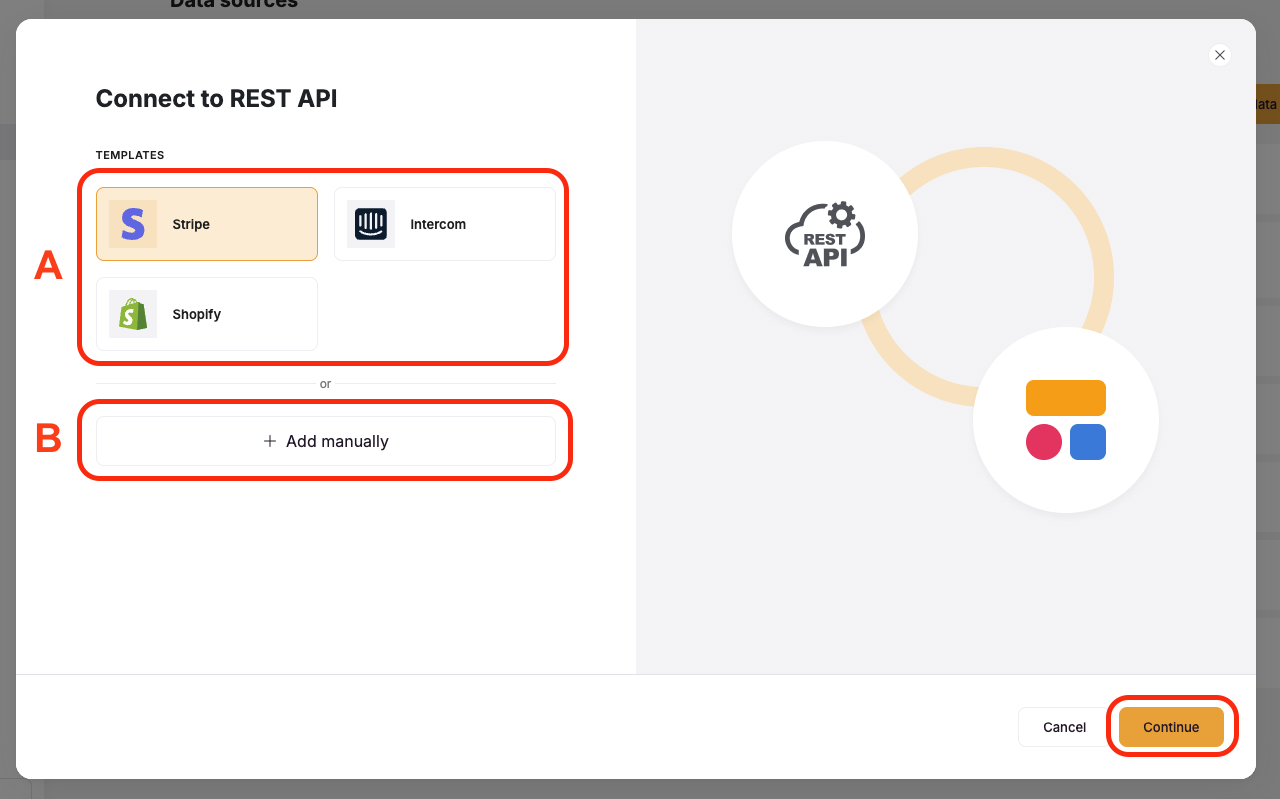
If the API you need is listed as a template, select it. Otherwise, choose Add Manually.
Set up default headers
Most REST APIs require some parameters to be placed in the header of the API call. You can add or remove as many headers as you need in the Softr setup, but here they should be headers that apply to all API endpoints. Headers that are only required for certain endpoints should be left out of this step - they can be added later on if needed.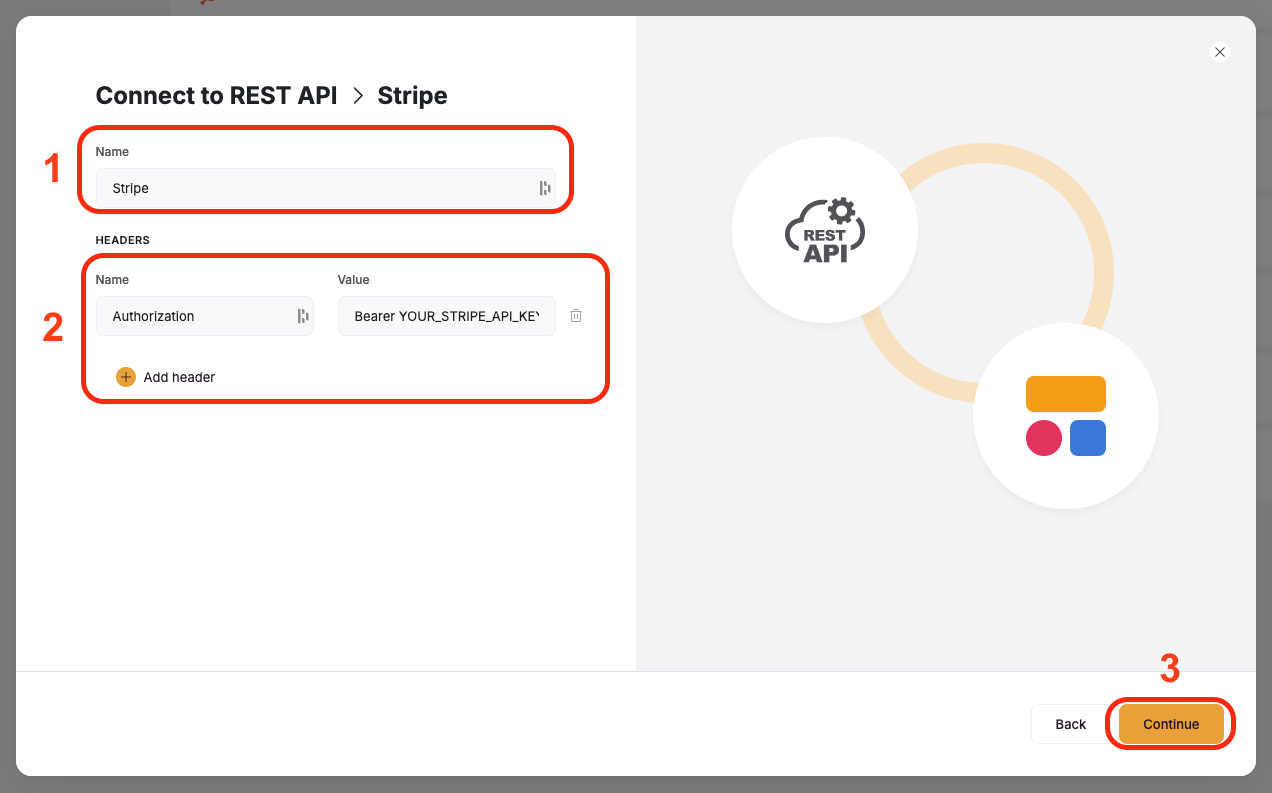
- Name: This is a name for the REST datasource and while it is required, it can be whatever you like that helps you identify the datasource in your dashboard.
-
Headers: In this section you will add or remove headers needed for all endpoints in the REST API. Typically headers like
AuthorizationandContent-Typeare required, but this varies between APIs. There are two fields for each header - the header Name and the header Value. - Click Continue when you’re finished setting up headers.
Authorization header that contains our Stripe API Key.
Add API Resources (Endpoints)
Resources are the different endpoints of an API and they currently support GET and POST endpoints. In our Stripe template, we already have two resources setup - one to get a list of customers from the customers endpoint in the Stripe API, and one to get a single customer. Now let’s setup one to get a list of invoices. To add a resource, click on Add Resource.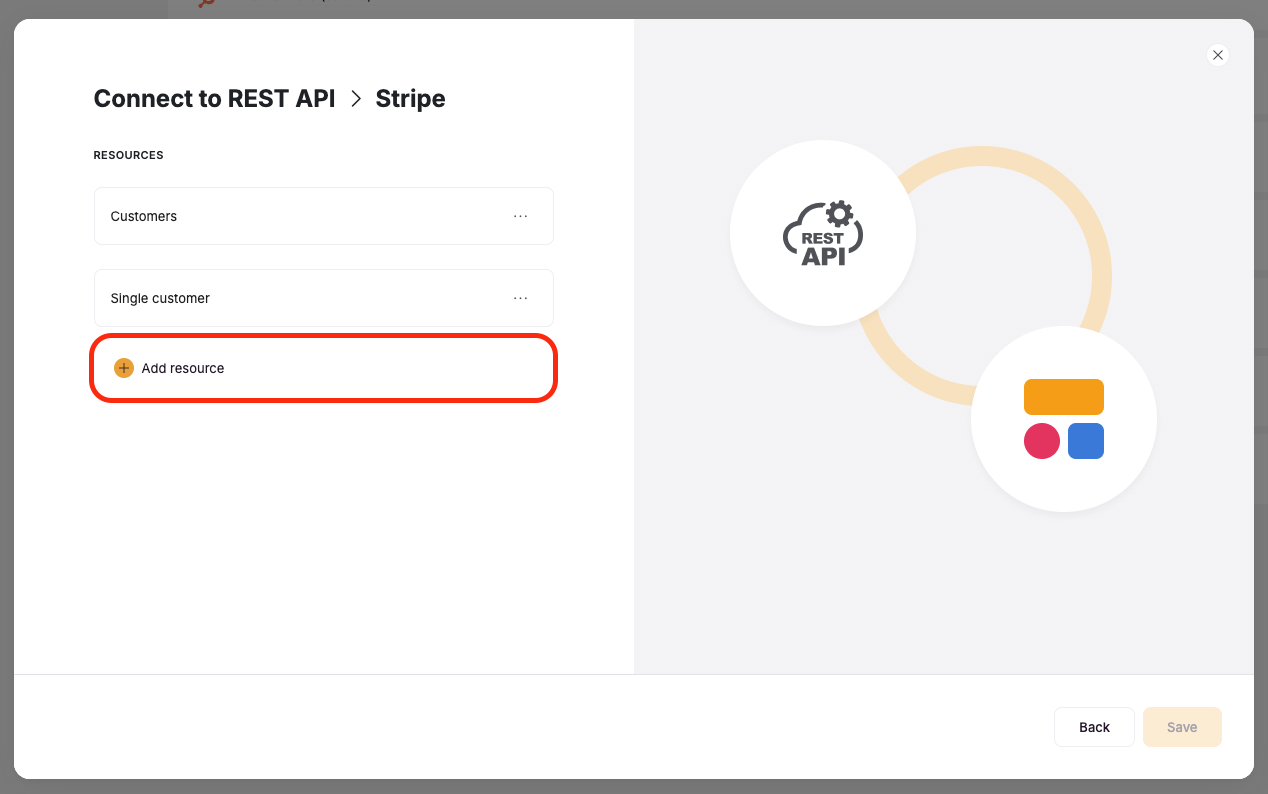
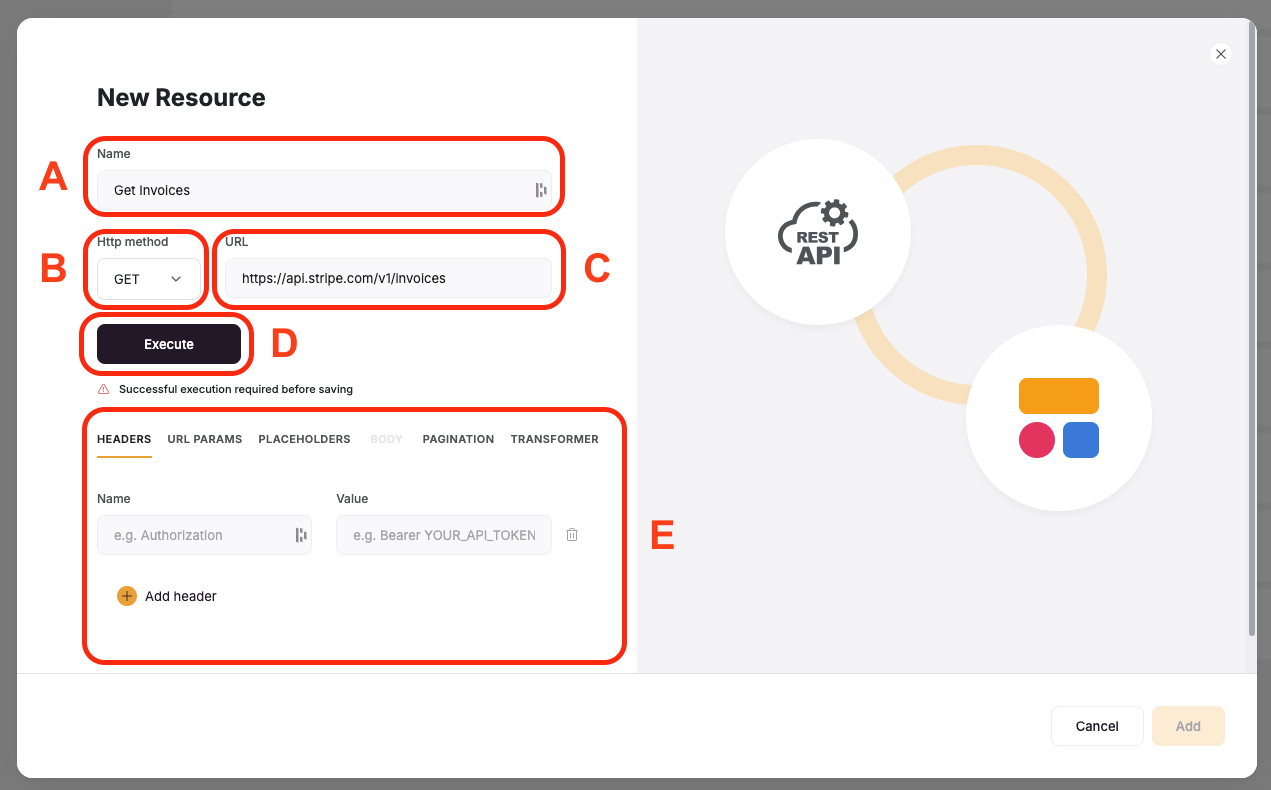

- Name: The name field is subjective and serves to help you identify it in your list of other Resources you may have added for this REST API connection.
- HTTP Method: This dropdown supports GET and POST methods for API endpoints. It should match the endpoint documentation for the REST API you are using.
- URL: This is the endpoint URL that Softr should call. You can get it from the documentation of the REST API you are using.
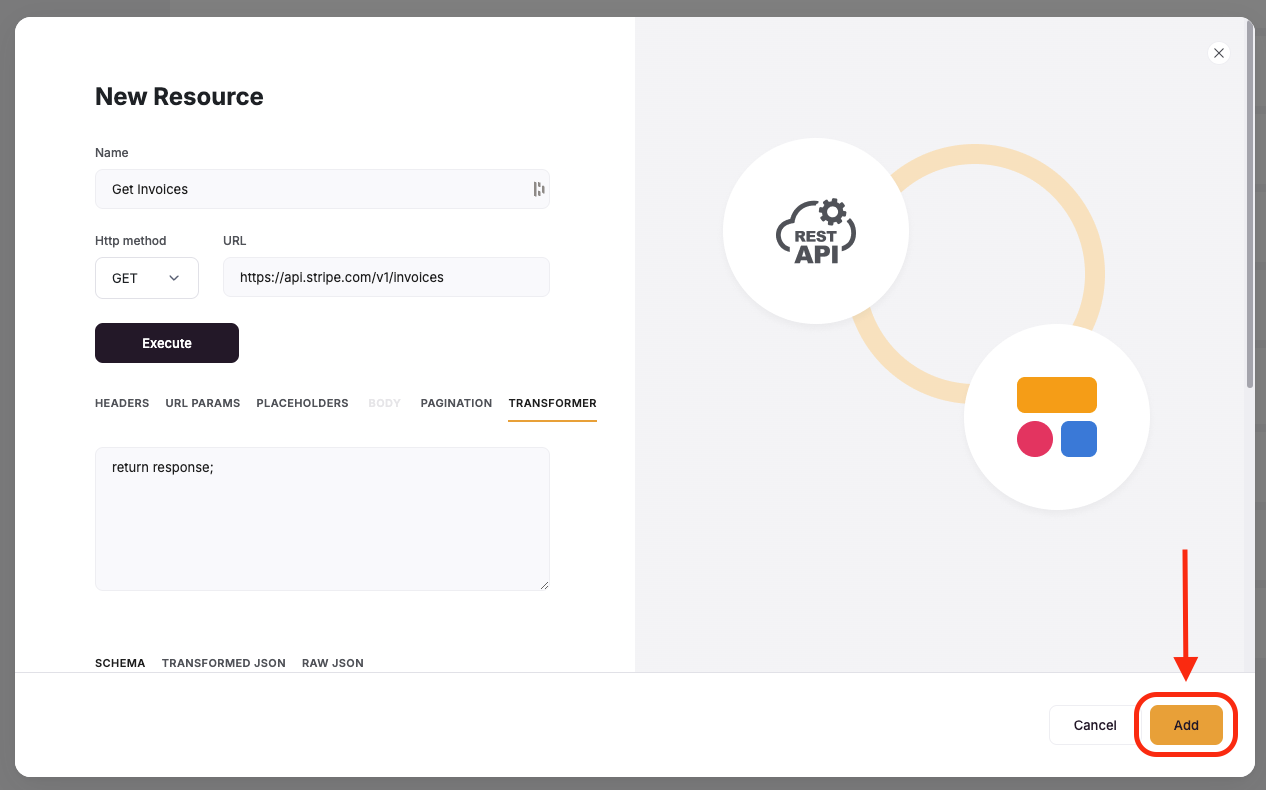
- Execute: Once you have filled out the other parts of the request (A, B, C, and E), you can use this Execute button to perform a test call to the API endpoint. Softr requires a successful response in order to add and save the API Resource.
- Additional Resource Settings: This panel is where you can adjust several different parameters and settings for the API Resource. Because every API is different, you may need to use all of these tabs, but you also may not need any of them. You’ll need to refer to the API’s documentation for this. More information about this section can be found in the Additional Resource Settings section below.
At minimum, this step needs a name (A), the HTTP Method (B), and a URL endpoint to call (C).


2. Configure Additional Settings
Headers
The headers tab makes it easy to add in additional headers that may be needed for a specific endpoint (in addition to the headers you setup in Step 2 above).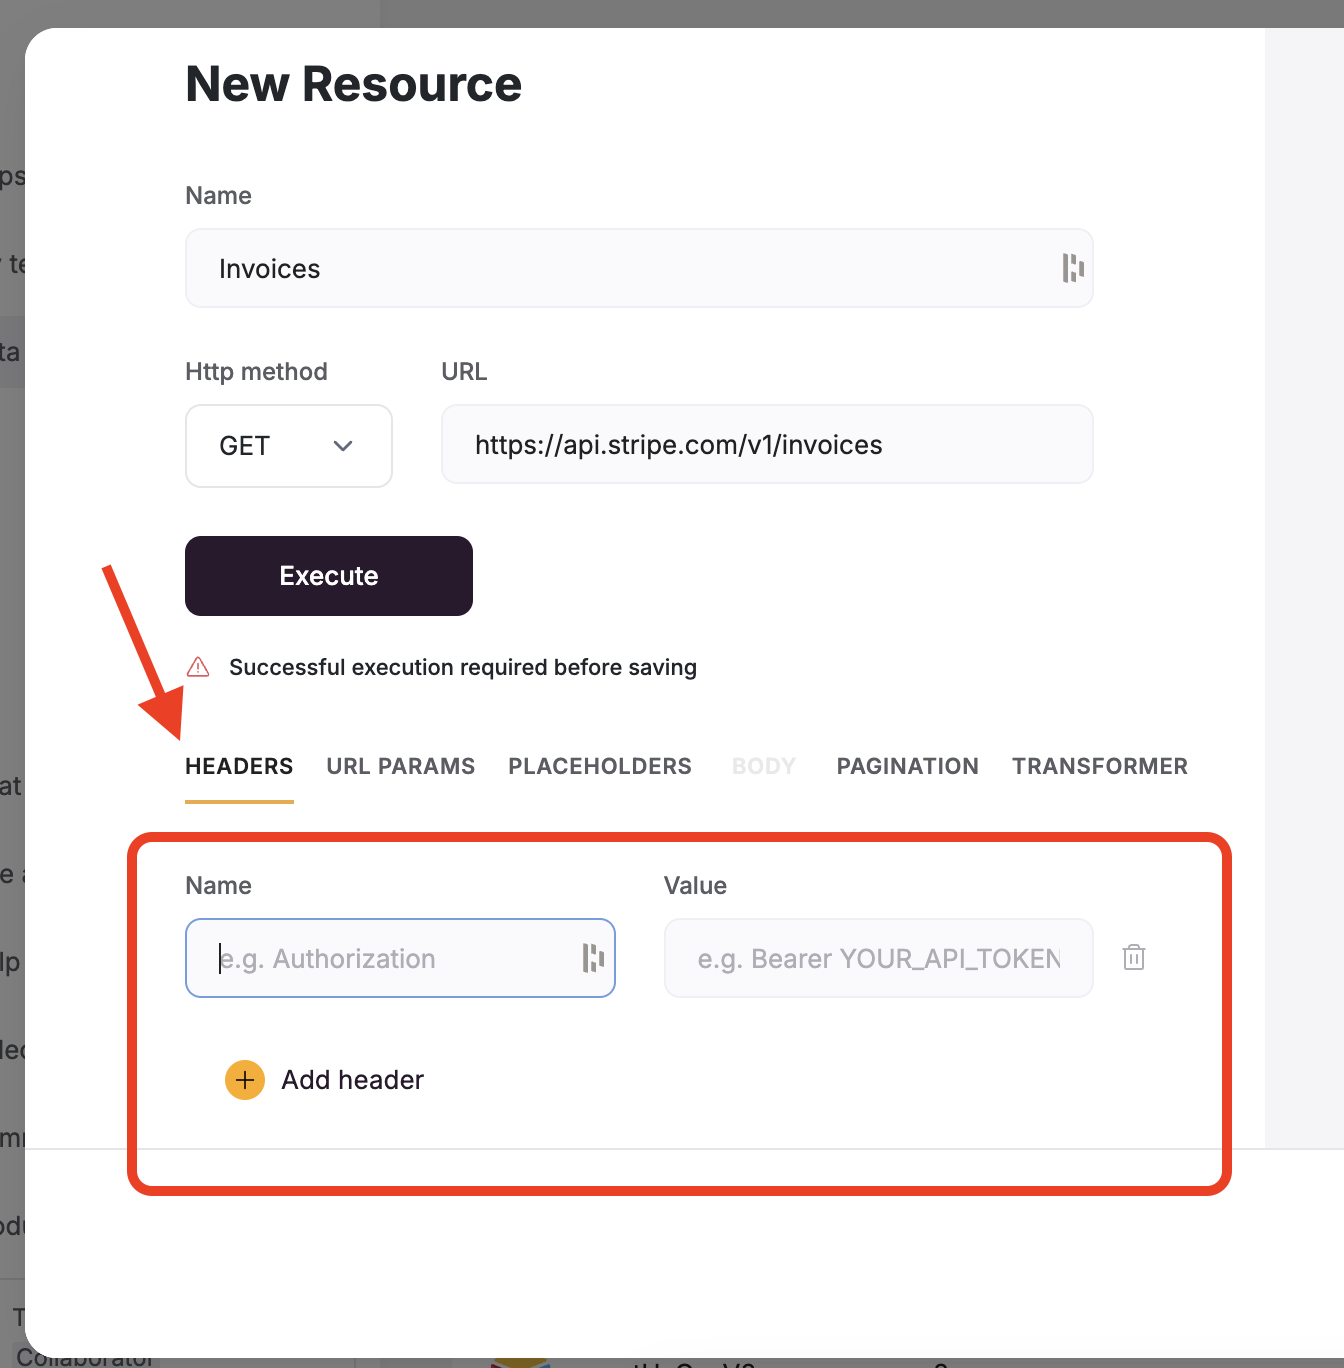
URL Params
In the URL parameters section you can add parameters to the call that will be appended to the URL. Of course you can also add them to the URL field directly, but it’s better to add them here since it’s possible that not all calls will need certain URL Params. You should add these as key/value pairs (Name and Value). You’ll need to search the REST APIs documentation to find these keys and also what types of values you can send here. In the example below, we are using a customer query parameter to tell the Invoices endpoint to get the invoices of a specific customer. Check out the Stripe docs below and how we use the query param in the call: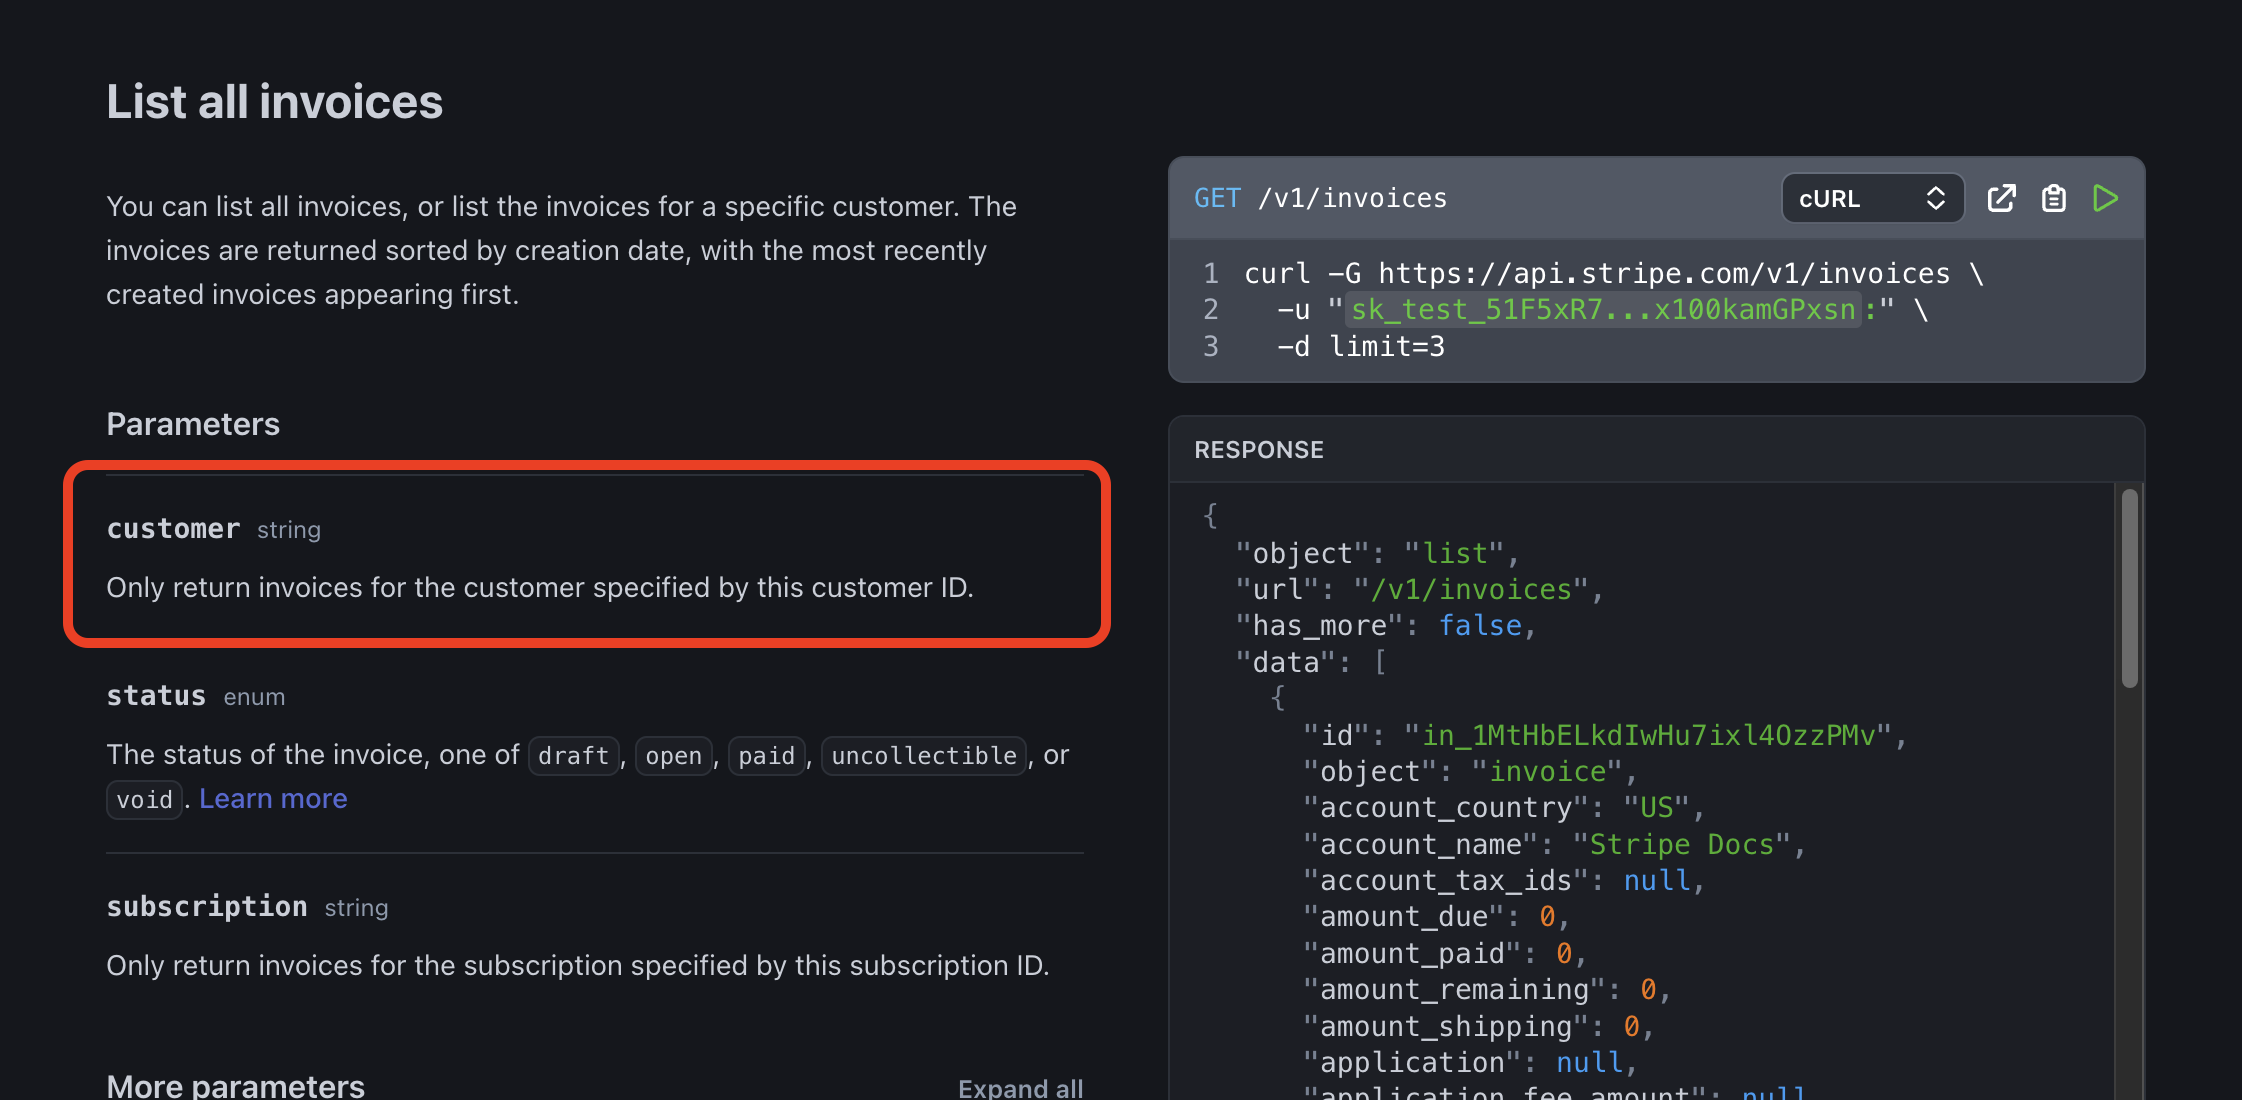
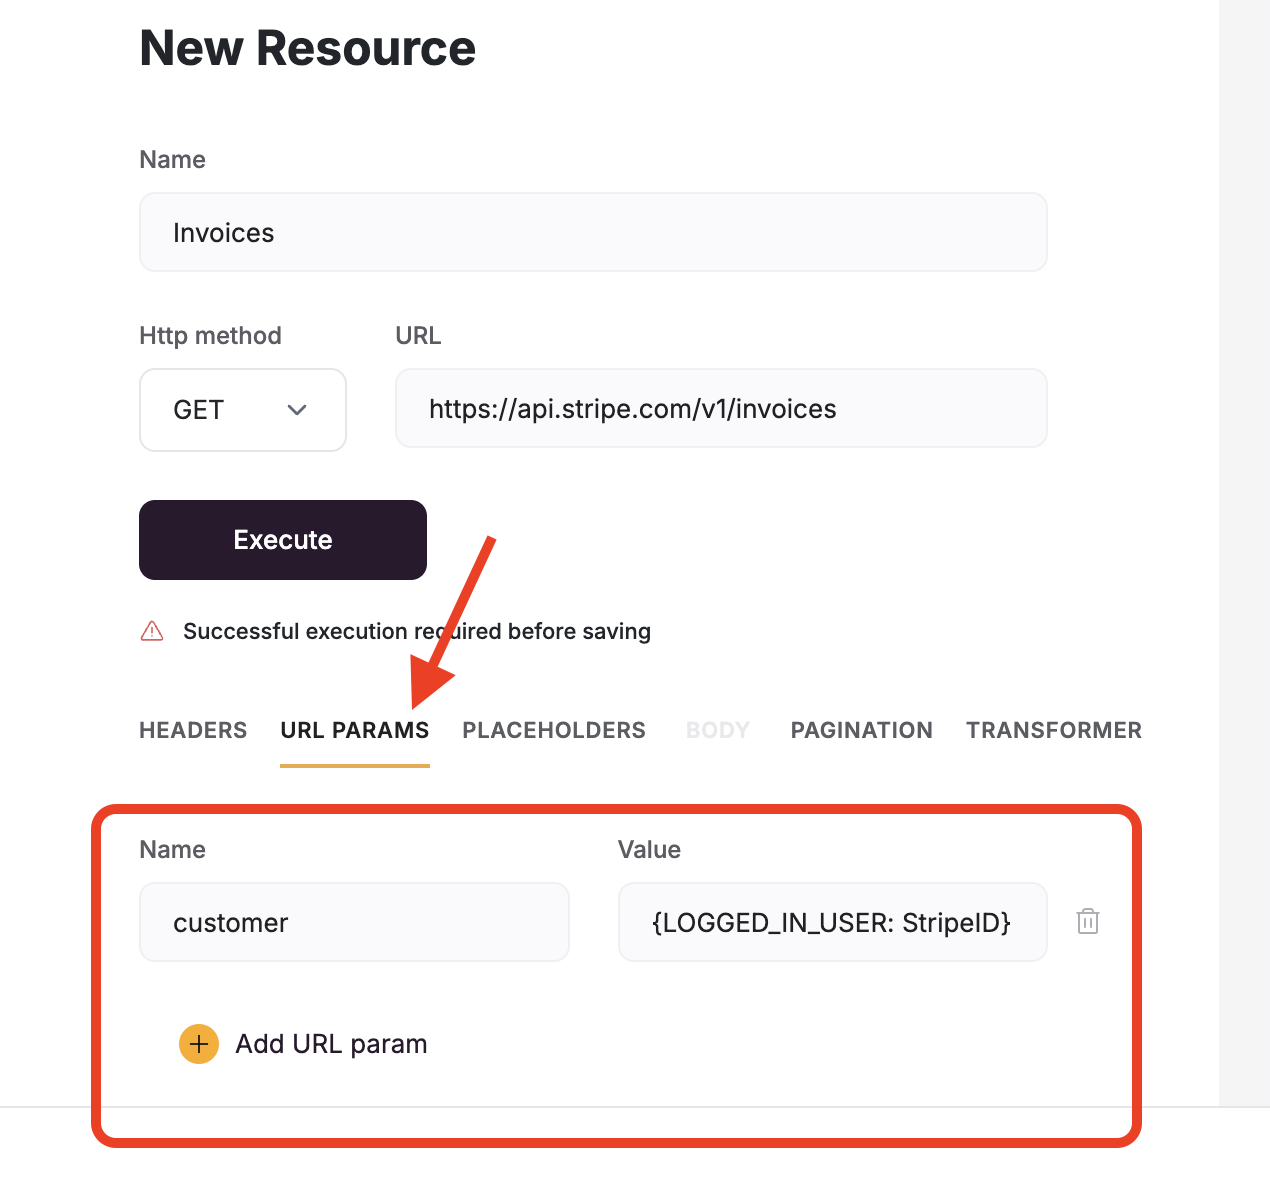
{LOGGED_IN_USER: StripeID} to tell Softr that this value will change and should be determined by the StripeID field of whoever is logged into the app. More about Placeholders below:
Placeholders
Placeholders are a great way to send variables or dynamic data to and from the REST API. Sending static parameters to an API will typically always yield a similar result. By putting in placeholders, we can send data that is based on user actions, selected records, or logged-in user data. There are three dynamic value placeholders you can use to access and send data across pages and blocks:-
{LOGGED_IN_USER: <FIELD NAME>}- used to access and input Logged-in user data into the API call -
{recordId}- used to access and input currently-selected record data into the API call -
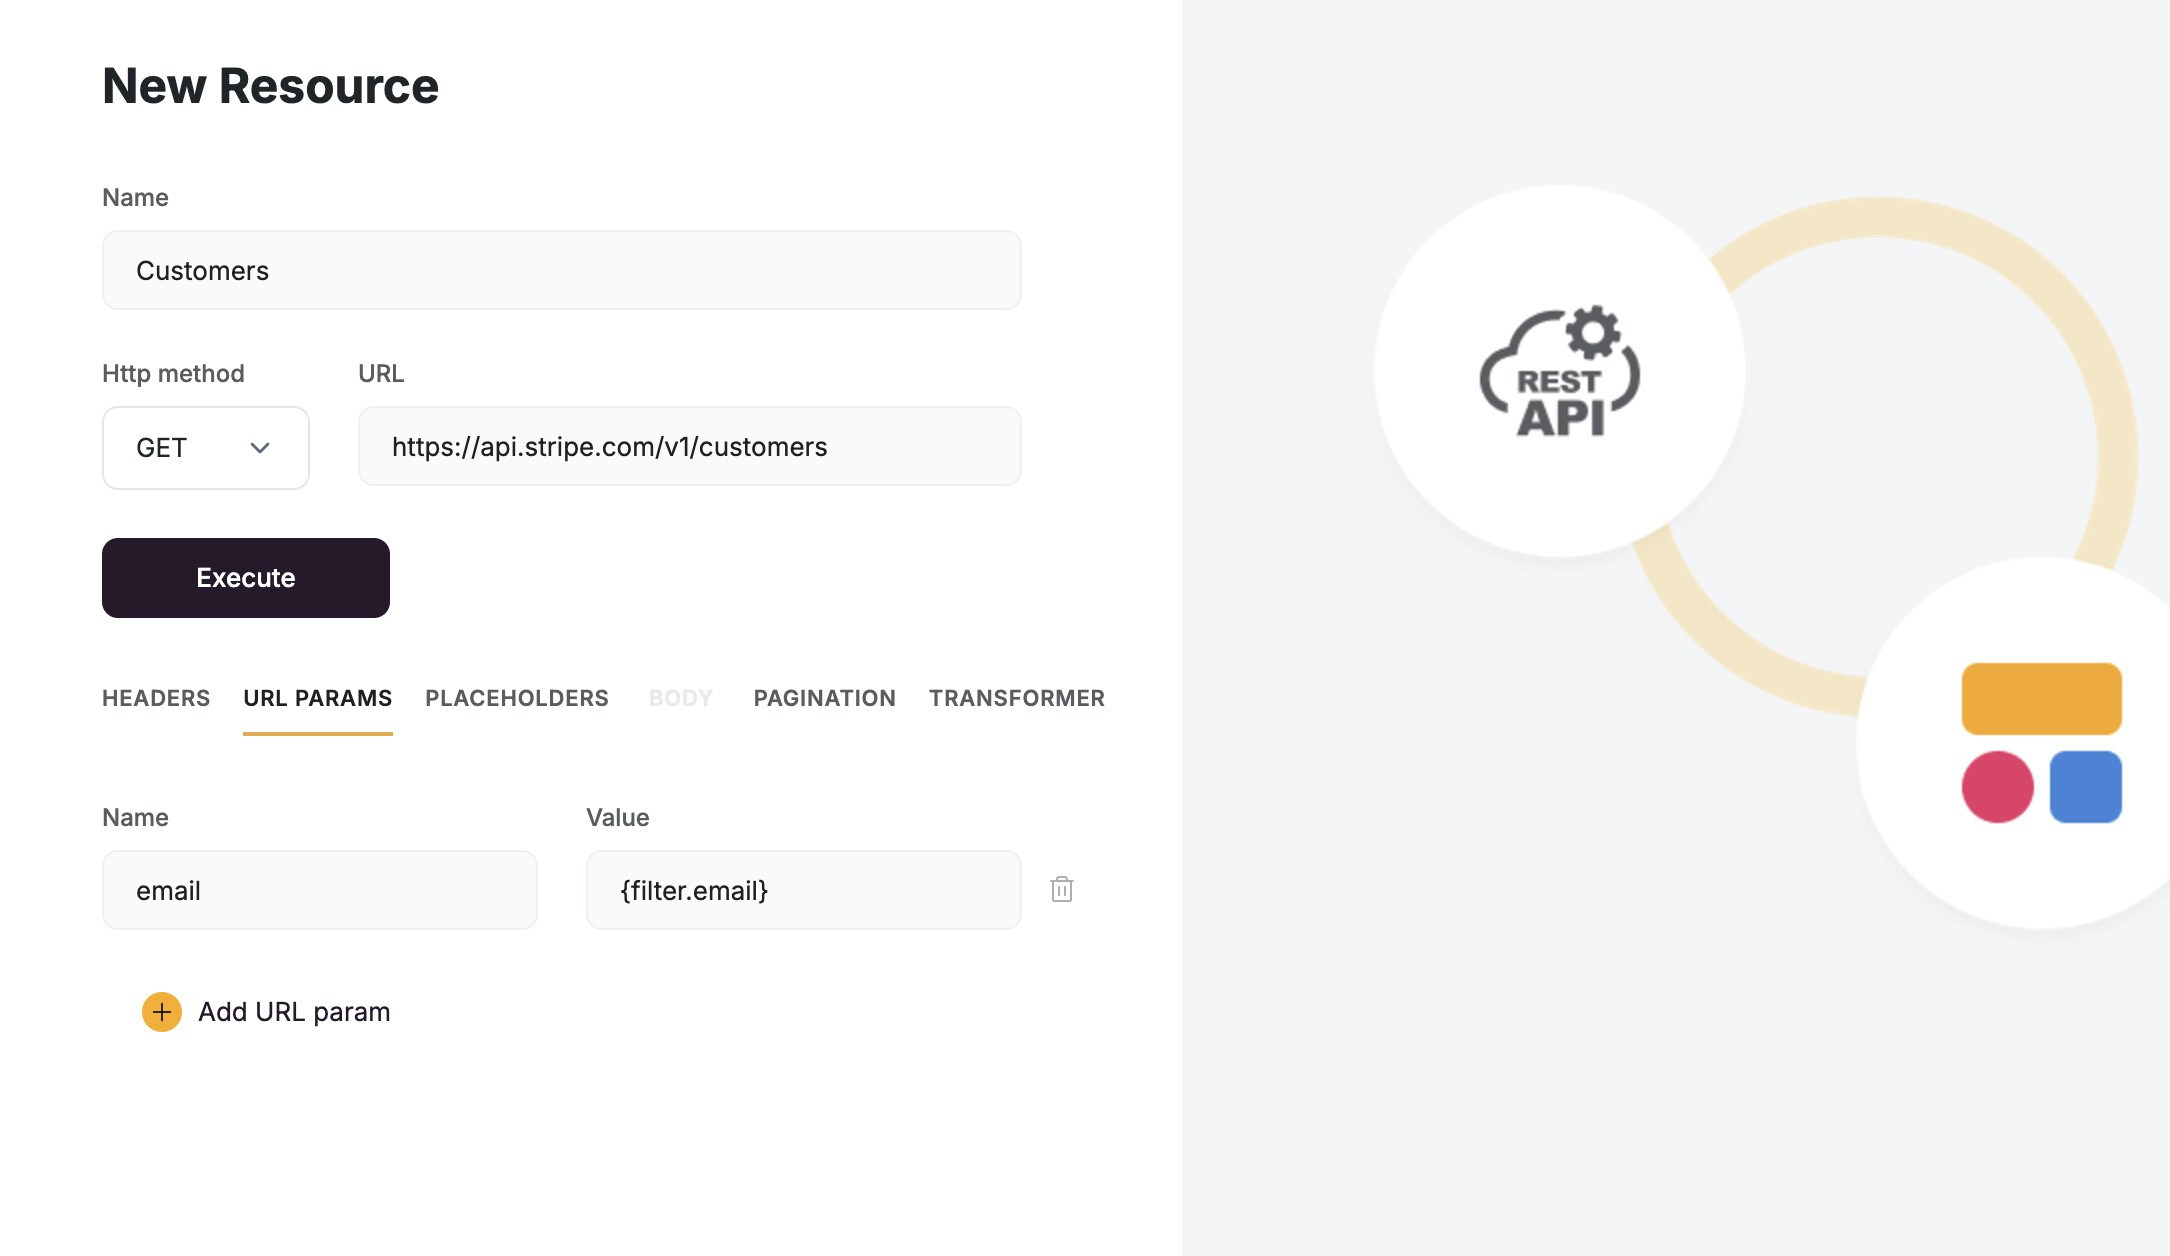
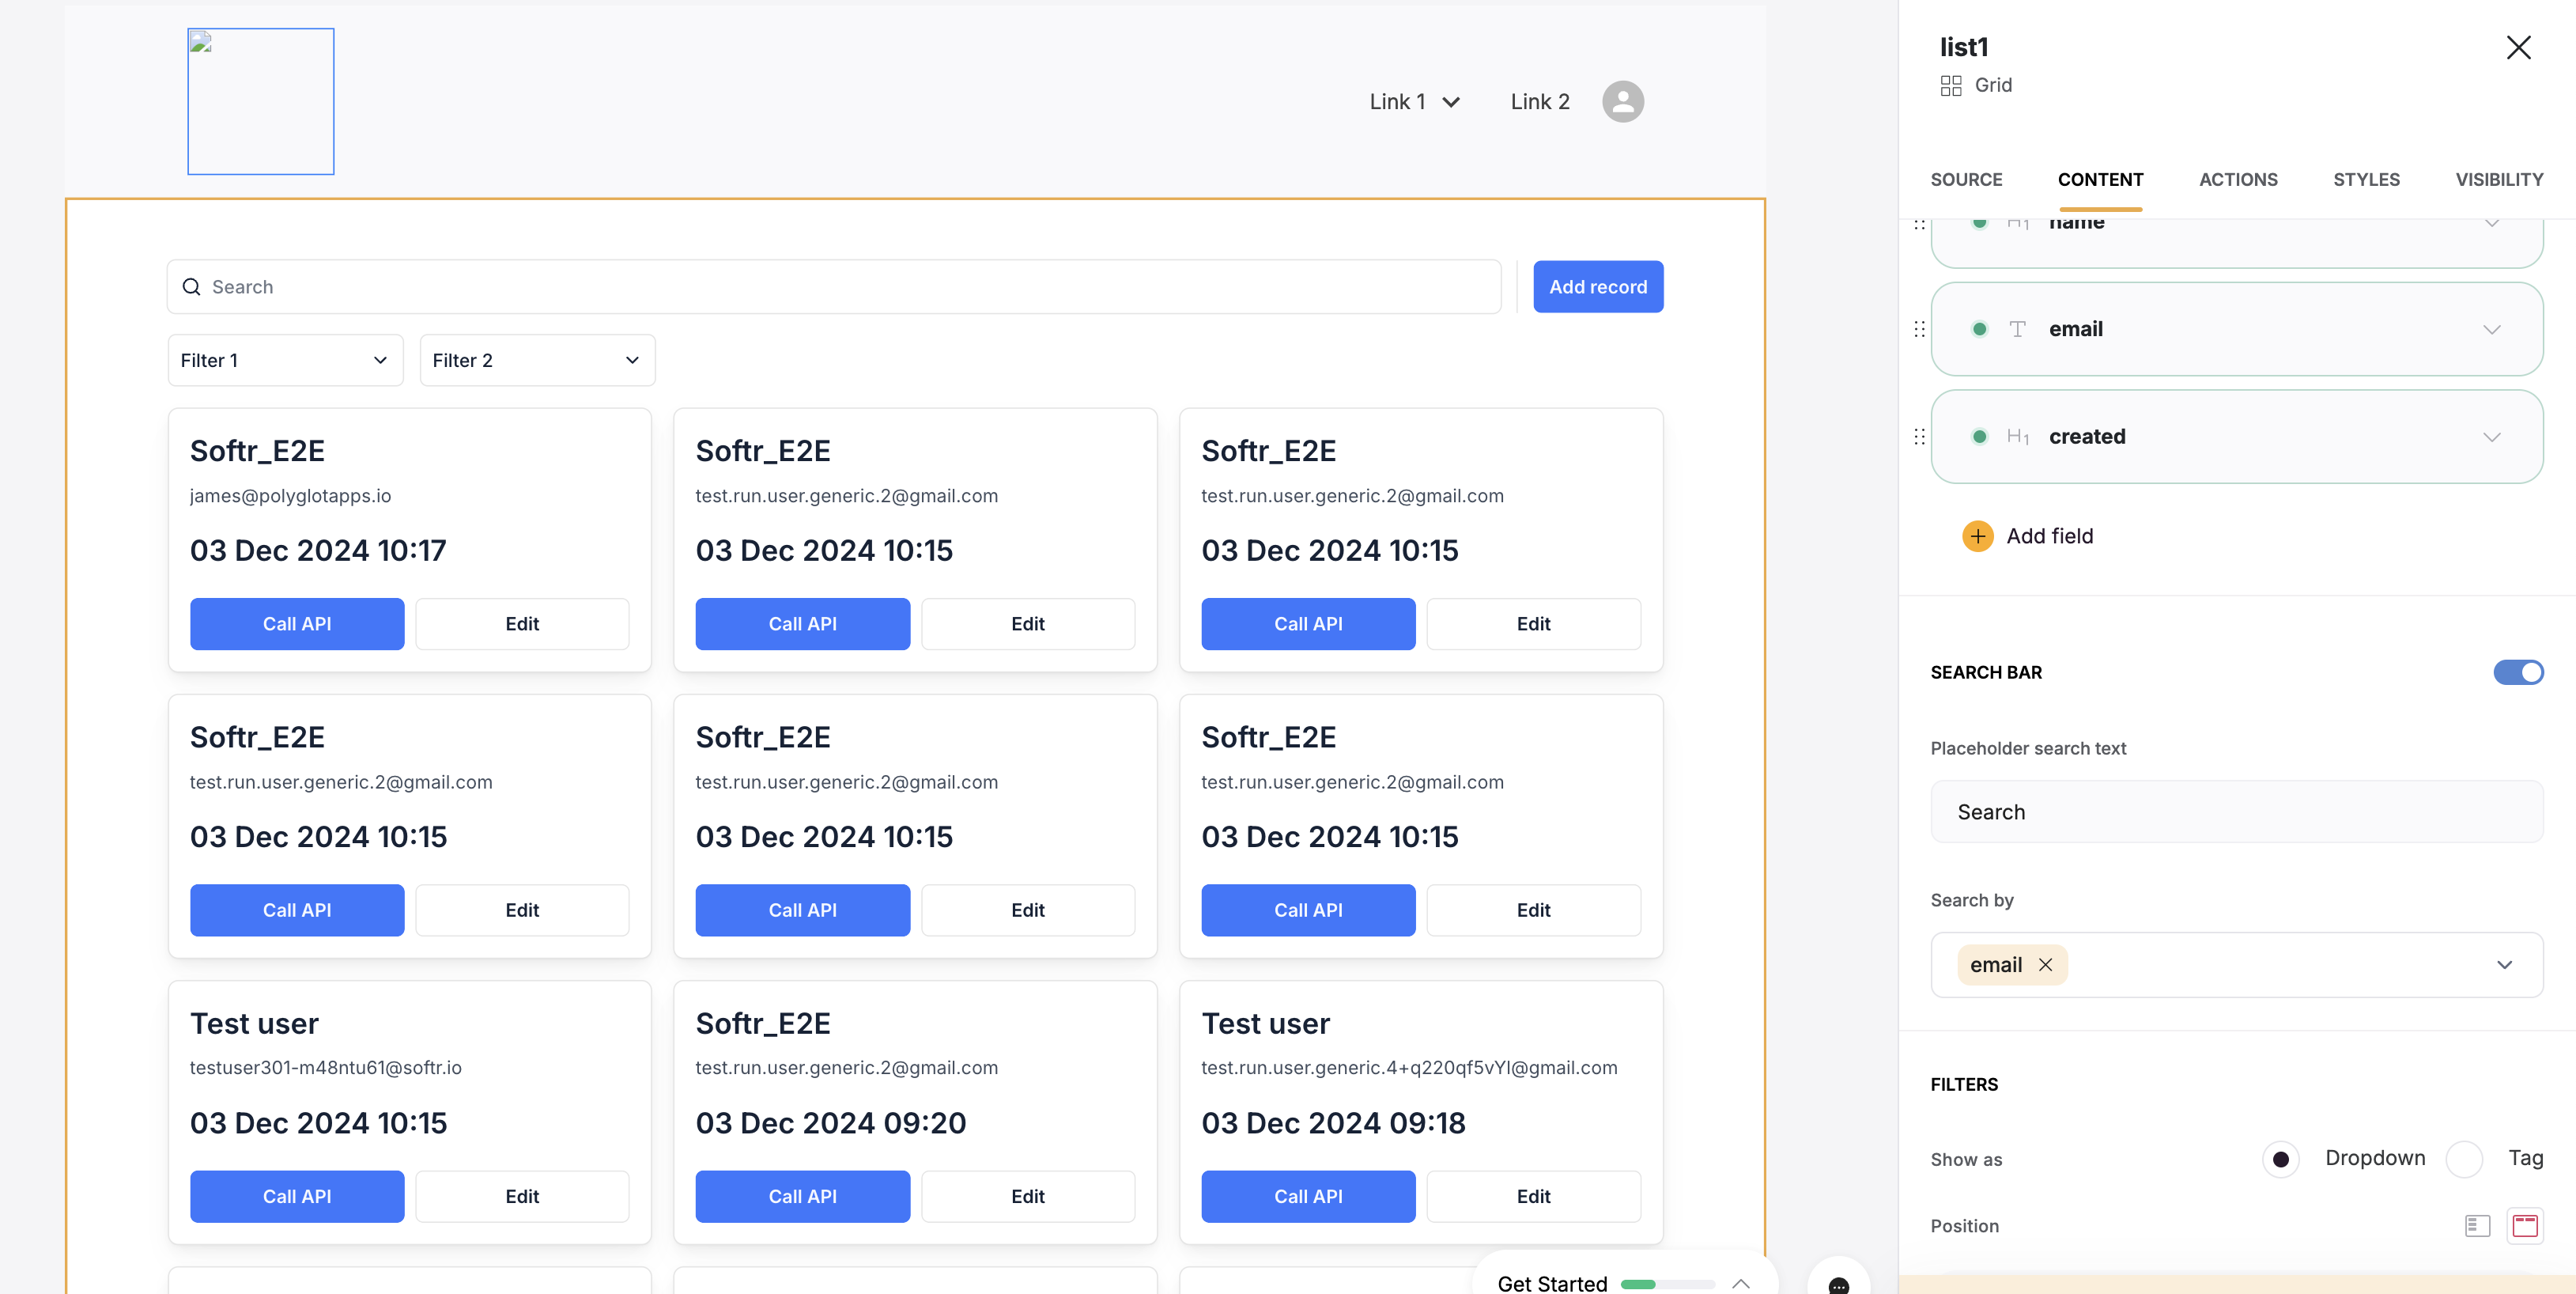
{filter.<FIELD NAME FROM API>}- used to pass filter and search fields as a part of the API request
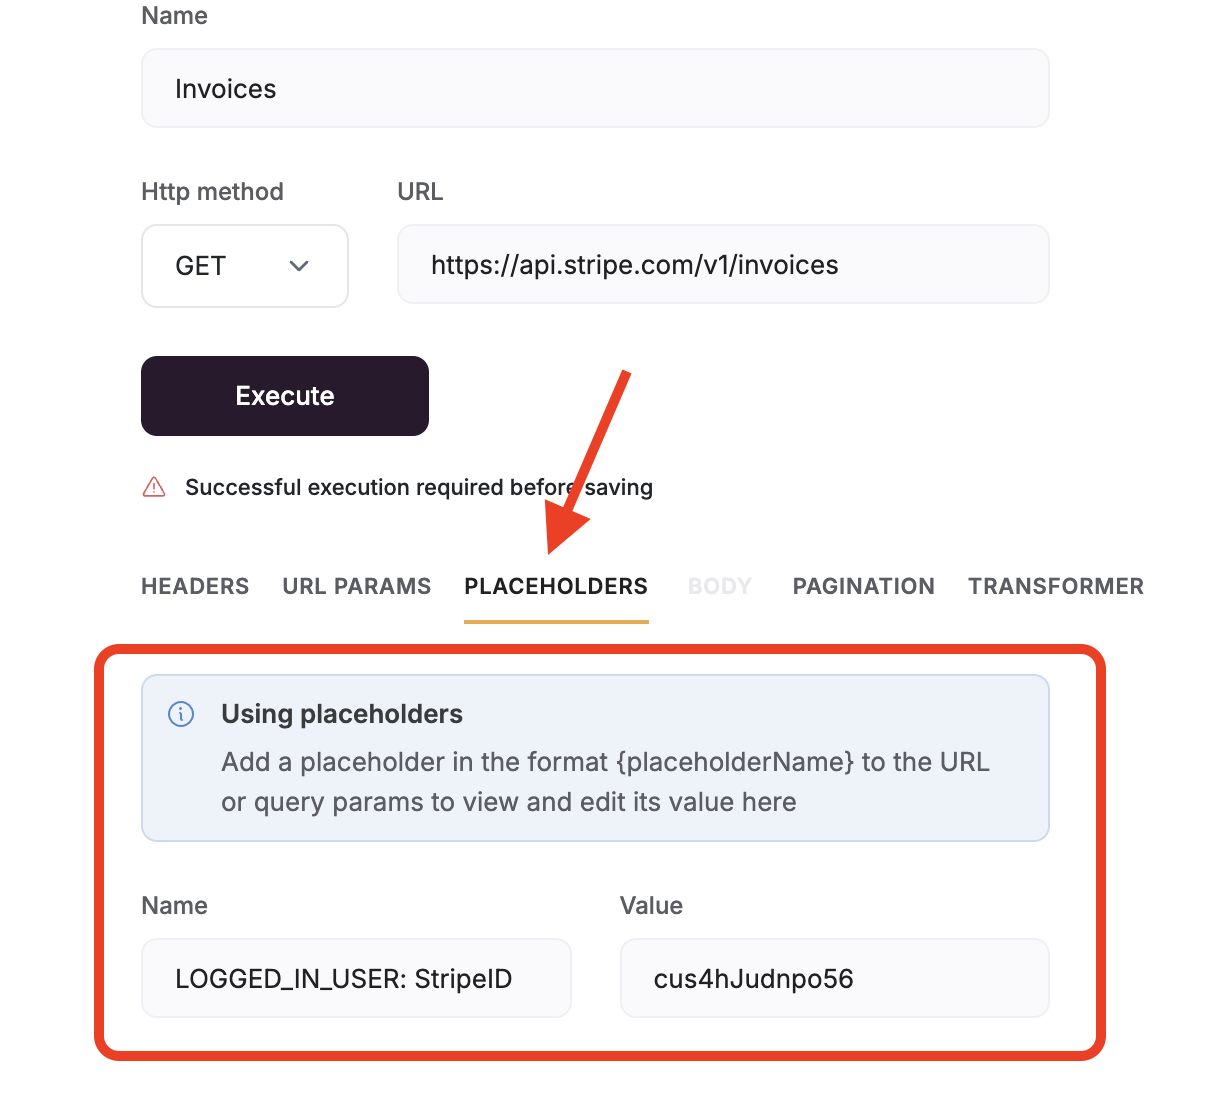
{LOGGED_IN_USER: StripeID} placeholder we used in the previous step is now shown as a placeholder name where we can put in some sample data to test with. In the live app, this static value of cus4hJudnpo56 won’t be used, it’s just for setup purposes.
{filter.<FIELD NAME FROM API>} This is incredibly helpful for allowing people to filter a REST API with search and filtering in Softr blocks, or for setting static conditional filters. For example:
Body
You can use the body tab when your HTTP Method is set to POST to send data to an API endpoint. This is really helpful when using an Add Record button on list blocks. Suppose we have a list of Stripe Invoices in our app and we want people to be able to create a new invoice directly via the Stripe API. We might use the Stripe documentation to come up with a body to send as a part of a POST request like this: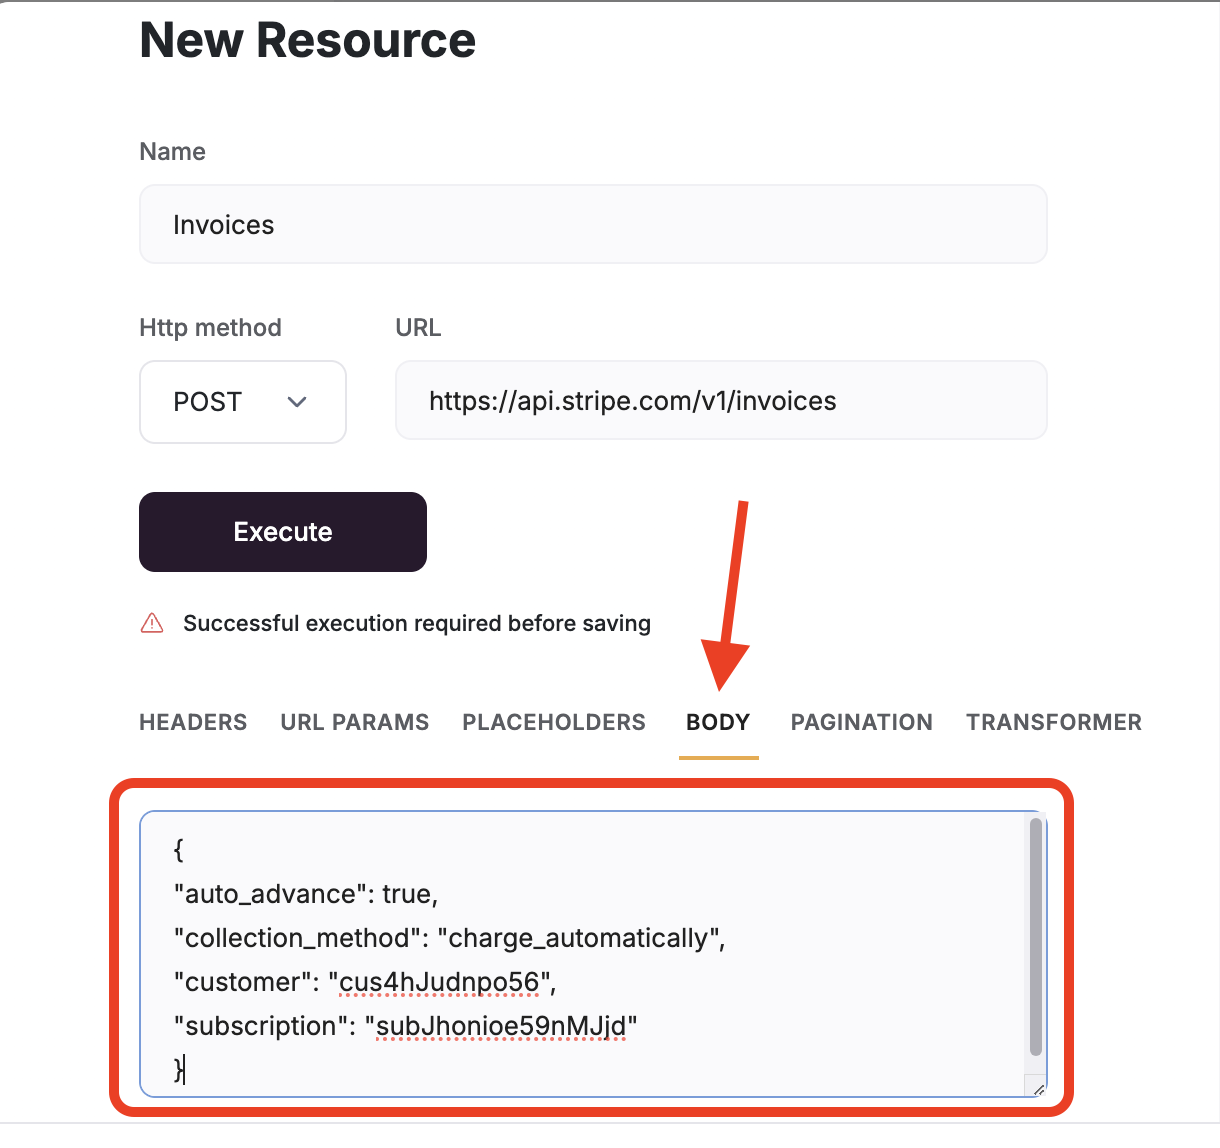
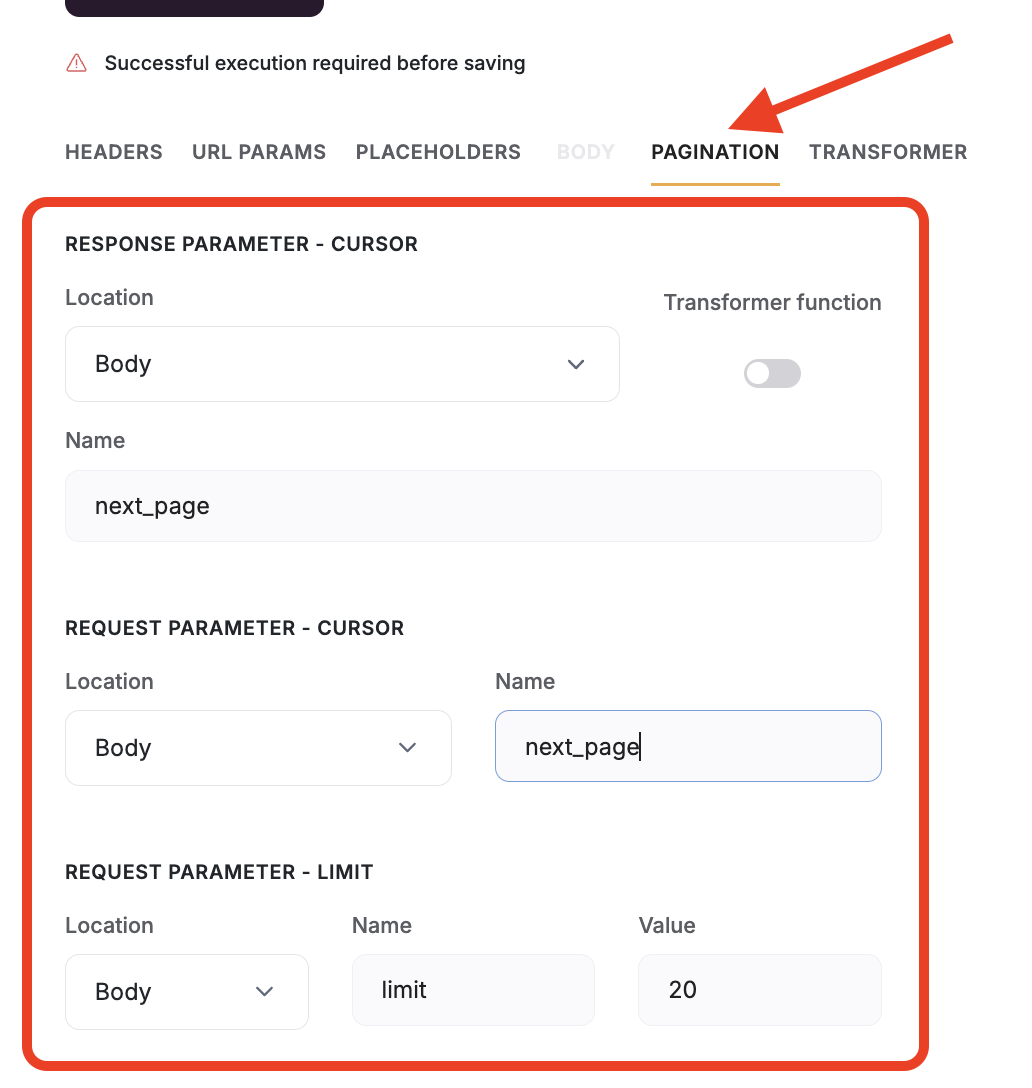
next_page parameter to cycle through the Invoices and the limit parameter to tell the Stripe API how many invoice records it should send us each time we call it.
3. Response and Schema Setup
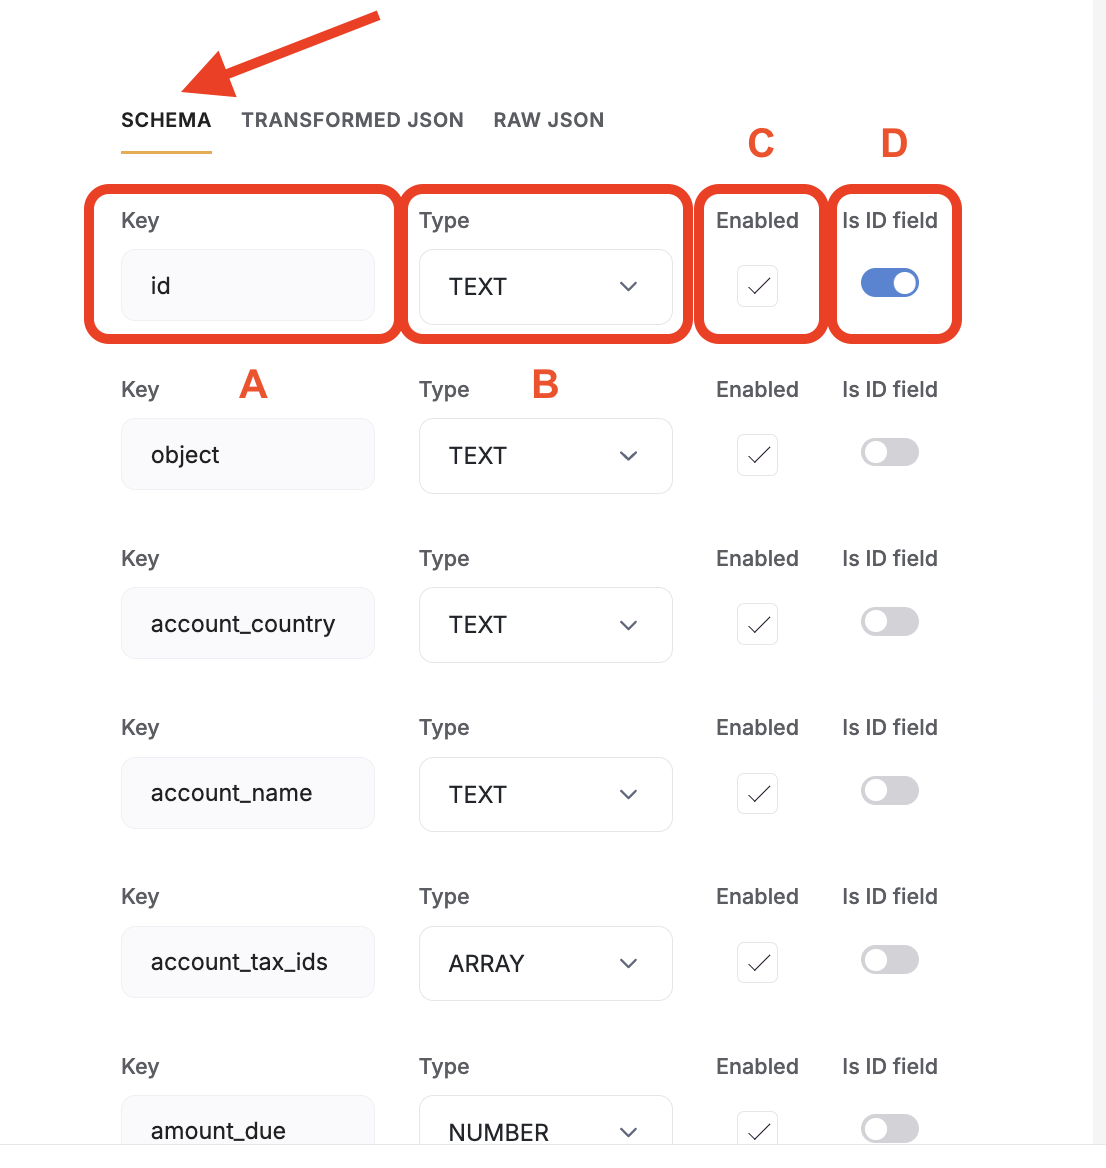
After you click the Execute button and get a response from the API, a new pane will appear in the bottom part of the window (you may need to scroll down). Here we have several tabs where we can monitor what the API responses are and how we handle them in Softr. Don’t forget, you need to Execute a test call in order to see these options! Schema Once you’ve gotten a response from the JSON, you can check the schema (structure) of the response in the Schema tab. You also have several options for setup here- Key: The key is the name of the parameter being returned in the response. This should match what is returned by the API and is what is shown in the Softr Studio UI when you map fields.
- Type: The type helps Softr understand how this number should be displayed in your app and also can be used for filtering and visibility conditions. It can be one of several types: TEXT, NUMBER, BOOLEAN (true/false), DATE, DATETIME, TIMESTAMP, OBJECT, ARRAY, EMAIL, or URL.
- Enabled: You can choose to enable or disable each schema parameter to have Softr ignore it in the Studio UI.
-
ID Field: This toggle is used to tell Softr which field should be used as the unique ID for each record.
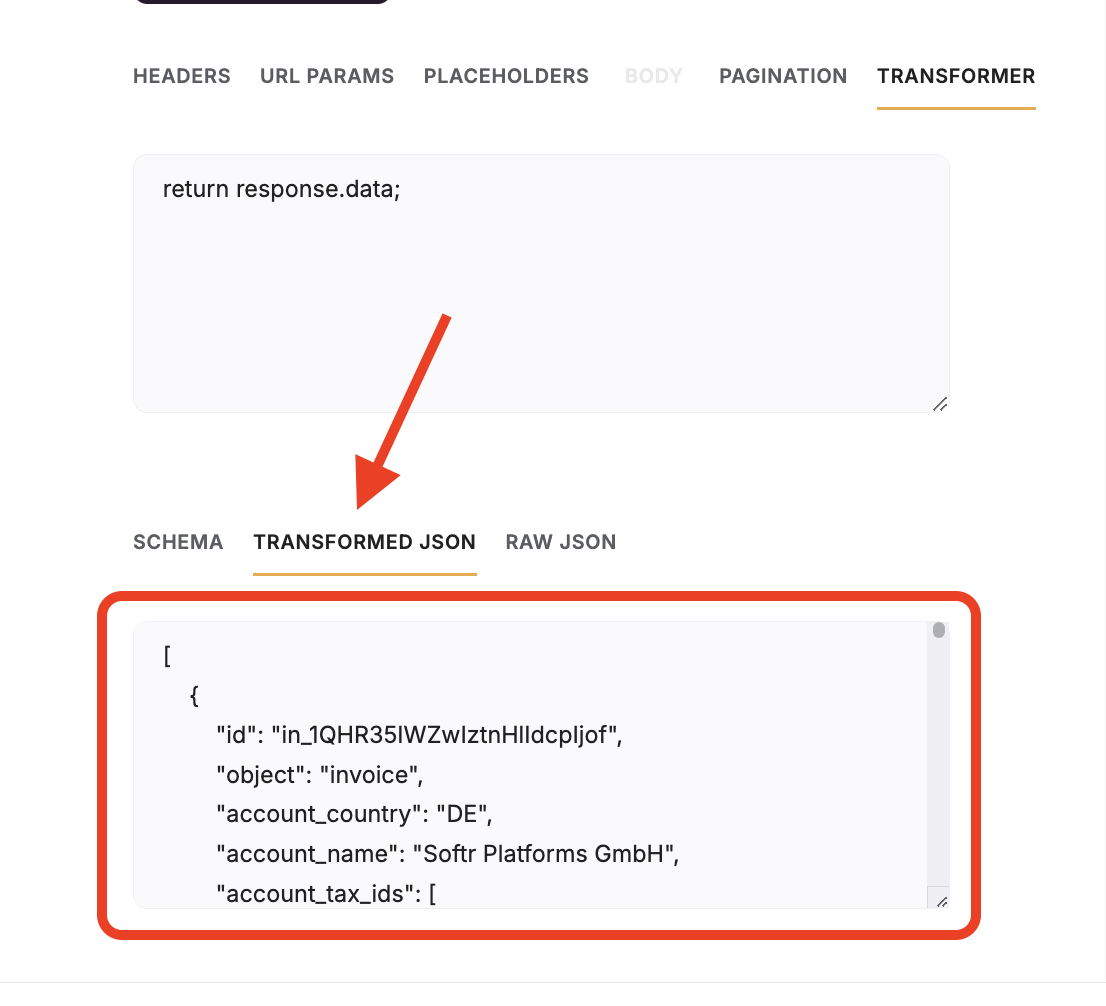
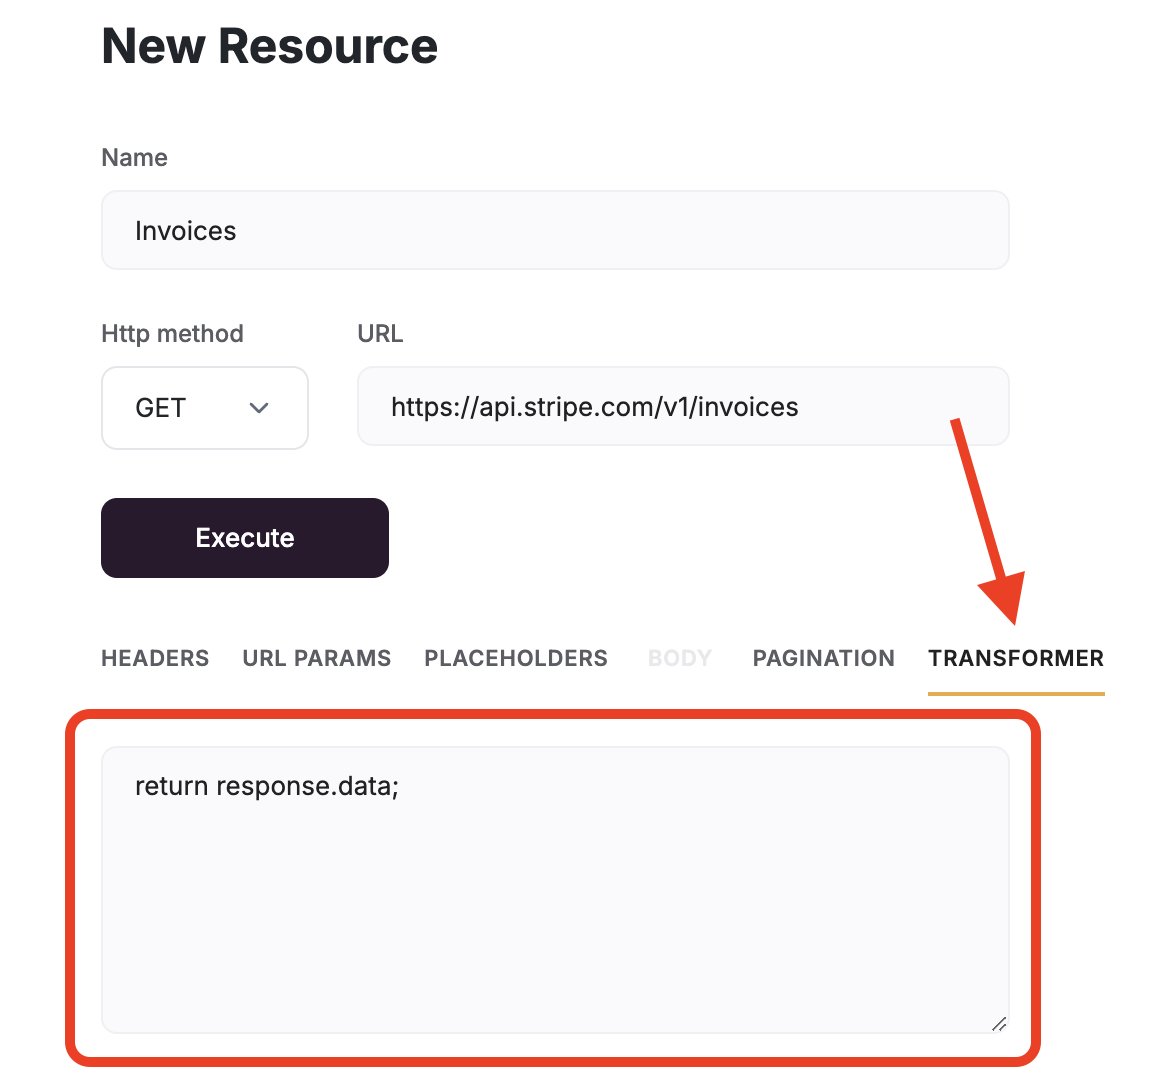
data key from the response since it contains an ARRAY of objects that are invoices.
FAQs
Can I use REST API to update data in Softr?
Can I use REST API to update data in Softr?
Yes! You can use POST requests to create new records.
How do I add authentication for my API?
How do I add authentication for my API?
Add Authorization headers with API keys or tokens.
Can I connect multiple APIs to one Softr app?
Can I connect multiple APIs to one Softr app?
Yes! You can add multiple REST API connections and use them across different blocks.