What can I do with the Call API action?
Call API action is available for users on the Professional plan and above.
- Click on an Invoice record in Softr app → Create an invoice in Stripe to the associated client
- Click on a Lead record in Softr → Update the status in Pipedrive or Salesforce
- Click on a File record Softr → Attach the record URL of the associated client project in tools like Clickup, Monday, Asana, Notion, or Coda
- Click on an Customer request record in Softr app → Send a notification to Slack or send an email
- Click on an Inventory record in Softr app → call API automations or workflows in automation softwares like Zapier, Make, Triggre, n8n, and more.
- Click on a Support Ticket record in Softr → Update the ticket in Jira
Where can I use it?
The Call API action is available for use in two locations:- List Blocks - Call API is available on buttons added to list items (not topbar buttons)
- List Details Blocks - Call API is available on buttons added to list details blocks
How do I use it?
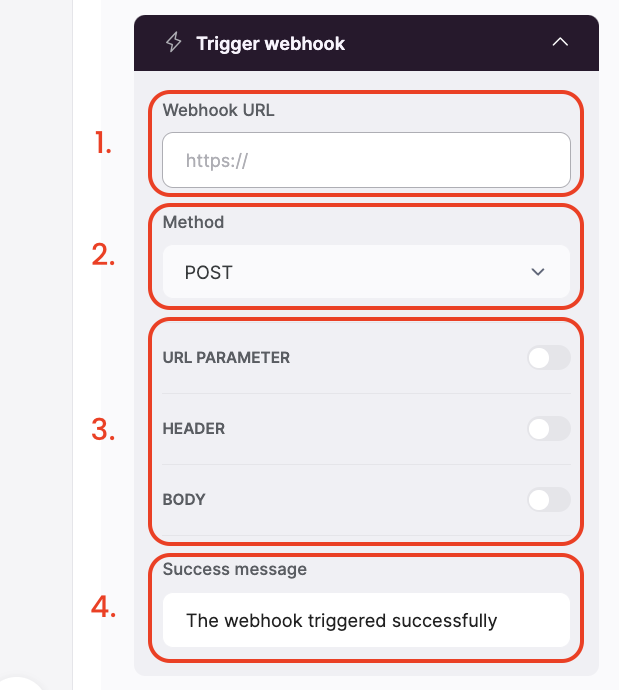
The Call API actions can be broken down into 4 main sections:- Webhook or Base URL
- Request Method
- Parameters
-
Success Message

1. Webhook URL
In this field you will put the webhook URL or API endpoint URL you would like to send the request to. The URL you use will depend on the service you are using to receive the data. All URLs should begin withhttps:// and act as one-way “doors” that you need to “knock on” or “call” in order to do or see different things with the service you’re integrating with. Some doors are locked though, as we will see in point number 3.
2. Request Method
In this dropdown you have 4 options to choose from, depending on what the webhook or API requires as a part of its service. Using the door analogy, different doors have different methods for operating them - some have knobs, some have levers, some push or pull to open. In the same way, webhook and API URLs can have different methods for calling them and we can use the POST, PUT, PATCH, and DELETE methods in this dropdown to tell an endpoint what we want to do with it. The differences in how these methods are used can vary, but for simplicity sake here’s a general break down of how they are used for most webhooks and APIs:- POST - Typically used to create new data with an endpoint or perform a new action
- PUT - Typically used to update and replace all data
- PATCH - Typically used to update and replace only the data specified in the call
- DELETE - Used to delete the entirety of a record or data
3. Parameters
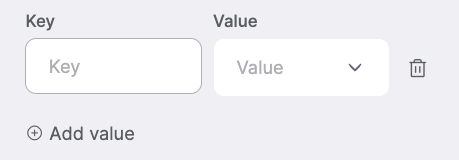
The parameters section offers three ways to add what are called key/value pairs to the webhook or API call. You can think of these key/value pairs as the information should be sent in the request. If the URL and Method is the door and the way the door operates, then key/value pairs are what pass through the door. As mentioned in point number 1, some doors are locked and require a key. In the same way, some webhook or API URLs may require an API Key or password to access them, which you can often send using Query Parameters or the Header. Different webhooks and APIs will require different combinations of these to be toggled on or off, but turning any of them on reveals two fields that you can use to define both the key and the value of the key. You can add as many of these as are required by the tool or service. You can also use any combination of static data or logged-in user and current record data in the “Value” dropdown. This allows you to send any app data as a part of the call.
- URL Parameter - this type of key/value pair is appended to the end of the Webhook URL when the call is performed and is very flexible in how it can be used, whether sending simple information or even API Keys to access an endpoint
- Header Parameter - this key/value pair is often used to authenticate the request with an API Key or send information about the type of content you’re sending.
- Body - key/value pairs placed in the body are typically the important content you’re actually wanting to send and use elsewhere such as emails, names, numbers, or lists of other items
4. Success Message
Much like forms and editing list items, you can set a success message that is shown to the app user, after the webhook or API call has been completed.Advanced Capabilities
Webhook/API Event Listeners
You can use custom code in the header or footer of a page along with an event listener to monitor the server’s response to a webhook or API call:call-api-success event with field values is triggered after getting response with a success status code.
call-api-failure event is triggered after getting response with error code.
Example: