> ## Documentation Index
> Fetch the complete documentation index at: https://docs.softr.io/llms.txt
> Use this file to discover all available pages before exploring further.
# Advanced Concepts
> Patterns and techniques for building advanced workflows: referencing data between steps, using AI reliably, making external API calls, writing custom logic, and designing human-in-the-loop automations.
# Workflows: Advanced Concepts
This page covers the patterns and techniques for building non-trivial workflows: referencing data across steps, conditional logic, data transformation, AI-powered automation, human-in-the-loop approvals, and more.
***
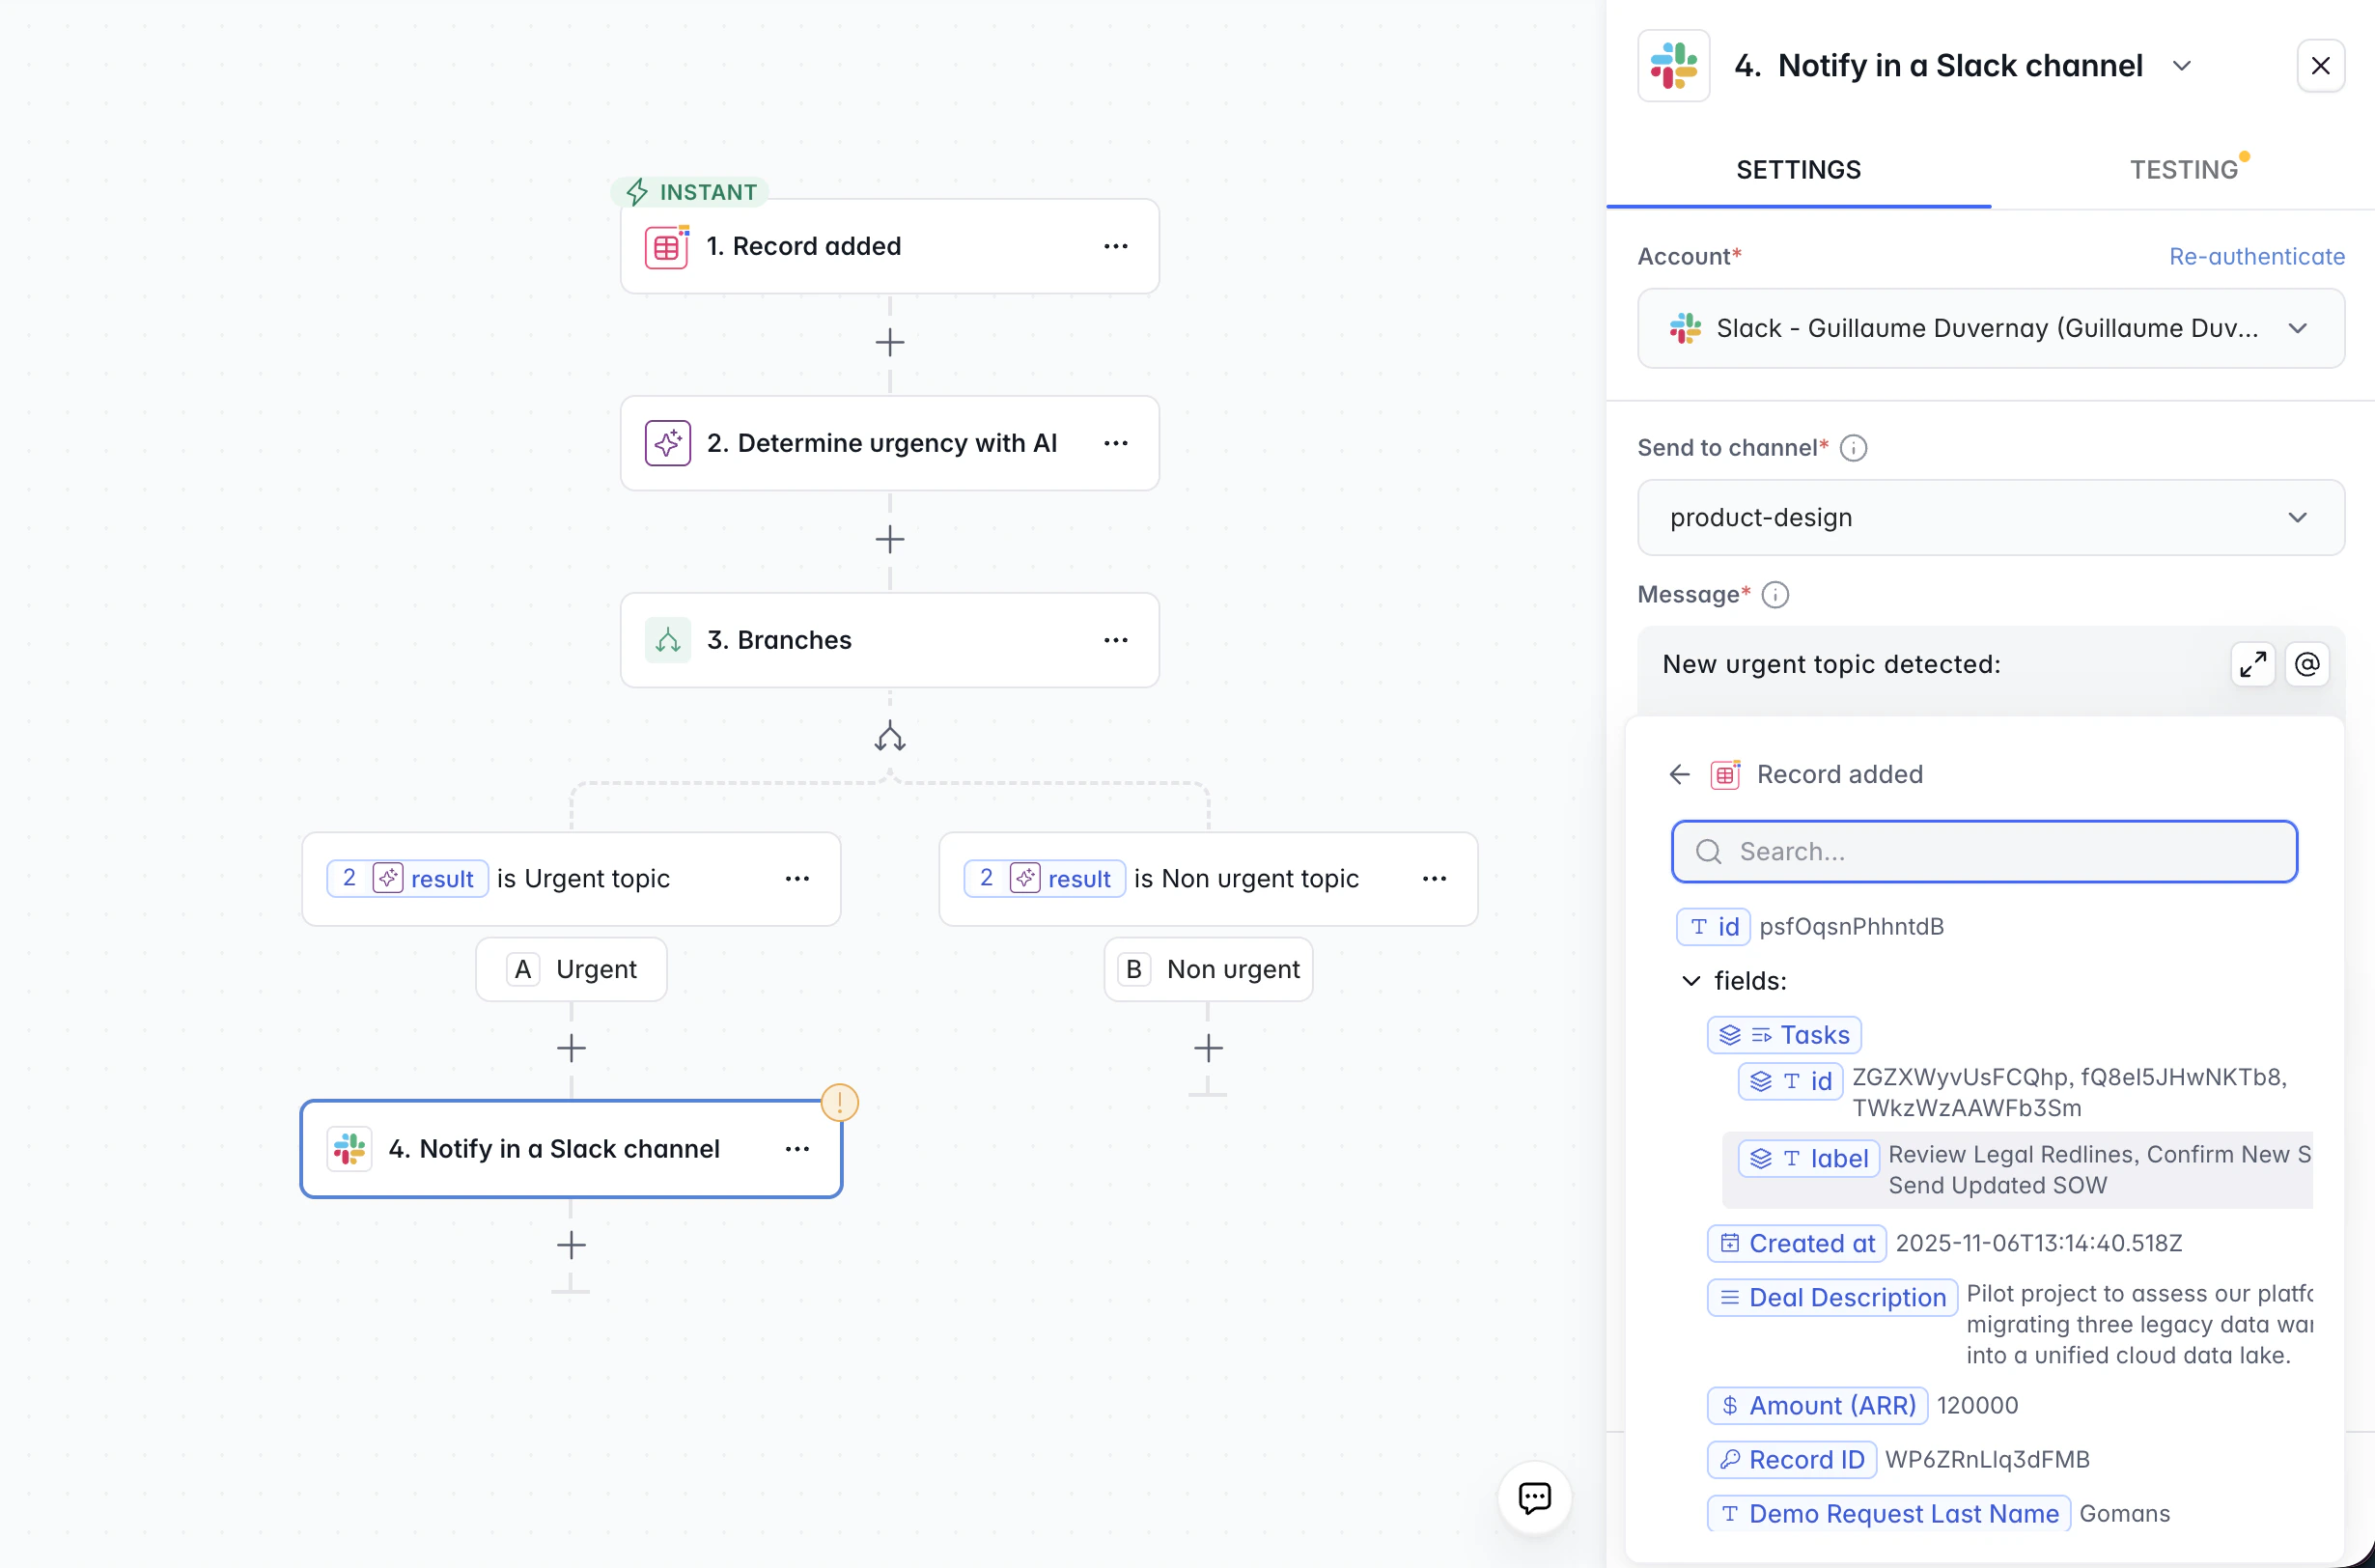
## Referencing Data Between Steps
Most workflow actions need data from earlier steps: the record that triggered the workflow, a value returned by an AI action, a field from a database lookup. **Variables** are how you pass data from one step to the next.
**How it works:**
1. In any action's settings, click the **+** button to open the variable picker.
2. Browse the list of previous steps (the trigger and every action that ran before this one).
3. Select a field. Its value will be injected at runtime when the workflow runs.
 You can combine variables with static text. For example, a Slack message might read: `A new bug was reported by [+ Trigger → email]: [+ Trigger → description]`.
**Where variables come from:**
* **Trigger data** - the record, form submission, or webhook payload that started the workflow. Available in every subsequent step.
* **Action outputs** - the result of any previous action. For example, an AI Categorize step outputs a `category` field; a Get Record step outputs all the record's fields.
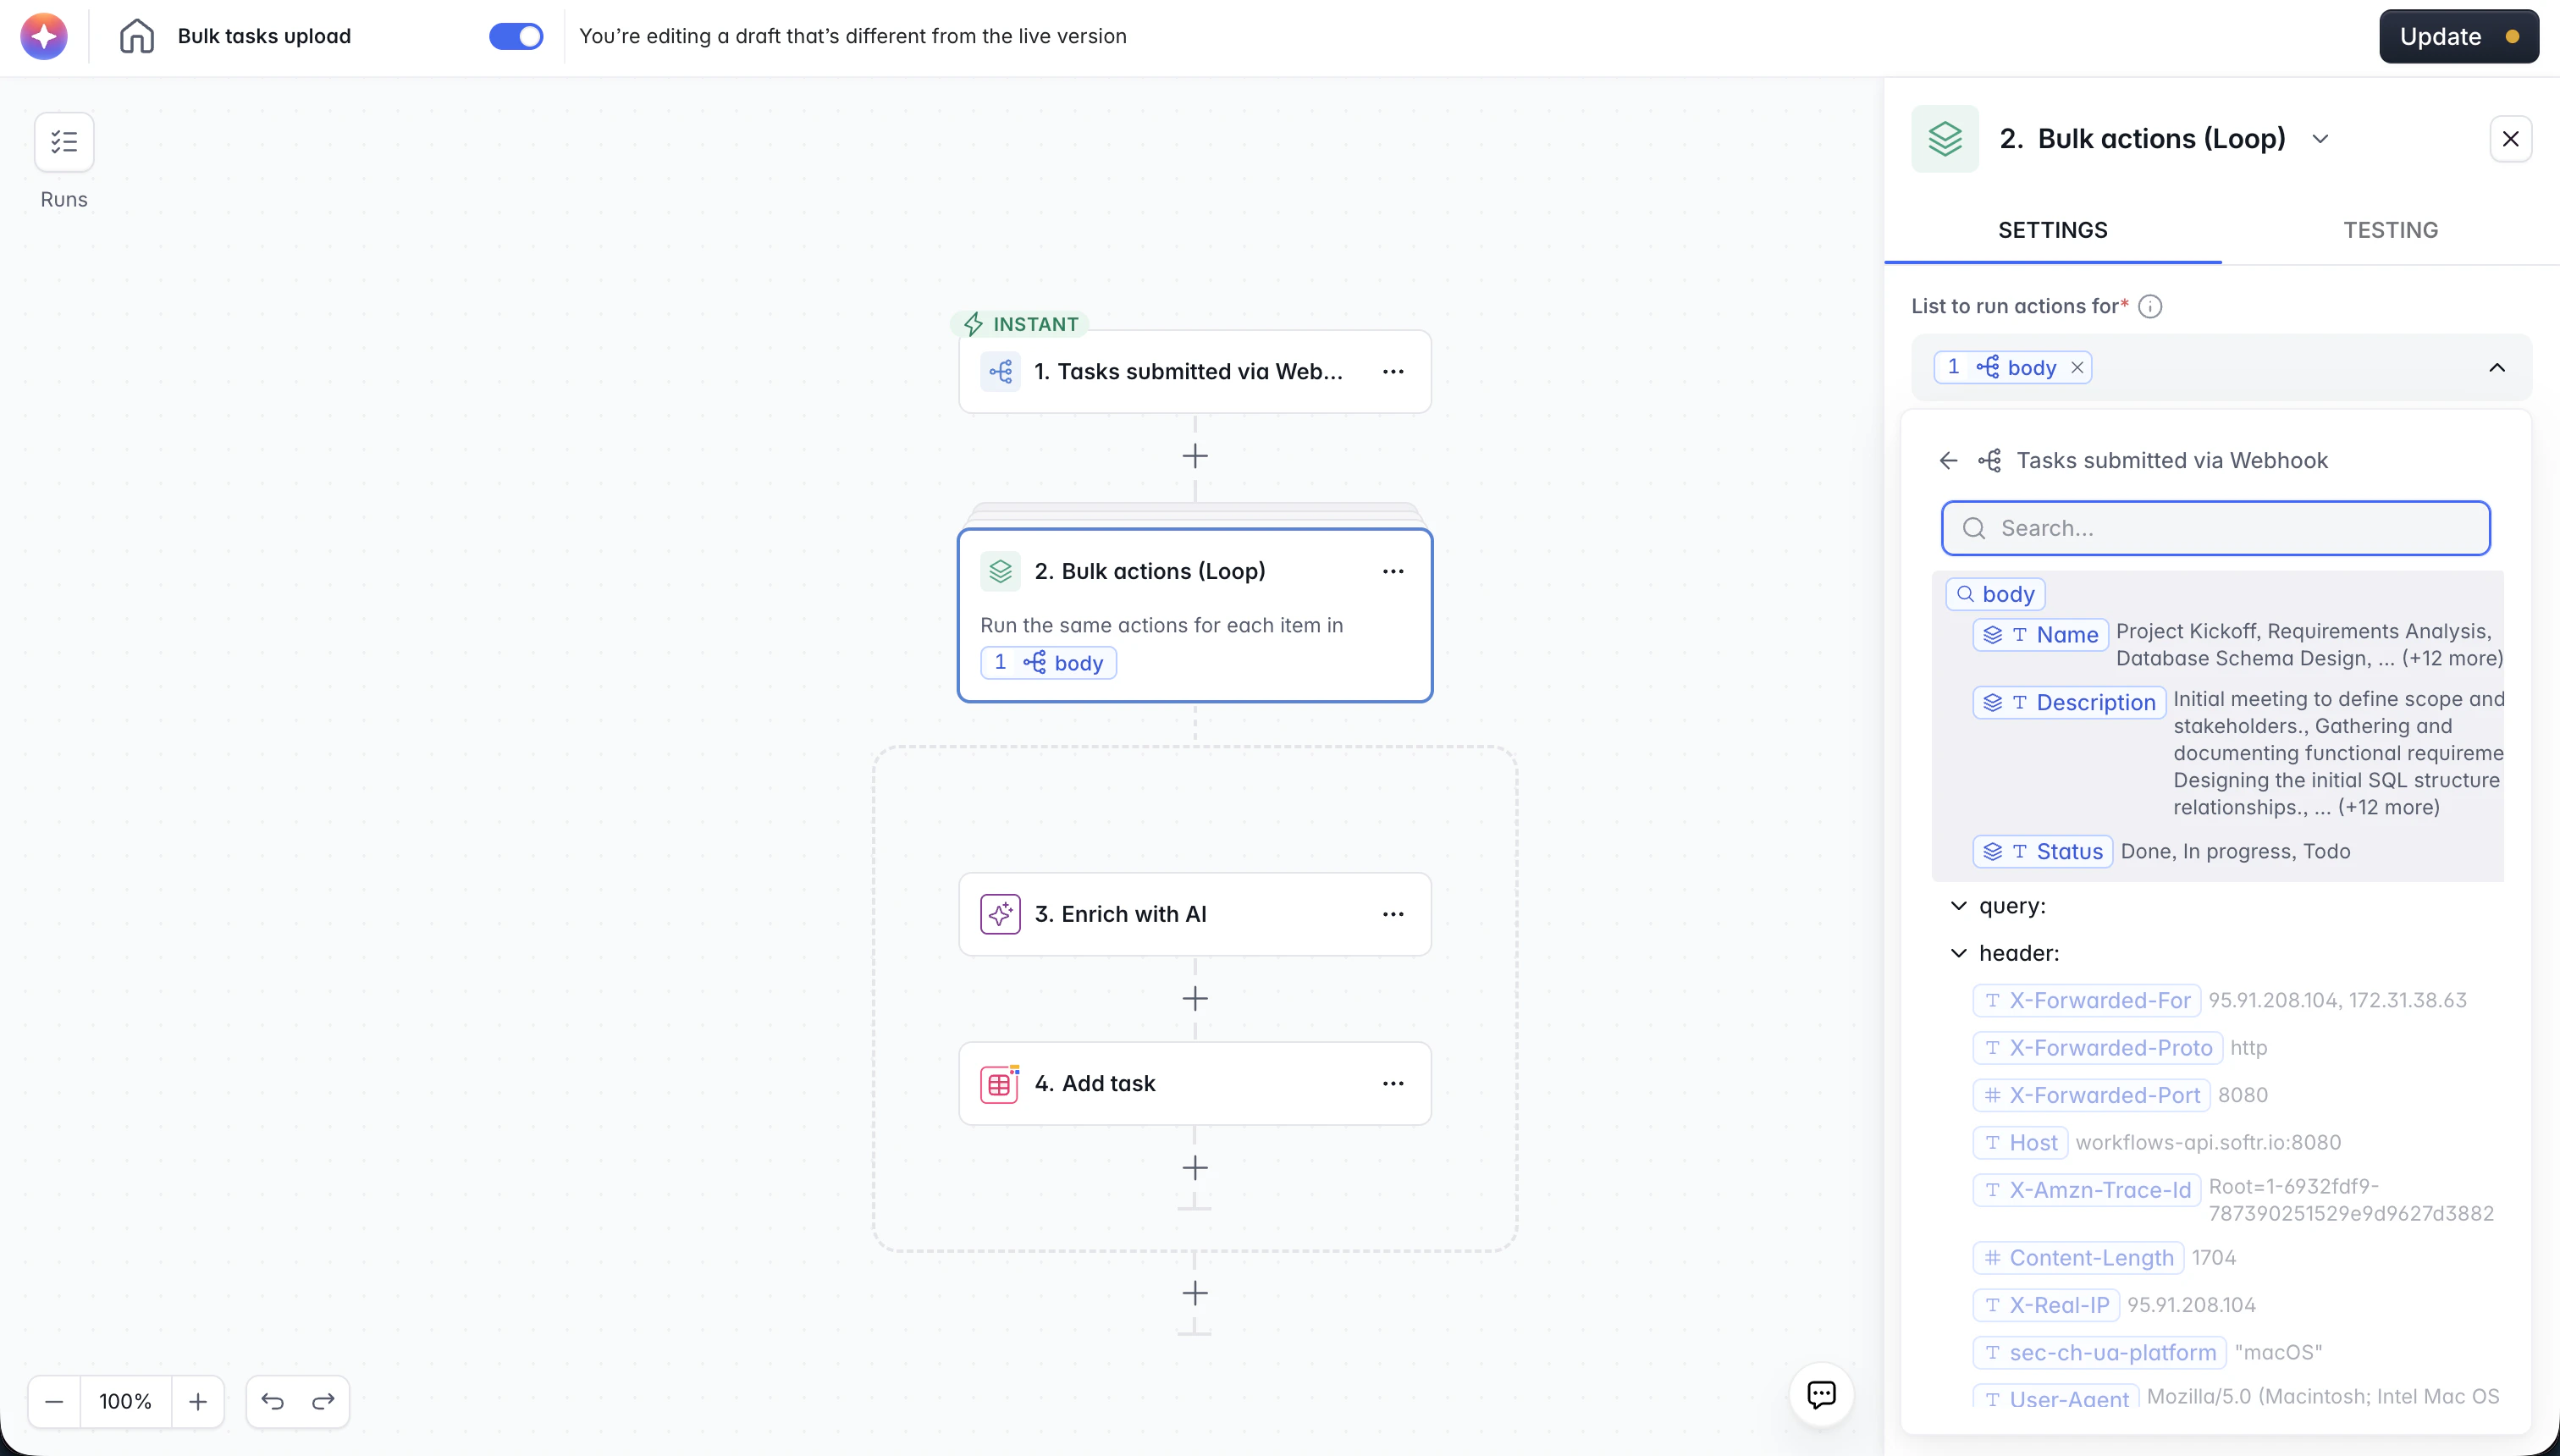
* **Loop variables** - inside a Loop, use `{loopVariables.fieldName}` to access the current item's data. See the Loop section below.
Every action produces outputs that become available as variables in later steps - including AI actions. This is what makes it possible to chain an AI classification into a Branch condition or a record update.
**Example:** A form submission triggers a workflow. Step 1 uses the submitter's email from the trigger to look up their full user record. Step 2 sends a Slack message that combines the form's message field (`+` → Trigger → message) with the user's account plan from Step 1 (`+` → Step 1 → plan).
**Common Trigger Payloads:**
Different triggers provide different sets of variables at the start of your workflow. Understanding these helps you design better logic:
* **UI Triggers (Forms/Buttons):** Provide context about the app context, including `applicationId`, `pageId`, and `blockId`. Triggers from list blocks also include the specific `record` object.
* **Unified Record Triggers:** Standardized via the Softr logic, these provide an `id` and a `fields` object containing all key-value pairs from the record.
* **System Triggers (New User):** Provide rich user metadata including `fullName`, `credentials.email`, and `userGroups` — allowing you to branch based on permissions.
* **Webhooks & Calendly:** Pass the raw `body` of the event. Webhooks additionally provide `header` and `query` variables.
***
## Branch
The **Branch** action splits your workflow into two paths based on a condition.
* If the condition is **true**, the workflow follows the "yes" path.
* If the condition is **false**, it follows the "no" path.
This is the main way to build if/else logic without writing code.
You can combine variables with static text. For example, a Slack message might read: `A new bug was reported by [+ Trigger → email]: [+ Trigger → description]`.
**Where variables come from:**
* **Trigger data** - the record, form submission, or webhook payload that started the workflow. Available in every subsequent step.
* **Action outputs** - the result of any previous action. For example, an AI Categorize step outputs a `category` field; a Get Record step outputs all the record's fields.
* **Loop variables** - inside a Loop, use `{loopVariables.fieldName}` to access the current item's data. See the Loop section below.
Every action produces outputs that become available as variables in later steps - including AI actions. This is what makes it possible to chain an AI classification into a Branch condition or a record update.
**Example:** A form submission triggers a workflow. Step 1 uses the submitter's email from the trigger to look up their full user record. Step 2 sends a Slack message that combines the form's message field (`+` → Trigger → message) with the user's account plan from Step 1 (`+` → Step 1 → plan).
**Common Trigger Payloads:**
Different triggers provide different sets of variables at the start of your workflow. Understanding these helps you design better logic:
* **UI Triggers (Forms/Buttons):** Provide context about the app context, including `applicationId`, `pageId`, and `blockId`. Triggers from list blocks also include the specific `record` object.
* **Unified Record Triggers:** Standardized via the Softr logic, these provide an `id` and a `fields` object containing all key-value pairs from the record.
* **System Triggers (New User):** Provide rich user metadata including `fullName`, `credentials.email`, and `userGroups` — allowing you to branch based on permissions.
* **Webhooks & Calendly:** Pass the raw `body` of the event. Webhooks additionally provide `header` and `query` variables.
***
## Branch
The **Branch** action splits your workflow into two paths based on a condition.
* If the condition is **true**, the workflow follows the "yes" path.
* If the condition is **false**, it follows the "no" path.
This is the main way to build if/else logic without writing code.
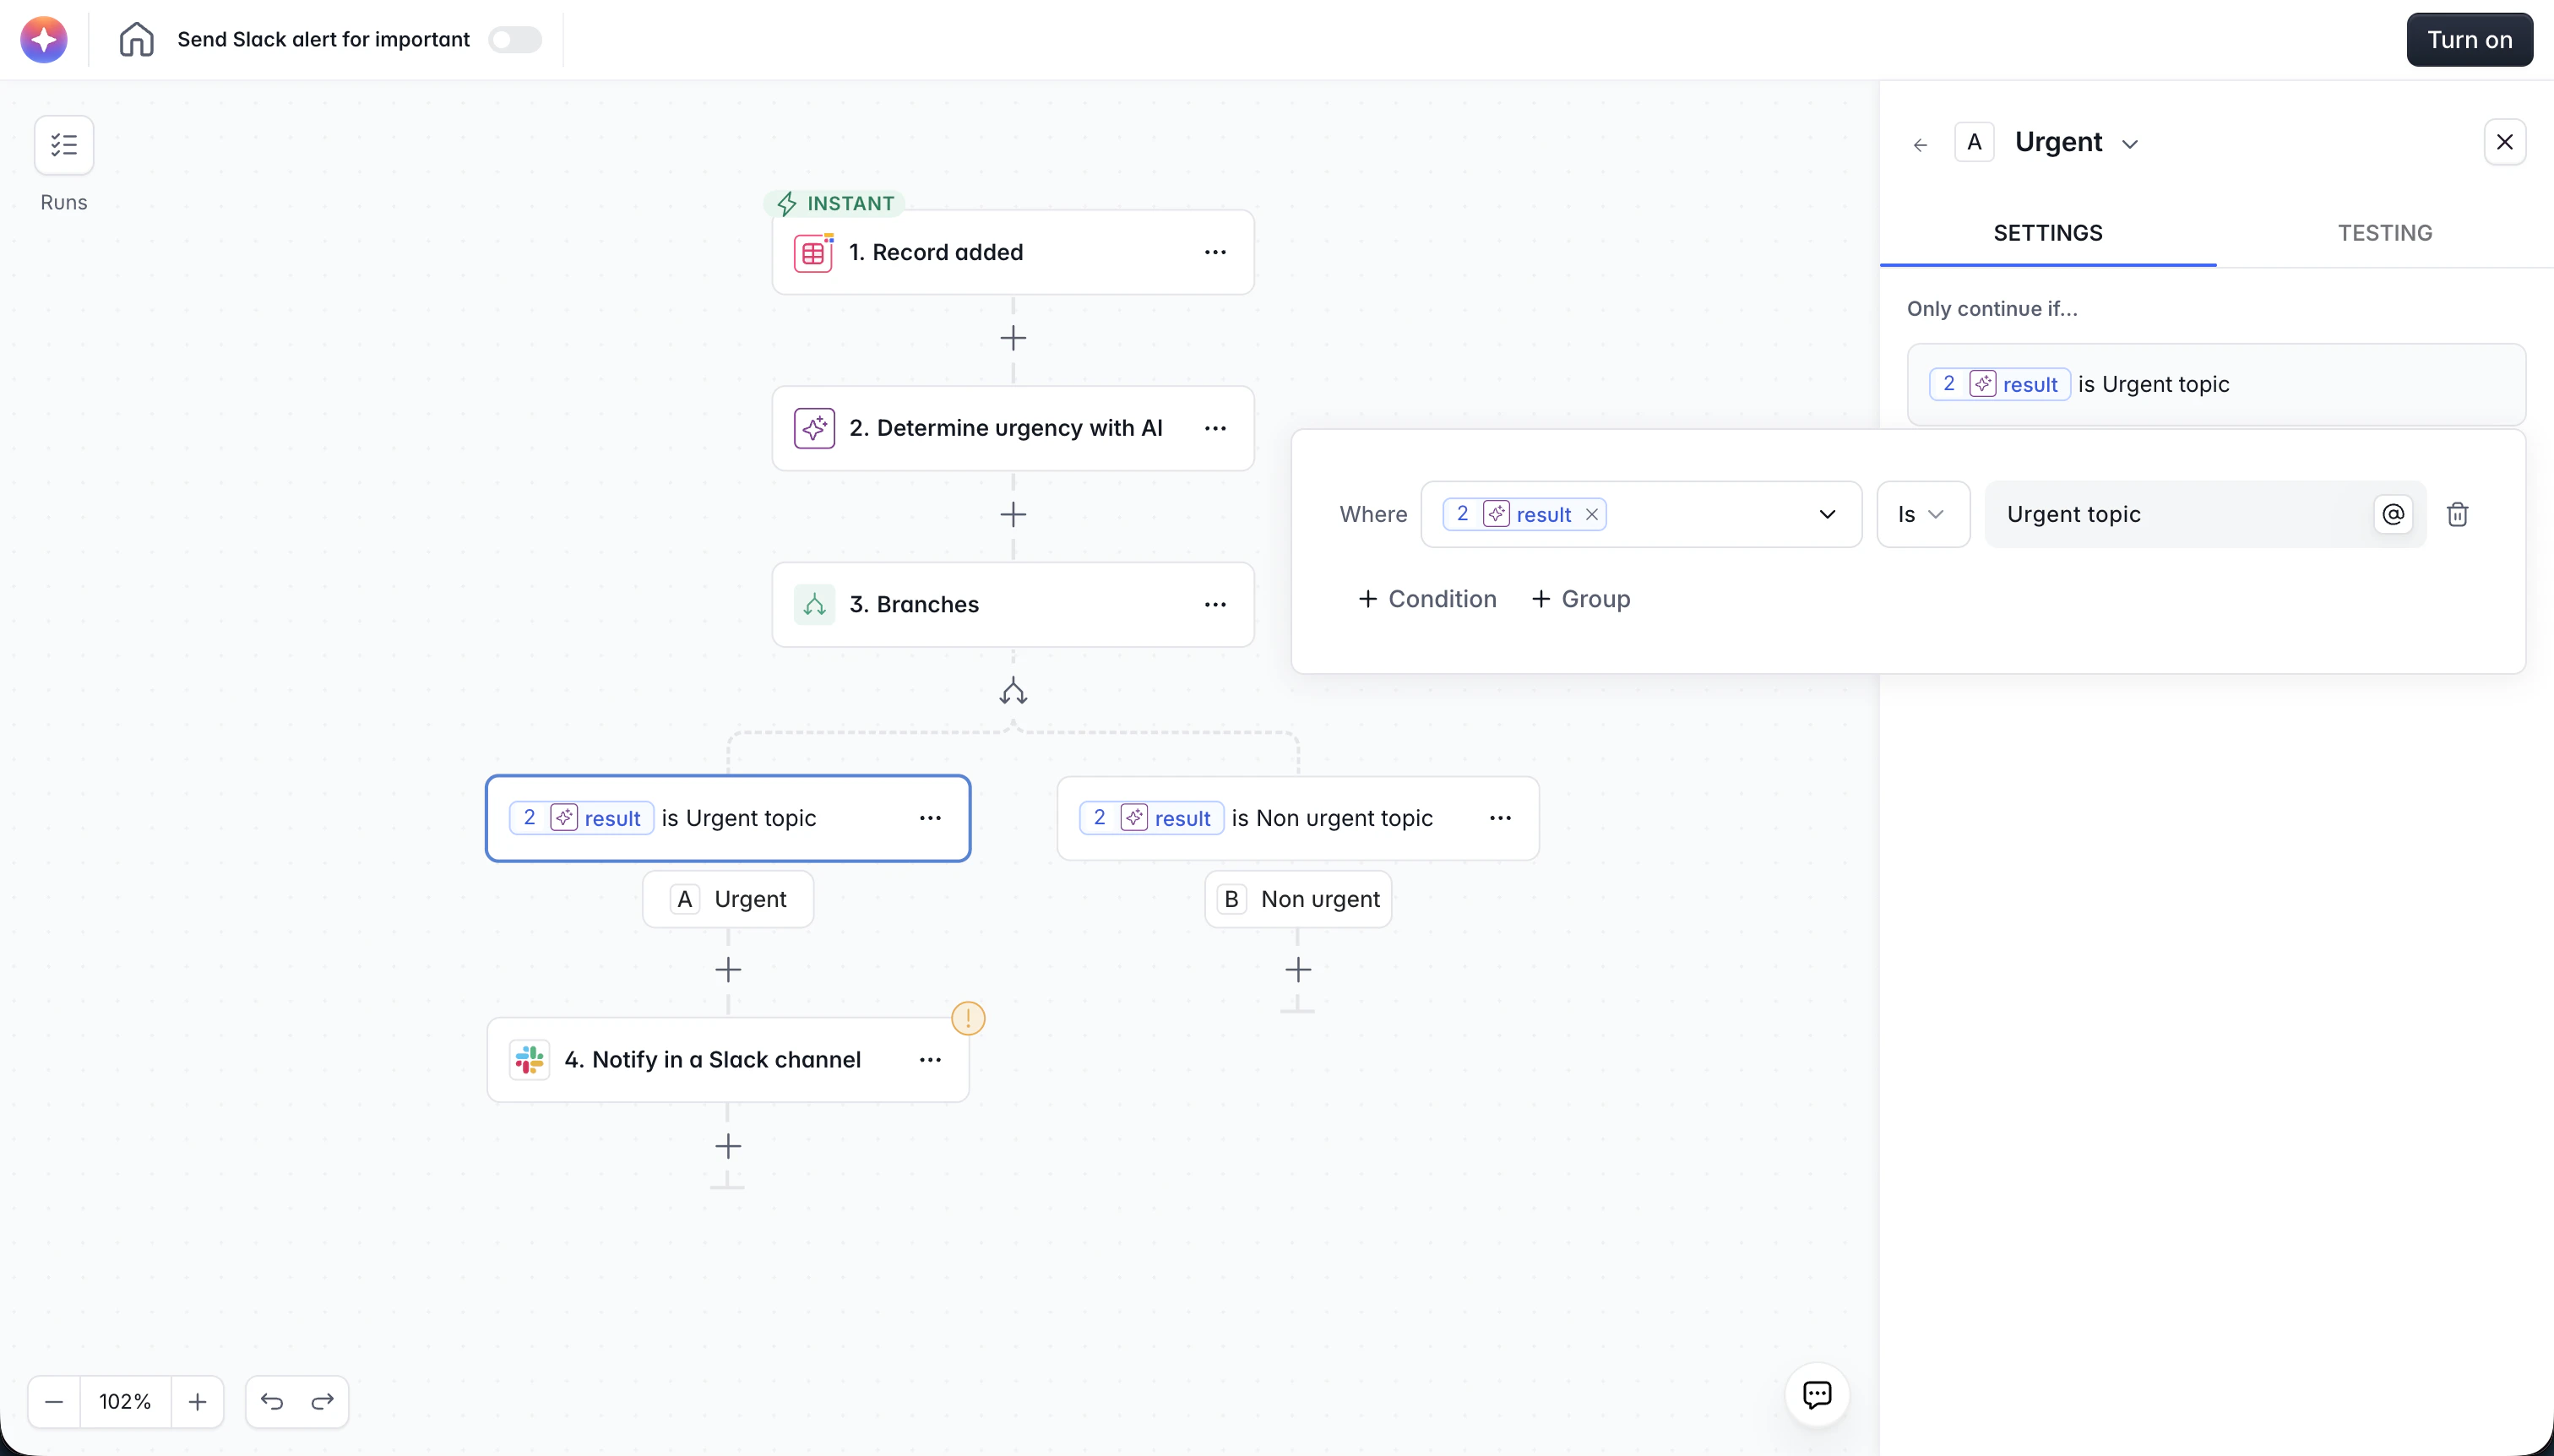
 **Example:** After a user submits a form, branch on whether their subscription plan is "Pro". If yes, send them a welcome email for Pro users. If no, send the standard welcome email.
Branches are especially powerful when combined with AI actions - see [AI + Branch Patterns](#ai--branch-patterns) below.
***
## Filter
The **Filter** action checks a condition and **stops the workflow** if the condition is not met.
Use it when you only want the workflow to continue for certain records or situations, and there's nothing to do in the "no" case.
**Example:** A workflow triggers on every new Airtable record. Add a Filter at the start to stop the workflow if the record's "Status" field is not "Ready". Only "Ready" records will proceed through the rest of the workflow.
**Example:** After a user submits a form, branch on whether their subscription plan is "Pro". If yes, send them a welcome email for Pro users. If no, send the standard welcome email.
Branches are especially powerful when combined with AI actions - see [AI + Branch Patterns](#ai--branch-patterns) below.
***
## Filter
The **Filter** action checks a condition and **stops the workflow** if the condition is not met.
Use it when you only want the workflow to continue for certain records or situations, and there's nothing to do in the "no" case.
**Example:** A workflow triggers on every new Airtable record. Add a Filter at the start to stop the workflow if the record's "Status" field is not "Ready". Only "Ready" records will proceed through the rest of the workflow.
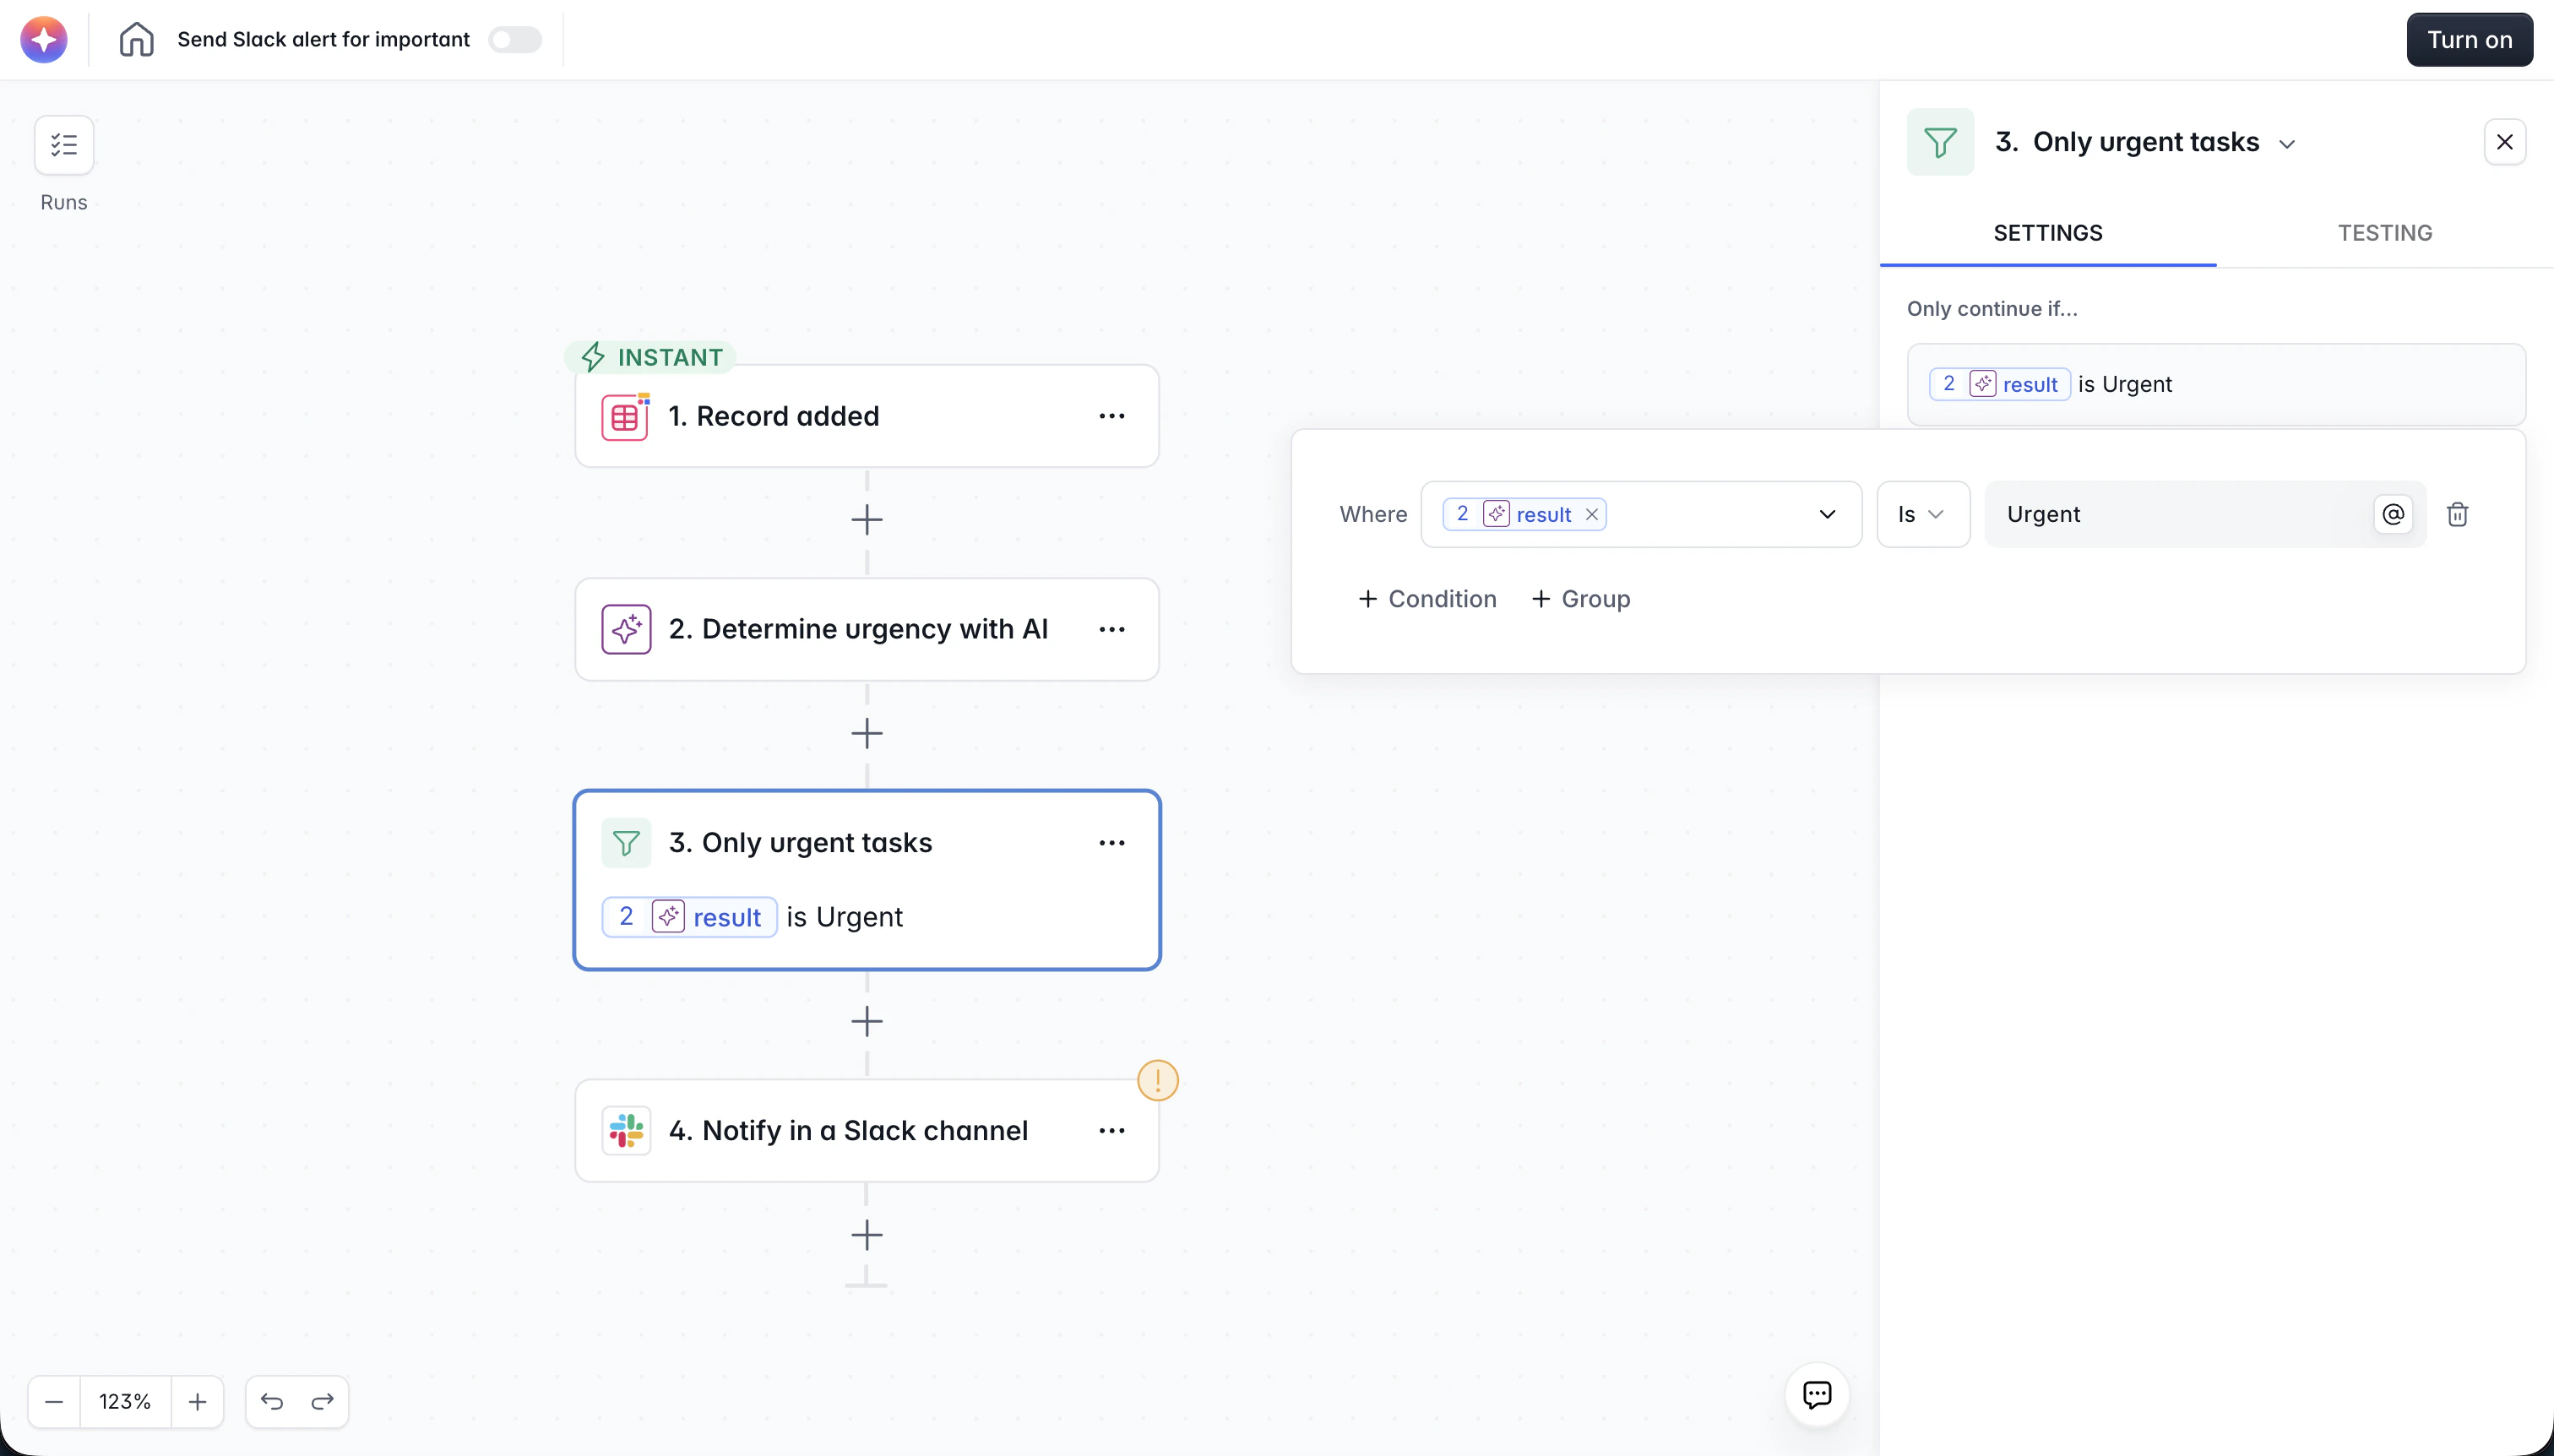 Unlike Branch, Filter doesn't create two paths. It's an early exit.
***
## Loop
The **Loop** action runs a group of actions once for each item in a list.
**How it works:**
1. You point the Loop at an array of items (e.g. a list of records returned by a "Get Records" action).
2. The actions inside the loop run once per item.
3. Inside the loop, use `{loopVariables.fieldName}` to access the current item's data and `{loopCounter}` to know which iteration you're on.
4. After all items are processed, the workflow continues with the next action after the loop.
Unlike Branch, Filter doesn't create two paths. It's an early exit.
***
## Loop
The **Loop** action runs a group of actions once for each item in a list.
**How it works:**
1. You point the Loop at an array of items (e.g. a list of records returned by a "Get Records" action).
2. The actions inside the loop run once per item.
3. Inside the loop, use `{loopVariables.fieldName}` to access the current item's data and `{loopCounter}` to know which iteration you're on.
4. After all items are processed, the workflow continues with the next action after the loop.
 **Example:** Fetch all "Pending" orders from Airtable, then loop over them and send each customer a status update email.
### Nested Loops
You can place a Loop inside another Loop to handle **lists within lists**.
**When to use it:** When each item in your outer list contains its own list of items that each need individual processing.
**Example:** You have a list of Tasks, and each Task has multiple Tags. You want to create one record per Task and Tag combination.
```
Loop Tasks
└── Loop Tags of this Task
└── Create record (Task + Tag)
└── Mark Task as checked
```
Here, if a task has 3 tags, the inner loop runs 3 times and creates 3 records for that task. The outer loop then moves on to the next task.
Nesting is not limited to two levels. You can nest further if your data structure requires it.
Be mindful of loop size. If you loop over a large list, every action inside the loop runs once per item - this affects both performance and your workflow action usage. Combine loops with Filters or conditions on your Get Records step to keep the list small.
***
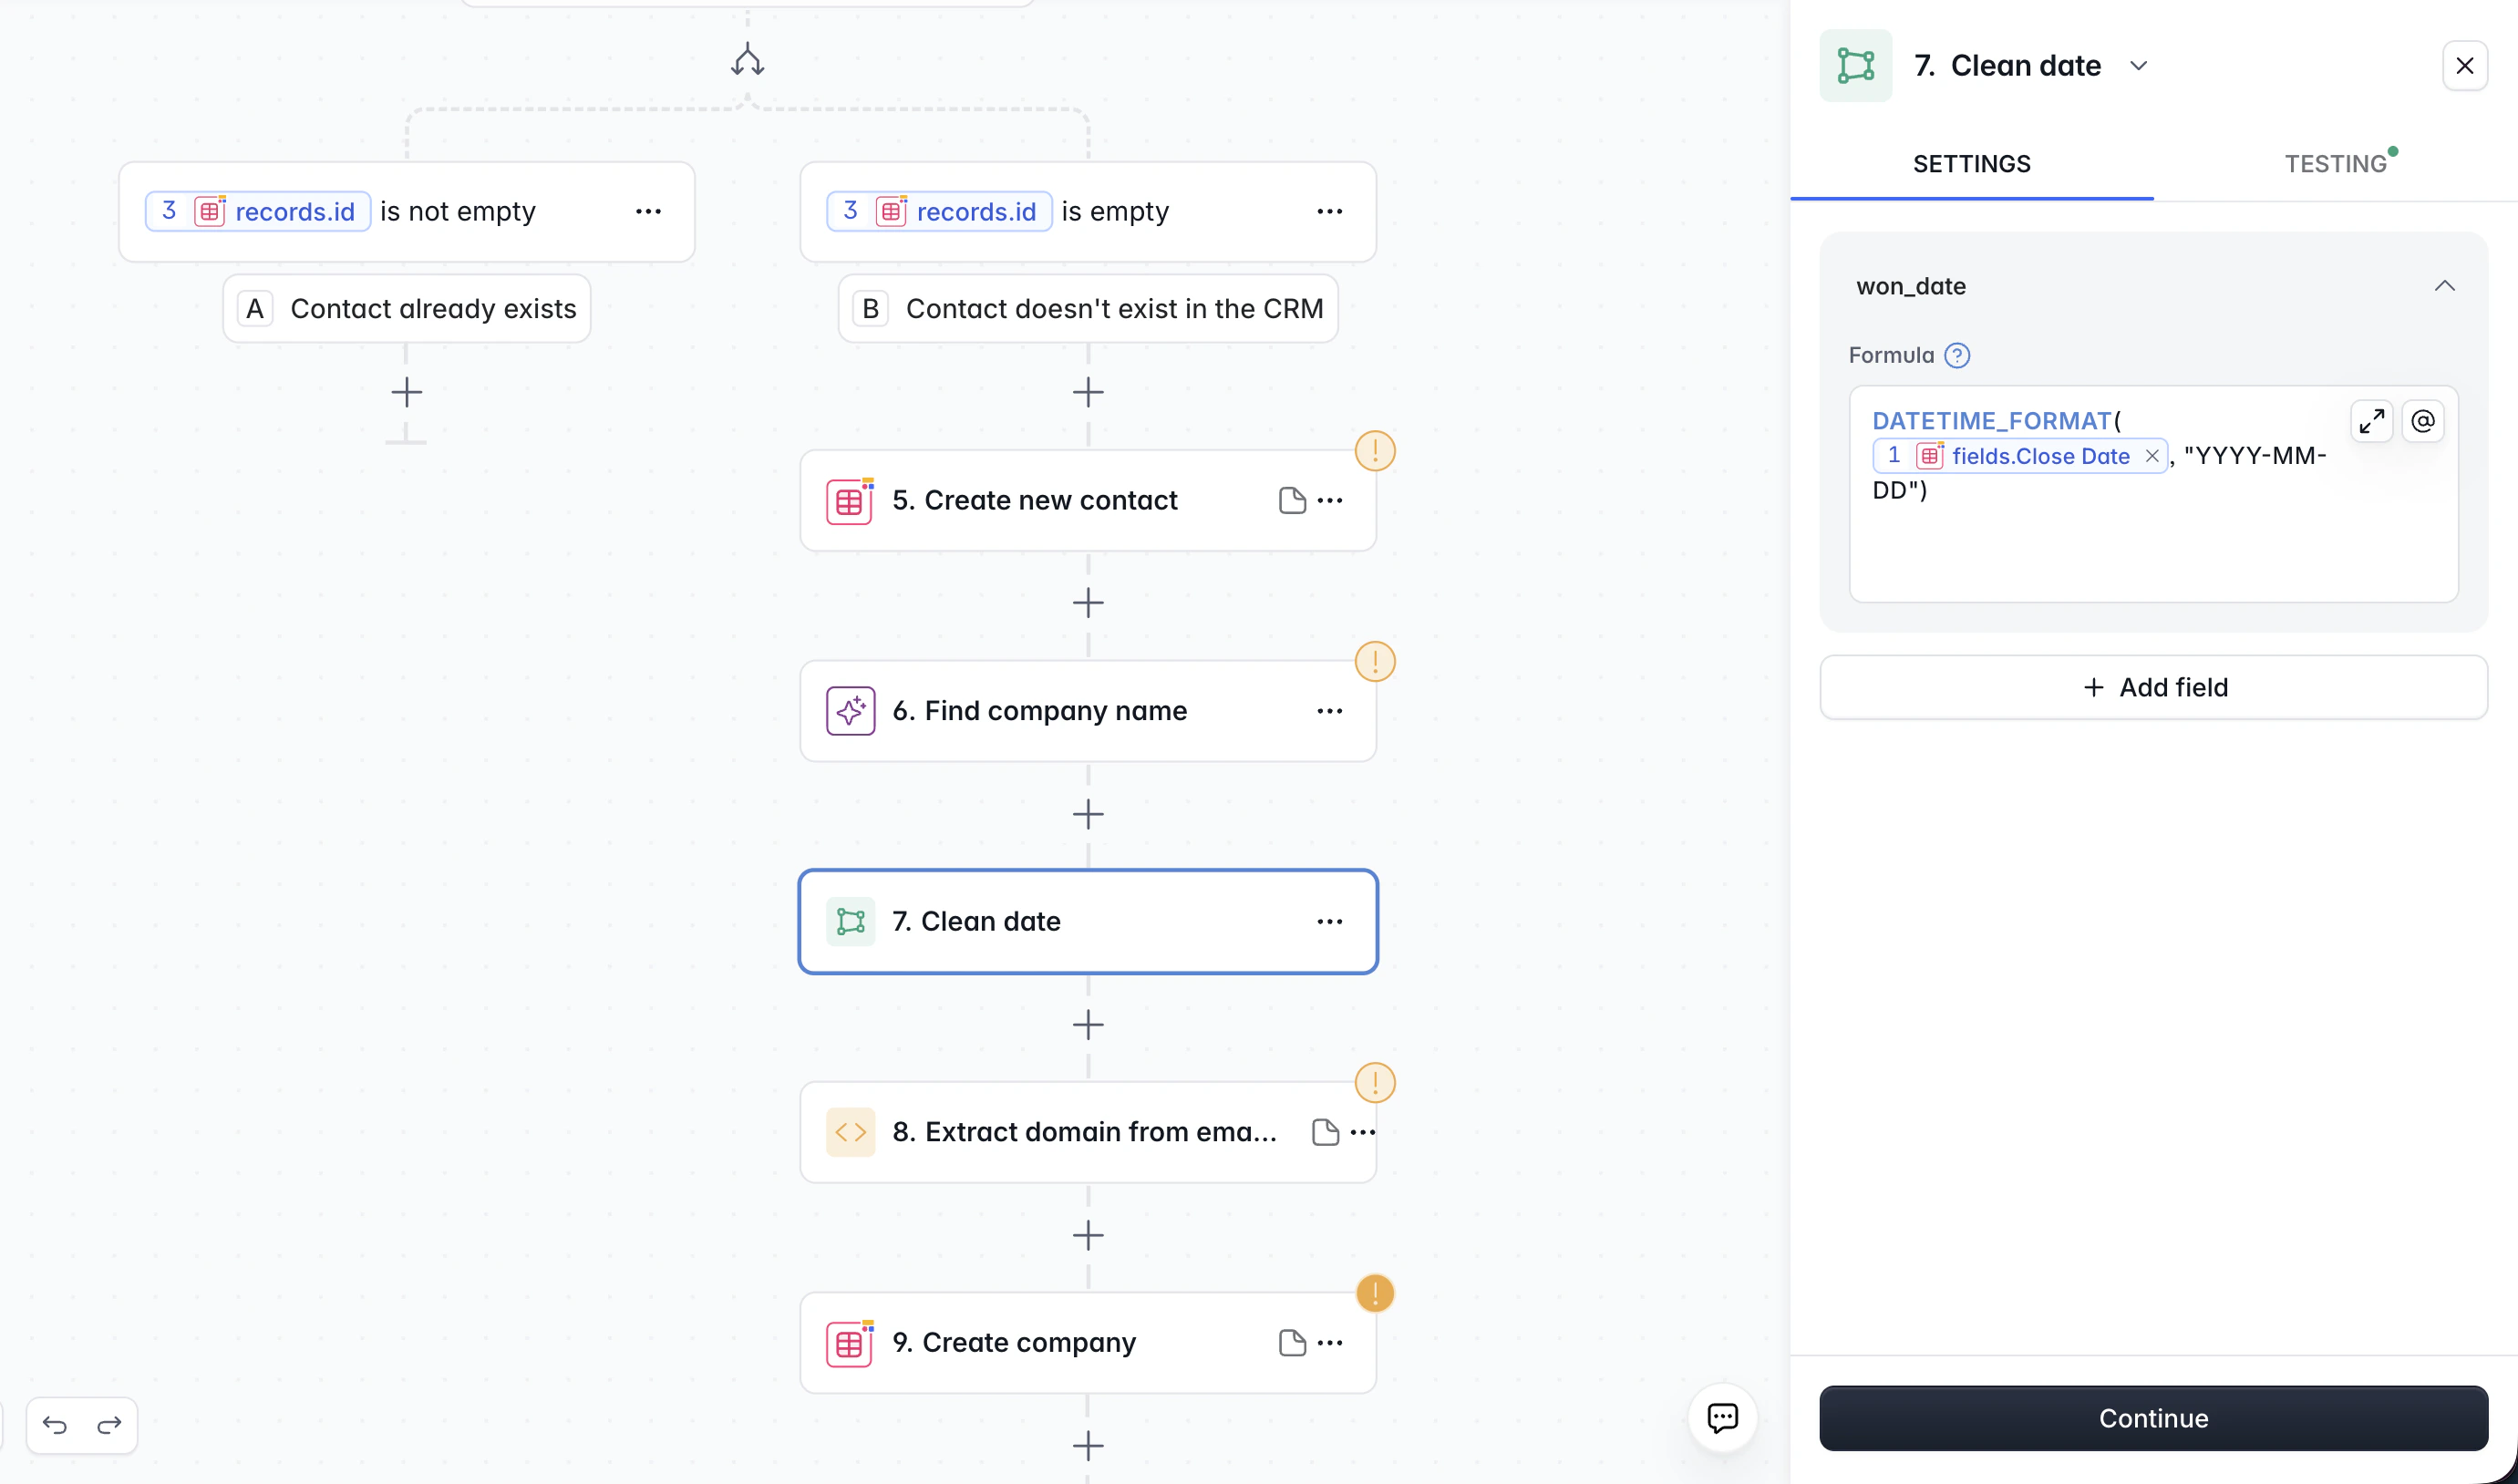
## Transform Data
The **Transform Data** action lets you create new values using **formulas** - the same formula syntax available in Softr Databases. Use it to reshape, calculate, or extract data between steps without writing code.
**Common use cases:**
* **Arithmetic:** Increment a counter (`{vote_count} + 1`), calculate a total, compute a percentage
* **String manipulation:** Convert text to lowercase, concatenate fields, extract a substring
* **Date extraction:** Get the day of the week from a date (`WEEKDAY({submission_date})`), format a date for display
* **Conditional values:** Return different values based on a condition using `IF()` formulas
You name each output field yourself, and those names become available as variables in subsequent steps.
**Example:** Fetch all "Pending" orders from Airtable, then loop over them and send each customer a status update email.
### Nested Loops
You can place a Loop inside another Loop to handle **lists within lists**.
**When to use it:** When each item in your outer list contains its own list of items that each need individual processing.
**Example:** You have a list of Tasks, and each Task has multiple Tags. You want to create one record per Task and Tag combination.
```
Loop Tasks
└── Loop Tags of this Task
└── Create record (Task + Tag)
└── Mark Task as checked
```
Here, if a task has 3 tags, the inner loop runs 3 times and creates 3 records for that task. The outer loop then moves on to the next task.
Nesting is not limited to two levels. You can nest further if your data structure requires it.
Be mindful of loop size. If you loop over a large list, every action inside the loop runs once per item - this affects both performance and your workflow action usage. Combine loops with Filters or conditions on your Get Records step to keep the list small.
***
## Transform Data
The **Transform Data** action lets you create new values using **formulas** - the same formula syntax available in Softr Databases. Use it to reshape, calculate, or extract data between steps without writing code.
**Common use cases:**
* **Arithmetic:** Increment a counter (`{vote_count} + 1`), calculate a total, compute a percentage
* **String manipulation:** Convert text to lowercase, concatenate fields, extract a substring
* **Date extraction:** Get the day of the week from a date (`WEEKDAY({submission_date})`), format a date for display
* **Conditional values:** Return different values based on a condition using `IF()` formulas
You name each output field yourself, and those names become available as variables in subsequent steps.
 **When to use Transform Data vs. Run Custom Code:**
| | Transform Data | Run Custom Code |
| -------------------- | ------------------------------------------------------- | ------------------------------------------------------- |
| **Best for** | Simple calculations, string formatting, date operations | Complex logic, JSON parsing, multi-step transformations |
| **Syntax** | Softr formula language | JavaScript or Python |
| **Setup** | Zero setup - just write a formula | Define input variables, write code |
| **Plan requirement** | All plans | Paid plans |
**Example:** A user clicks an "Upvote" button, triggering a workflow. Step 1: Get the current record to read its `vote_count`. Step 2: Transform Data with formula `{vote_count} + 1`. Step 3: Update the record with the new value from Step 2.
***
## Run Custom Code
The **Run Custom Code** action executes **JavaScript** or **Python** inside your workflow. It's the escape hatch for logic that formulas can't express - parsing complex JSON, applying multi-step transformations, or computing values that would require deeply nested branches.
**How inputs and outputs work:**
1. Define **input variables** in the action settings and map them to outputs from previous steps.
2. Inside the code, access these values through the input variables.
3. Return a value from your code - it becomes available as a variable in subsequent steps.
You don't need to write code from scratch. Click **Help me write code** in the code editor, describe what you want in plain language, and the AI assistant will generate the code for you.
**When to use Transform Data vs. Run Custom Code:**
| | Transform Data | Run Custom Code |
| -------------------- | ------------------------------------------------------- | ------------------------------------------------------- |
| **Best for** | Simple calculations, string formatting, date operations | Complex logic, JSON parsing, multi-step transformations |
| **Syntax** | Softr formula language | JavaScript or Python |
| **Setup** | Zero setup - just write a formula | Define input variables, write code |
| **Plan requirement** | All plans | Paid plans |
**Example:** A user clicks an "Upvote" button, triggering a workflow. Step 1: Get the current record to read its `vote_count`. Step 2: Transform Data with formula `{vote_count} + 1`. Step 3: Update the record with the new value from Step 2.
***
## Run Custom Code
The **Run Custom Code** action executes **JavaScript** or **Python** inside your workflow. It's the escape hatch for logic that formulas can't express - parsing complex JSON, applying multi-step transformations, or computing values that would require deeply nested branches.
**How inputs and outputs work:**
1. Define **input variables** in the action settings and map them to outputs from previous steps.
2. Inside the code, access these values through the input variables.
3. Return a value from your code - it becomes available as a variable in subsequent steps.
You don't need to write code from scratch. Click **Help me write code** in the code editor, describe what you want in plain language, and the AI assistant will generate the code for you.
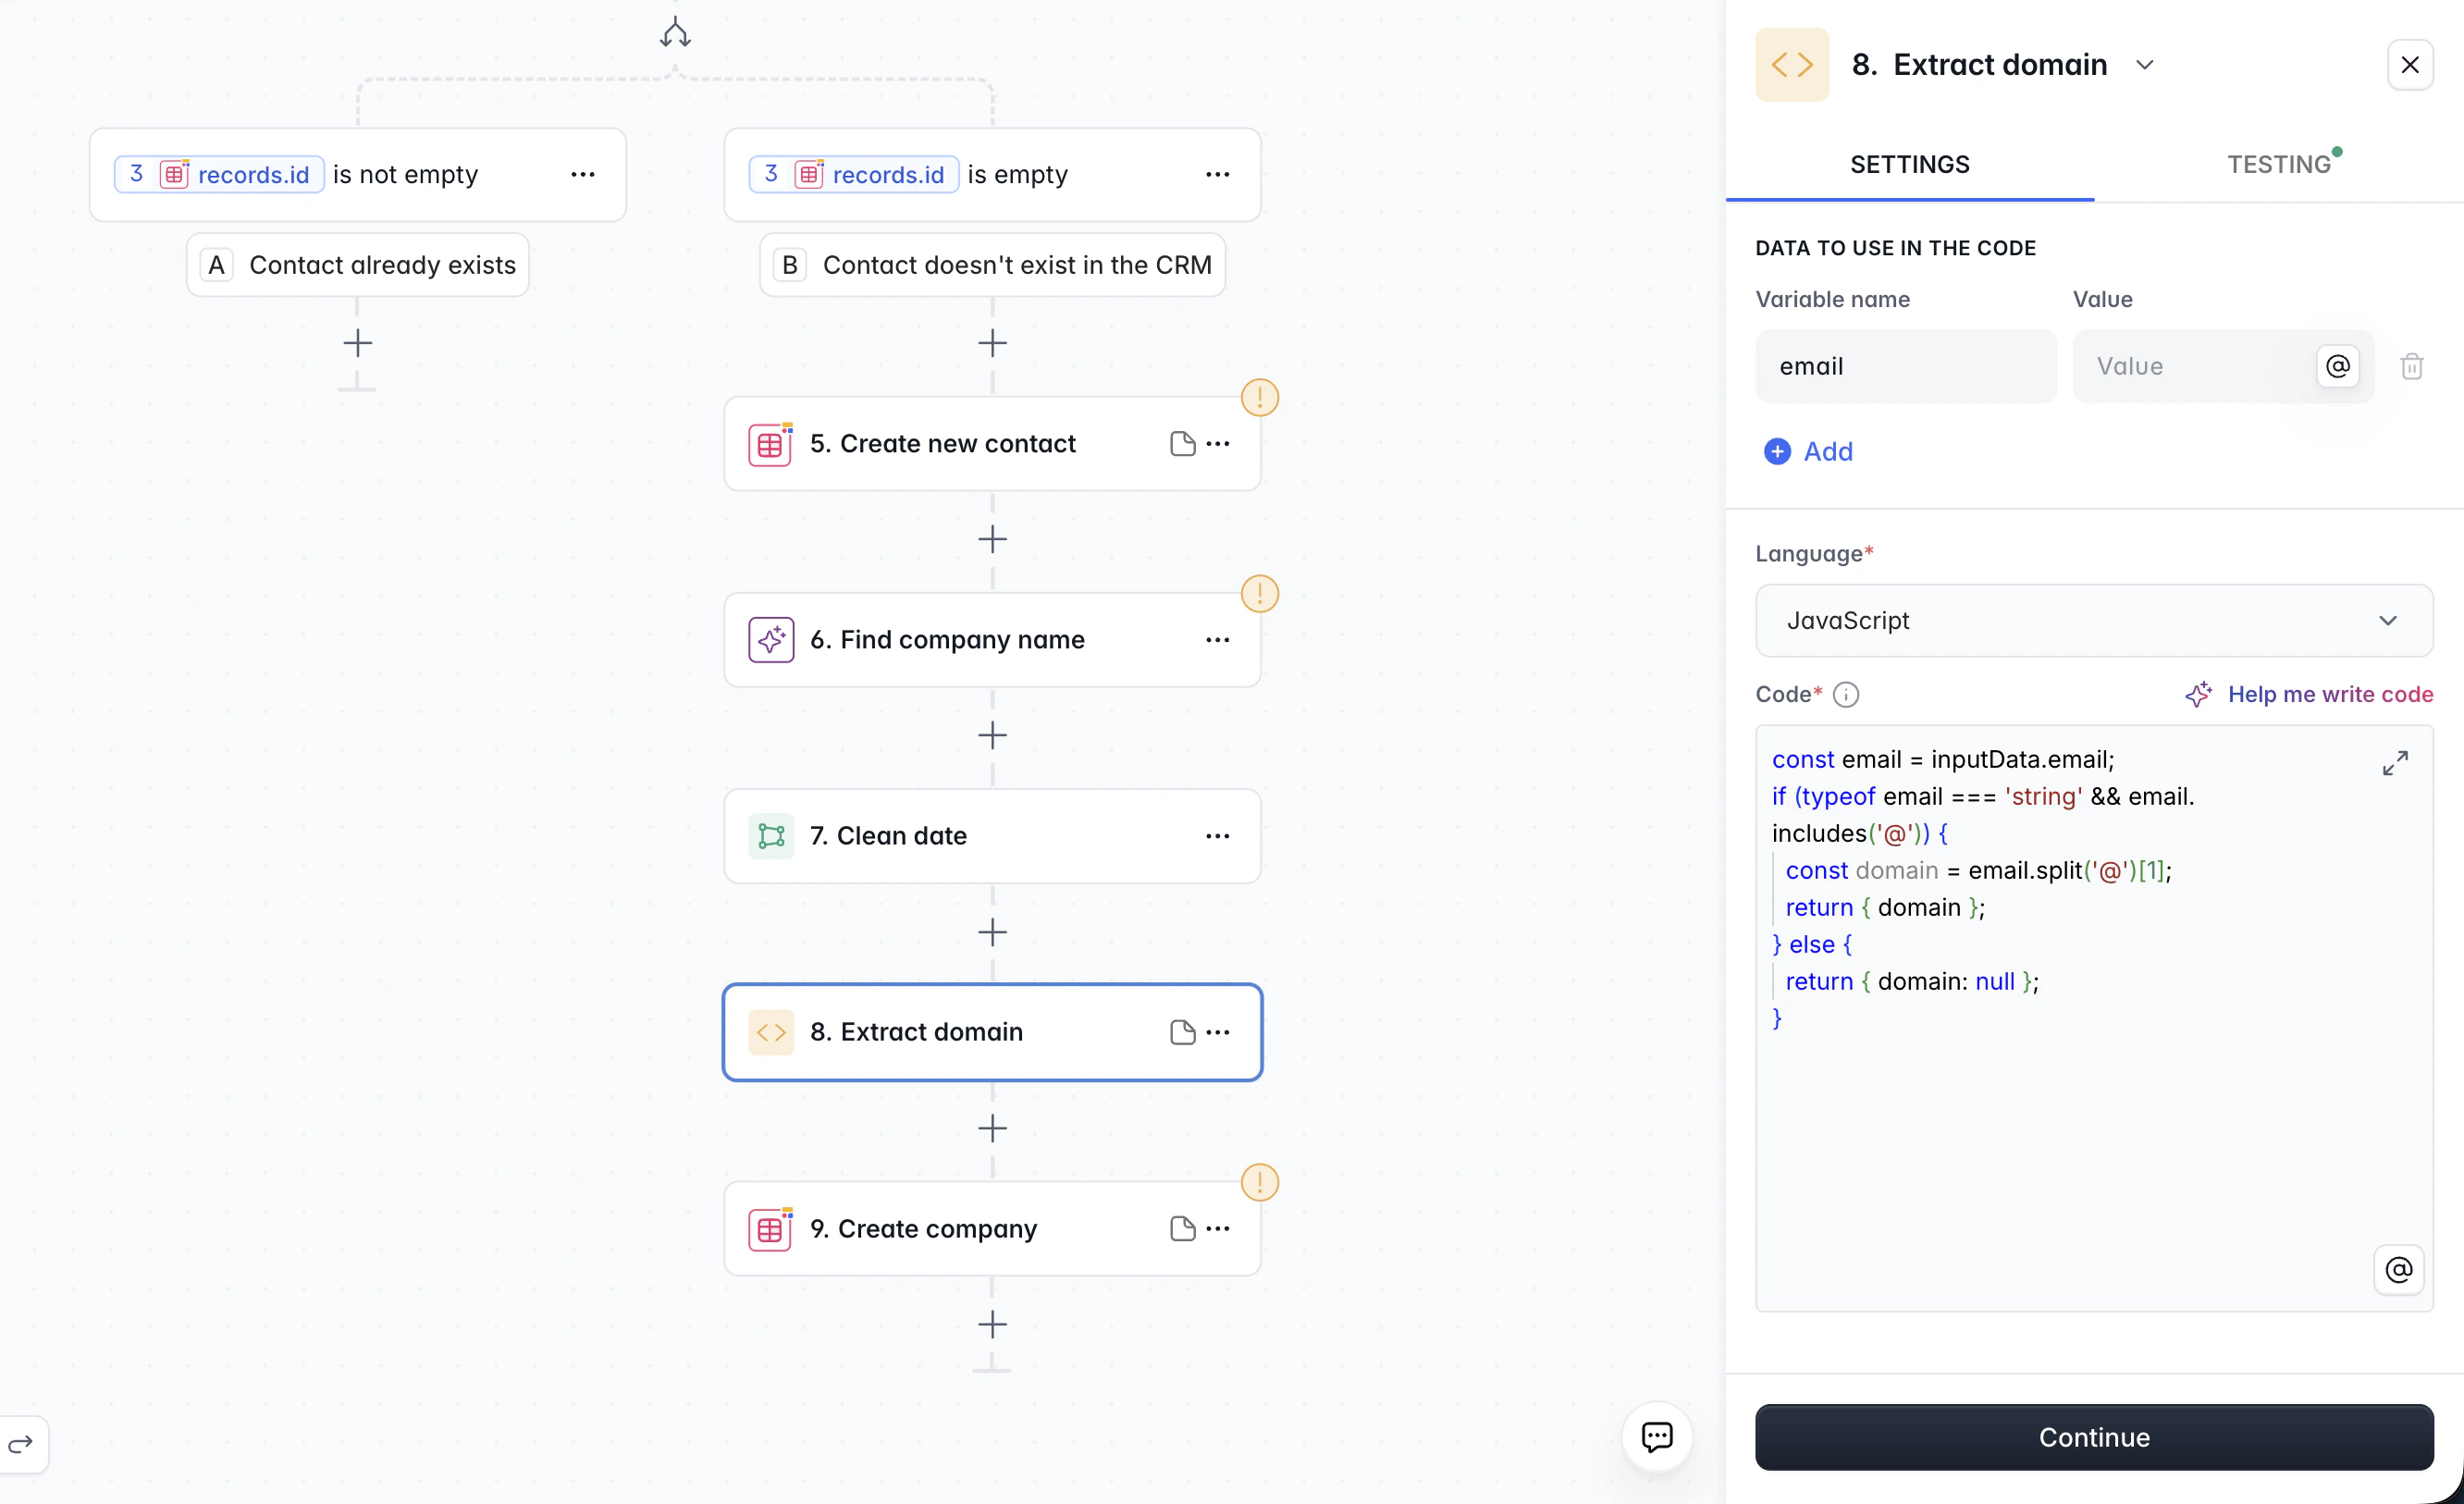 Run Custom Code is available on paid plans.
**Example:** A Call API step returns a complex JSON response with nested objects. Use Run Custom Code to extract just the fields you need (e.g., pull out `response.data.items[0].name`) and return them as clean variables for the next step.
***
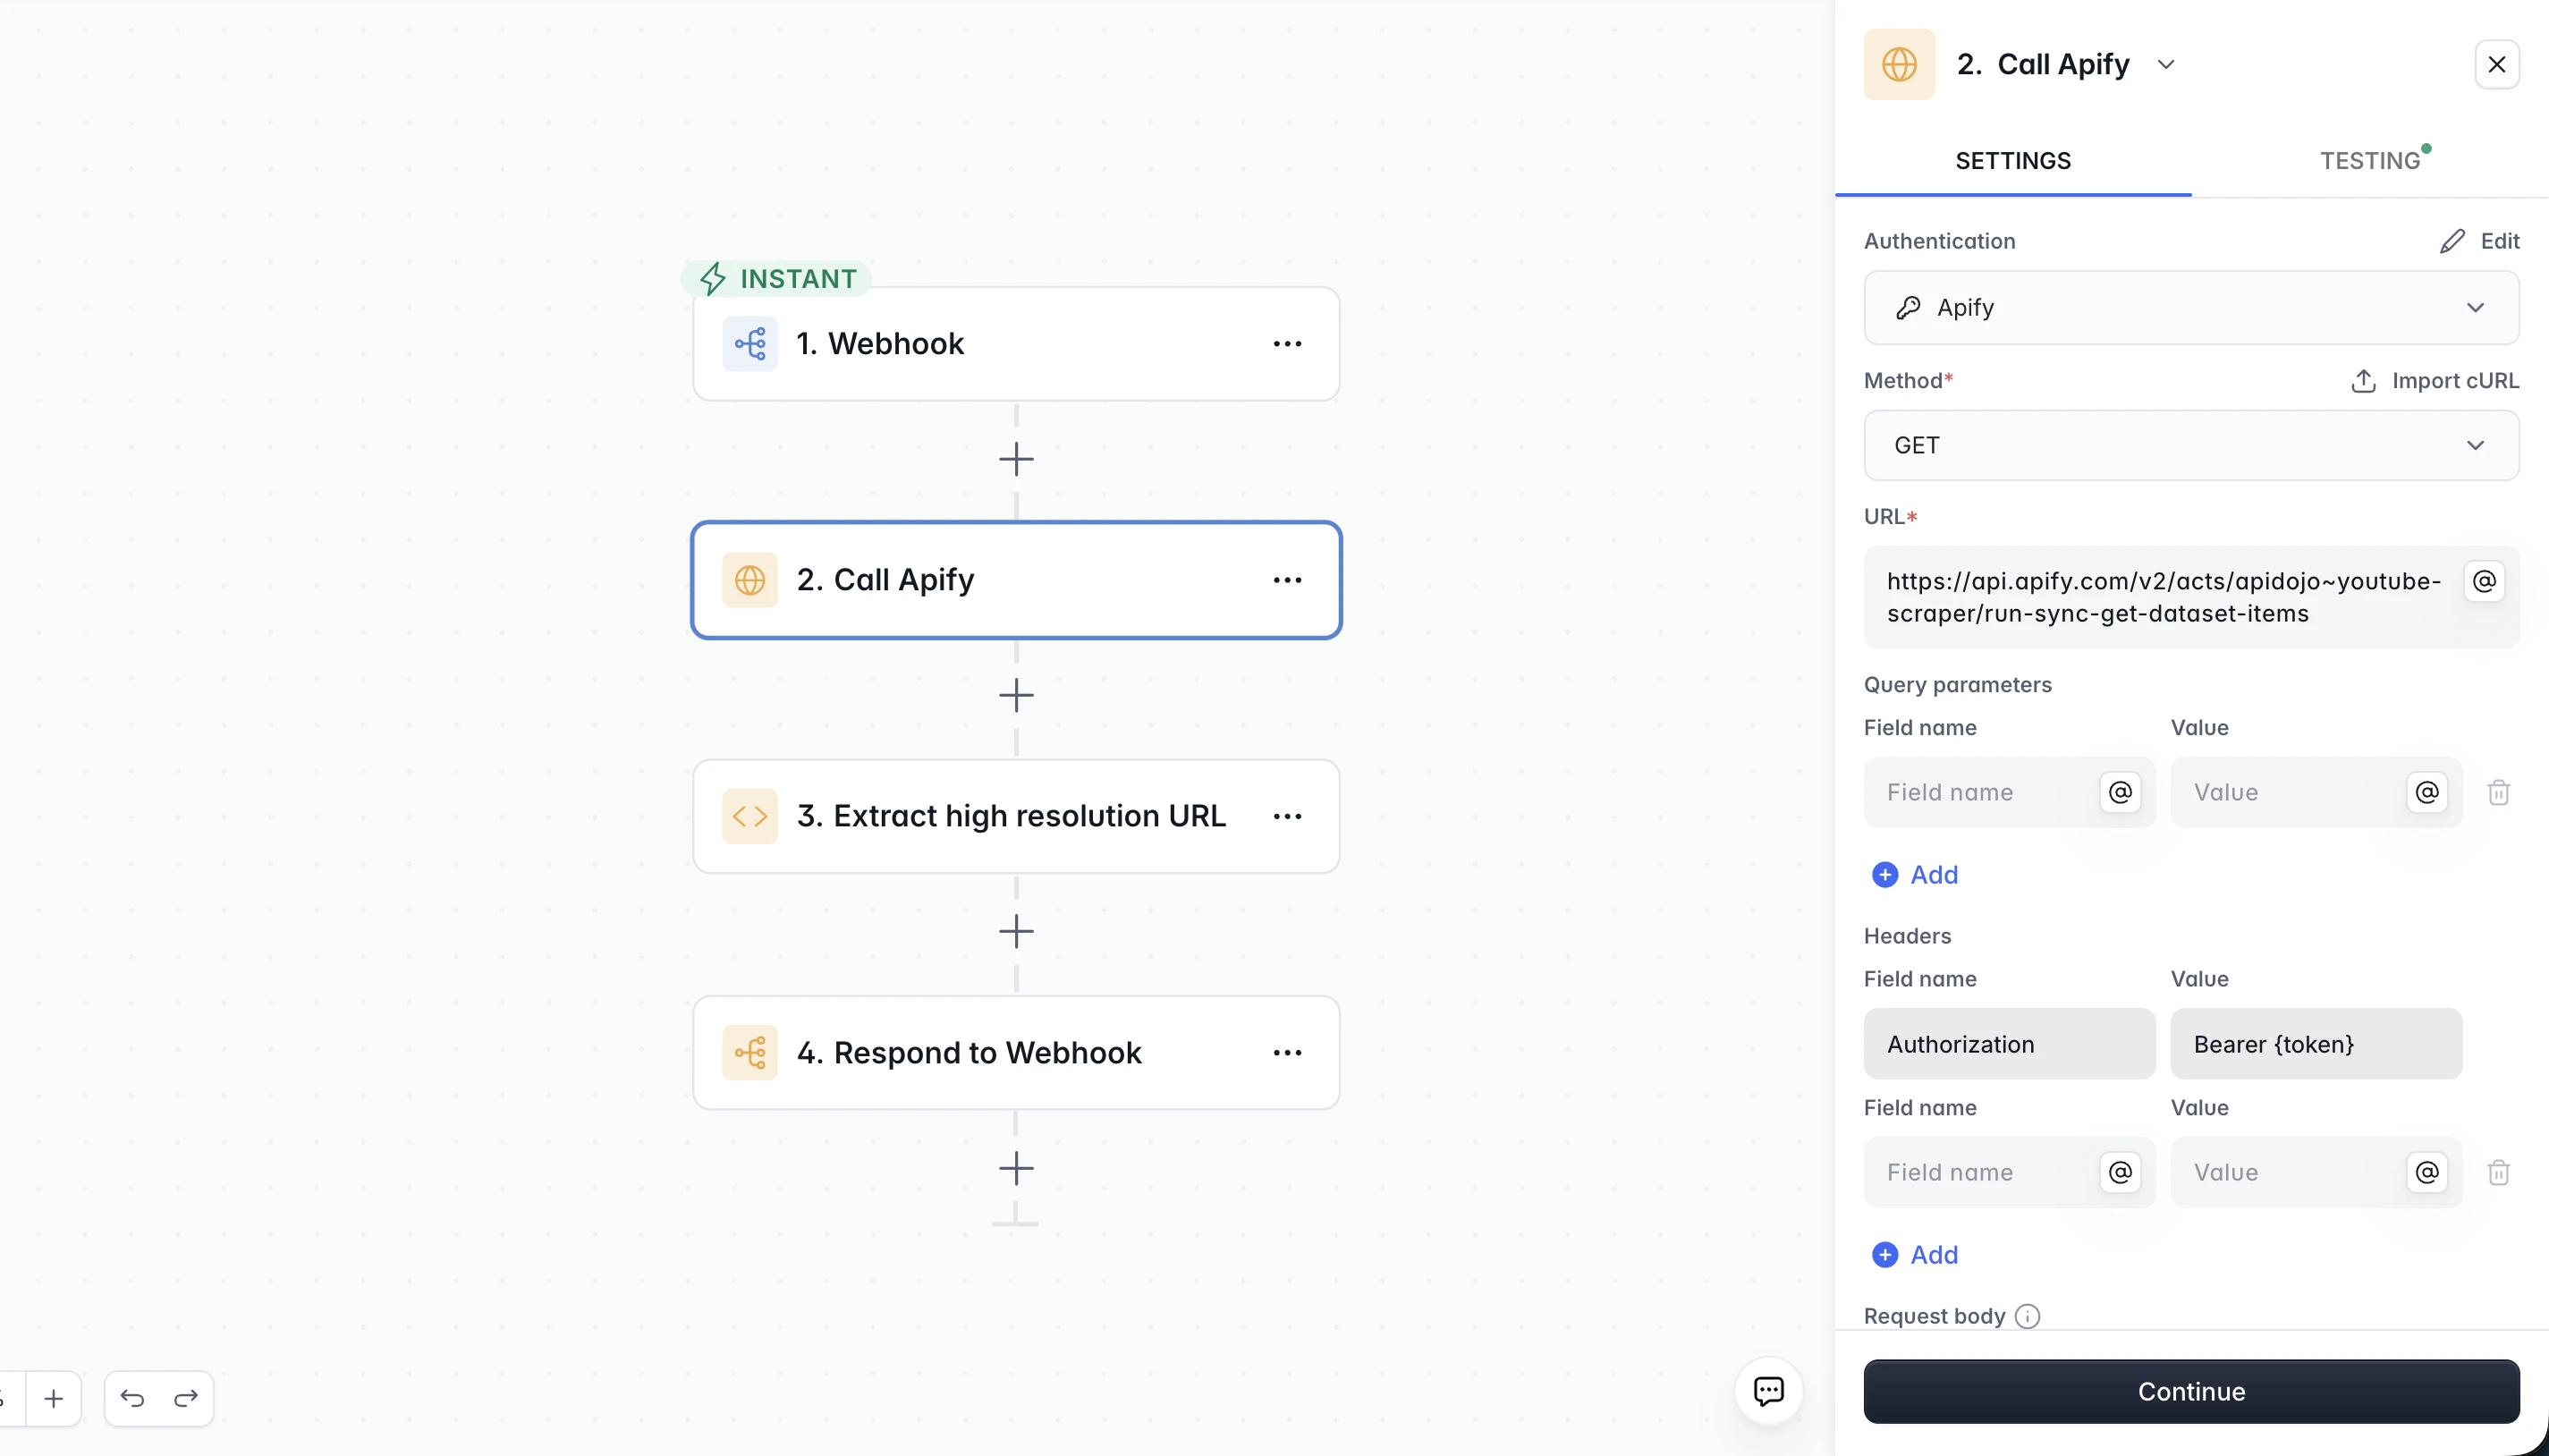
## Call API
The **Call API** action makes an outgoing HTTP request to any REST endpoint. Use it to push data to external services, fetch information from third-party APIs, or connect with any system that supports HTTP.
**Key settings:**
* **Method:** GET, POST, PUT, PATCH, or DELETE
* **URL:** The endpoint you're calling
* **Headers:** Authentication tokens, content type, and other metadata
* **Query parameters:** Key-value pairs appended to the URL
* **Request body:** The JSON payload to send (for POST, PUT, PATCH)
Run Custom Code is available on paid plans.
**Example:** A Call API step returns a complex JSON response with nested objects. Use Run Custom Code to extract just the fields you need (e.g., pull out `response.data.items[0].name`) and return them as clean variables for the next step.
***
## Call API
The **Call API** action makes an outgoing HTTP request to any REST endpoint. Use it to push data to external services, fetch information from third-party APIs, or connect with any system that supports HTTP.
**Key settings:**
* **Method:** GET, POST, PUT, PATCH, or DELETE
* **URL:** The endpoint you're calling
* **Headers:** Authentication tokens, content type, and other metadata
* **Query parameters:** Key-value pairs appended to the URL
* **Request body:** The JSON payload to send (for POST, PUT, PATCH)
 The response body is available as a variable in subsequent steps - you can reference individual fields from the JSON response, or use Run Custom Code to parse a complex response.
**Common HTTP status codes:**
| Code | Meaning | What to check |
| ---- | ------------ | -------------------------------------------------------------- |
| 200 | Success | Request worked as expected |
| 400 | Bad Request | Check your request body or parameters - something is malformed |
| 401 | Unauthorized | Check your API key or authentication headers |
| 404 | Not Found | Check the URL - the endpoint or resource doesn't exist |
**Call API vs. Webhook trigger:** Call API makes *outgoing* requests to external services. The Webhook trigger does the opposite - it *listens* for incoming requests from external services. One is an action, the other is a trigger.
Call API is available on the Professional plan and above.
**Example:** When a form is submitted, use Call API to POST the submitter's name and email to your CRM's API. Map the form fields into the JSON body, set the `Authorization` header with your API key, and the CRM creates a new contact automatically.
***
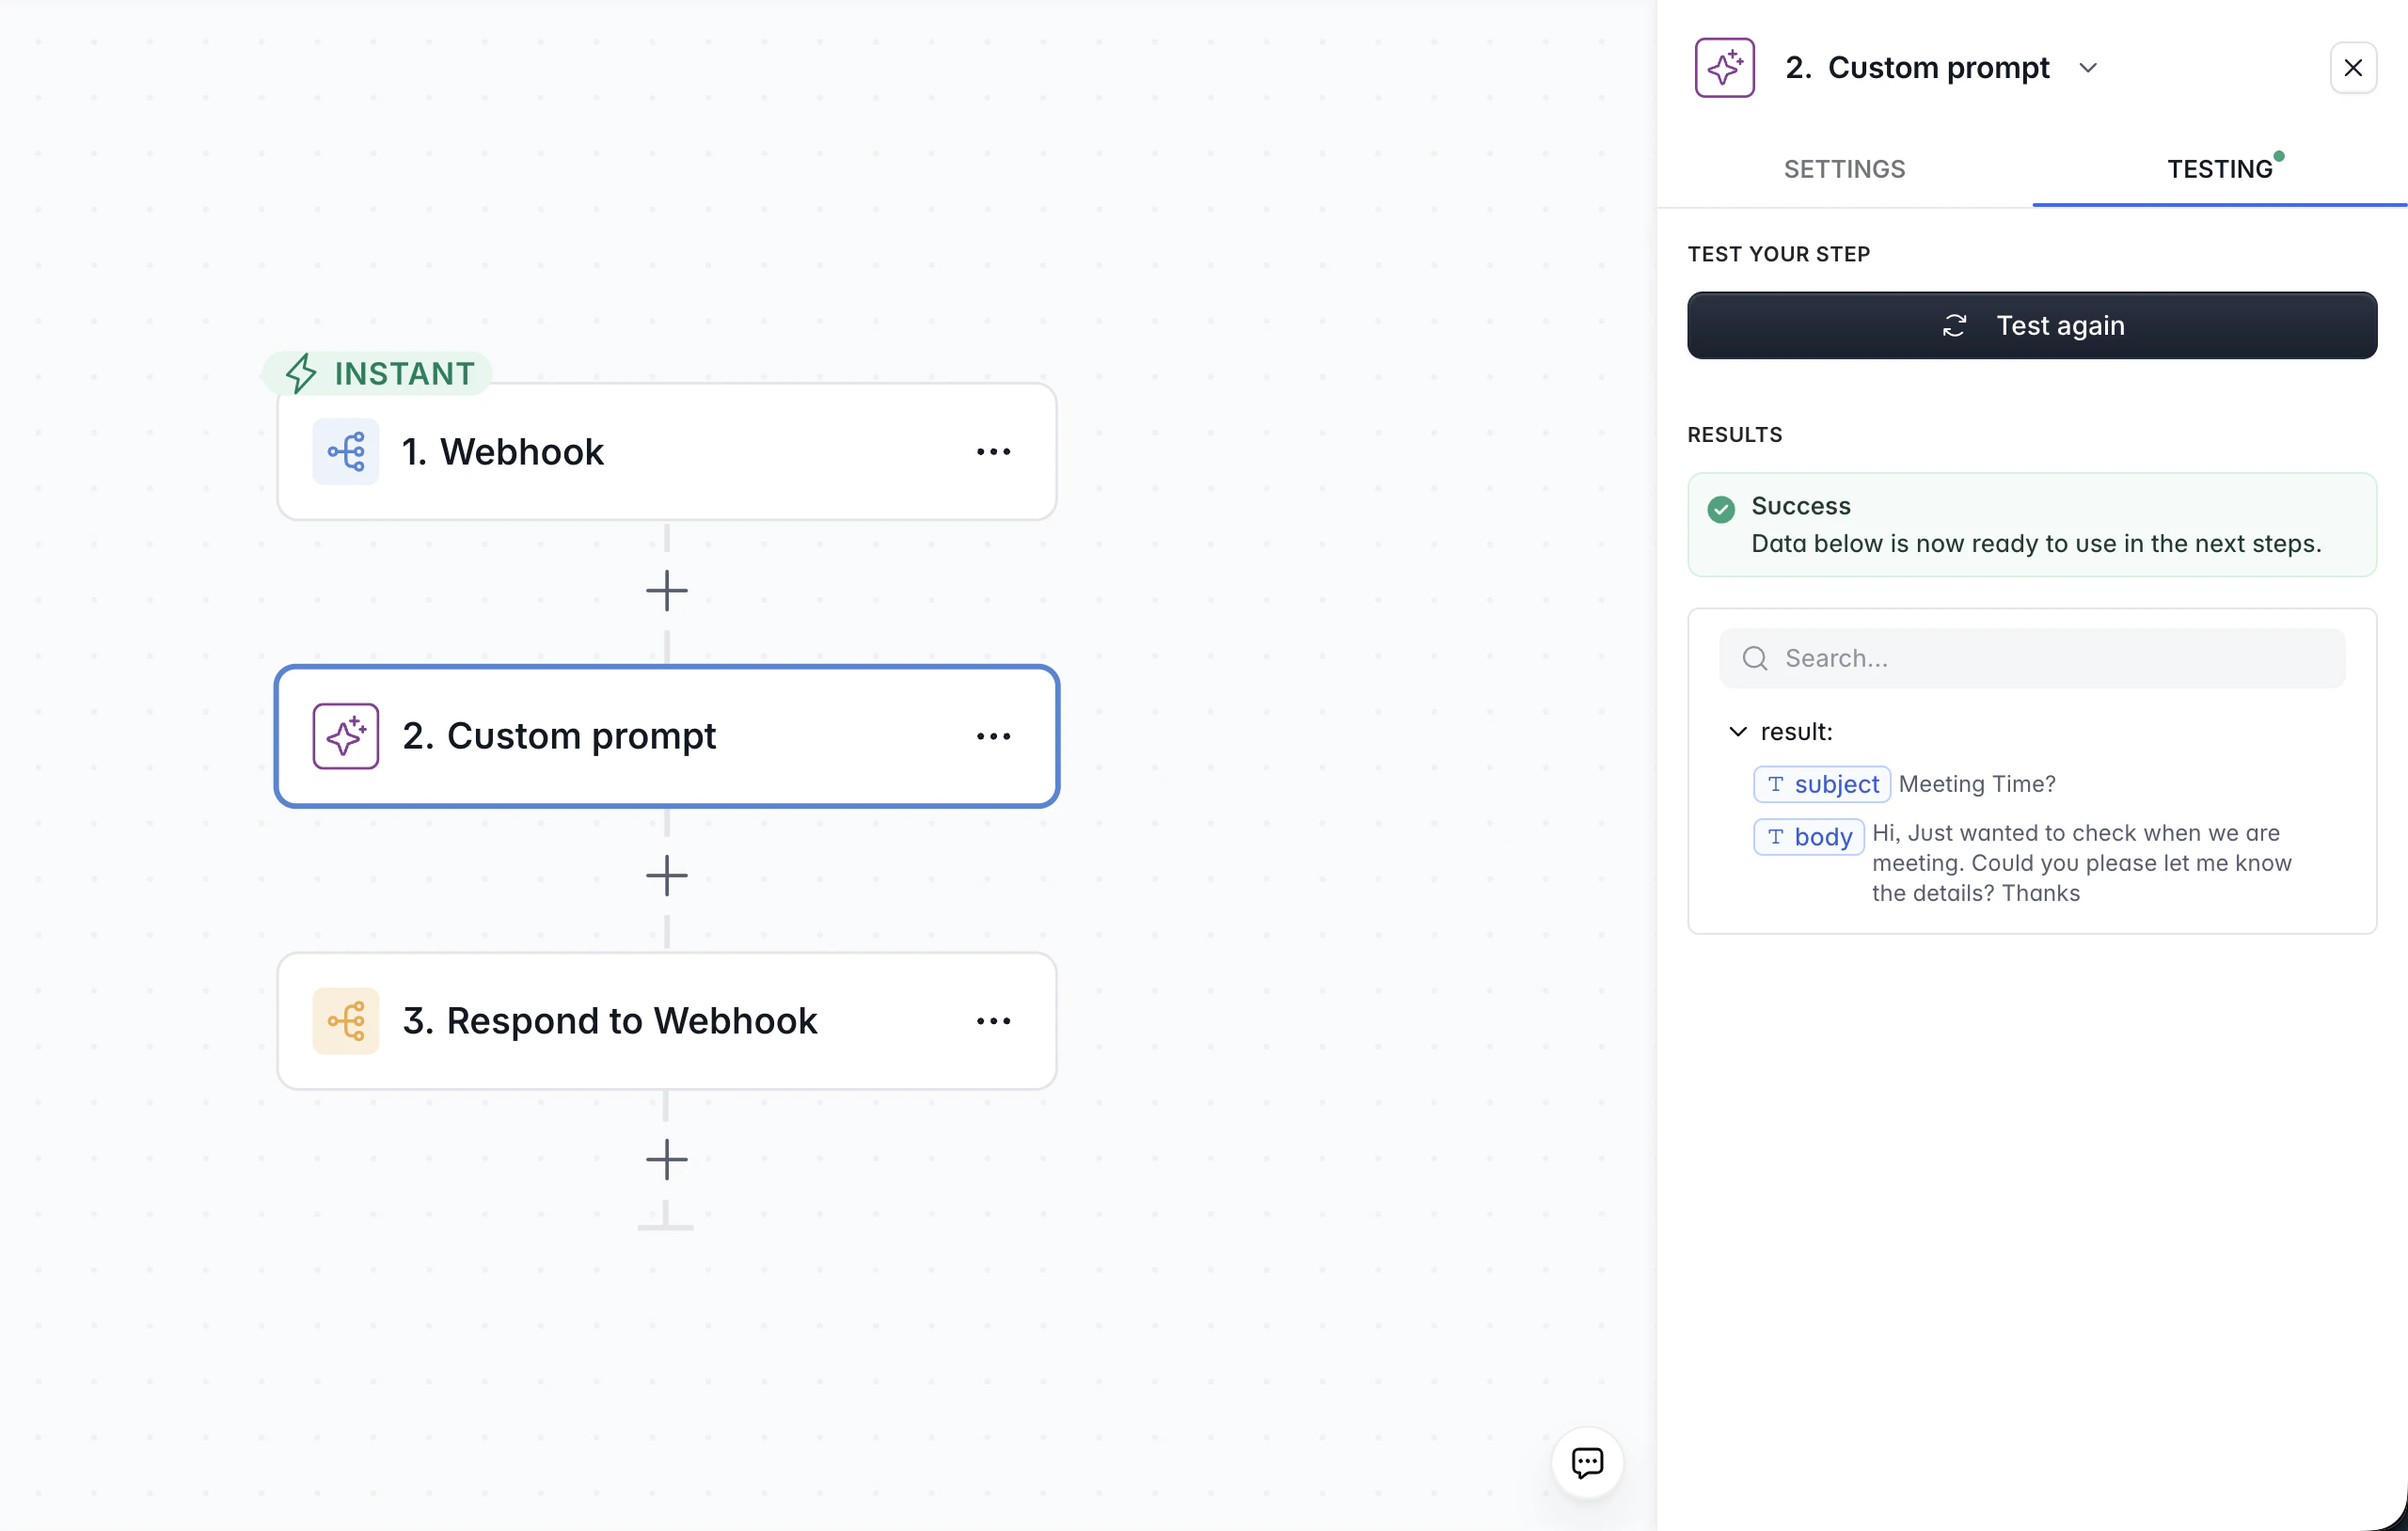
## Structured Output from AI Actions
By default, AI actions return **freeform text** - useful for generating content, but difficult to use in Branch conditions or record updates because the format can vary.
Enable **Structured output** to get back a **JSON object with typed fields** instead. This makes the AI's response predictable and machine-readable, so you can reliably branch on it, store individual fields, or pass specific values to later steps.
**How to enable it:**
1. In any Custom Prompt AI action (Softr AI or bring-your-own-key), toggle **Structured output** on.
2. Provide a **JSON schema** that describes the fields and types you expect.
The response body is available as a variable in subsequent steps - you can reference individual fields from the JSON response, or use Run Custom Code to parse a complex response.
**Common HTTP status codes:**
| Code | Meaning | What to check |
| ---- | ------------ | -------------------------------------------------------------- |
| 200 | Success | Request worked as expected |
| 400 | Bad Request | Check your request body or parameters - something is malformed |
| 401 | Unauthorized | Check your API key or authentication headers |
| 404 | Not Found | Check the URL - the endpoint or resource doesn't exist |
**Call API vs. Webhook trigger:** Call API makes *outgoing* requests to external services. The Webhook trigger does the opposite - it *listens* for incoming requests from external services. One is an action, the other is a trigger.
Call API is available on the Professional plan and above.
**Example:** When a form is submitted, use Call API to POST the submitter's name and email to your CRM's API. Map the form fields into the JSON body, set the `Authorization` header with your API key, and the CRM creates a new contact automatically.
***
## Structured Output from AI Actions
By default, AI actions return **freeform text** - useful for generating content, but difficult to use in Branch conditions or record updates because the format can vary.
Enable **Structured output** to get back a **JSON object with typed fields** instead. This makes the AI's response predictable and machine-readable, so you can reliably branch on it, store individual fields, or pass specific values to later steps.
**How to enable it:**
1. In any Custom Prompt AI action (Softr AI or bring-your-own-key), toggle **Structured output** on.
2. Provide a **JSON schema** that describes the fields and types you expect.
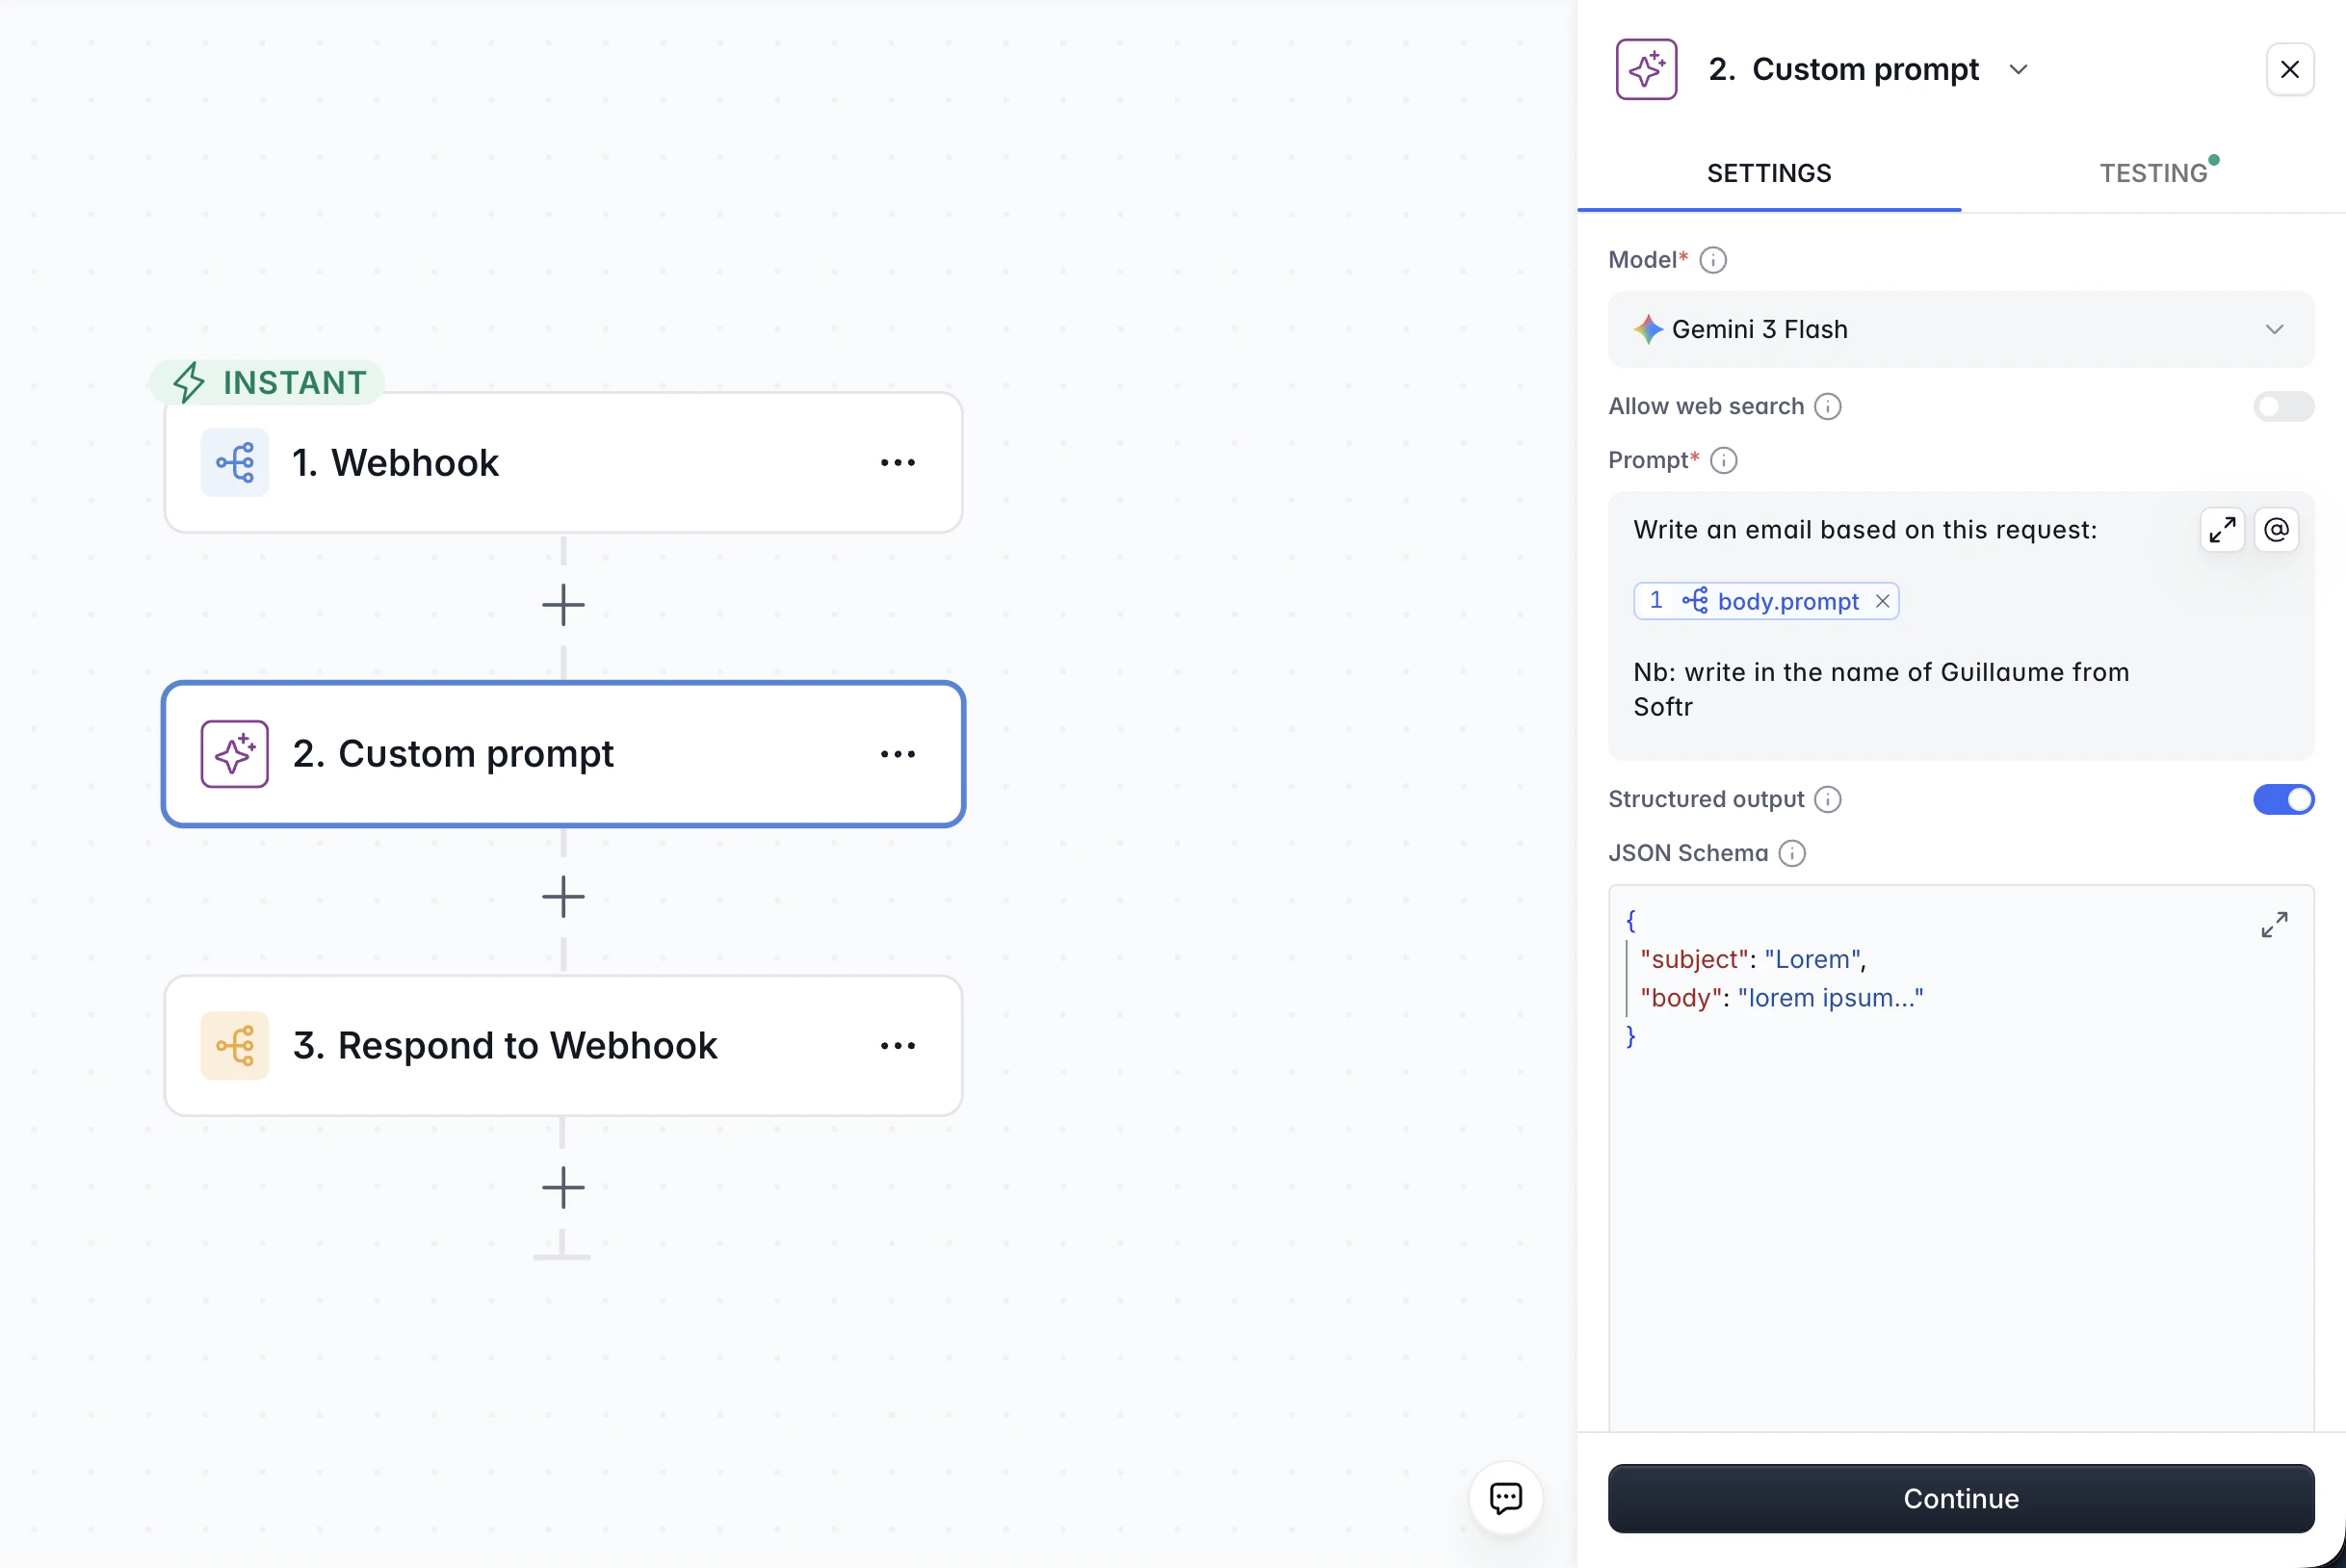
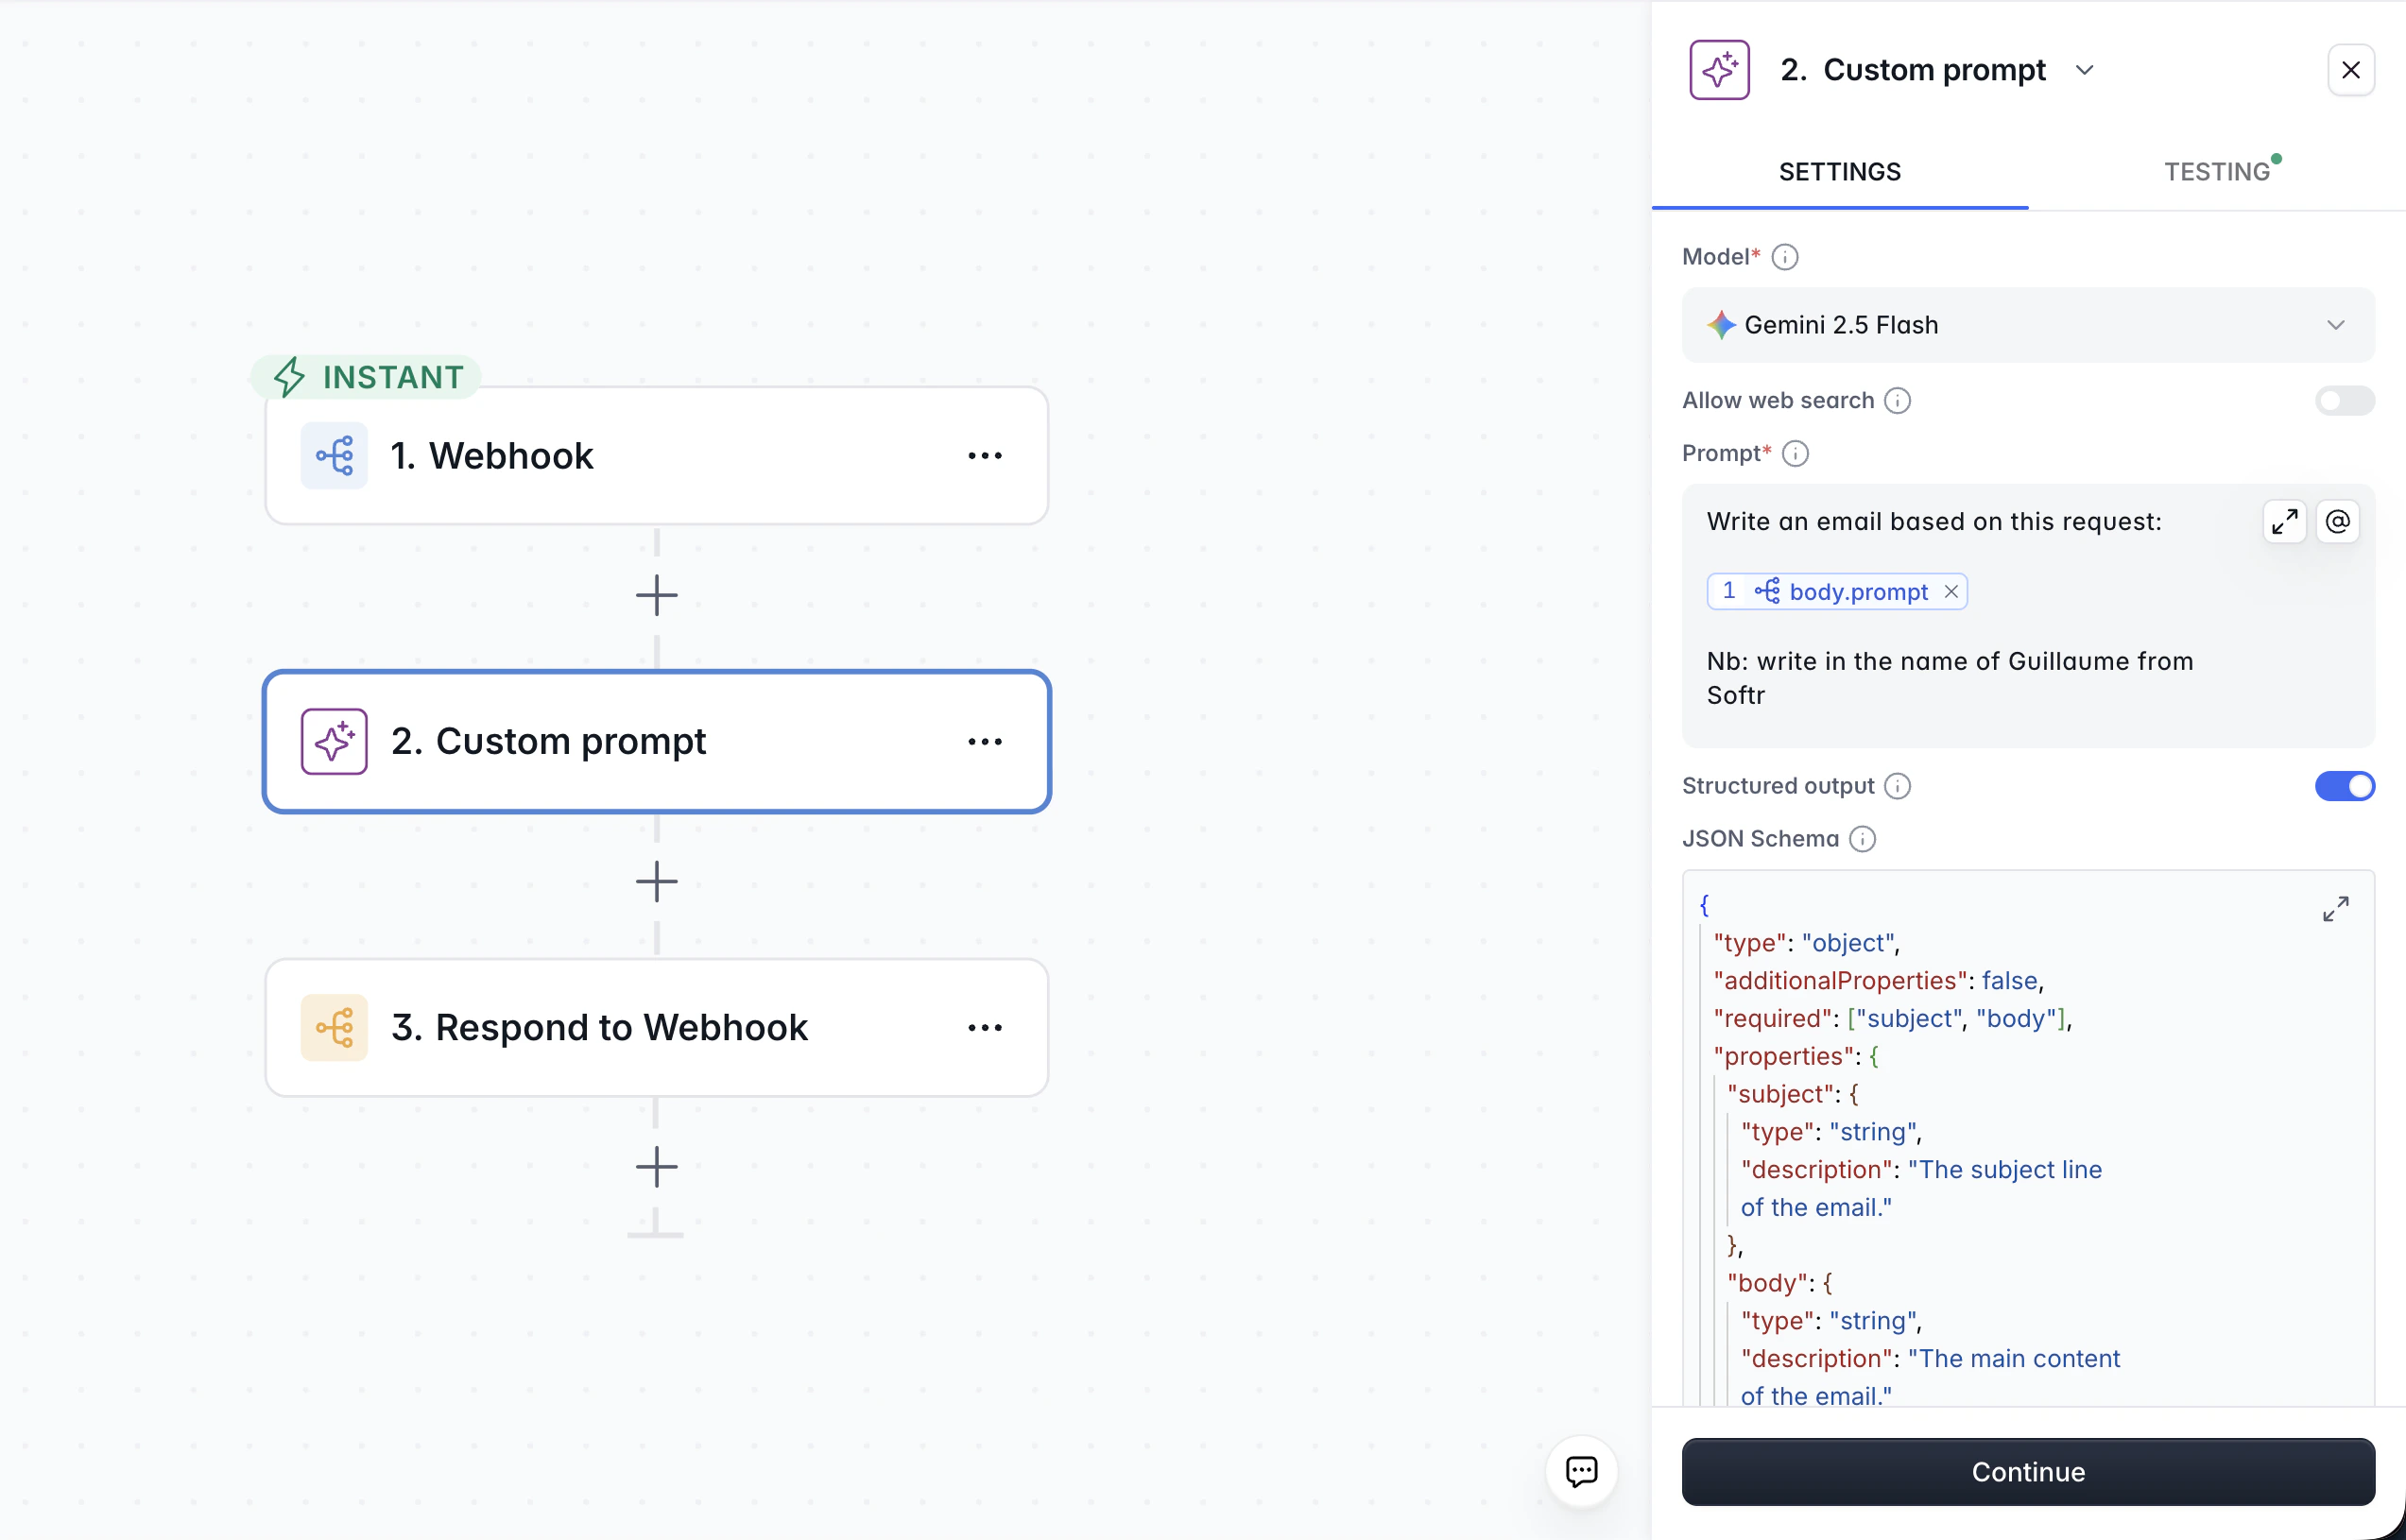 **Example schema** for categorizing customer feedback with a confidence score:
```json theme={null}
{
"type": "object",
"properties": {
"category": {
"type": "string",
"enum": ["bug", "feature_request", "billing"]
},
"confidence": {
"type": "integer",
"description": "Confidence score from 0 to 100"
}
},
"required": ["category", "confidence"]
}
```
With this schema, the AI will always return exactly two fields - `category` and `confidence` - that you can reference in subsequent steps. No risk of the model returning unexpected text or varying its format between runs.
**Example schema** for categorizing customer feedback with a confidence score:
```json theme={null}
{
"type": "object",
"properties": {
"category": {
"type": "string",
"enum": ["bug", "feature_request", "billing"]
},
"confidence": {
"type": "integer",
"description": "Confidence score from 0 to 100"
}
},
"required": ["category", "confidence"]
}
```
With this schema, the AI will always return exactly two fields - `category` and `confidence` - that you can reference in subsequent steps. No risk of the model returning unexpected text or varying its format between runs.
 If you only need simple classification into predefined categories, the **Categorize** AI action handles this without a JSON schema. Use **Custom Prompt + Structured output** when you need richer outputs (e.g., a category *and* a confidence score, or multiple extracted fields).
***
## AI + Branch Patterns
Combining AI actions with Branches is one of the most common advanced patterns. The AI classifies or analyzes data, and the Branch routes the workflow based on the result.
### Basic AI routing
```
Trigger: New feedback record added
→ AI Categorize (categories: Bug, Feature Request)
→ Branch: Is category "Bug"?
├── Yes → Post to #bugs Slack channel + Update record category
└── No → Post to #feature-requests channel + Update record category
```
The AI Categorize action outputs a `category` value. The Branch checks that value and sends the workflow down the appropriate path. Each path can notify a different team and update the original record with the assigned category.
### Confidence-gated routing
When you need more control, use a **Custom Prompt with Structured output** that returns both a category and a confidence score. Then branch on the confidence level:
```
Trigger: New support ticket
→ Custom Prompt AI (structured output: category + confidence)
→ Branch: Is confidence ≥ 70?
├── Yes → Auto-assign to team + Update record
└── No → Send interactive Slack message to reviewer
→ Branch on reviewer's response
├── Approve AI suggestion → Update record
└── Override → Update record with reviewer's category
```
This pattern lets AI handle the clear-cut cases automatically while routing ambiguous ones to a human. See [Human-in-the-Loop](#human-in-the-loop) below for more on the interactive review step.
***
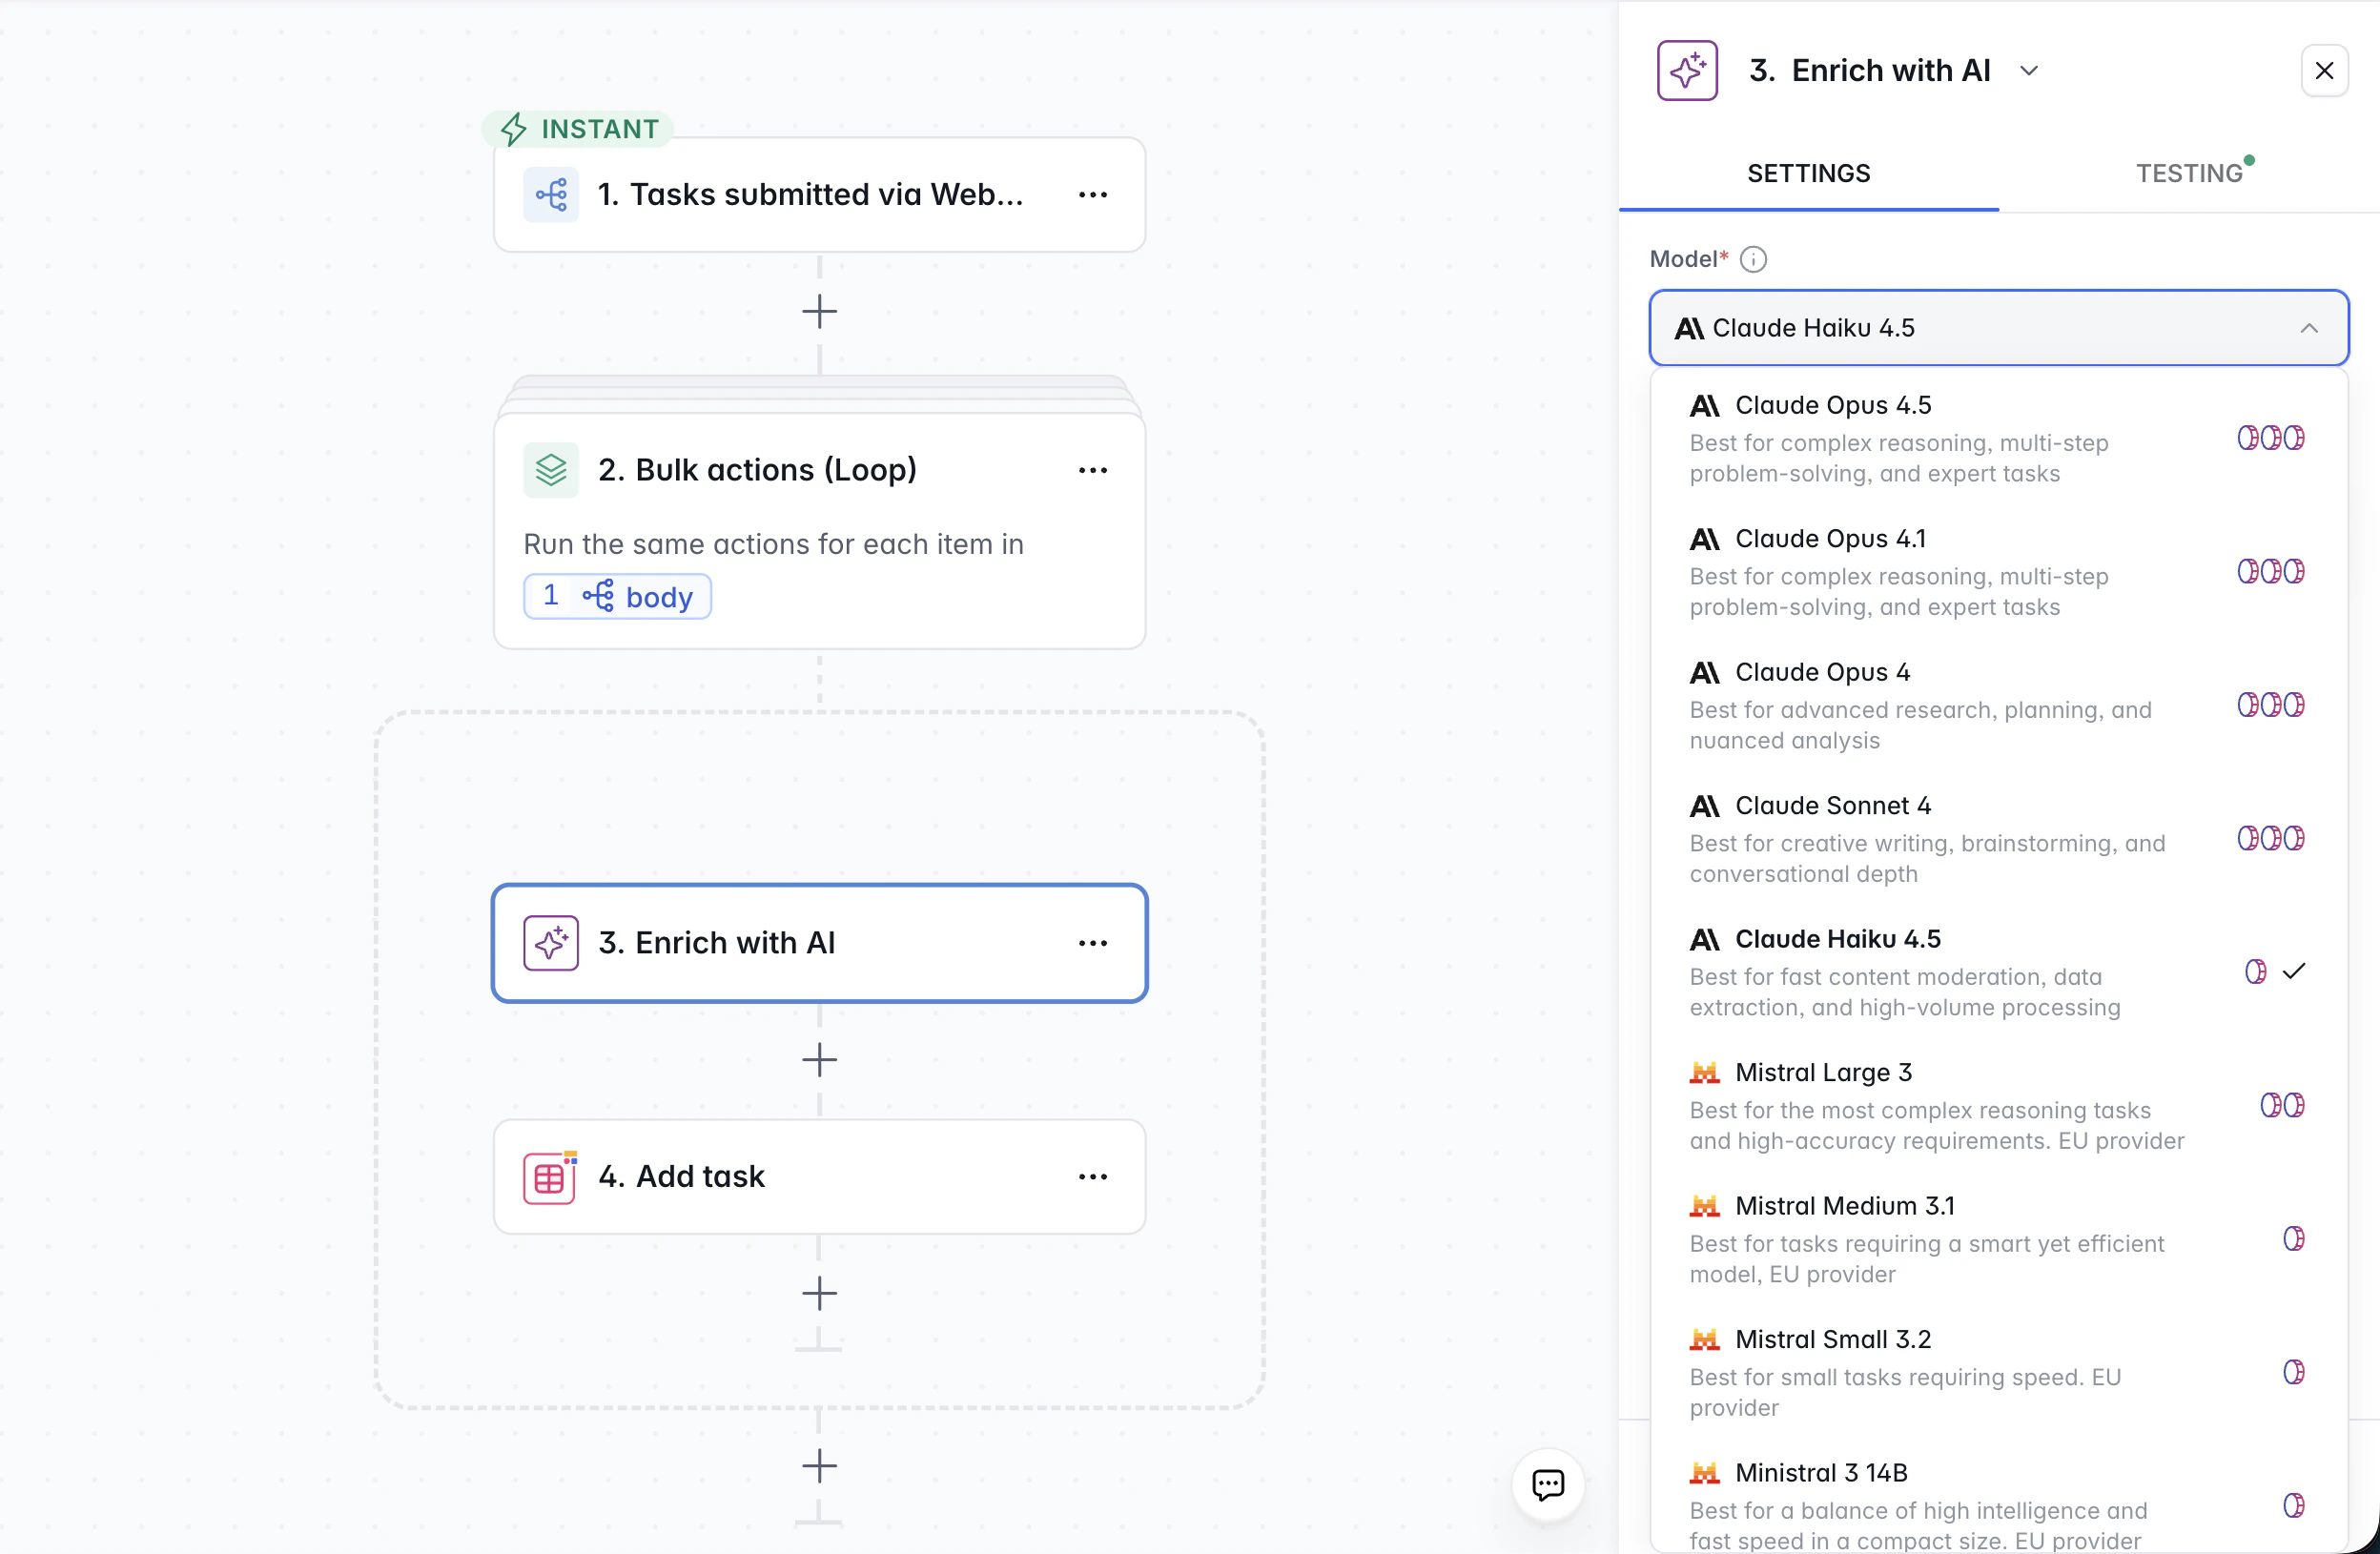
## Choosing an AI Model
Softr workflows give you access to models from OpenAI, Anthropic, Google, Mistral, and DeepSeek. The right model depends on the complexity of the task - using the most powerful model for every step wastes credits and slows down your workflow.
| Task type | Recommended tier | Examples |
| ----------------------------------------------------------- | ---------------------- | -------------------------------------- |
| **Classification and routing** | Smaller, faster models | Claude Haiku, GPT-4.1 mini, GPT-5 nano |
| **Writing, summarization, data extraction** | Mid-tier models | Claude Sonnet, GPT-4.1, GPT-5 mini |
| **Complex reasoning, code generation, multi-step analysis** | Top-tier models | Claude Opus, GPT-5, o3 |
Start with the smallest model that could handle the task. Run a few tests and compare outputs. Only move to a more capable (and more expensive) model if quality is insufficient.
If you only need simple classification into predefined categories, the **Categorize** AI action handles this without a JSON schema. Use **Custom Prompt + Structured output** when you need richer outputs (e.g., a category *and* a confidence score, or multiple extracted fields).
***
## AI + Branch Patterns
Combining AI actions with Branches is one of the most common advanced patterns. The AI classifies or analyzes data, and the Branch routes the workflow based on the result.
### Basic AI routing
```
Trigger: New feedback record added
→ AI Categorize (categories: Bug, Feature Request)
→ Branch: Is category "Bug"?
├── Yes → Post to #bugs Slack channel + Update record category
└── No → Post to #feature-requests channel + Update record category
```
The AI Categorize action outputs a `category` value. The Branch checks that value and sends the workflow down the appropriate path. Each path can notify a different team and update the original record with the assigned category.
### Confidence-gated routing
When you need more control, use a **Custom Prompt with Structured output** that returns both a category and a confidence score. Then branch on the confidence level:
```
Trigger: New support ticket
→ Custom Prompt AI (structured output: category + confidence)
→ Branch: Is confidence ≥ 70?
├── Yes → Auto-assign to team + Update record
└── No → Send interactive Slack message to reviewer
→ Branch on reviewer's response
├── Approve AI suggestion → Update record
└── Override → Update record with reviewer's category
```
This pattern lets AI handle the clear-cut cases automatically while routing ambiguous ones to a human. See [Human-in-the-Loop](#human-in-the-loop) below for more on the interactive review step.
***
## Choosing an AI Model
Softr workflows give you access to models from OpenAI, Anthropic, Google, Mistral, and DeepSeek. The right model depends on the complexity of the task - using the most powerful model for every step wastes credits and slows down your workflow.
| Task type | Recommended tier | Examples |
| ----------------------------------------------------------- | ---------------------- | -------------------------------------- |
| **Classification and routing** | Smaller, faster models | Claude Haiku, GPT-4.1 mini, GPT-5 nano |
| **Writing, summarization, data extraction** | Mid-tier models | Claude Sonnet, GPT-4.1, GPT-5 mini |
| **Complex reasoning, code generation, multi-step analysis** | Top-tier models | Claude Opus, GPT-5, o3 |
Start with the smallest model that could handle the task. Run a few tests and compare outputs. Only move to a more capable (and more expensive) model if quality is insufficient.
 With **Softr AI**, you select from these models and usage is deducted from your AI credits. On Business and Enterprise plans, you can also **bring your own API key** for OpenAI, Anthropic, Google Gemini, Mistral, or DeepSeek to use your own account directly.
***
## Human-in-the-Loop
Some workflows should pause for human judgment rather than proceeding fully automatically. **Interactive actions** pause the workflow, send a message with response options, and resume based on the person's decision.
### When to use it
* **High-stakes decisions:** expense approvals, content publishing, permission changes
* **AI confidence is low:** the AI categorized something but isn't sure (see [Confidence-gated routing](#confidence-gated-routing) above)
* **Compliance requirements:** a human must review before certain actions proceed
### Slack Interactive Messages
The **Slack - Send Interactive Channel Message** and **Slack - Send Interactive Direct Message** actions send a Slack message that includes buttons. The workflow pauses until the recipient clicks a button, then resumes on the corresponding branch.
**Example - Expense approval workflow:**
```
Trigger: New expense report submitted (form)
→ AI validates expense category (structured output)
→ Slack interactive DM to manager:
"New expense: $500 for Software - submitted by Jane"
[Approve] [Reject] [Request more info]
→ Branch on manager's response:
├── Approve → Update record status to "Approved" + Notify submitter
├── Reject → Update record status to "Rejected" + Notify submitter
└── Request more info → Send email to submitter asking for details
```
The workflow stays paused until the manager clicks one of the buttons. This means the total execution time can be minutes, hours, or even days - the workflow will pick up right where it left off.
Interactive messages pair well with AI actions just before them. For instance, the AI can pre-fill a suggested category or summary in the message body, so the reviewer has context without opening the app.
***
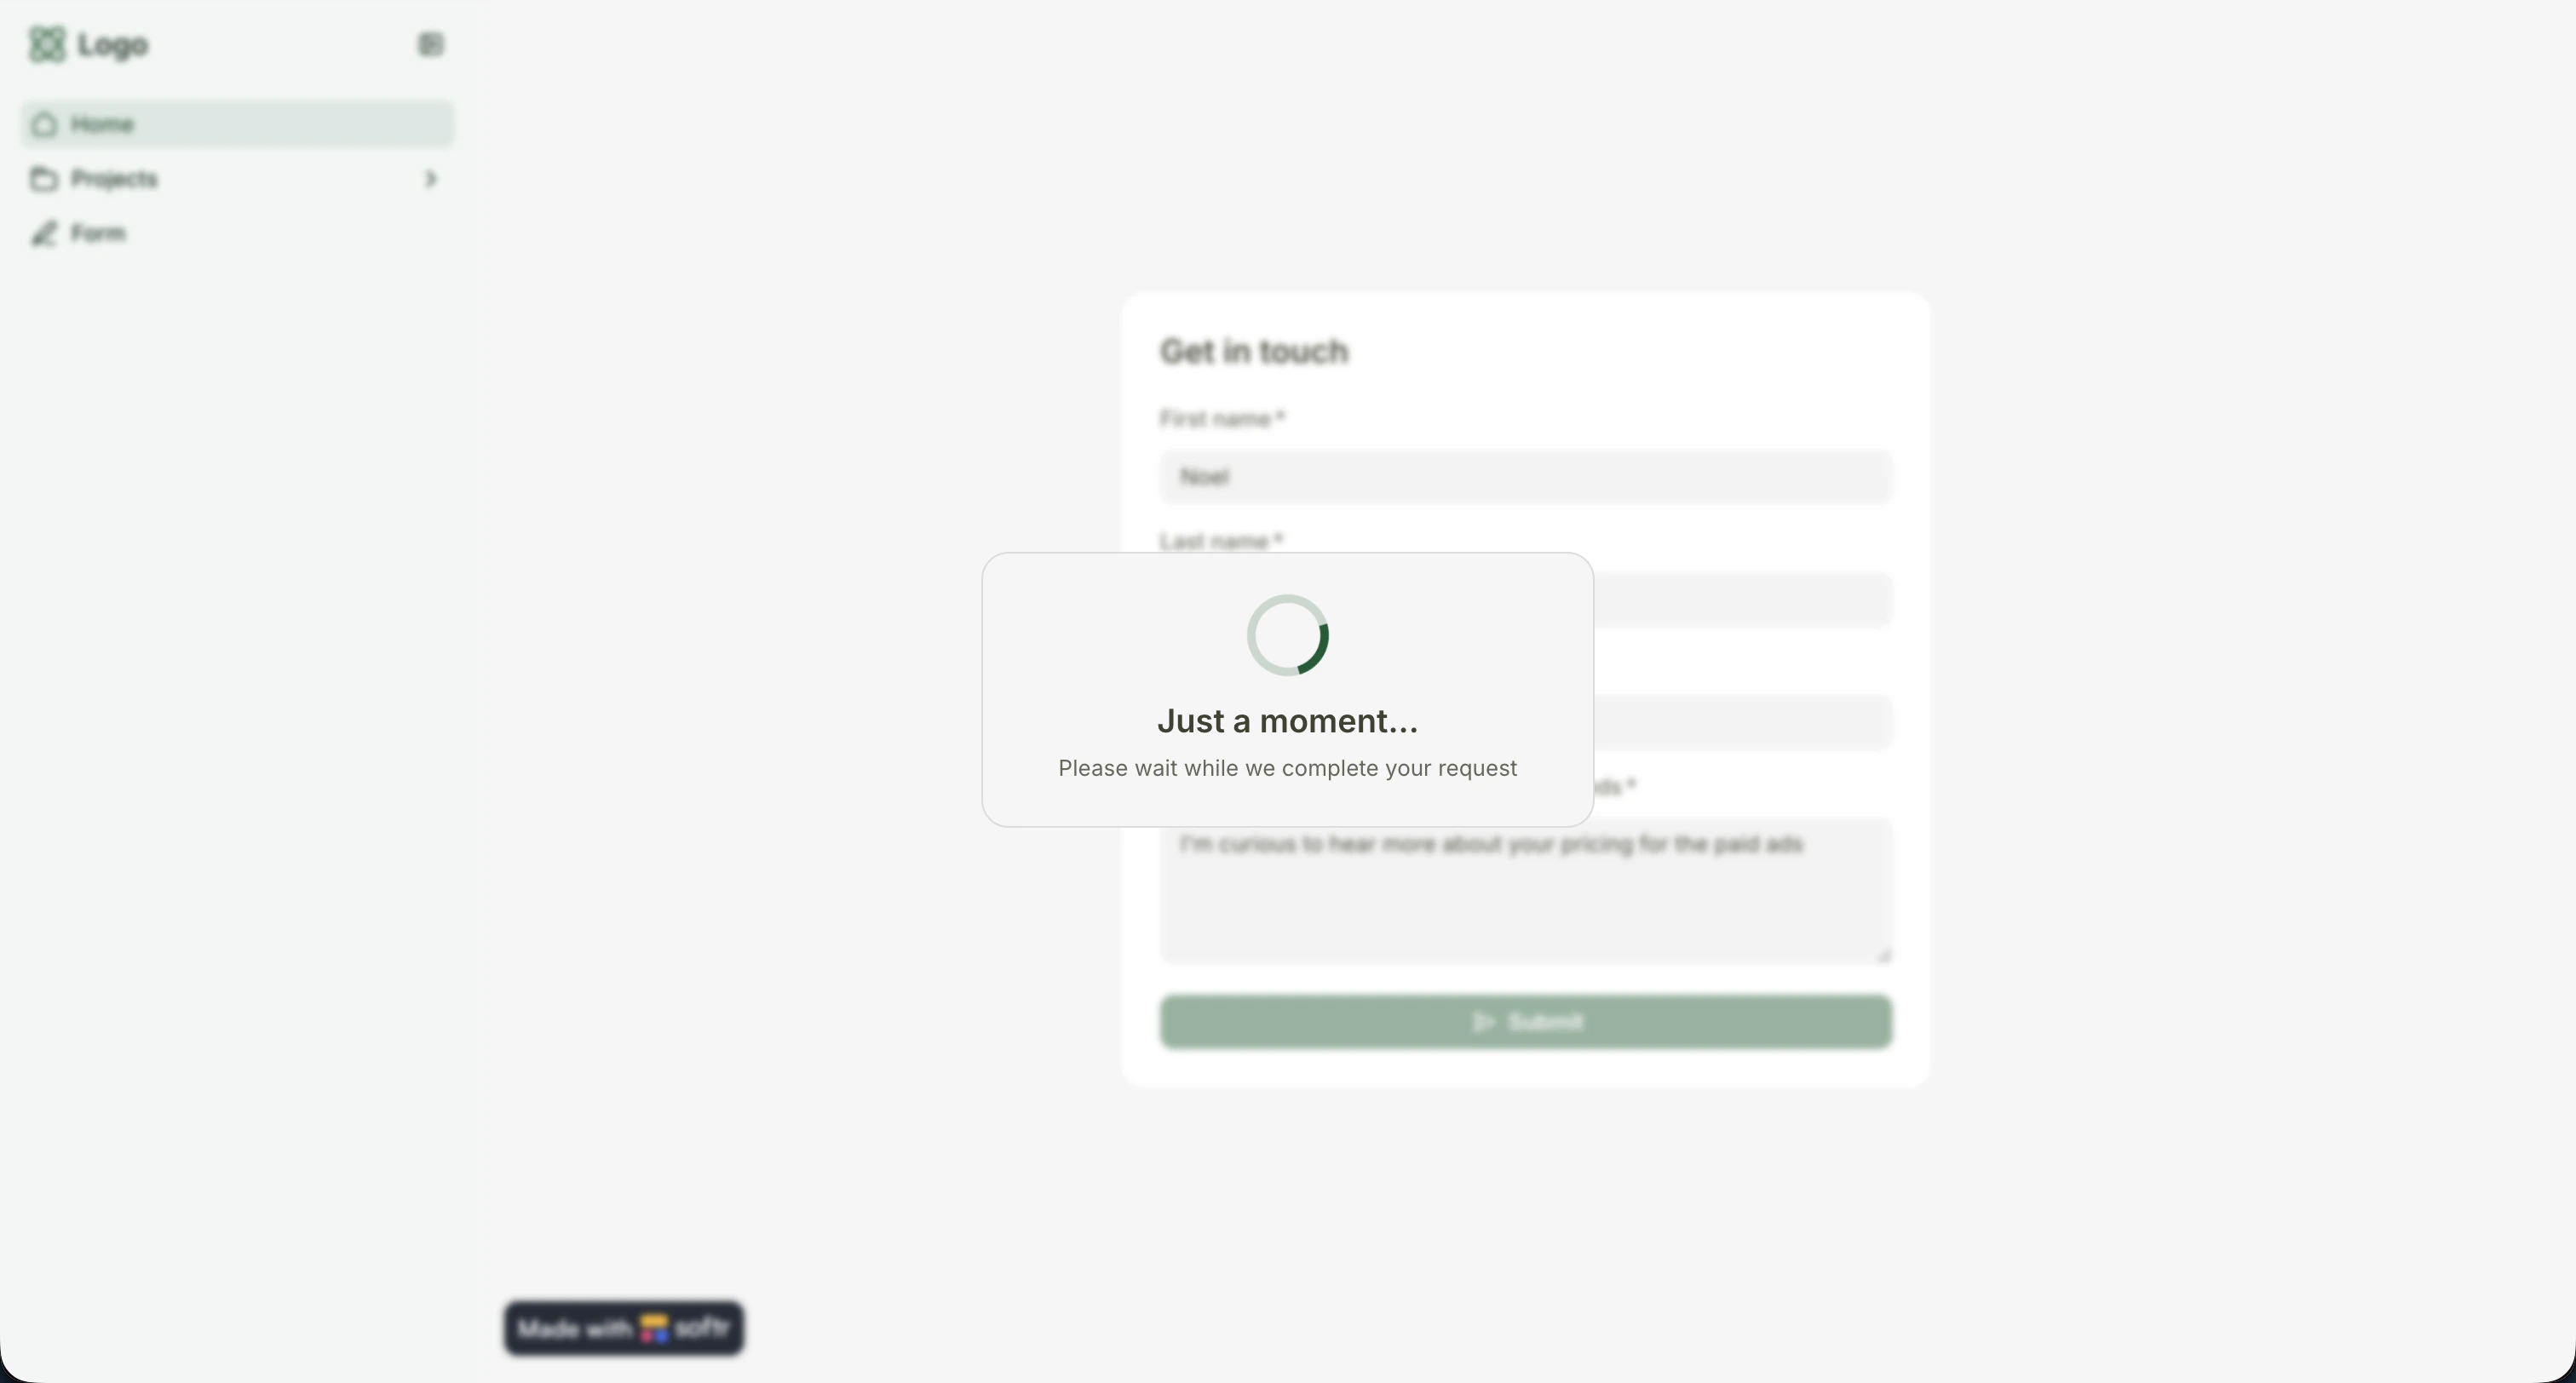
## App-Triggered Workflows and UI Feedback
When a workflow is triggered by a user action inside your Softr app (clicking a button or submitting a form), the user is **waiting for a response**. These workflows are synchronous from the user's perspective, so you can control what they see while the workflow runs and after it completes.
### Wait Screen
The **Show Wait Screen** action displays a loading overlay in the app while the workflow processes. Add a custom message so the user knows what's happening (e.g., "Processing your vote..." or "Generating your report...").
With **Softr AI**, you select from these models and usage is deducted from your AI credits. On Business and Enterprise plans, you can also **bring your own API key** for OpenAI, Anthropic, Google Gemini, Mistral, or DeepSeek to use your own account directly.
***
## Human-in-the-Loop
Some workflows should pause for human judgment rather than proceeding fully automatically. **Interactive actions** pause the workflow, send a message with response options, and resume based on the person's decision.
### When to use it
* **High-stakes decisions:** expense approvals, content publishing, permission changes
* **AI confidence is low:** the AI categorized something but isn't sure (see [Confidence-gated routing](#confidence-gated-routing) above)
* **Compliance requirements:** a human must review before certain actions proceed
### Slack Interactive Messages
The **Slack - Send Interactive Channel Message** and **Slack - Send Interactive Direct Message** actions send a Slack message that includes buttons. The workflow pauses until the recipient clicks a button, then resumes on the corresponding branch.
**Example - Expense approval workflow:**
```
Trigger: New expense report submitted (form)
→ AI validates expense category (structured output)
→ Slack interactive DM to manager:
"New expense: $500 for Software - submitted by Jane"
[Approve] [Reject] [Request more info]
→ Branch on manager's response:
├── Approve → Update record status to "Approved" + Notify submitter
├── Reject → Update record status to "Rejected" + Notify submitter
└── Request more info → Send email to submitter asking for details
```
The workflow stays paused until the manager clicks one of the buttons. This means the total execution time can be minutes, hours, or even days - the workflow will pick up right where it left off.
Interactive messages pair well with AI actions just before them. For instance, the AI can pre-fill a suggested category or summary in the message body, so the reviewer has context without opening the app.
***
## App-Triggered Workflows and UI Feedback
When a workflow is triggered by a user action inside your Softr app (clicking a button or submitting a form), the user is **waiting for a response**. These workflows are synchronous from the user's perspective, so you can control what they see while the workflow runs and after it completes.
### Wait Screen
The **Show Wait Screen** action displays a loading overlay in the app while the workflow processes. Add a custom message so the user knows what's happening (e.g., "Processing your vote..." or "Generating your report...").
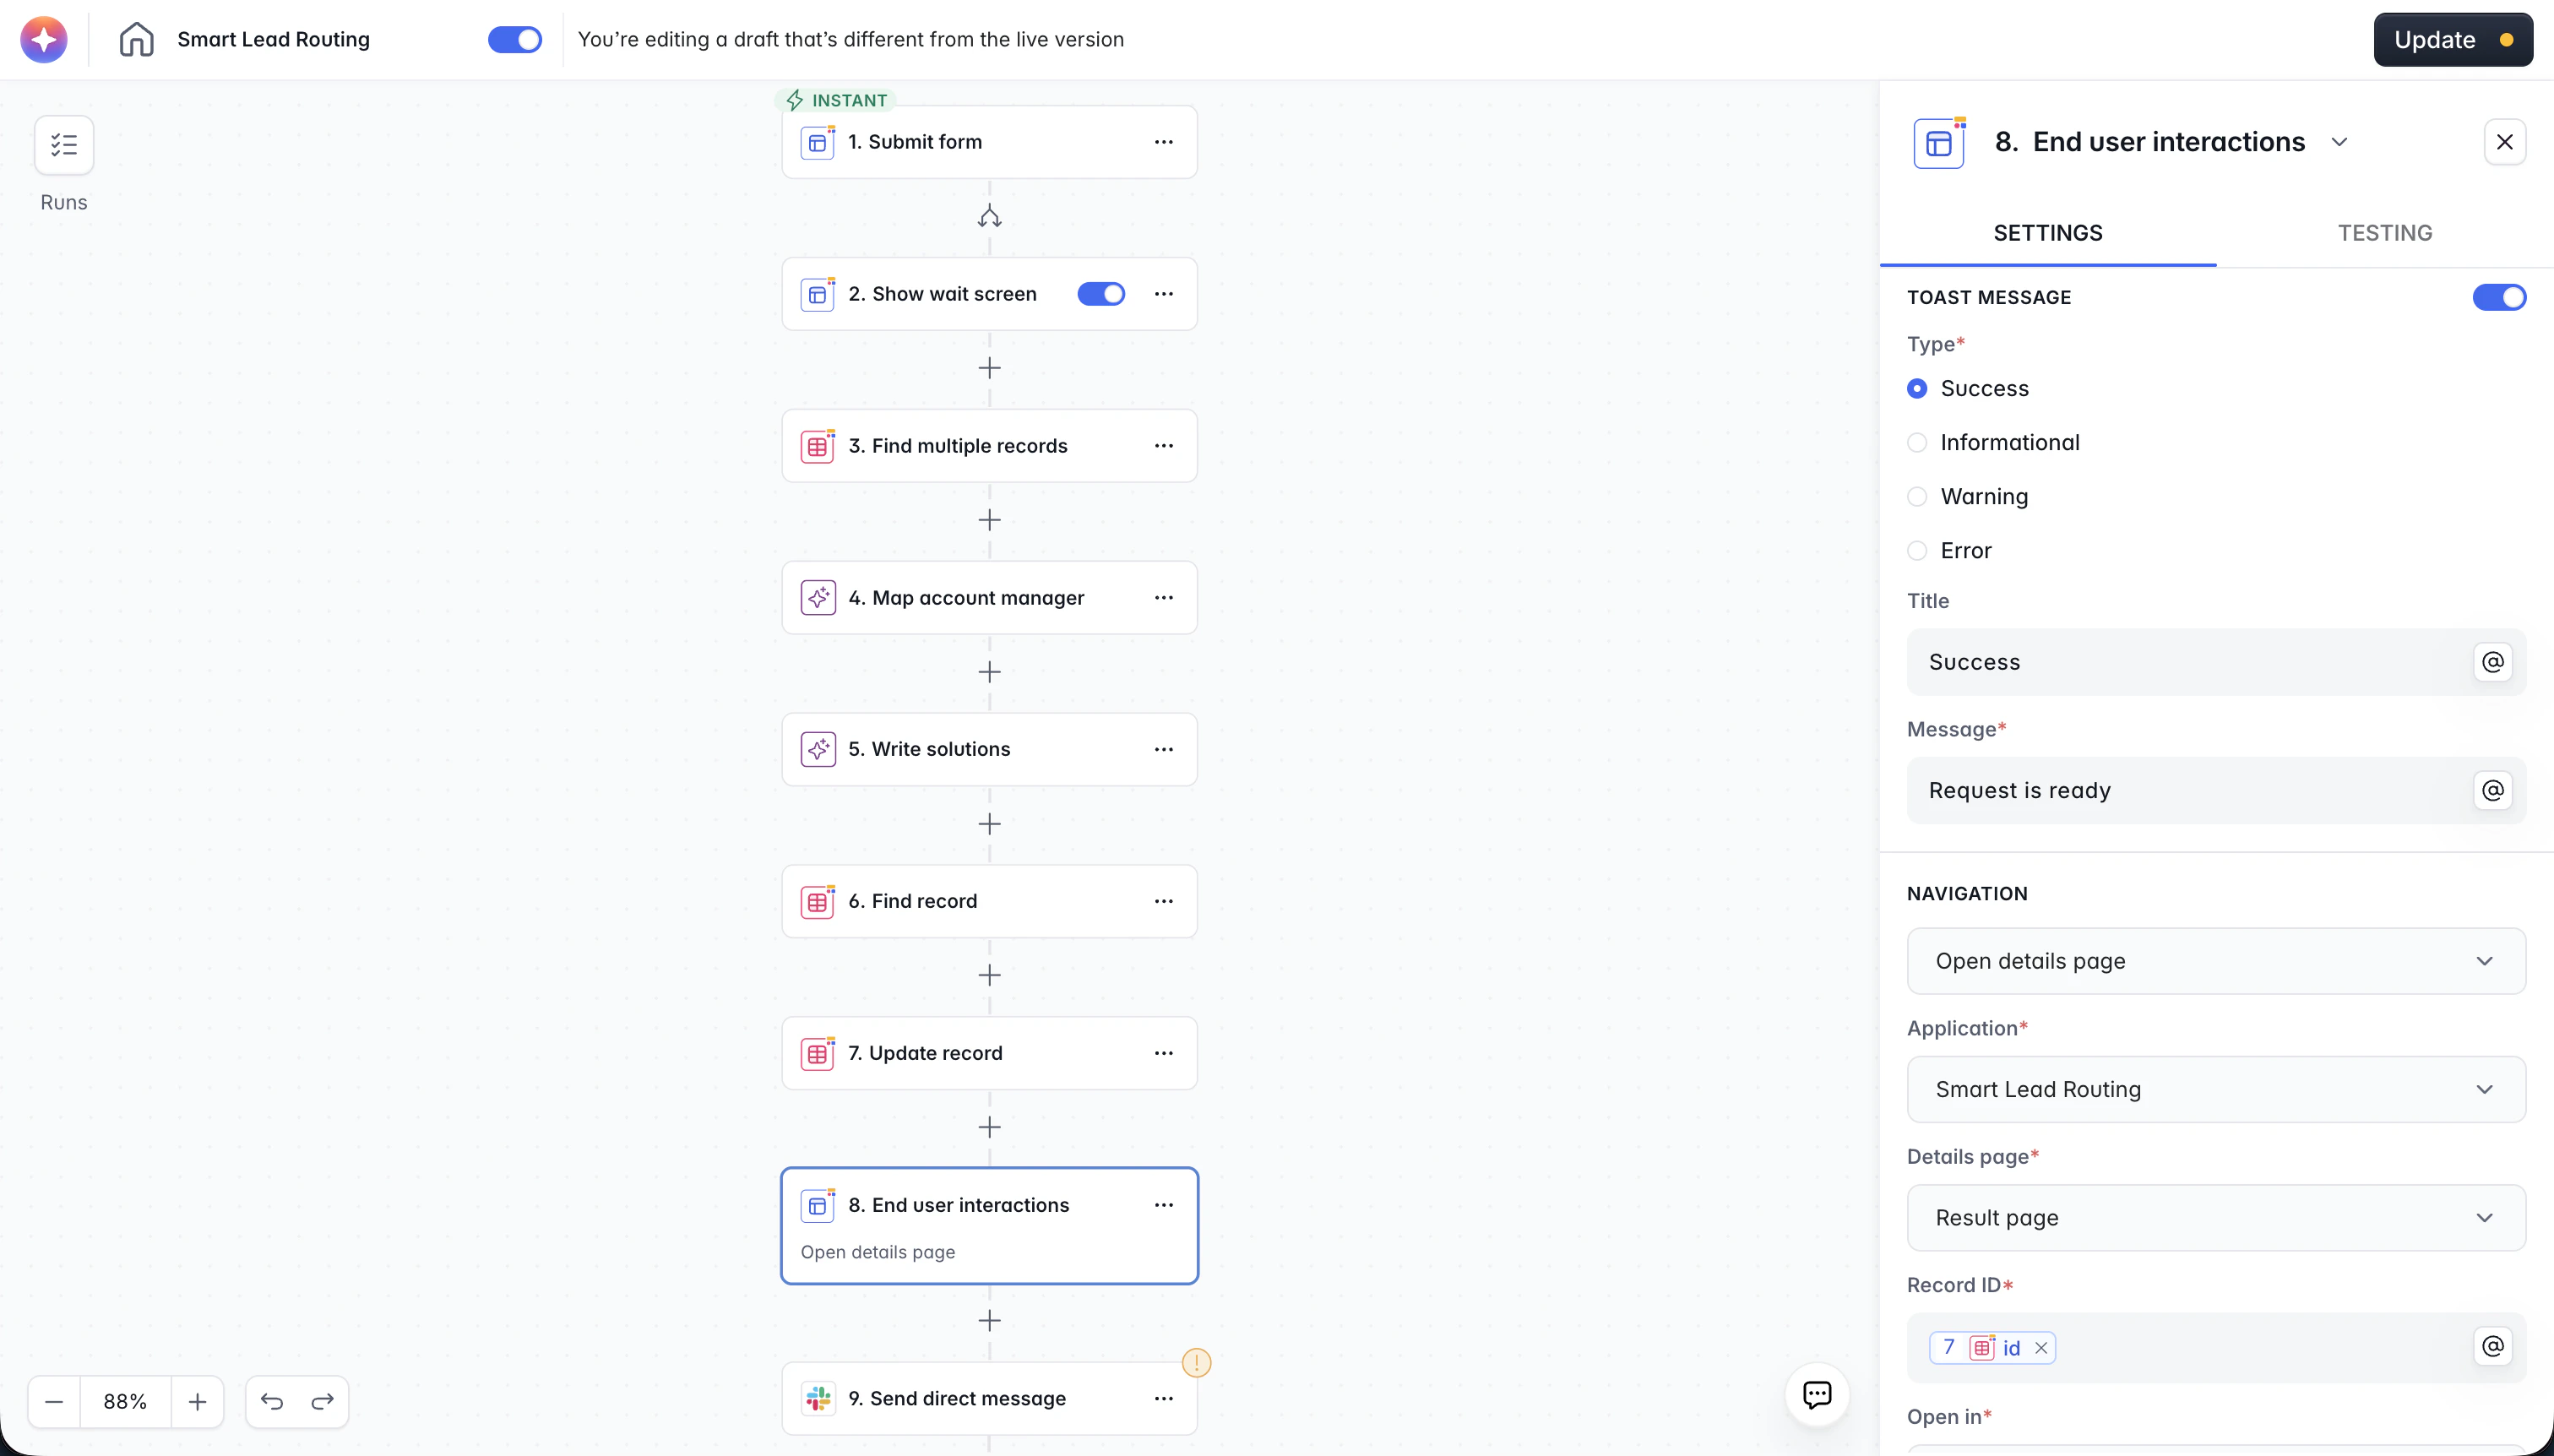
 ### End User Interactions
The **End User Interactions** action defines what happens after the workflow completes:
* **Toast message:** Show a success, info, warning, or error notification with a custom title and message
* **Navigation:** Stay on the current page, open a different page, open a record's details page, open an external URL, refresh the form, or close a modal
* **Reload blocks:** Toggle **Reload all blocks on current page** to refresh data displayed in the app - essential when your workflow updated a record that's visible on screen
### End User Interactions
The **End User Interactions** action defines what happens after the workflow completes:
* **Toast message:** Show a success, info, warning, or error notification with a custom title and message
* **Navigation:** Stay on the current page, open a different page, open a record's details page, open an external URL, refresh the form, or close a modal
* **Reload blocks:** Toggle **Reload all blocks on current page** to refresh data displayed in the app - essential when your workflow updated a record that's visible on screen
 **Example - Upvote button:**
```
Trigger: User clicks "Upvote" button (Run Custom Workflow)
→ Show Wait Screen ("Processing your vote...")
→ Get Record (using record ID from trigger)
→ Transform Data: vote_count + 1
→ Update Record with new vote count
→ End User Interactions:
Toast: "Vote recorded!" (success)
Reload all blocks on current page: Yes
```
The user sees a brief loading state, then a success message, and the vote count on screen updates immediately.
Wait screens and End User Interactions only apply to app-triggered workflows (Run Custom Workflow trigger). They are not available for database triggers, schedule triggers, or webhooks.
***
## Selective Context Pattern
When using AI to process information from your database, a common mistake is dumping all your records into a single AI prompt. This is expensive, slow, and often produces worse results because the AI has too much noise to sift through.
The **selective context pattern** solves this by using a two-pass approach: a small AI model first selects which records are relevant, then only those records are passed to the main AI task.
**The pattern:**
```
Trigger: New task / request arrives
→ Get Records: Fetch all items from your knowledge base
→ Run Custom Code: Extract only the ID and title of each record
→ AI Custom Prompt (small model):
"Given this task: {task_description},
which of these items are relevant? {list_of_titles_and_ids}"
Structured output: array of selected IDs
→ Loop over selected IDs:
└── Get Record: Fetch the full content of each selected record
→ AI Custom Prompt (larger model):
"Complete this task: {task_description}
Using these resources: {full_content_of_selected_records}"
→ Store result
```
**Why this works:**
* **Pass 1** is cheap: a small model reads short titles and picks the relevant ones. This can process hundreds of items for minimal cost.
* **Pass 2** is focused: the larger model only receives the 3-5 records that actually matter, so it produces higher-quality output with less noise.
* **Total cost is lower** than sending everything to a large model in a single prompt.
**Example:** You have a database of 50 marketing insights (brand guidelines, product specs, audience research, content frameworks). A user requests a LinkedIn post about a specific product. Instead of sending all 50 insights to the AI, the workflow extracts their titles, asks a small model to pick the relevant ones (e.g., "LinkedIn post framework", "Product X specs", "Brand voice guidelines"), fetches those 3 full records, and passes them to a larger model to write the post.
**Example - Upvote button:**
```
Trigger: User clicks "Upvote" button (Run Custom Workflow)
→ Show Wait Screen ("Processing your vote...")
→ Get Record (using record ID from trigger)
→ Transform Data: vote_count + 1
→ Update Record with new vote count
→ End User Interactions:
Toast: "Vote recorded!" (success)
Reload all blocks on current page: Yes
```
The user sees a brief loading state, then a success message, and the vote count on screen updates immediately.
Wait screens and End User Interactions only apply to app-triggered workflows (Run Custom Workflow trigger). They are not available for database triggers, schedule triggers, or webhooks.
***
## Selective Context Pattern
When using AI to process information from your database, a common mistake is dumping all your records into a single AI prompt. This is expensive, slow, and often produces worse results because the AI has too much noise to sift through.
The **selective context pattern** solves this by using a two-pass approach: a small AI model first selects which records are relevant, then only those records are passed to the main AI task.
**The pattern:**
```
Trigger: New task / request arrives
→ Get Records: Fetch all items from your knowledge base
→ Run Custom Code: Extract only the ID and title of each record
→ AI Custom Prompt (small model):
"Given this task: {task_description},
which of these items are relevant? {list_of_titles_and_ids}"
Structured output: array of selected IDs
→ Loop over selected IDs:
└── Get Record: Fetch the full content of each selected record
→ AI Custom Prompt (larger model):
"Complete this task: {task_description}
Using these resources: {full_content_of_selected_records}"
→ Store result
```
**Why this works:**
* **Pass 1** is cheap: a small model reads short titles and picks the relevant ones. This can process hundreds of items for minimal cost.
* **Pass 2** is focused: the larger model only receives the 3-5 records that actually matter, so it produces higher-quality output with less noise.
* **Total cost is lower** than sending everything to a large model in a single prompt.
**Example:** You have a database of 50 marketing insights (brand guidelines, product specs, audience research, content frameworks). A user requests a LinkedIn post about a specific product. Instead of sending all 50 insights to the AI, the workflow extracts their titles, asks a small model to pick the relevant ones (e.g., "LinkedIn post framework", "Product X specs", "Brand voice guidelines"), fetches those 3 full records, and passes them to a larger model to write the post.