> ## Documentation Index
> Fetch the complete documentation index at: https://docs.softr.io/llms.txt
> Use this file to discover all available pages before exploring further.
# Simple Billing Block
> Allow your Softr app users to manage their billing info.
Using this block, you can enable your users to manage their subscriptions and purchases on your Softr app. So, let's see what the steps are involved in the setup.
## Integrating Stripe
The block is supposed to work with Stripe and get all the purchase and subscription info from there, so, first of all, you need to [integrate a Stripe checkout](/integrations/etS18kJqm1fuD58KCsjC3z/stripe-checkout/iBomMEucRZtM2y6HuutYVC) with your Softr app.
In our example we are going to use the **Pricing** block along with **Stripe Checkout** integration, which will link your users to a separate Stripe checkout page.
However, you can also use the [Simple Checkout Form](/integrations/etS18kJqm1fuD58KCsjC3z/simple-checkout-form/tKt3f5cV2CxsFLGM1aaNYX) instead (with or without the Pricing block). All the subscription and purchase info of your users processed through the **Simple Checkout Form** will be available via the **Simple Billing Form**.
## Setting up a pricing block
As soon as you're done with Stripe integration, you can proceed with setting up a [Pricing](/integrations/etS18kJqm1fuD58KCsjC3z/layout-pricing-in-card-view-with-details/pNspR4mKu6spj1KSzRf4p7) block, where you offer your Stripe products/subscriptions to your users.
Below, you can see a product that we've set up on Stripe (available in the **Products** section of your Stripe dashboard).
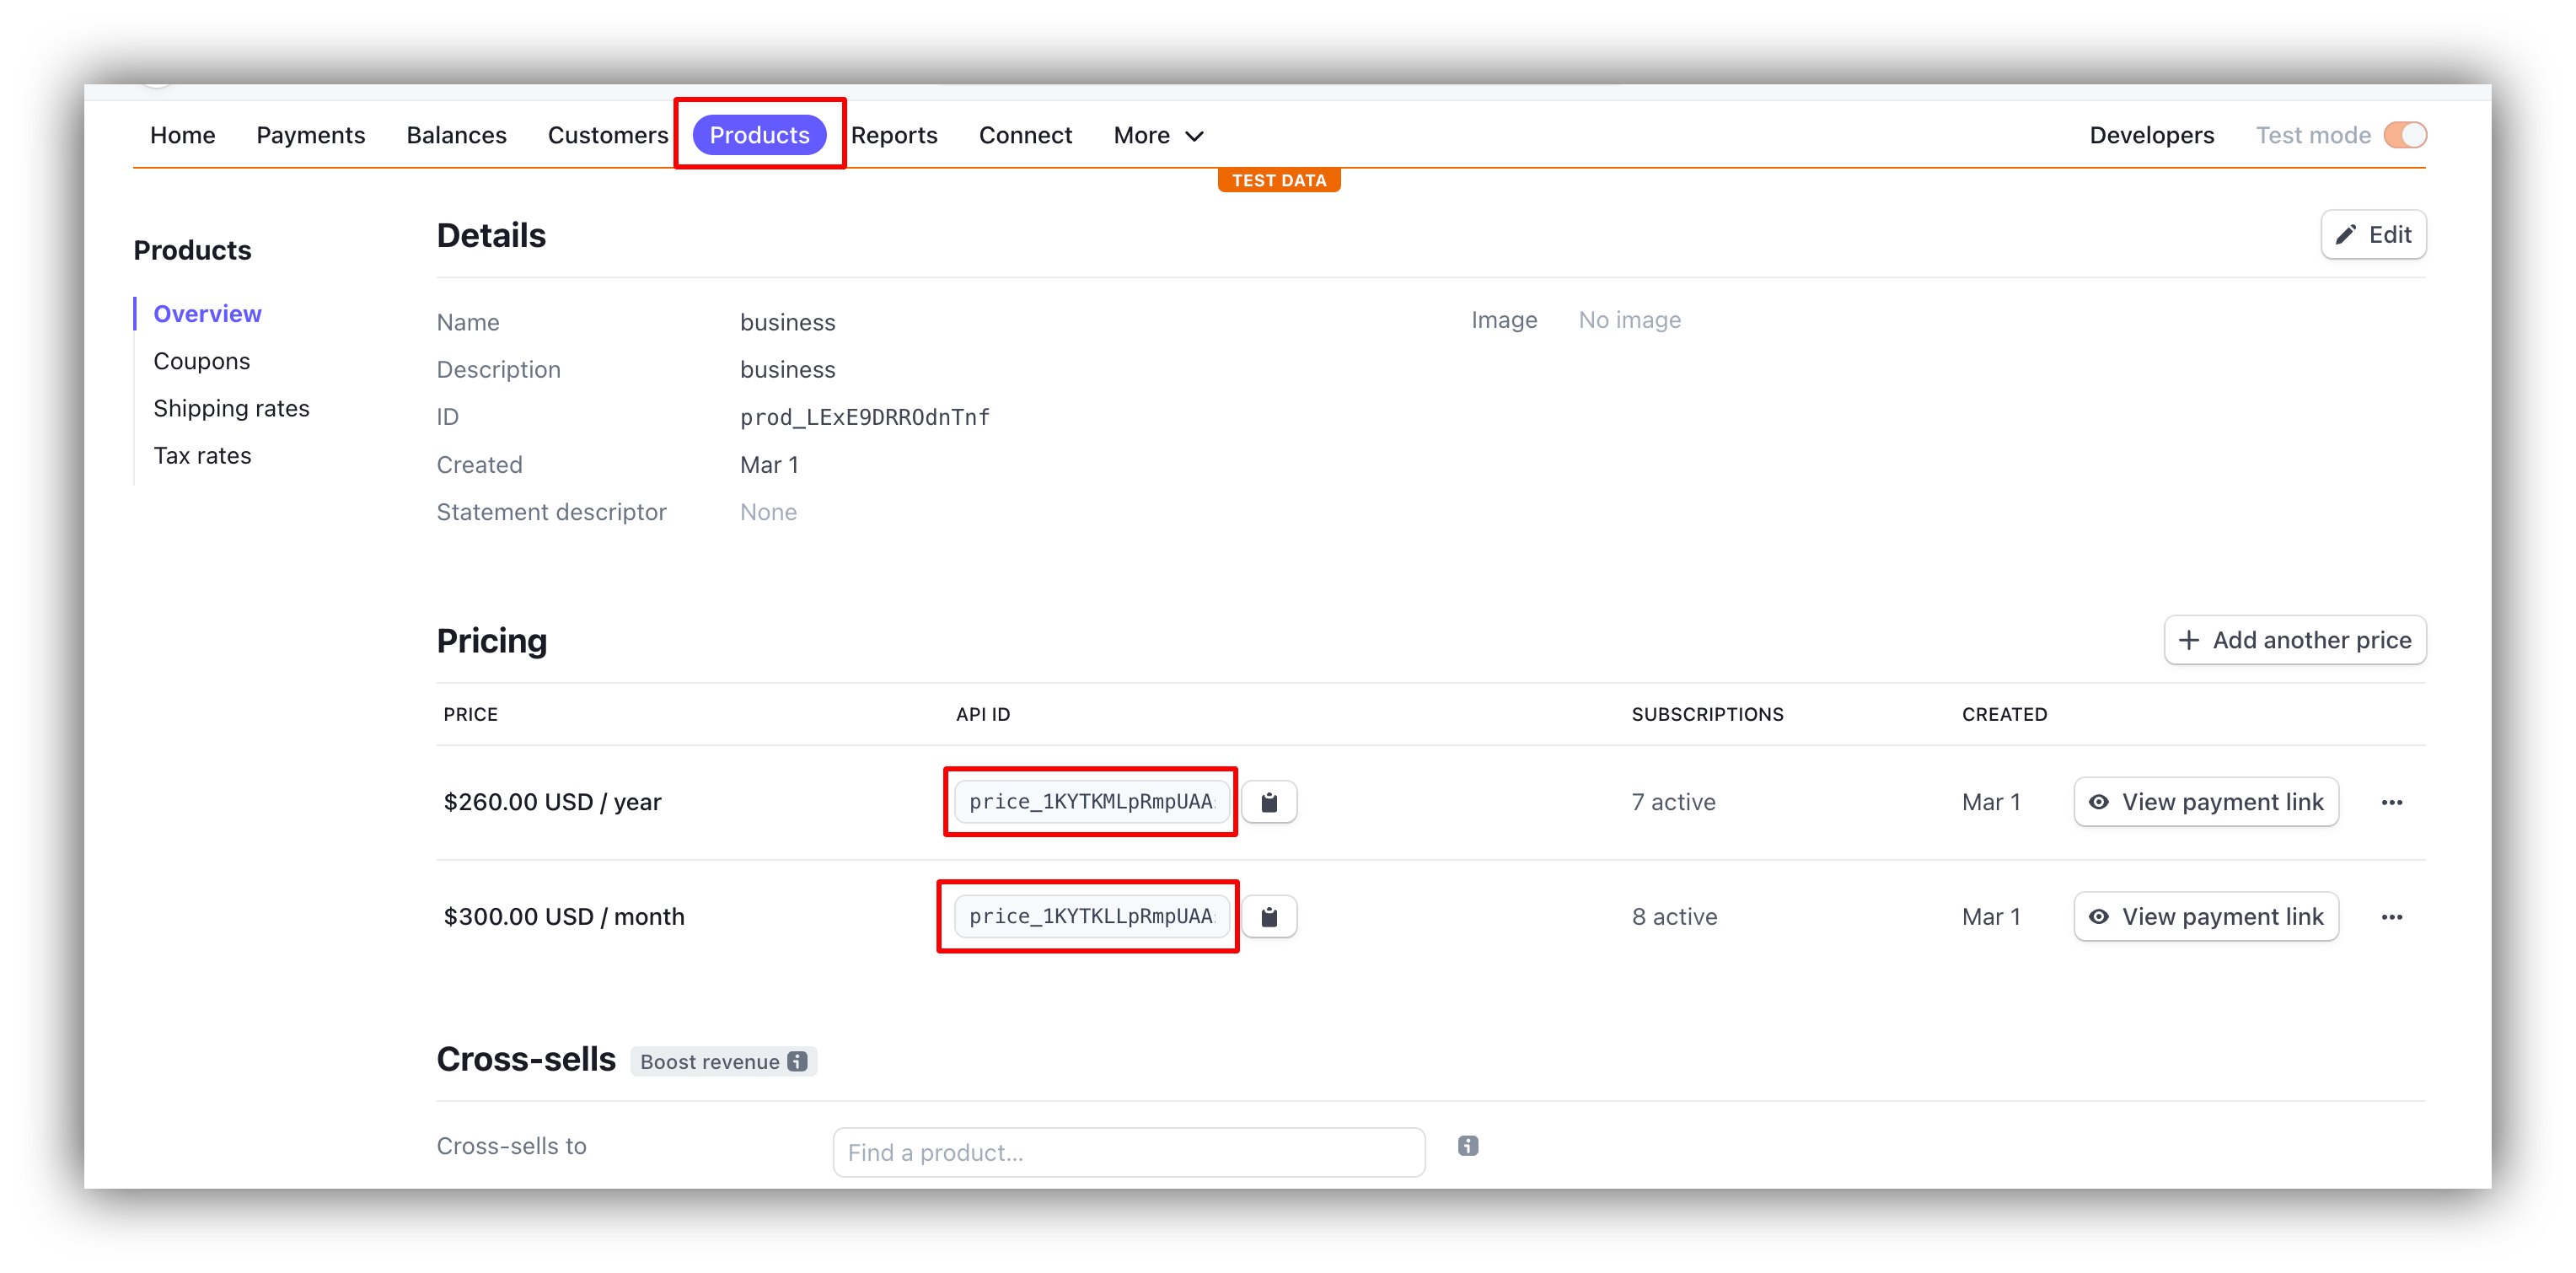 Now, we are going to add this product on our Pricing block in Softr. Below, you can see how it's configured.
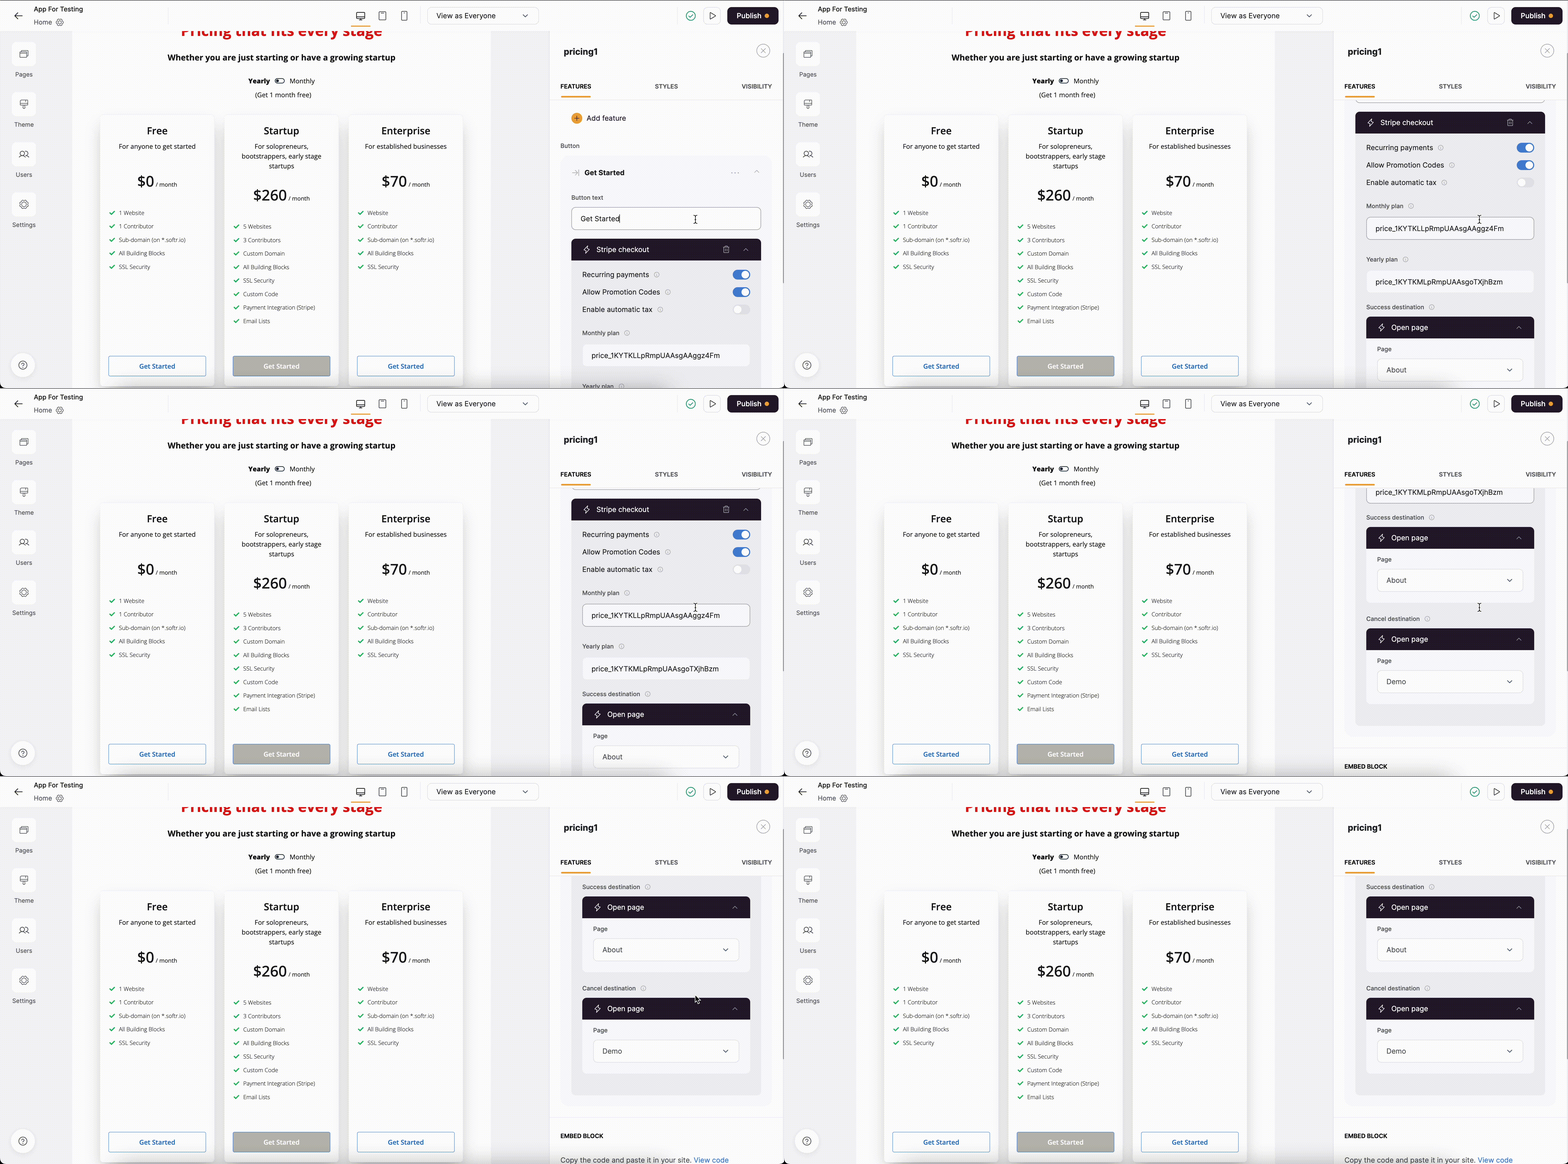 As you can see, we've set the **Button** action to **Stripe checkout** and enabled **Recurring payments**, as the product we've added is a subscription. Moreover, we've copied the **Monthly** and **Yearly** price IDs from the product page on Stripe as well as added **Success** and **Cancel** URLs, which are mandatory. You can find more info on configuring the Pricing block [here](/integrations/etS18kJqm1fuD58KCsjC3z/stripe-checkout/iBomMEucRZtM2y6HuutYVC).
Other subscription plans or products on your Pricing block can be configured the same way. You might also need to provide your users with coupon codes. So, let's review that part as well.
### **Adding Coupon Codes**
Coupons can be created under **Products => Coupons**. Further on, you need to add a **Promotional Code** for your coupon, and the **Name** of your **Promotional Code** is what you should give to your users to use on checkout. Below you can see how that's set up.
As you can see, we've set the **Button** action to **Stripe checkout** and enabled **Recurring payments**, as the product we've added is a subscription. Moreover, we've copied the **Monthly** and **Yearly** price IDs from the product page on Stripe as well as added **Success** and **Cancel** URLs, which are mandatory. You can find more info on configuring the Pricing block [here](/integrations/etS18kJqm1fuD58KCsjC3z/stripe-checkout/iBomMEucRZtM2y6HuutYVC).
Other subscription plans or products on your Pricing block can be configured the same way. You might also need to provide your users with coupon codes. So, let's review that part as well.
### **Adding Coupon Codes**
Coupons can be created under **Products => Coupons**. Further on, you need to add a **Promotional Code** for your coupon, and the **Name** of your **Promotional Code** is what you should give to your users to use on checkout. Below you can see how that's set up.
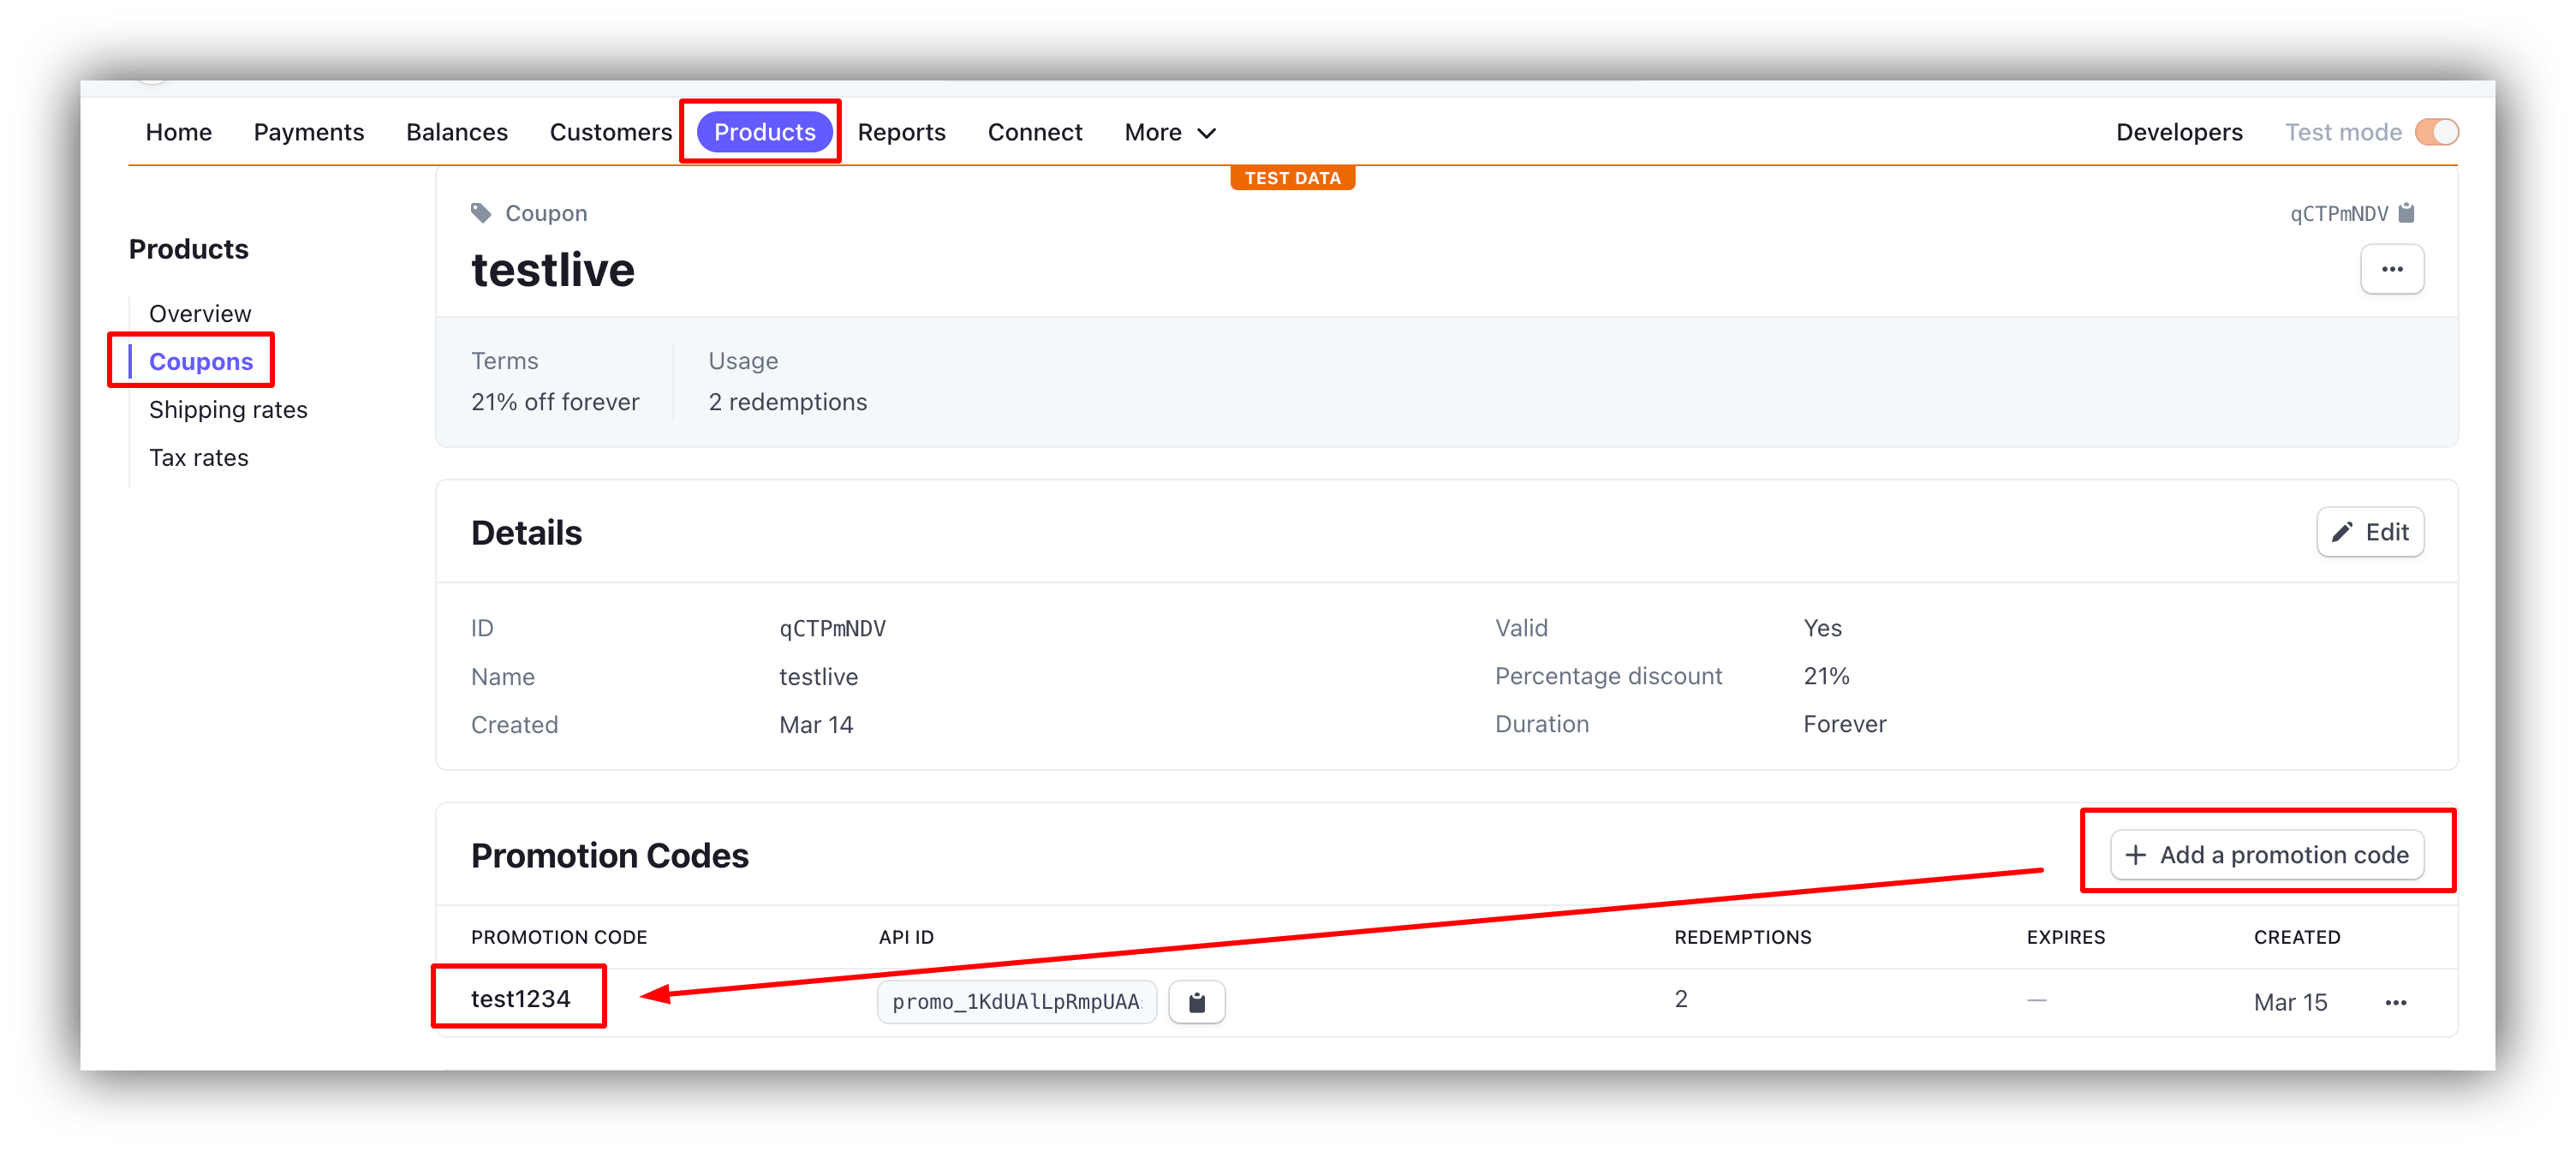 We'll use this code ("test1234") later on in this guide when demonstrating the checkout and billing management process from your users' standpoint.
So, now, let's proceed to setting up the **Simple Billing Form**.
## Configuring the Simple Billing Form block
We are just going to add the **Simple Billing Form** block on a separate page and configure it. Let's quickly go through the block settings.
We'll use this code ("test1234") later on in this guide when demonstrating the checkout and billing management process from your users' standpoint.
So, now, let's proceed to setting up the **Simple Billing Form**.
## Configuring the Simple Billing Form block
We are just going to add the **Simple Billing Form** block on a separate page and configure it. Let's quickly go through the block settings.
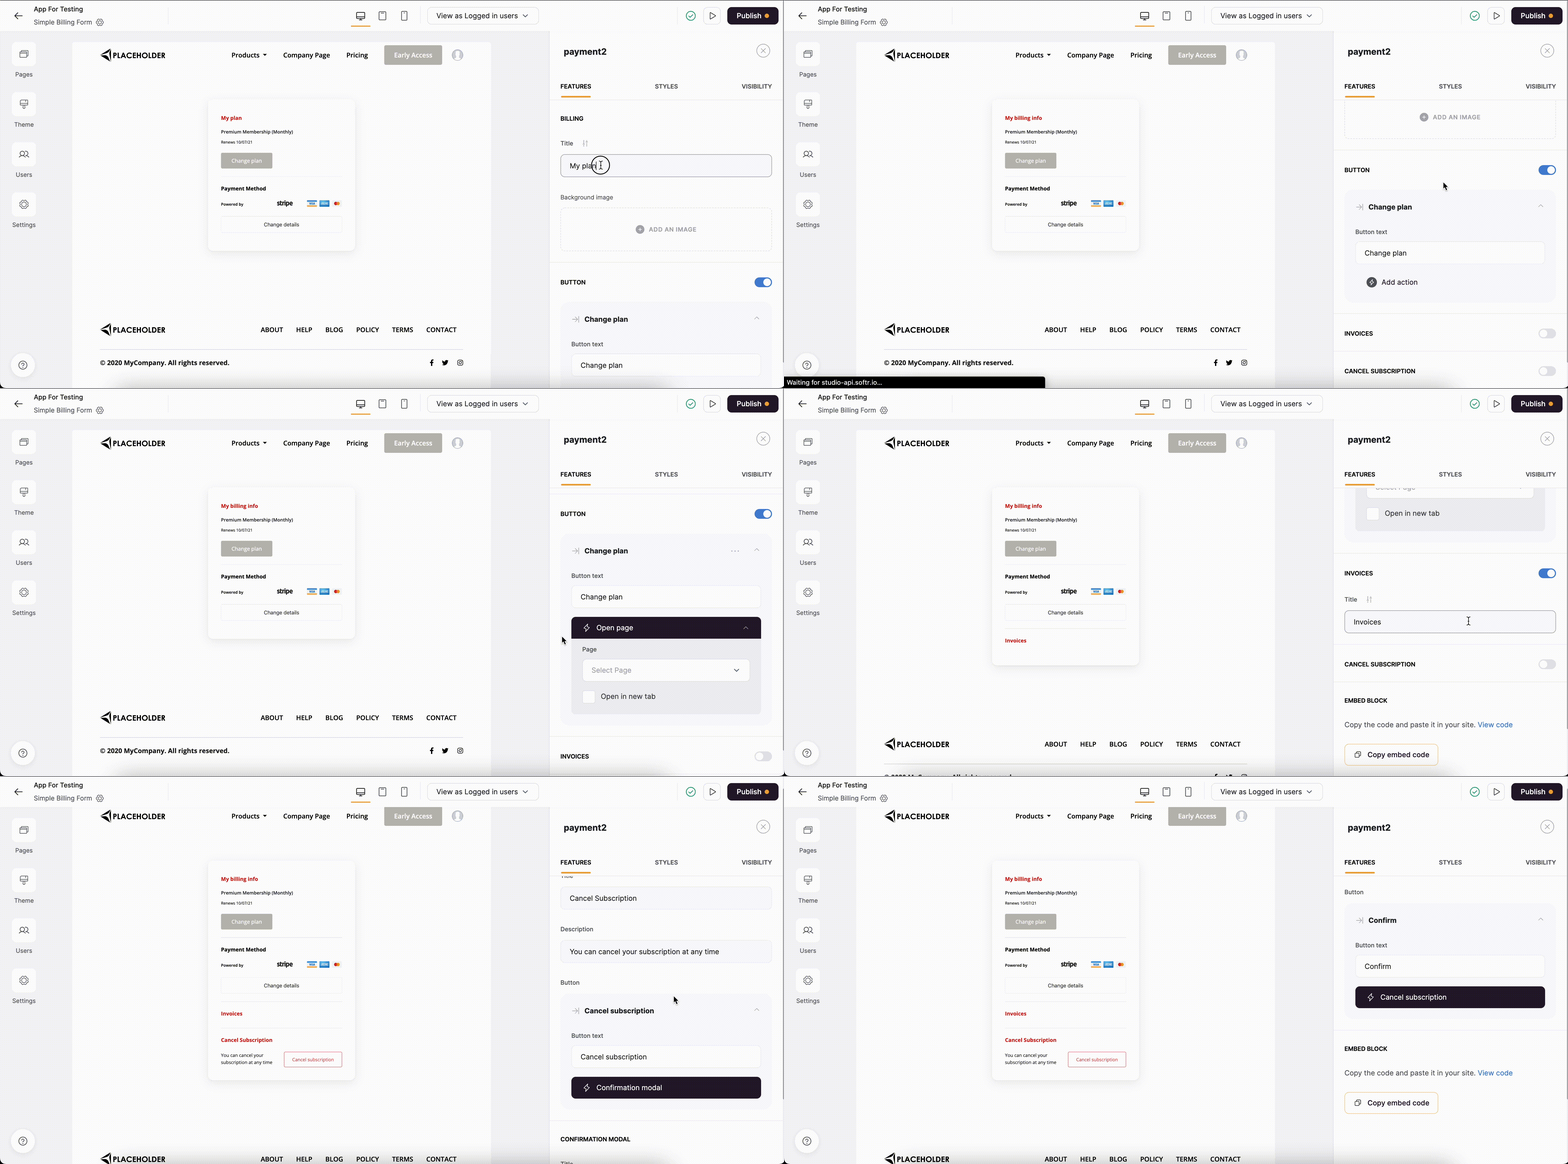 Above you can see an overview of the block configuration. Now, let's go through each setting in detail.
First, we can customize the block **Title** and set a **Background image**. Next we need to set the page that the user is going to be taken to if he/she wants to change the subscription plan (**Change plan**). In our case, it's the page with the **Pricing** block, which we configured above.
### **Invoices**
Next up we have the **Invoices** toggle, which allows the users to view all their invoices (fetched from Stripe).
### **Cancel Subscription**
We can also allow the users to cancel their subscriptions at any time. If we enable this option, a number of other fields appear below, where we can customize the section's title and descriptions as well as what appears on the confirmation pop-up.
Now that we've reviewed the configs from the site owner's perspective, let's see how everything looks from the site users' standpoint.
## Billing Management from the User's Perspective
Below you can see how the user purchases a subscription through the **Pricing** block and is later on able to view his/her subscription along with additional info (e.g. Invoices) using the Simple Billing block as well as cancel the subscription. The user also applies a promotional code during checkout.
In our example, we've used a subscription-type product from Stripe, but one-off purchase products can be set up in a similar manner.
Above you can see an overview of the block configuration. Now, let's go through each setting in detail.
First, we can customize the block **Title** and set a **Background image**. Next we need to set the page that the user is going to be taken to if he/she wants to change the subscription plan (**Change plan**). In our case, it's the page with the **Pricing** block, which we configured above.
### **Invoices**
Next up we have the **Invoices** toggle, which allows the users to view all their invoices (fetched from Stripe).
### **Cancel Subscription**
We can also allow the users to cancel their subscriptions at any time. If we enable this option, a number of other fields appear below, where we can customize the section's title and descriptions as well as what appears on the confirmation pop-up.
Now that we've reviewed the configs from the site owner's perspective, let's see how everything looks from the site users' standpoint.
## Billing Management from the User's Perspective
Below you can see how the user purchases a subscription through the **Pricing** block and is later on able to view his/her subscription along with additional info (e.g. Invoices) using the Simple Billing block as well as cancel the subscription. The user also applies a promotional code during checkout.
In our example, we've used a subscription-type product from Stripe, but one-off purchase products can be set up in a similar manner.
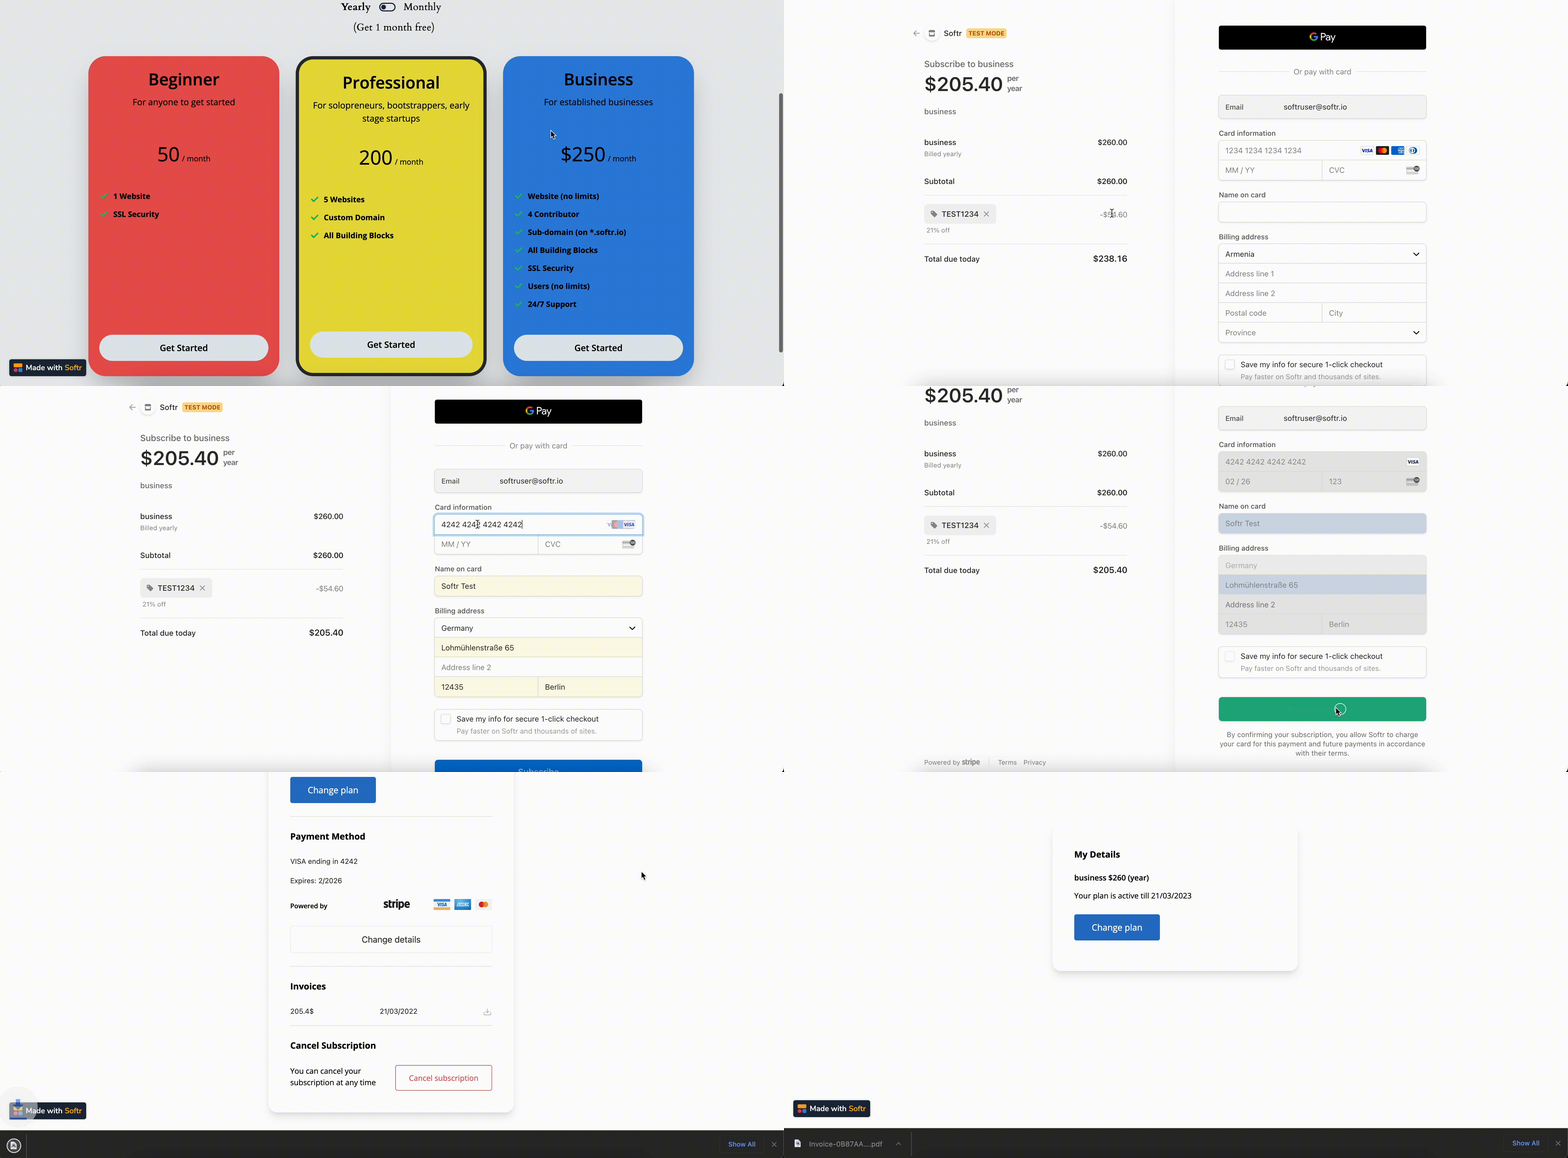 As you can see, after completing the checkout, the user is automatically taken to the page with the **Simple Billing Form**, where he/she can manage his/her details.