> ## Documentation Index
> Fetch the complete documentation index at: https://docs.softr.io/llms.txt
> Use this file to discover all available pages before exploring further.
# How to Enable Peer-to-Peer Chat?
> Creating a peer-to-peer to chat using Softr’s and Airtable’s native functionalities.
Using a peer-to-peer (or one-on-one) chat, you can let your users initiate private chats with other users. One of the options to add such a functionality is integrating third-party tools such as [AtomChat](/integrations/etS18kJqm1fuD58KCsjC3z/atomchat/bTiJ3zbePgQMwcB9SUYY93). But it’s also possible to build a peer-to-peer chat using just Softr and Airtable. Let’s see how.
## Chat functionality overview
We are going to break down [Cole Fortman](https://www.softr.io/softr-expert-profile/cole-fortman/r/recdRQxd3KleHO27i)’s video that showcases an application where each user has access to the list of all the members in the application and can initiate a chat with any of the members. Users also have access to all the past conversations and can continue from where they’ve left.
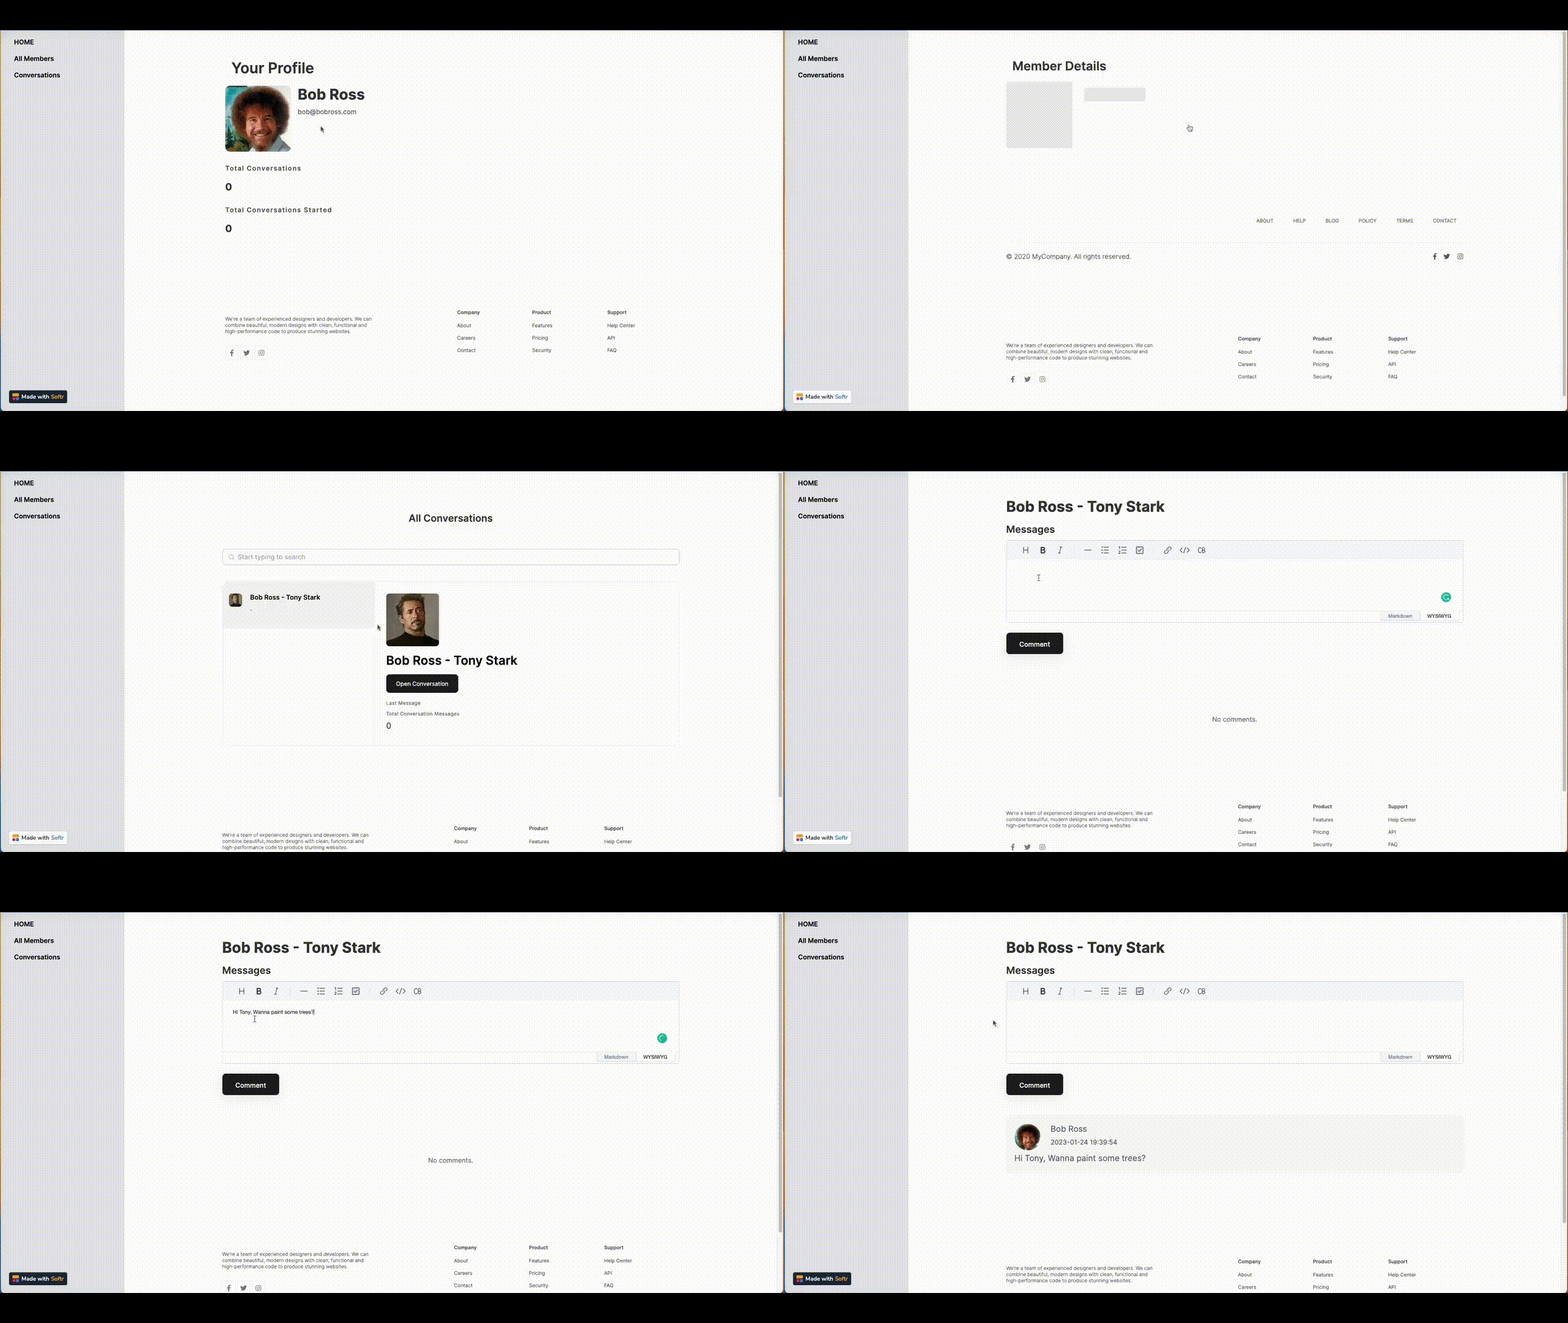
Our chat application contains three users: Bob Ross, Tony Stark, and Bruce Wayne. The recording below shows how we log in with Bob Ross’s account, navigate to **All Members**, and initiate a chat with Tony Stark.
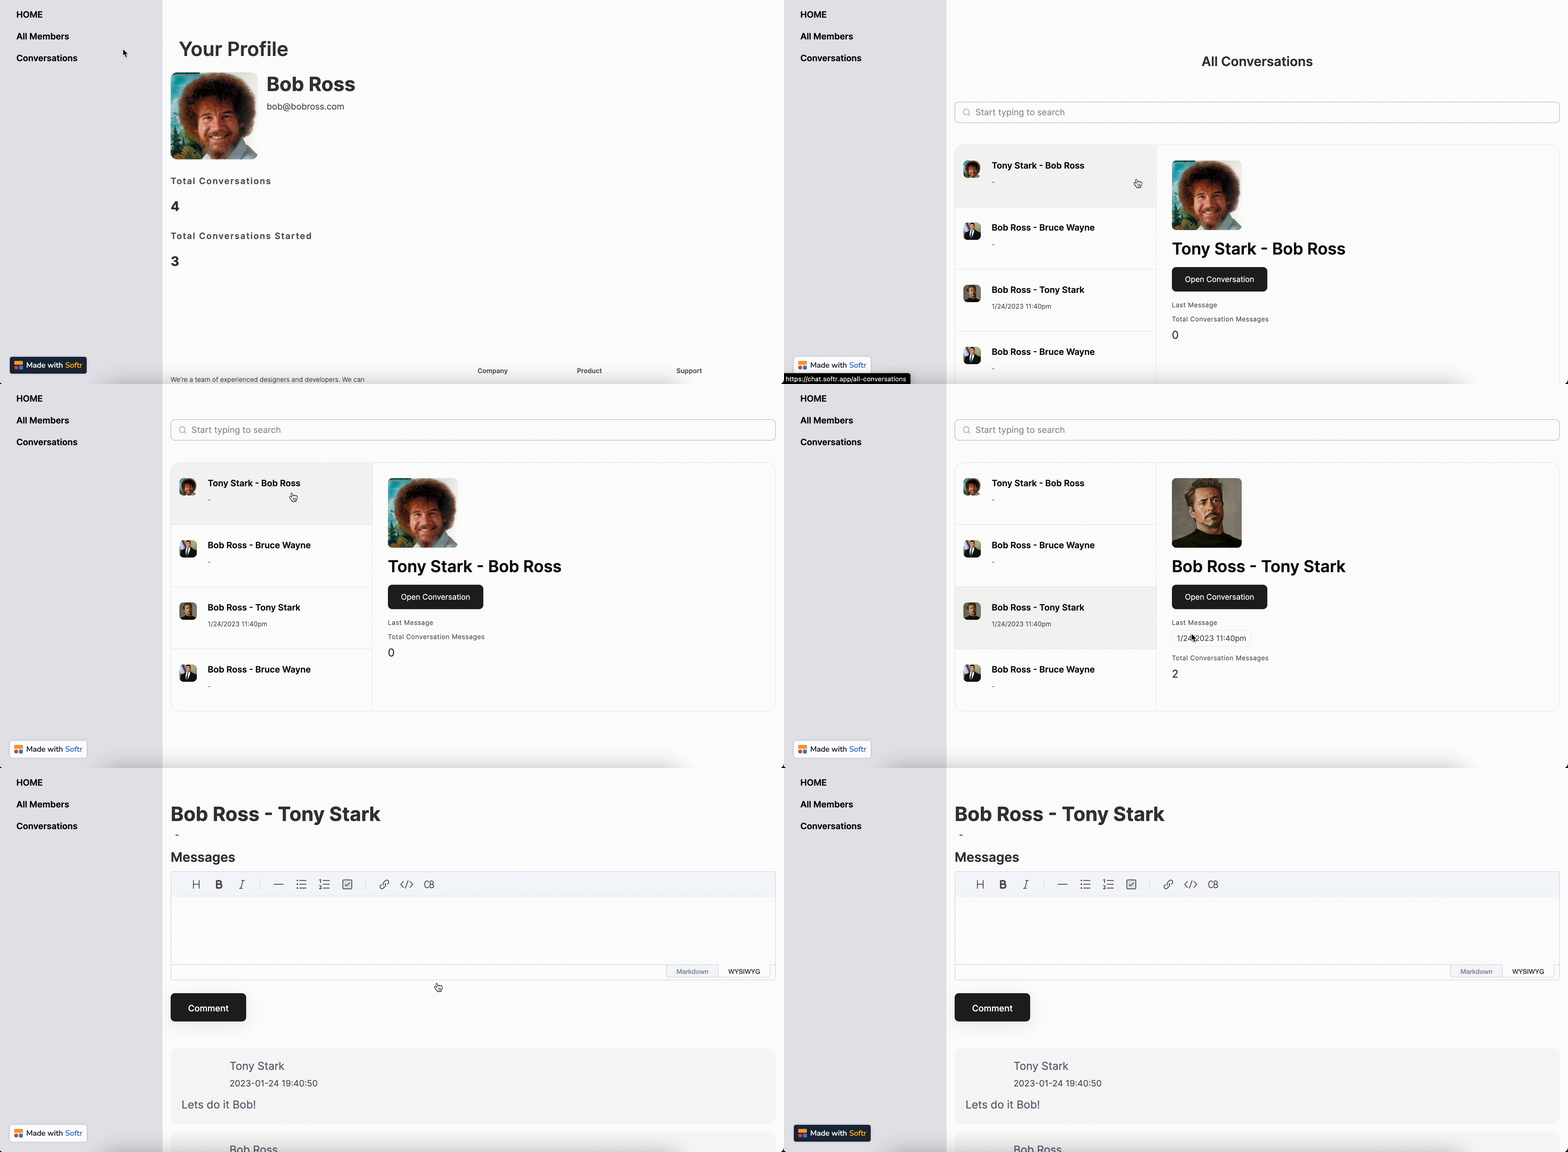
There’s also a **Conversations** section, where each user can see the list of all the conversations he/she has participated in, open those, and continue chatting.
We are first going to look into the Softr side of the application to see how each page is set up. Then, we will take a closer look into the Airtable base that serves as a [data source](/4230abecf813402aa2926466c313290a?pvs=25) for the app.
## Softr setup
### Home page with user profile
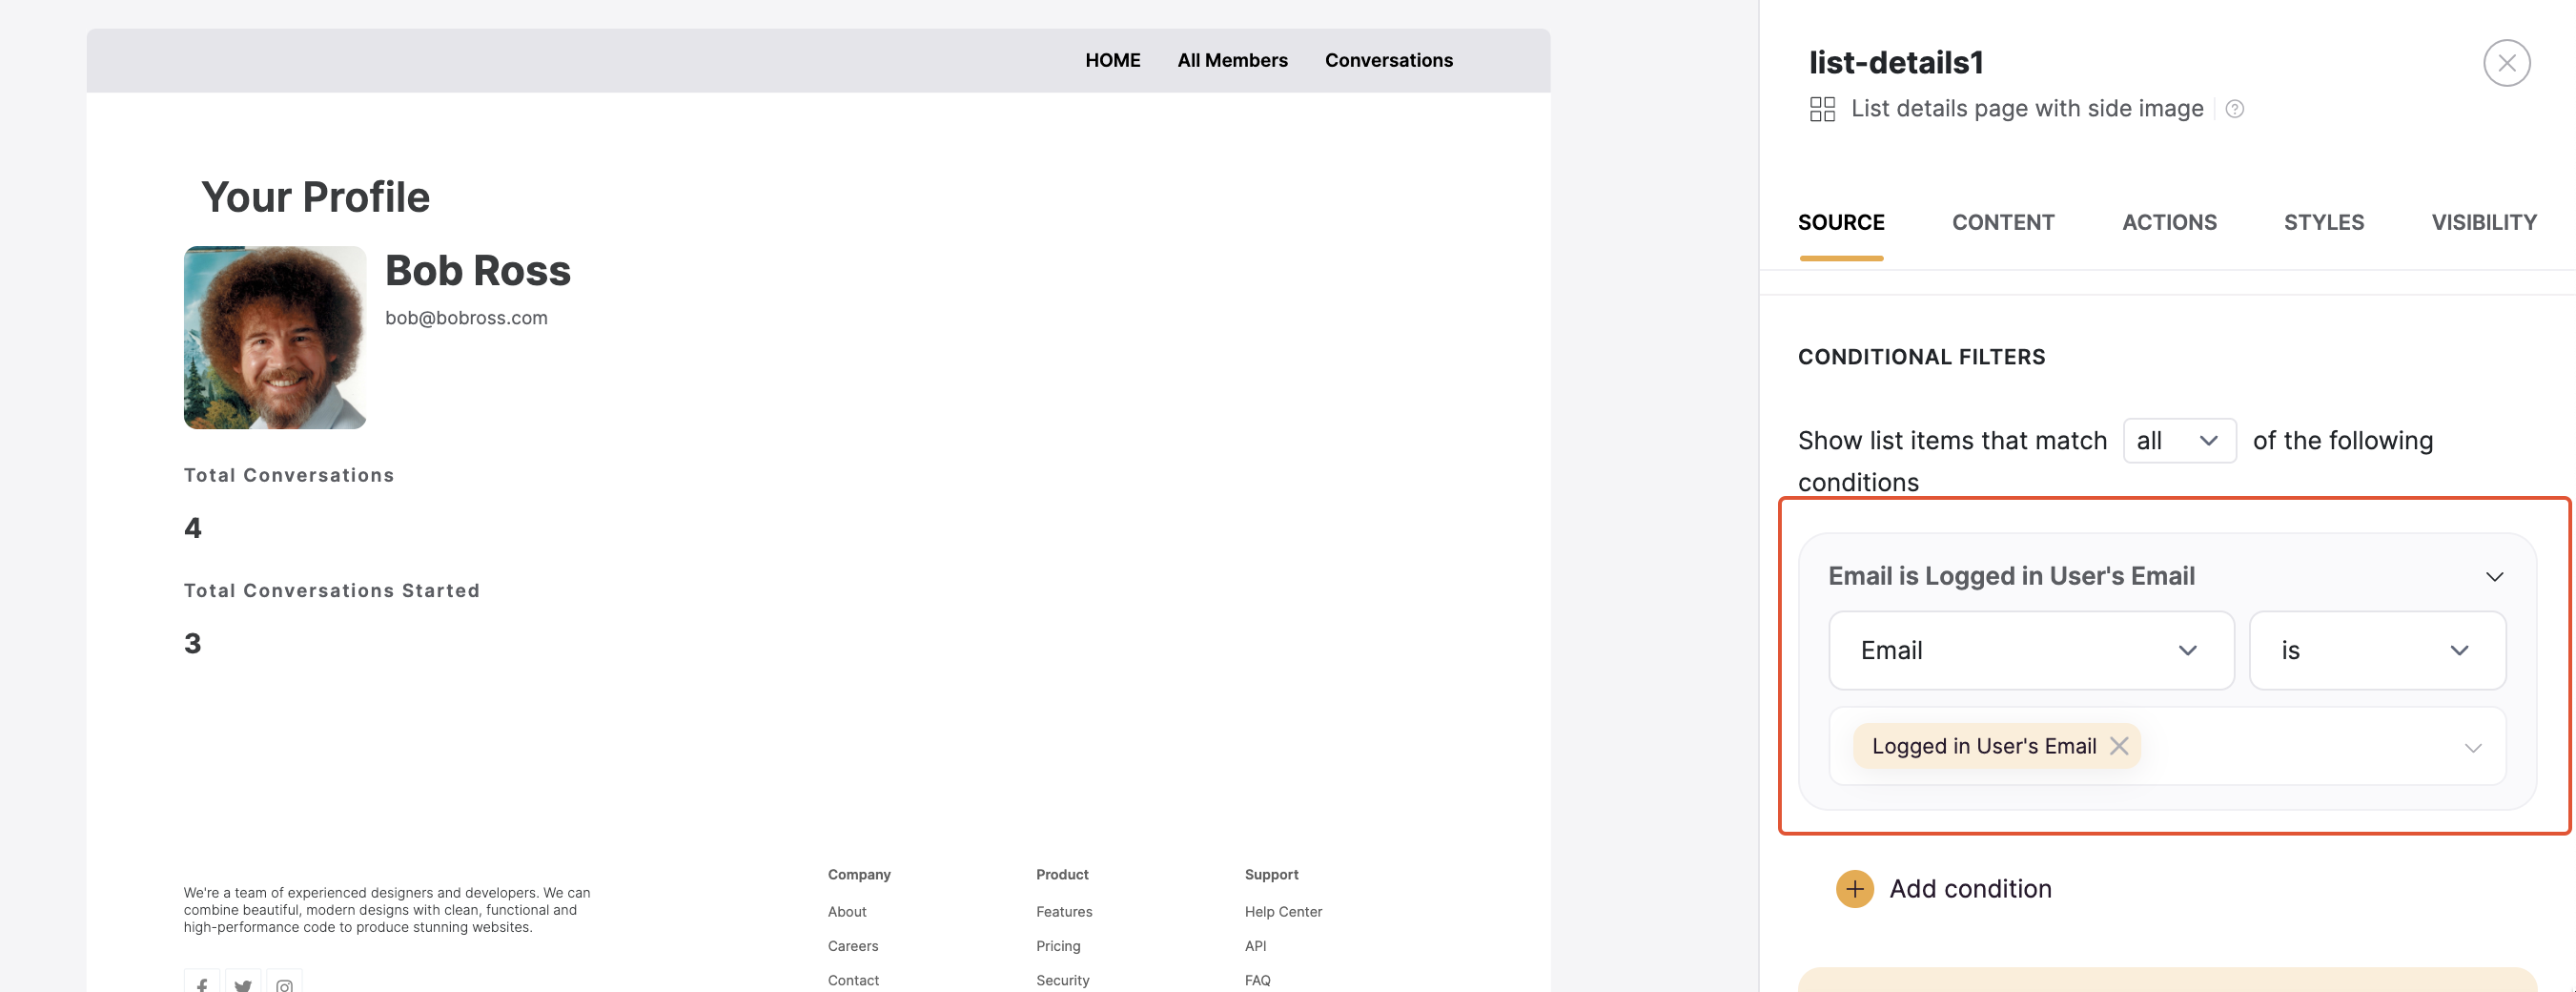
First comes the home page, where we have a [List Details](/building-blocks/vikC2AWEpQGkZd4jGyoVxo/item-details-block-/4bE8XaFbJp45wkAwuWiz8f) block that is connected to the **Users** table on Airtable. A [conditional filter](/user-groups-and-permissions/3oA6AaFzUiePs2sW2TpYrF/conditional-filters/mDnn7jnpPiYmJcT99jpt7m) is applied to show each user his/her own details.
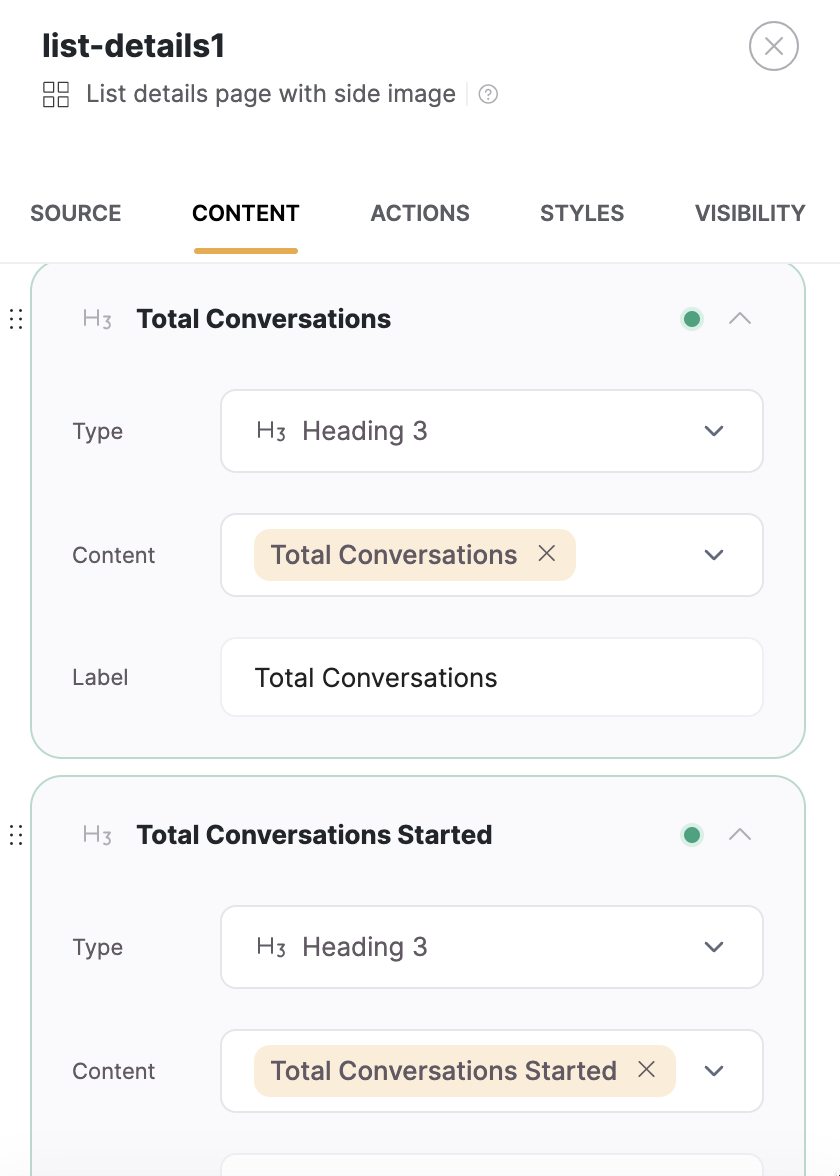
The block shows such user details as name and email as well as **Total Conversations** and **Total Conversations Started** fields from Airtable, which we’ll explore in greater detail when we proceed to the Airtable setup.
### All Members
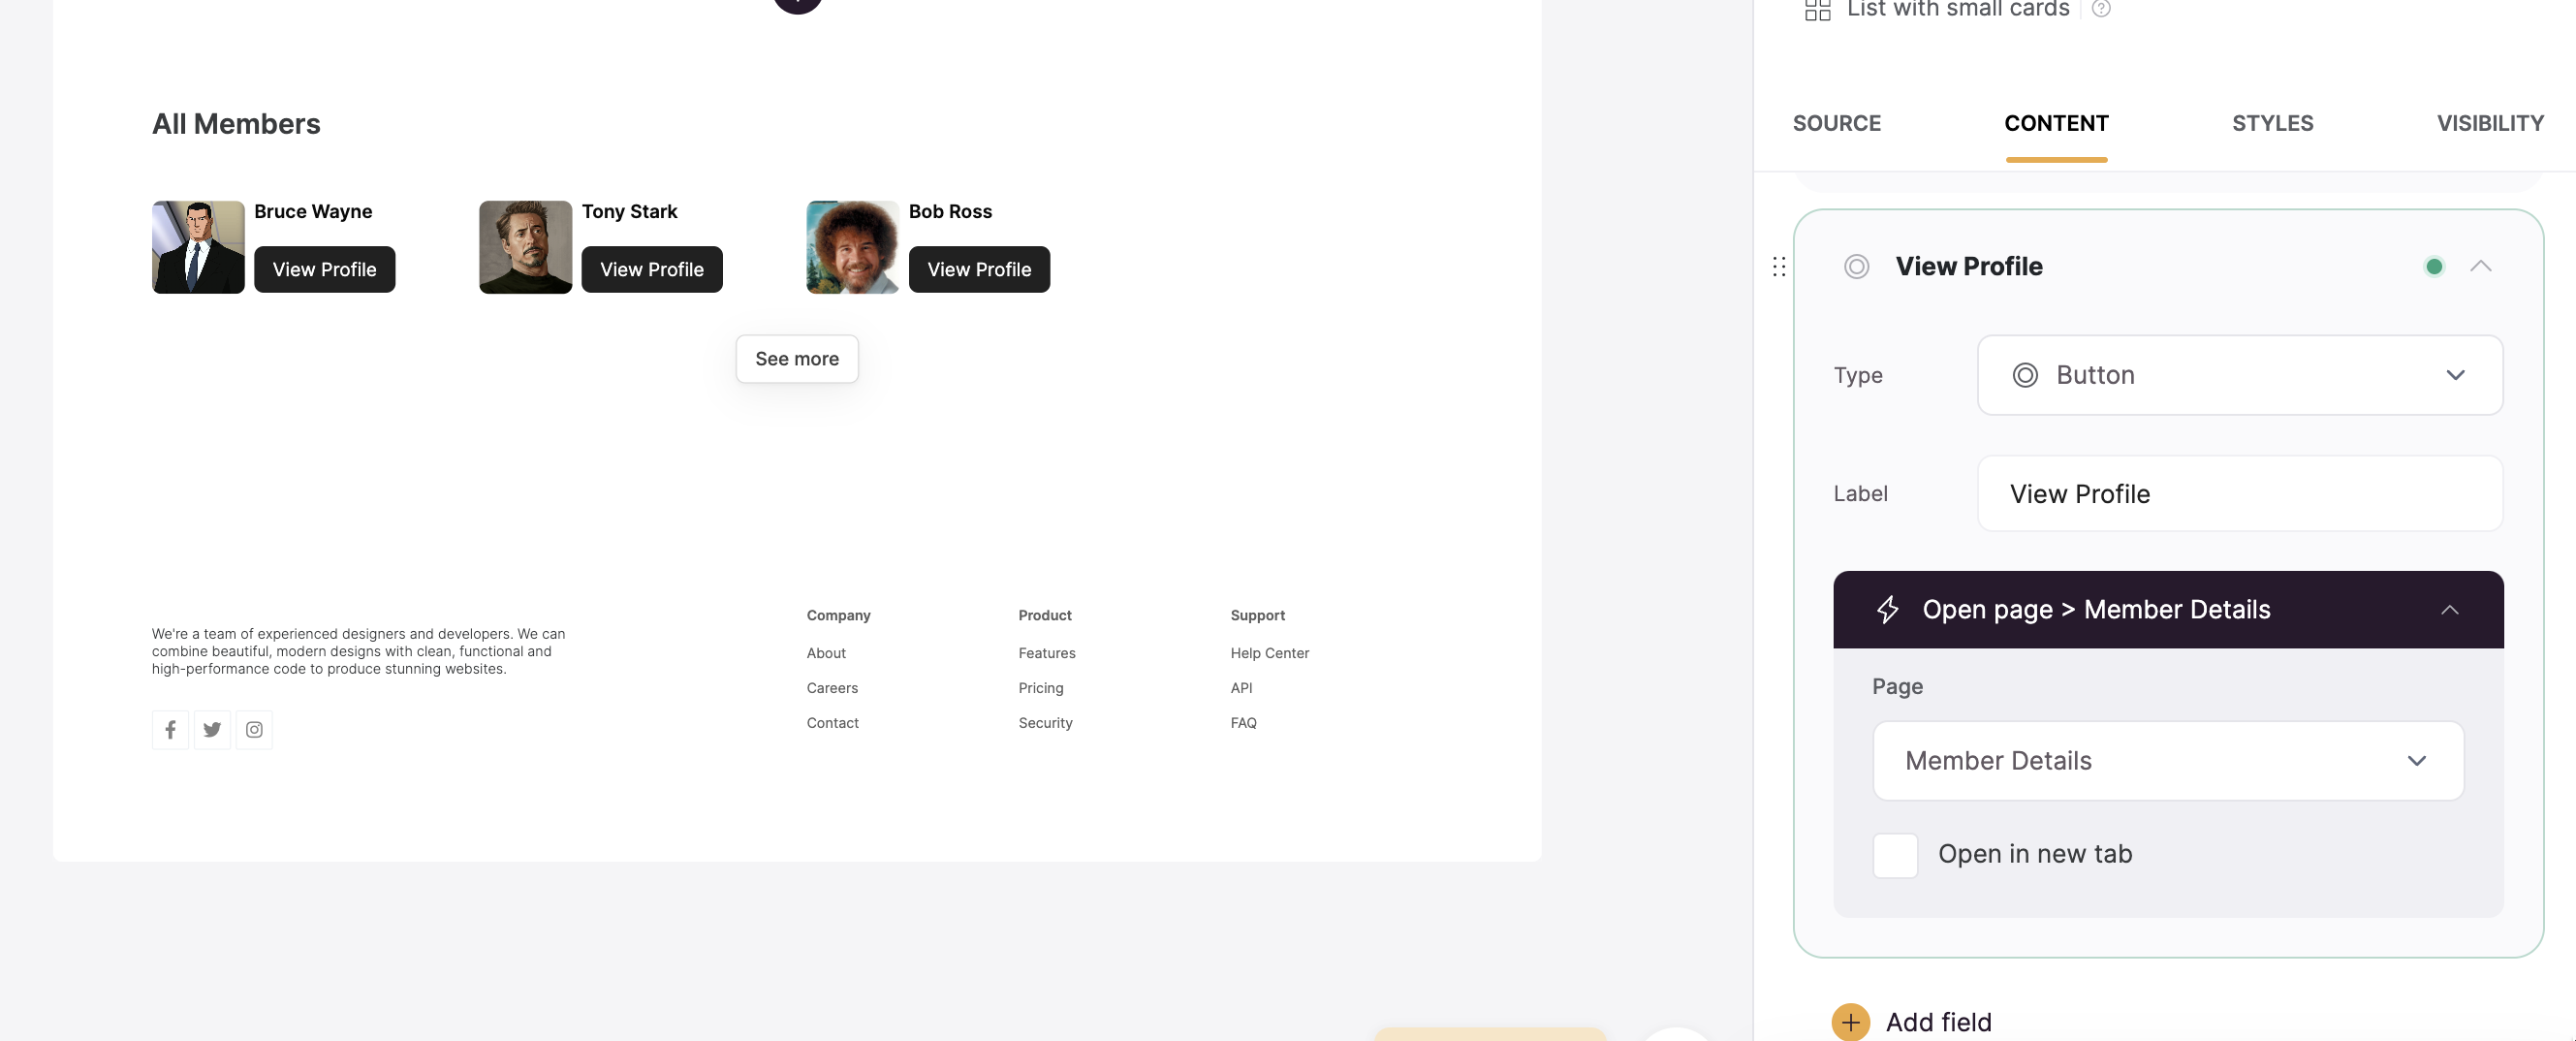
Next, we have the **All Members** page, which is a [List block](/building-blocks/vikC2AWEpQGkZd4jGyoVxo/list-block/pQhPYuA28VXr5tLLFBcbCU) that shows the list of all users and has a **View Profile** button that opens the **Member Details** page, which we’ll discuss next.
### Member Details
Similar to the Home page, the **Member Details** page contains a List Details block that shows some user info. But it also has a [Customizable Form](/building-blocks/vikC2AWEpQGkZd4jGyoVxo/advanced-form-features/jCim5VWZePgZuaRsUZBnpG) block that consists of a **Start Conversation** button and sends two hidden field values.
Basically, the form creates a new record in the **Conversations** table on Airtable, passing the [Record ID](https://support.airtable.com/docs/finding-airtable-record-ids) of the logged-in user who is initiating the conversation as well as the the **Recipient user’s Record ID**, which is the ID of the current record (user profile) that’s opened in the **Member Details** page.
When the form is submitted, the user is taken to the **All** **Conversations** page (through “On Form Submit” Action), where he/she can already view and access the newly-created conversation. Now, let’s see how the **All** **Conversations** page is configured.
### All Conversations
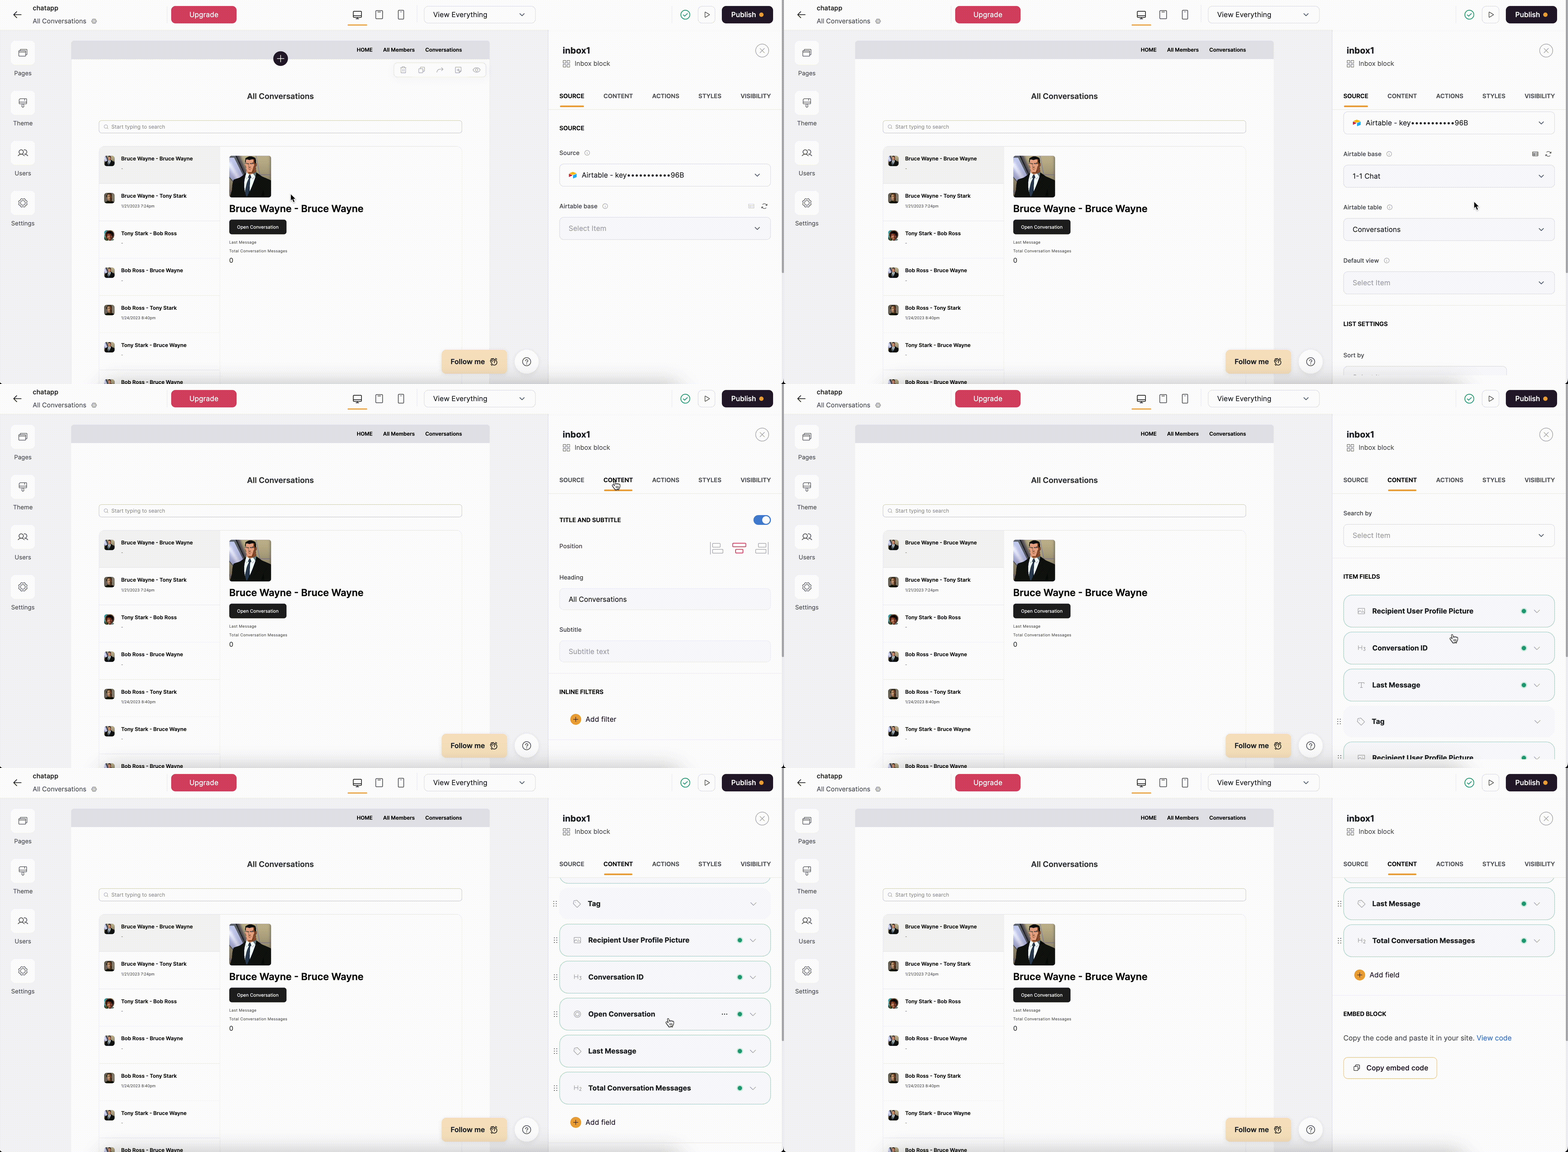
The **All Conversations** page contains an [Inbox block](/building-blocks/vikC2AWEpQGkZd4jGyoVxo/layout-inbox/9cbSp8Mvwru9g6L6RM4uJ5) that is connected to the **Conversations** table on Airtable, which contains all the conversations initiated between users.
In order for users to have access to their own conversations only, a [conditional filter](/user-groups-and-permissions/3oA6AaFzUiePs2sW2TpYrF/conditional-filters/mDnn7jnpPiYmJcT99jpt7m) is applied that shows only those conversations where the logged-in user is either a starter or a recipient of the conversation.
Each conversation contains **Recipient User’s Profile Picture**, the **Conversation ID** (displays the names of the starter and recipient users), L**ast Message** (displays time and date of the last message sent within the given conversation), T**otal Conversation Messages** (calculates the total number of messages exchanged within the given conversation), and an **Open Conversation** button that opens the page with the actual conversation (**Conversation Details** page).
We’ll take a closer look at how these fields are set up in Airtable in a bit. Now, let’s navigate to the **Conversation Details** page to see how it’s configured.
### Conversation Details
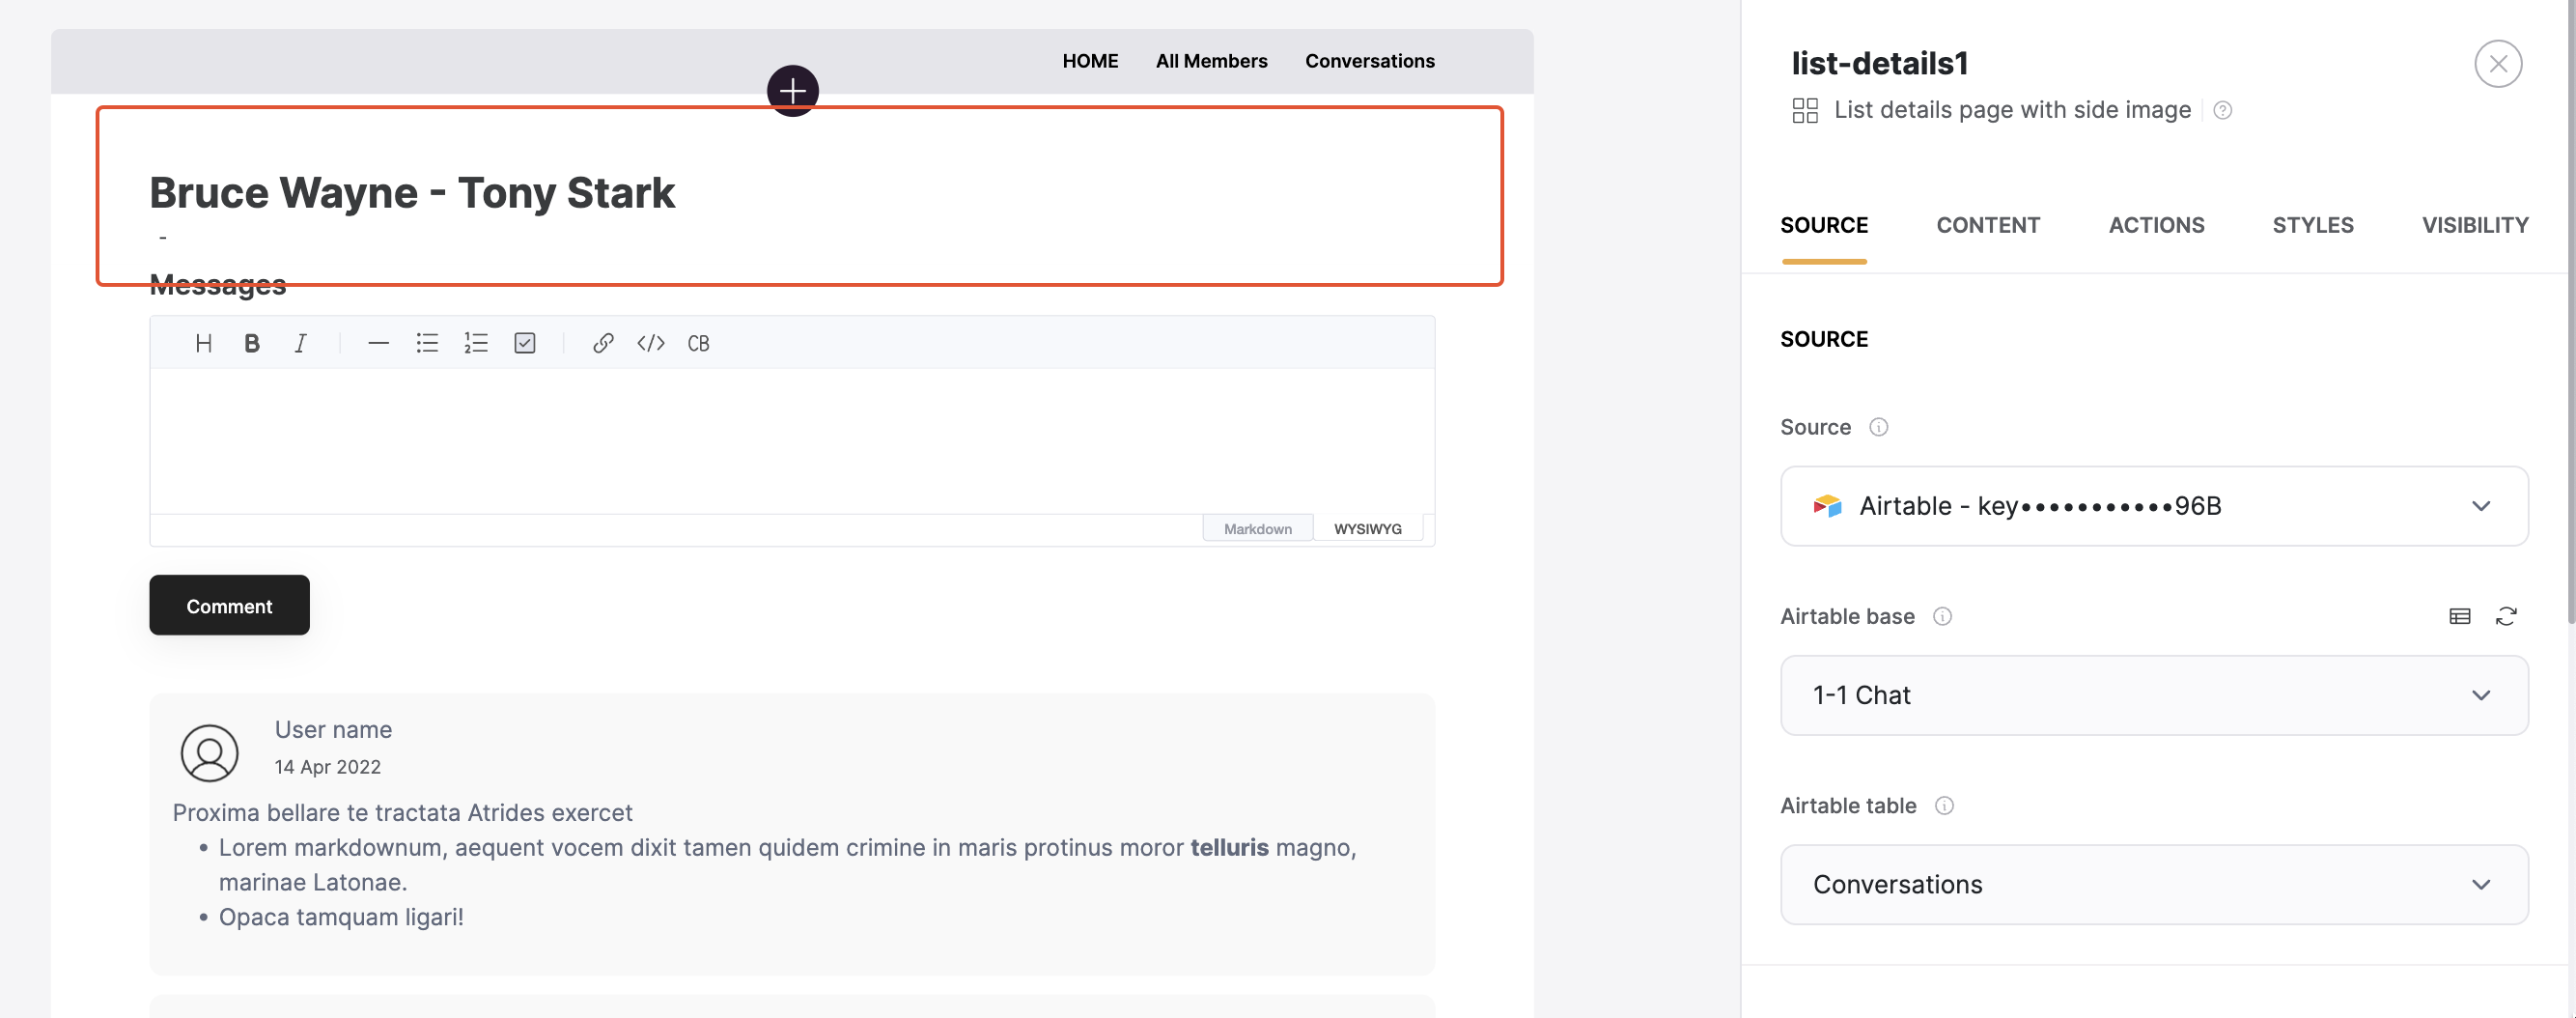
The first block is a List Details that’s linked to the **Conversations** table to indicate which conversation the user is currently on.
The block displays the **Conversation ID** field, which is simply a combination of the conversation starter and recipient names.
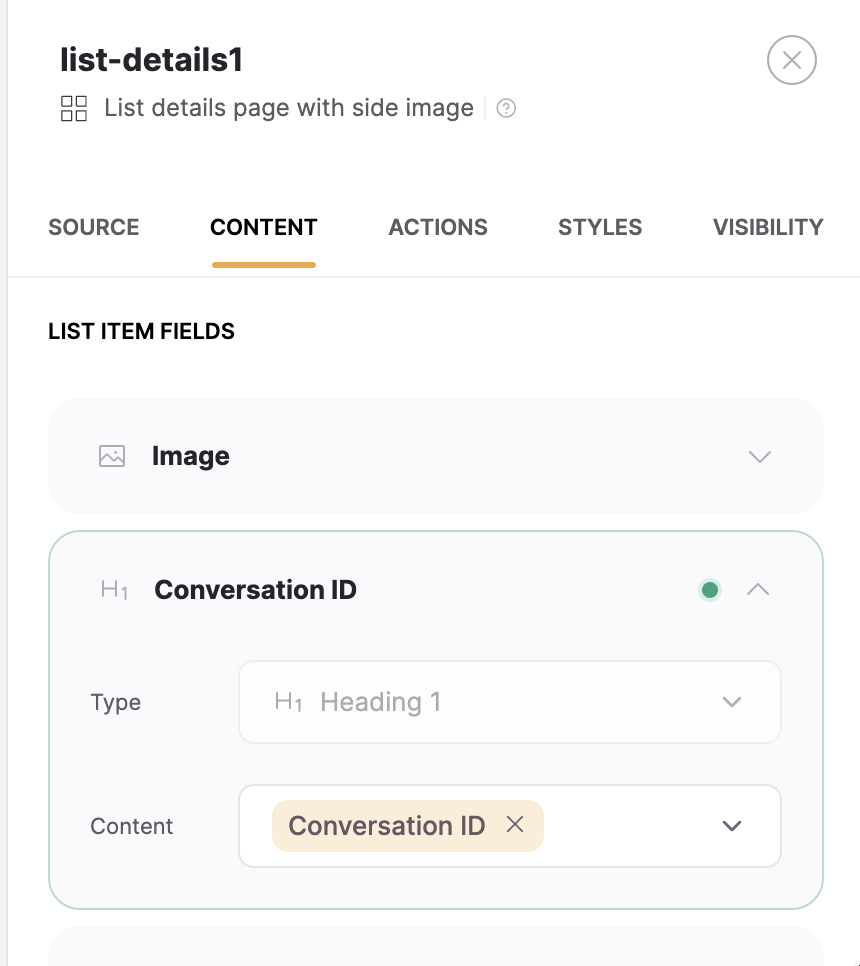
Next comes a [Comments](/697c2ac57a3c40a8b5c14cc7bcf8947c) block where the messaging happens. It is connected to the **Messages** table on Airtable.
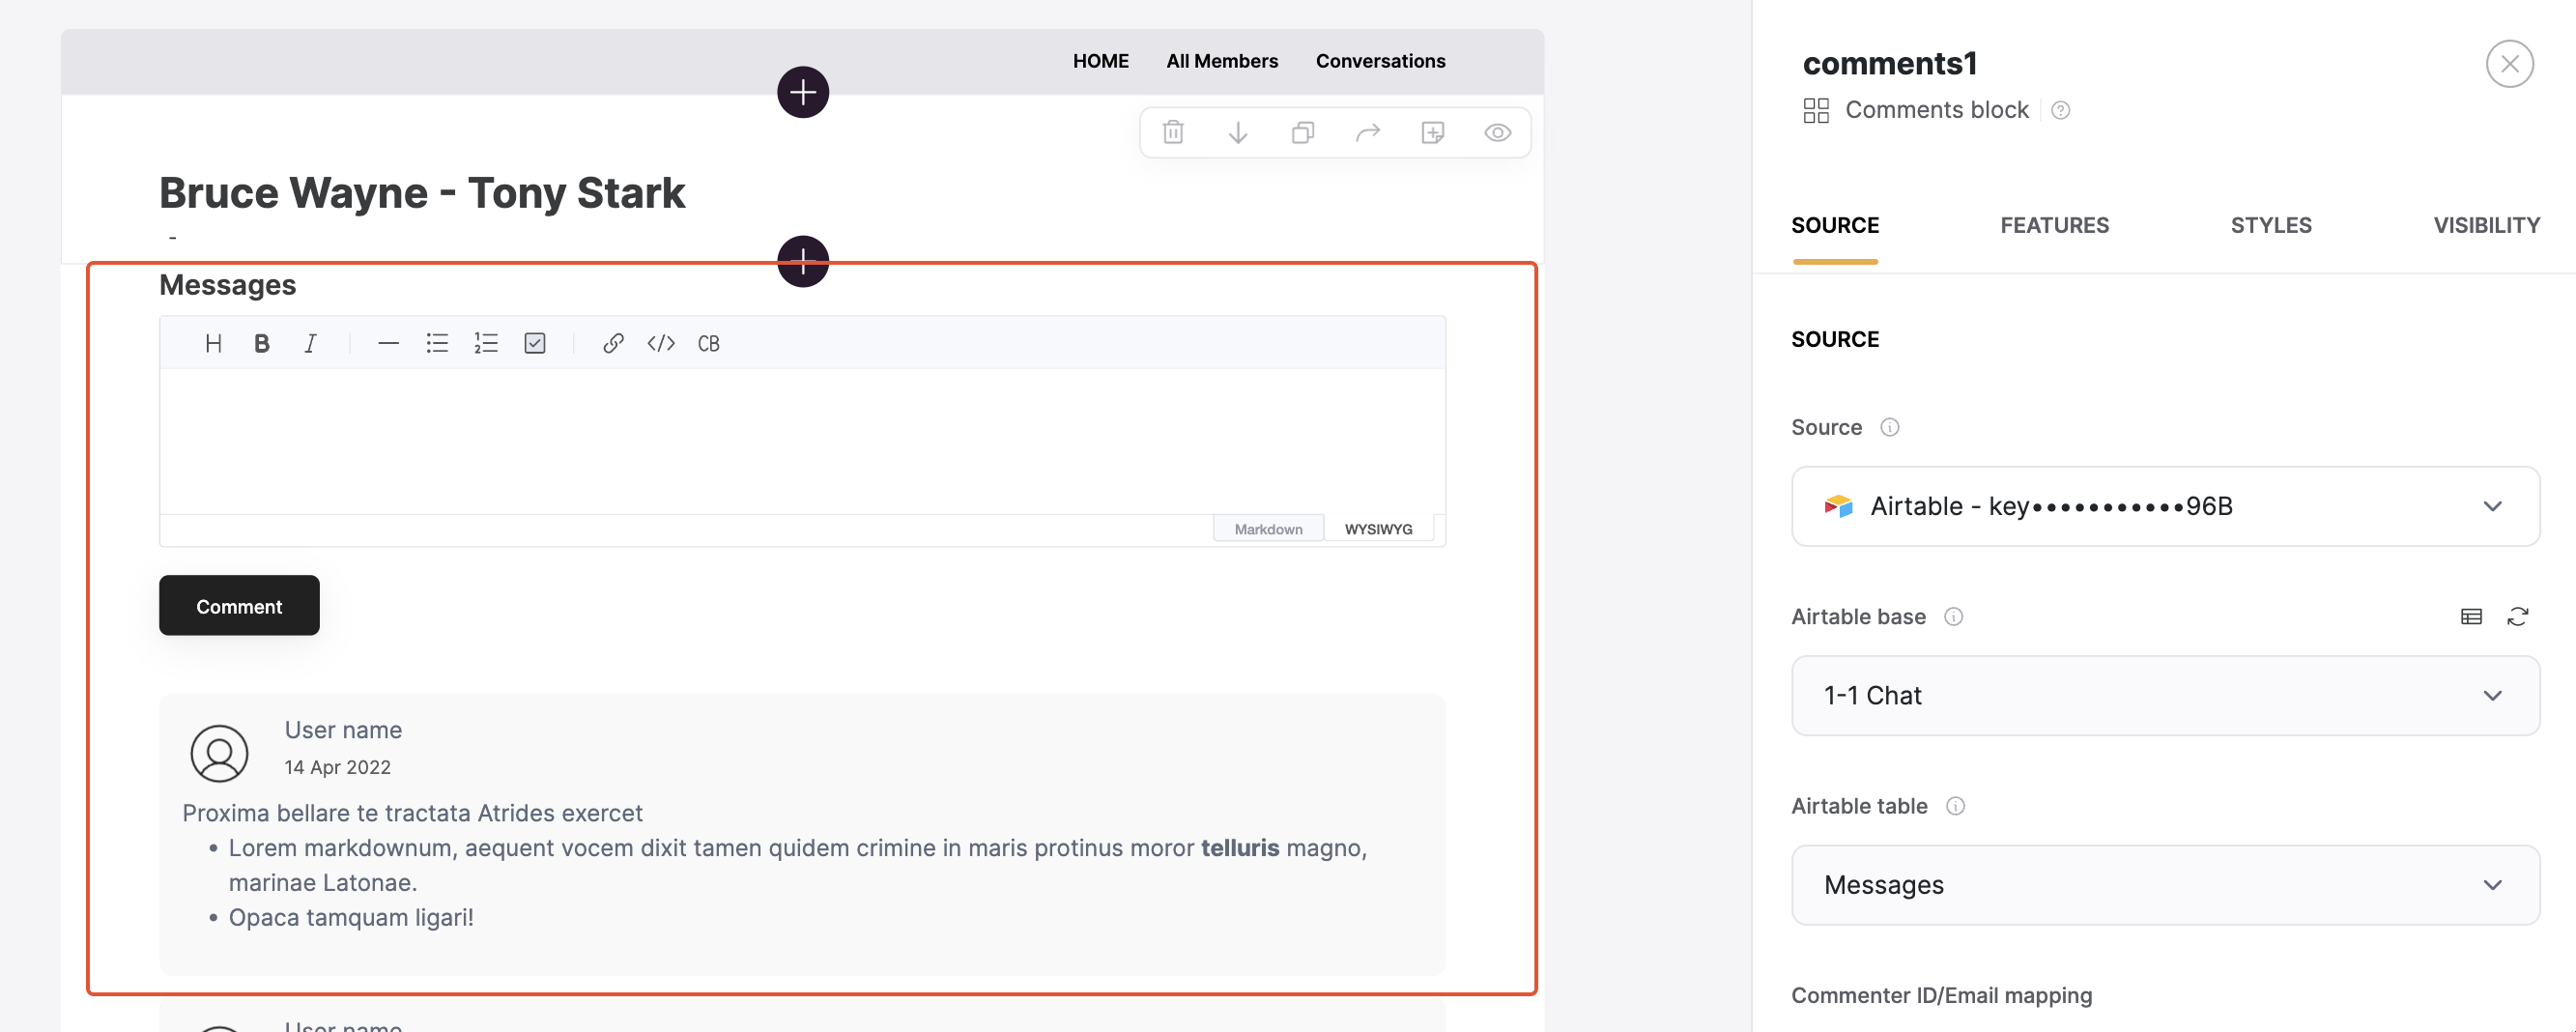
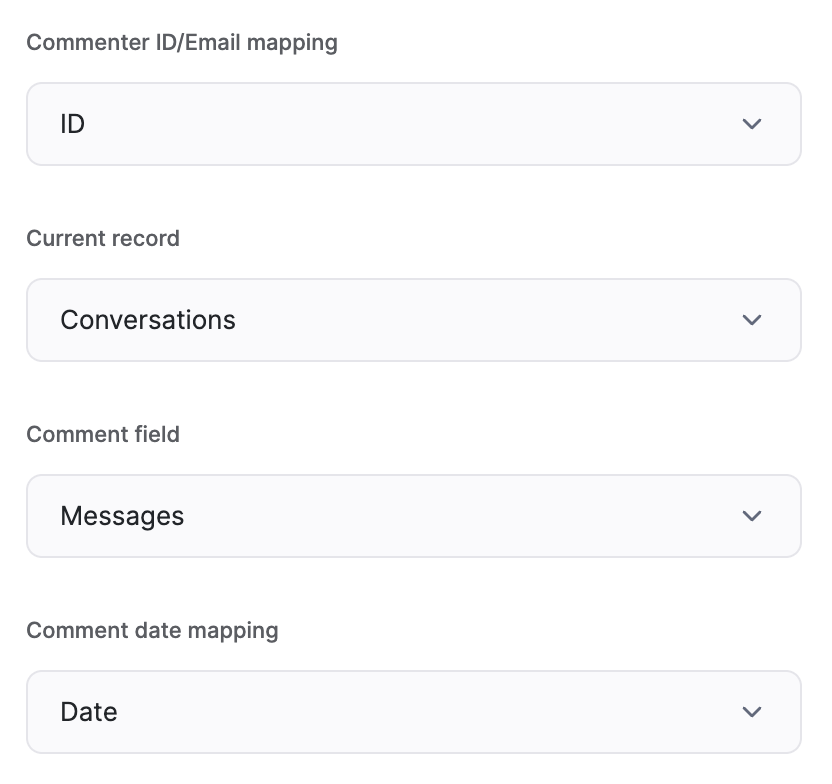
As you can see below, the block sends such data as **Commenter ID** (the name of the person initiating the chat), the [record ID](https://support.airtable.com/docs/finding-airtable-record-ids) of the conversation where the messaging happens (**Current record** parameter), the message body text (**Comment field** parameter), as well as the date.
That’s it for the Softr-side setup, now let’s navigate to the Airtable base of the project and see how the tables we’ve just been discussing are organized.
## Airtable setup
### Users
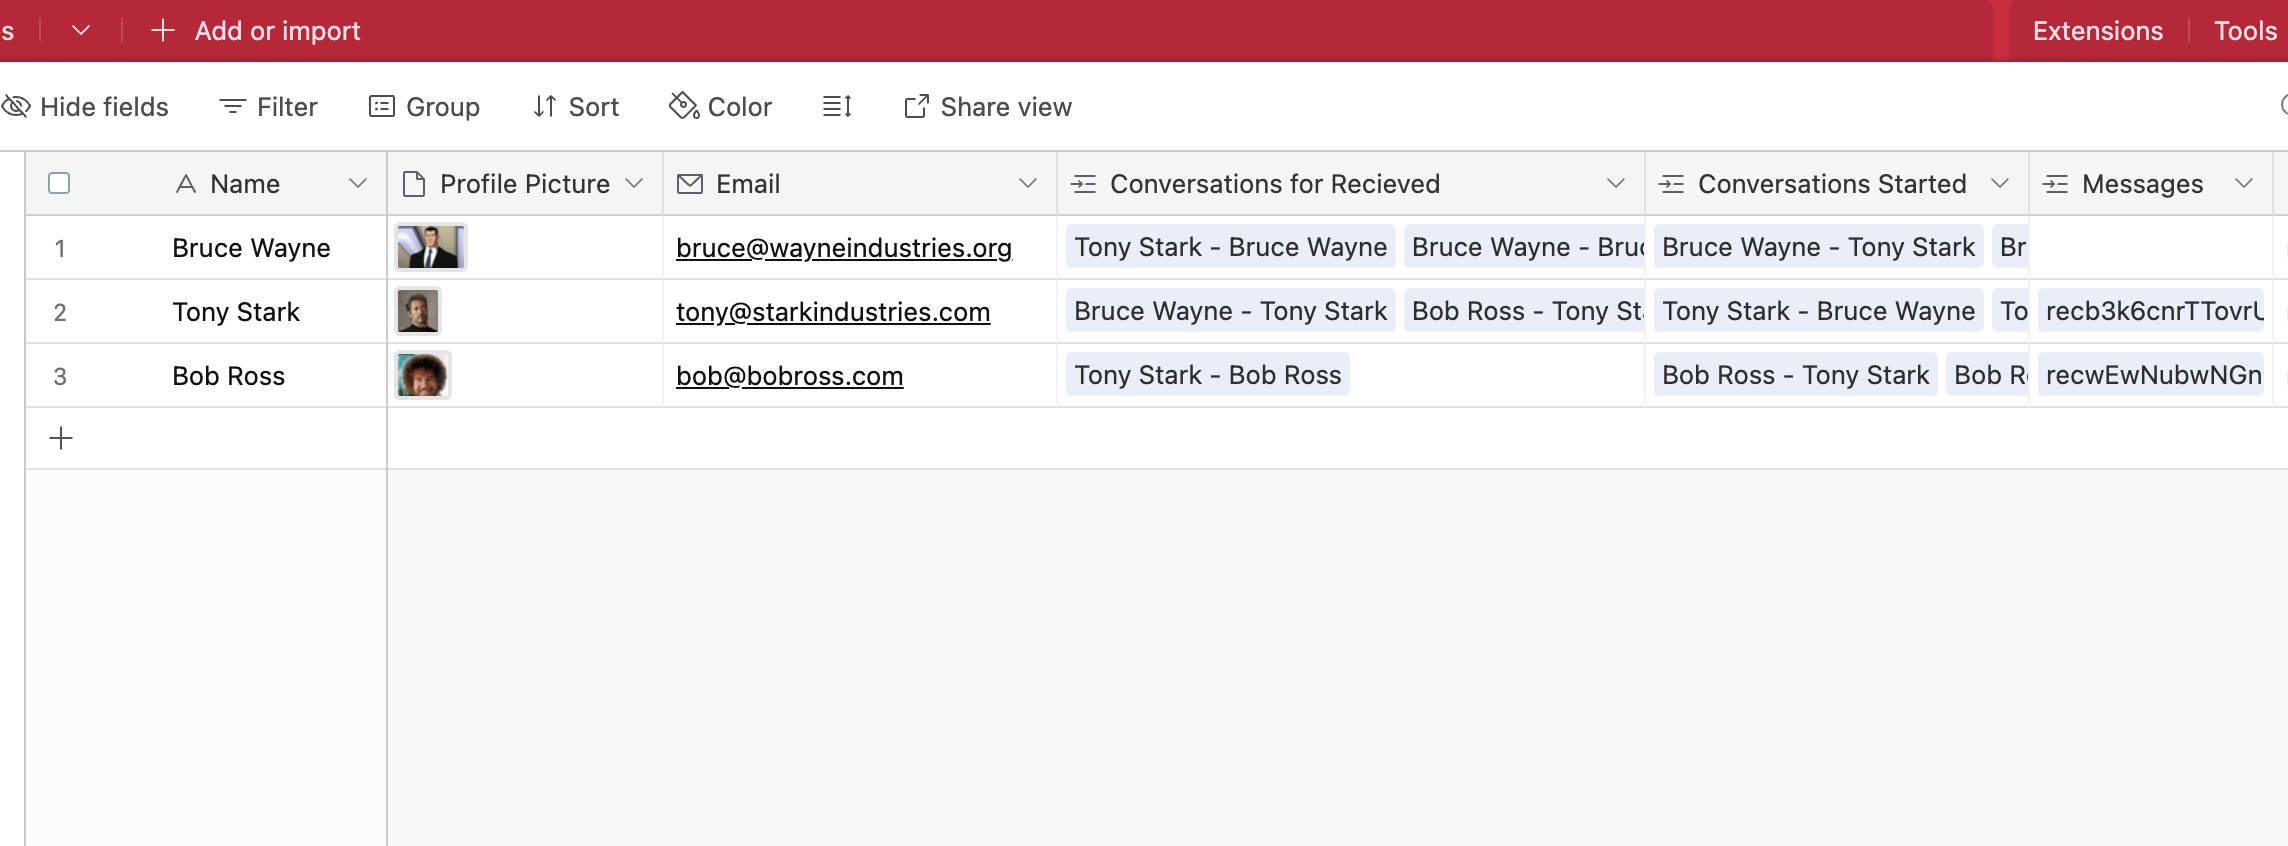
First comes the **Users** table, where all the user data is stored. It contains such fields as **Name**, **Profile Picture**, and **Email**. Further on, we have three [linked records](https://www.airtable.com/guides/build/connect-data-with-linked-records):
* **Conversations Started:** links to the **Conversations** table, where each conversation record contains data on the user who has started the conversation. As you might remember, this was collected through a hidden field in the **Start Conversation** form.
* **Conversations Received:** links to the **Conversations** table, where each conversation record contains data on the conversation recipient user). This was collected through a hidden field in the same form as well.
* **Messages:** links to the **Messages** table, showing the record ID of the messages that the given user has sent. As we saw in the Softr setup section, when a message was created by the user through the Comments block, it stored the **Commenter ID** in Airtable.
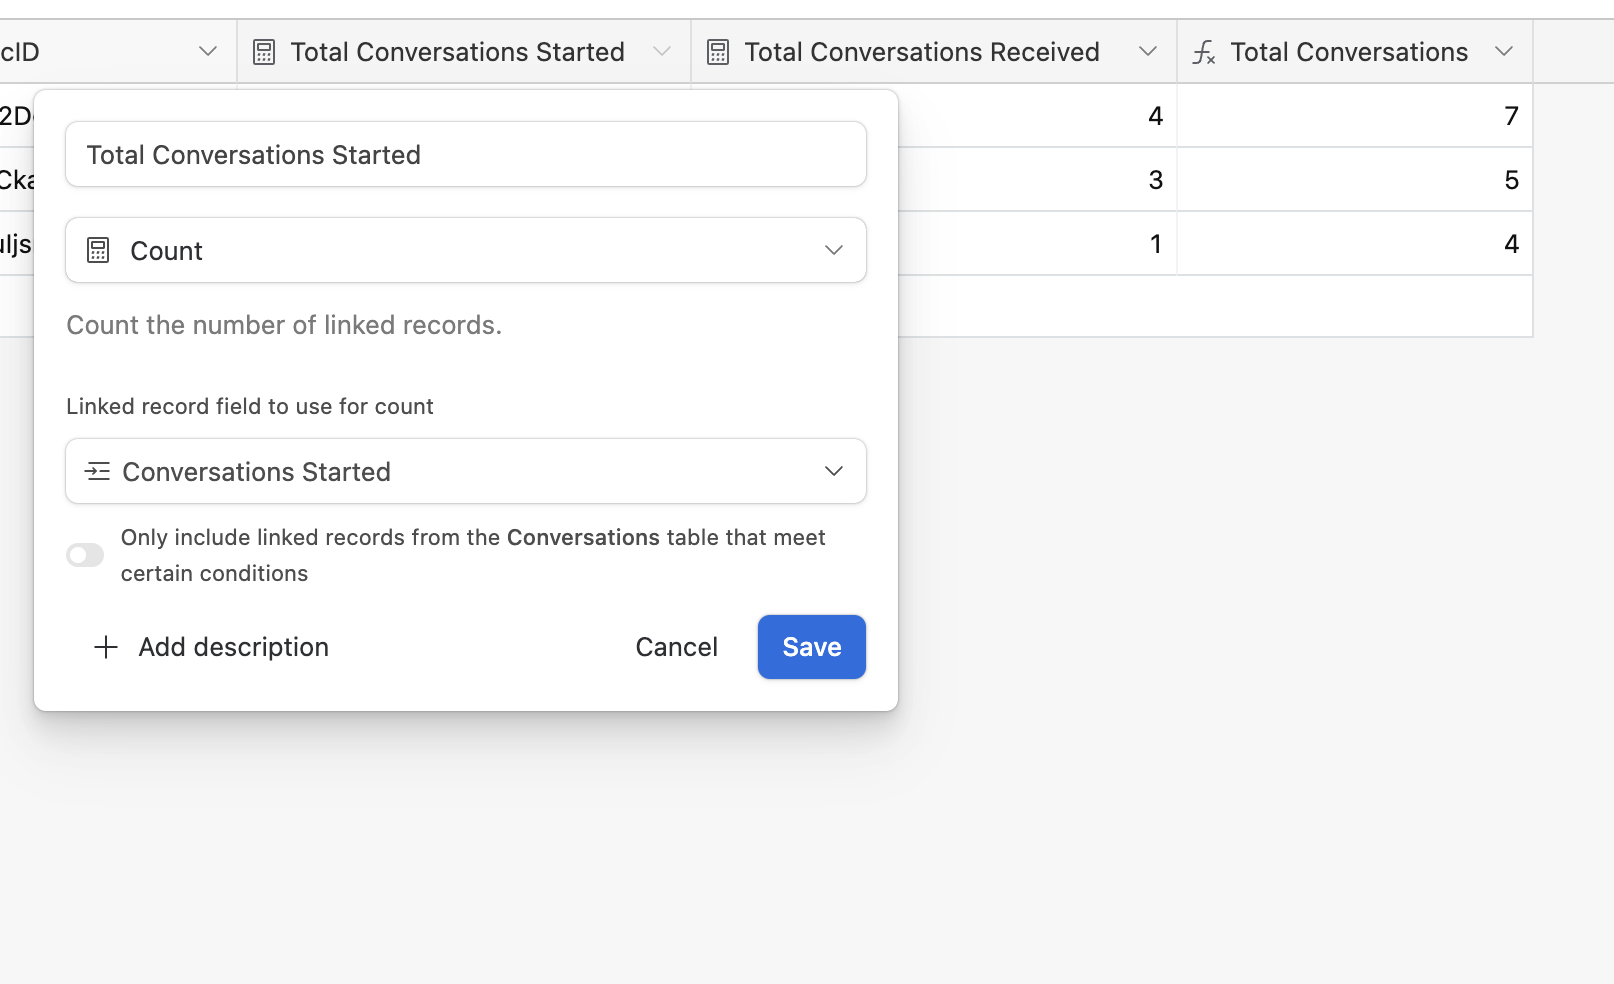
Then, we have the **Total Conversations Started** and **Total Conversations Received** fields, which calculate the number of conversations based on the **Conversations Started** and **Conversations Received** fields that we just reviewed. The last **Total Conversations** field just sums up the value from the two previous fields through a formula.
### Conversations
Here, we have the **Conversation Starter User** and **Recipient User** fields (linked records from the **Users** table) and the **Conversation ID** field, which is a [concatenation](https://support.airtable.com/docs/formula-field-reference#text-operators-and-functions) of these two fields. Also, there’s the **Messages** field, which is a linked record from the **Messages** table (as we’ve already discussed, each message is submitted under a specific conversation and is automatically linked to that conversation).
Then, we have a few fields that [look up](https://support.airtable.com/docs/lookup-field-overview) user data from the Users table.
Lastly, there are a few more fields that calculate things like **Total Messages** or **Conversation Age** as well as indicate the **Record ID** of the record through the [RECORD\_ID () formula](https://support.airtable.com/docs/finding-airtable-record-ids).
### Messages
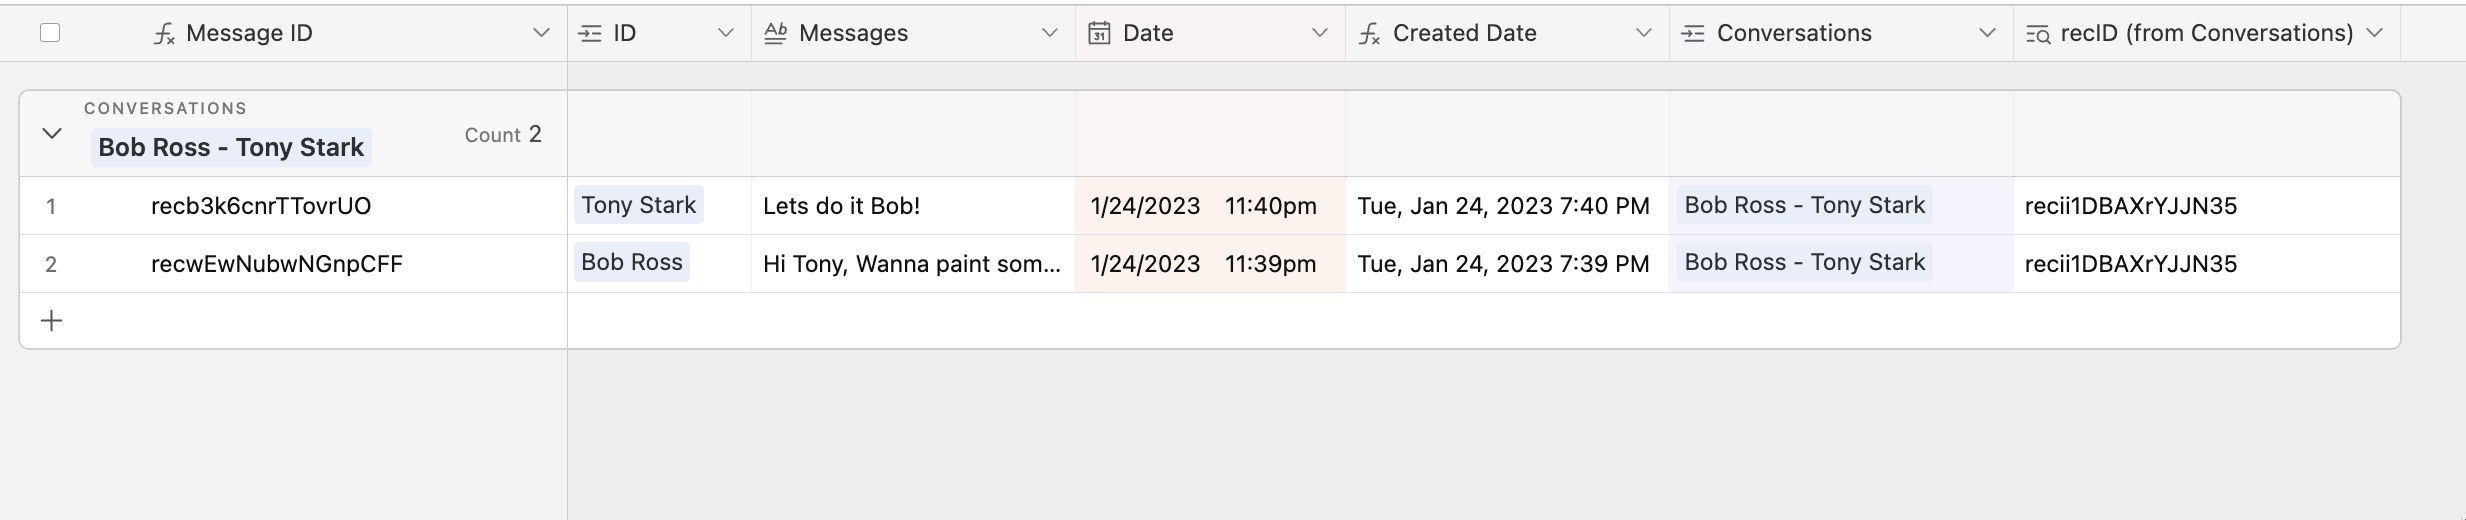
The last table we have in this base is the **Messages** table. Here, we store all the messages linked to their corresponding conversations (**Conversations** field) and senders (the **ID** field).
And there you have it. We hope that we’ve been able to provide sufficient detail to let you recreate this (or a similar) setup on your side. Enjoy!
 There’s also a **Conversations** section, where each user can see the list of all the conversations he/she has participated in, open those, and continue chatting.
 We are first going to look into the Softr side of the application to see how each page is set up. Then, we will take a closer look into the Airtable base that serves as a [data source](/4230abecf813402aa2926466c313290a?pvs=25) for the app.
## Softr setup
### Home page with user profile
First comes the home page, where we have a [List Details](/building-blocks/vikC2AWEpQGkZd4jGyoVxo/item-details-block-/4bE8XaFbJp45wkAwuWiz8f) block that is connected to the **Users** table on Airtable. A [conditional filter](/user-groups-and-permissions/3oA6AaFzUiePs2sW2TpYrF/conditional-filters/mDnn7jnpPiYmJcT99jpt7m) is applied to show each user his/her own details.
We are first going to look into the Softr side of the application to see how each page is set up. Then, we will take a closer look into the Airtable base that serves as a [data source](/4230abecf813402aa2926466c313290a?pvs=25) for the app.
## Softr setup
### Home page with user profile
First comes the home page, where we have a [List Details](/building-blocks/vikC2AWEpQGkZd4jGyoVxo/item-details-block-/4bE8XaFbJp45wkAwuWiz8f) block that is connected to the **Users** table on Airtable. A [conditional filter](/user-groups-and-permissions/3oA6AaFzUiePs2sW2TpYrF/conditional-filters/mDnn7jnpPiYmJcT99jpt7m) is applied to show each user his/her own details.
 The block shows such user details as name and email as well as **Total Conversations** and **Total Conversations Started** fields from Airtable, which we’ll explore in greater detail when we proceed to the Airtable setup.
 ### All Members
Next, we have the **All Members** page, which is a [List block](/building-blocks/vikC2AWEpQGkZd4jGyoVxo/list-block/pQhPYuA28VXr5tLLFBcbCU) that shows the list of all users and has a **View Profile** button that opens the **Member Details** page, which we’ll discuss next.
### All Members
Next, we have the **All Members** page, which is a [List block](/building-blocks/vikC2AWEpQGkZd4jGyoVxo/list-block/pQhPYuA28VXr5tLLFBcbCU) that shows the list of all users and has a **View Profile** button that opens the **Member Details** page, which we’ll discuss next.
 ### Member Details
Similar to the Home page, the **Member Details** page contains a List Details block that shows some user info. But it also has a [Customizable Form](/building-blocks/vikC2AWEpQGkZd4jGyoVxo/advanced-form-features/jCim5VWZePgZuaRsUZBnpG) block that consists of a **Start Conversation** button and sends two hidden field values.
### Member Details
Similar to the Home page, the **Member Details** page contains a List Details block that shows some user info. But it also has a [Customizable Form](/building-blocks/vikC2AWEpQGkZd4jGyoVxo/advanced-form-features/jCim5VWZePgZuaRsUZBnpG) block that consists of a **Start Conversation** button and sends two hidden field values.
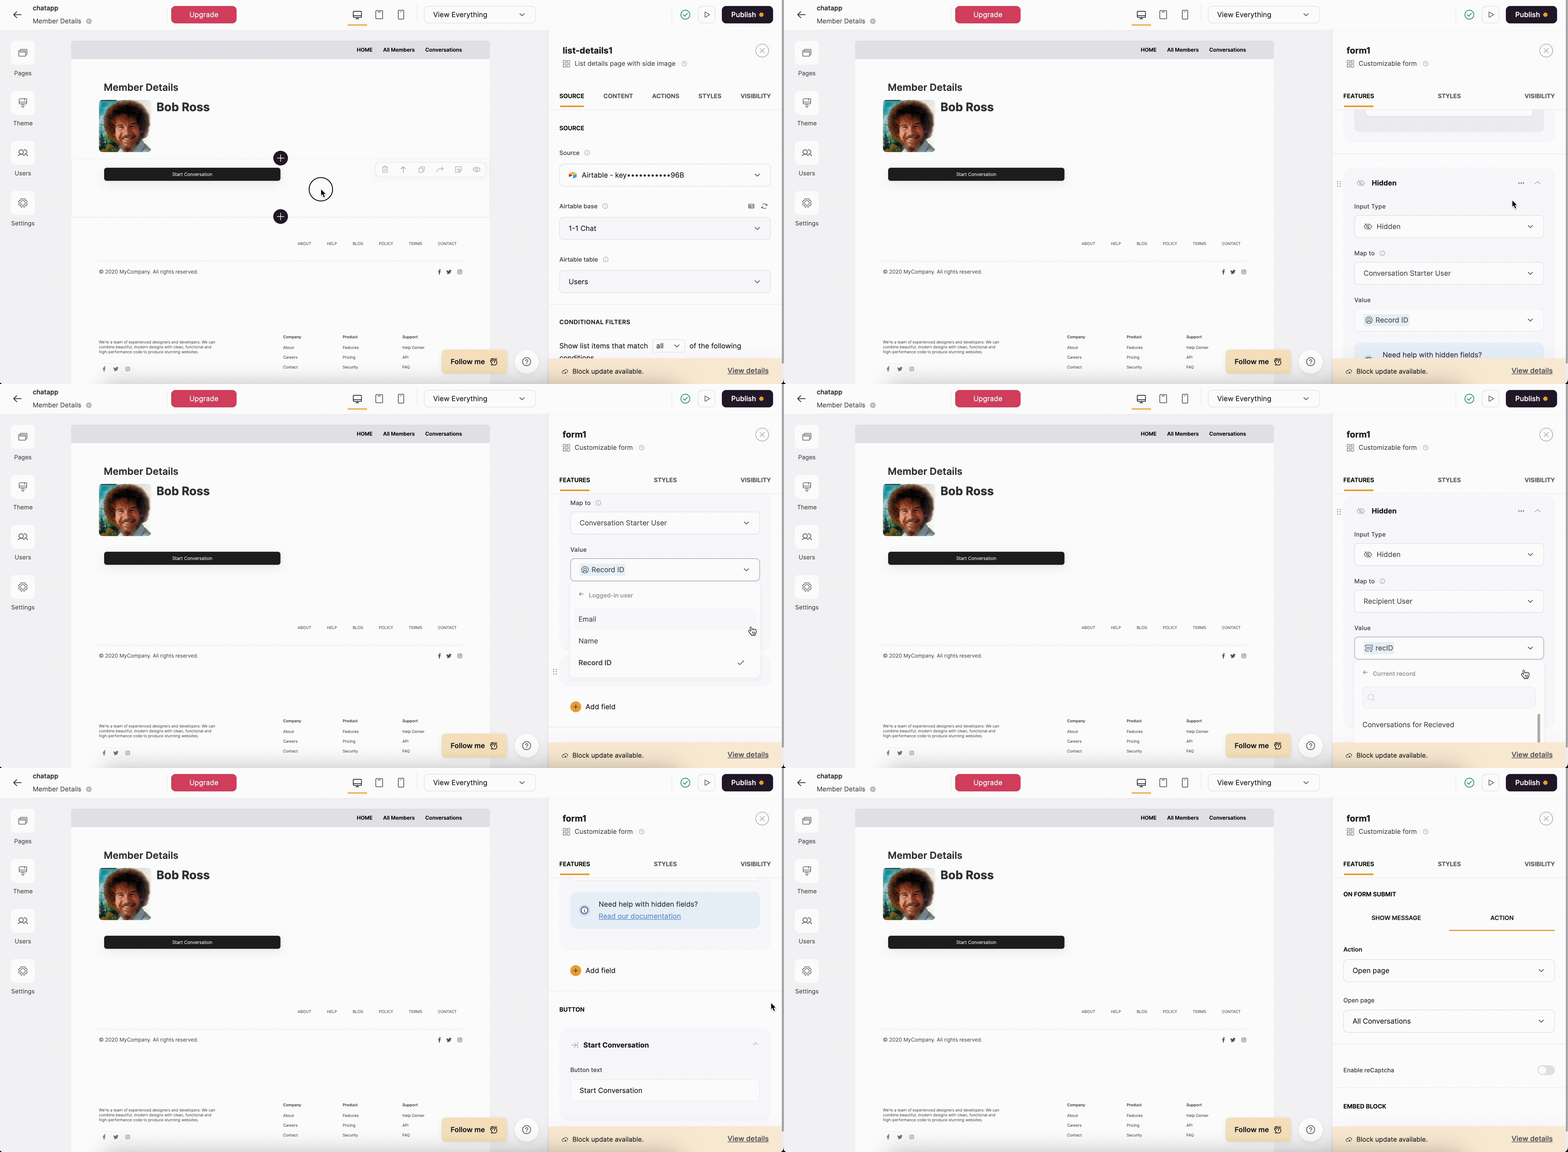 Basically, the form creates a new record in the **Conversations** table on Airtable, passing the [Record ID](https://support.airtable.com/docs/finding-airtable-record-ids) of the logged-in user who is initiating the conversation as well as the the **Recipient user’s Record ID**, which is the ID of the current record (user profile) that’s opened in the **Member Details** page.
When the form is submitted, the user is taken to the **All** **Conversations** page (through “On Form Submit” Action), where he/she can already view and access the newly-created conversation. Now, let’s see how the **All** **Conversations** page is configured.
### All Conversations
The **All Conversations** page contains an [Inbox block](/building-blocks/vikC2AWEpQGkZd4jGyoVxo/layout-inbox/9cbSp8Mvwru9g6L6RM4uJ5) that is connected to the **Conversations** table on Airtable, which contains all the conversations initiated between users.
Basically, the form creates a new record in the **Conversations** table on Airtable, passing the [Record ID](https://support.airtable.com/docs/finding-airtable-record-ids) of the logged-in user who is initiating the conversation as well as the the **Recipient user’s Record ID**, which is the ID of the current record (user profile) that’s opened in the **Member Details** page.
When the form is submitted, the user is taken to the **All** **Conversations** page (through “On Form Submit” Action), where he/she can already view and access the newly-created conversation. Now, let’s see how the **All** **Conversations** page is configured.
### All Conversations
The **All Conversations** page contains an [Inbox block](/building-blocks/vikC2AWEpQGkZd4jGyoVxo/layout-inbox/9cbSp8Mvwru9g6L6RM4uJ5) that is connected to the **Conversations** table on Airtable, which contains all the conversations initiated between users.
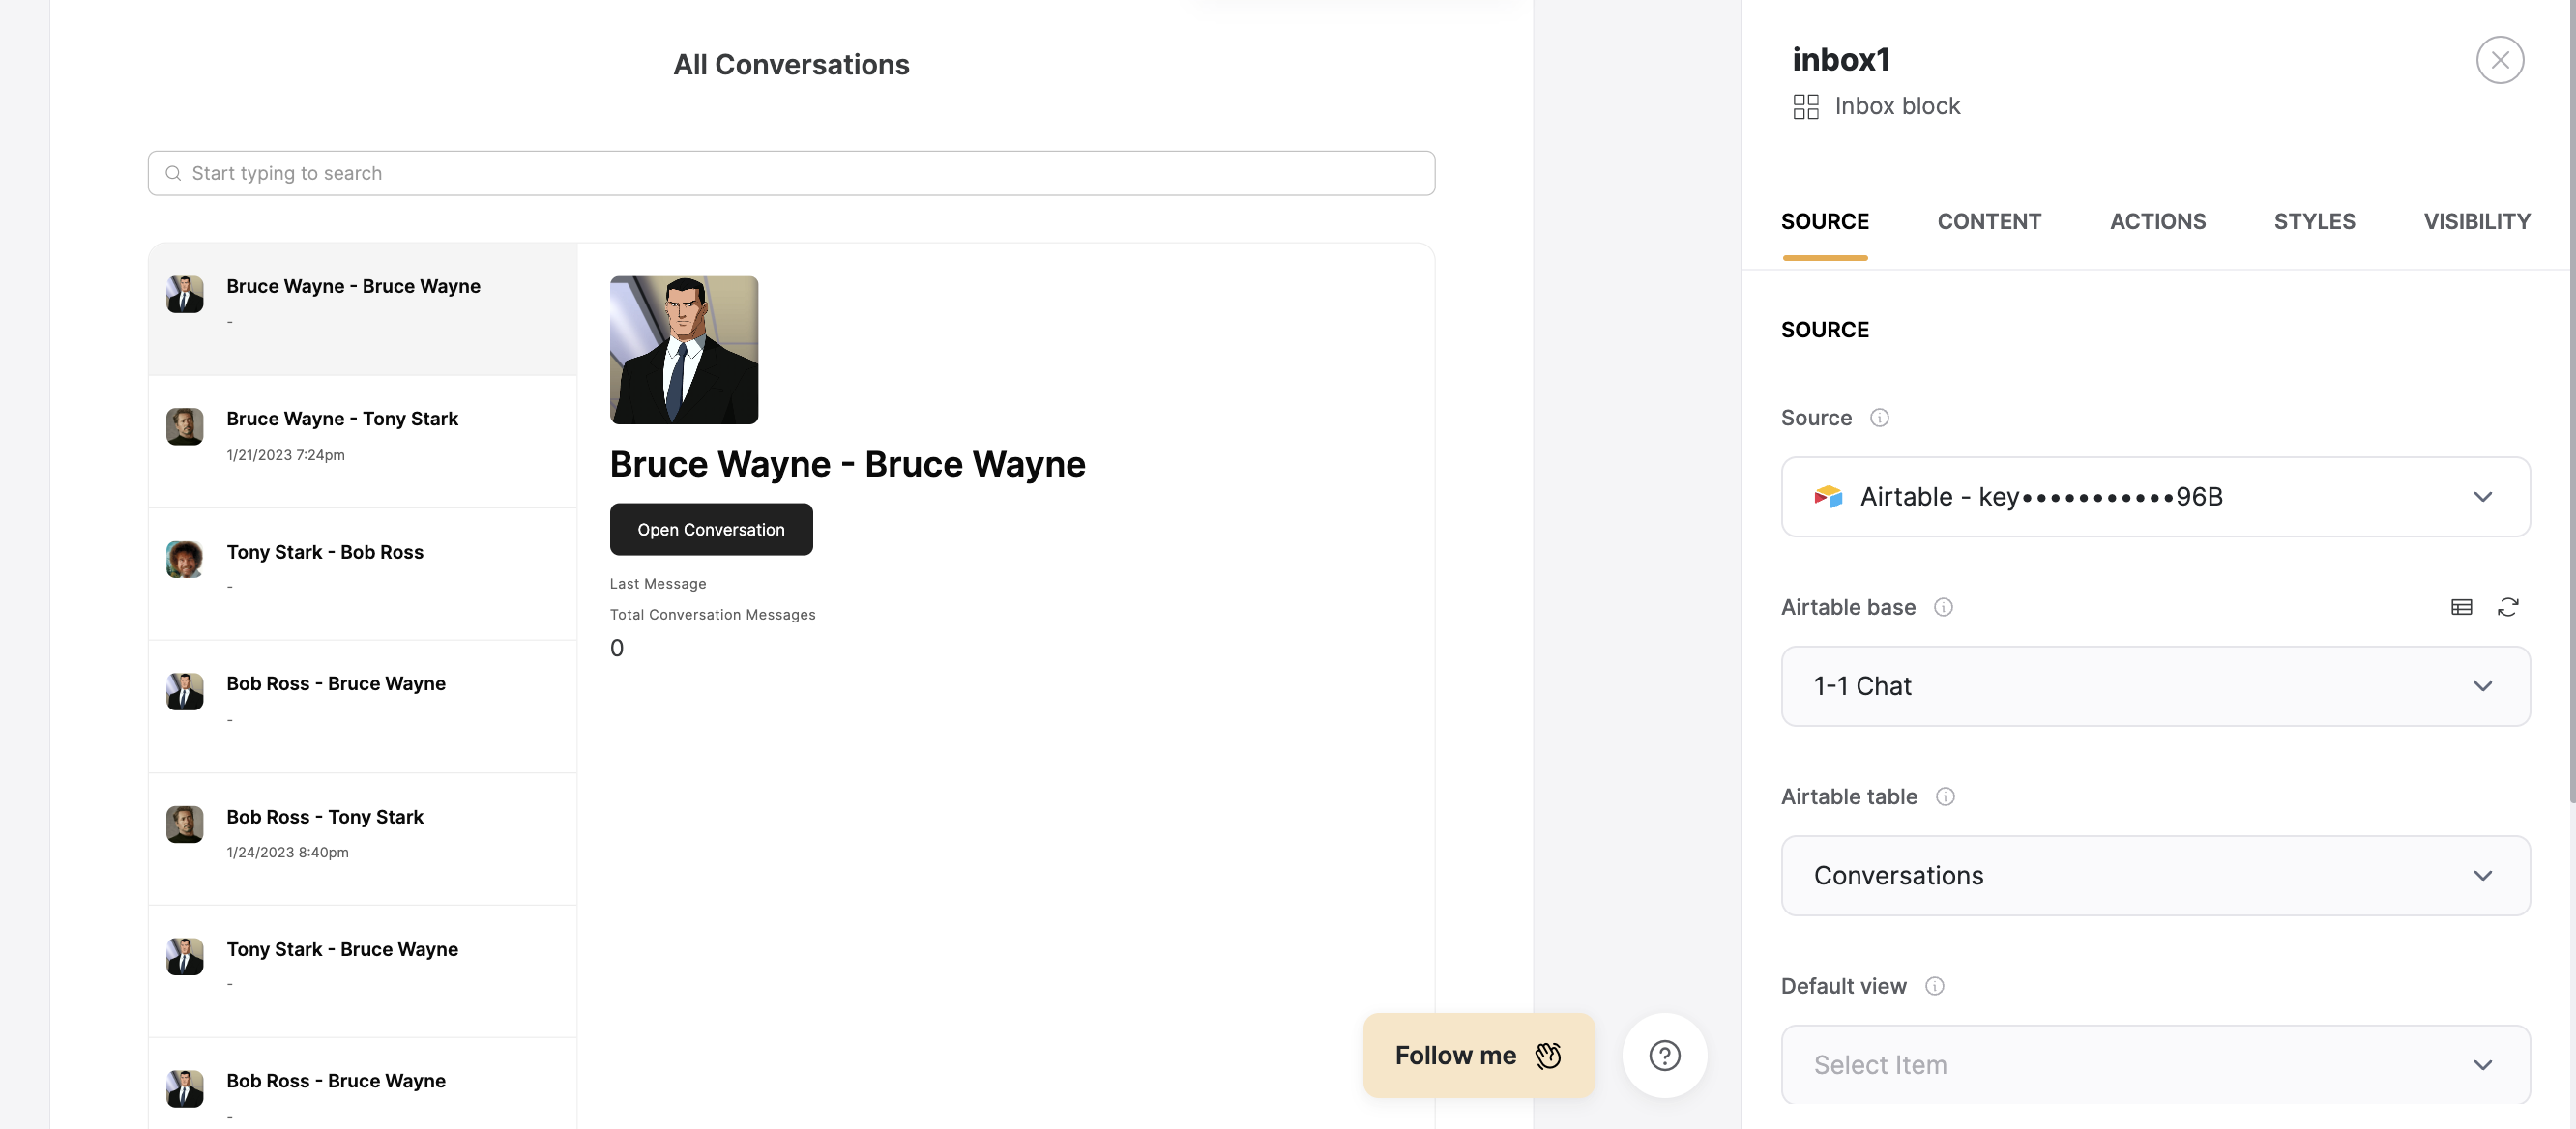 In order for users to have access to their own conversations only, a [conditional filter](/user-groups-and-permissions/3oA6AaFzUiePs2sW2TpYrF/conditional-filters/mDnn7jnpPiYmJcT99jpt7m) is applied that shows only those conversations where the logged-in user is either a starter or a recipient of the conversation.
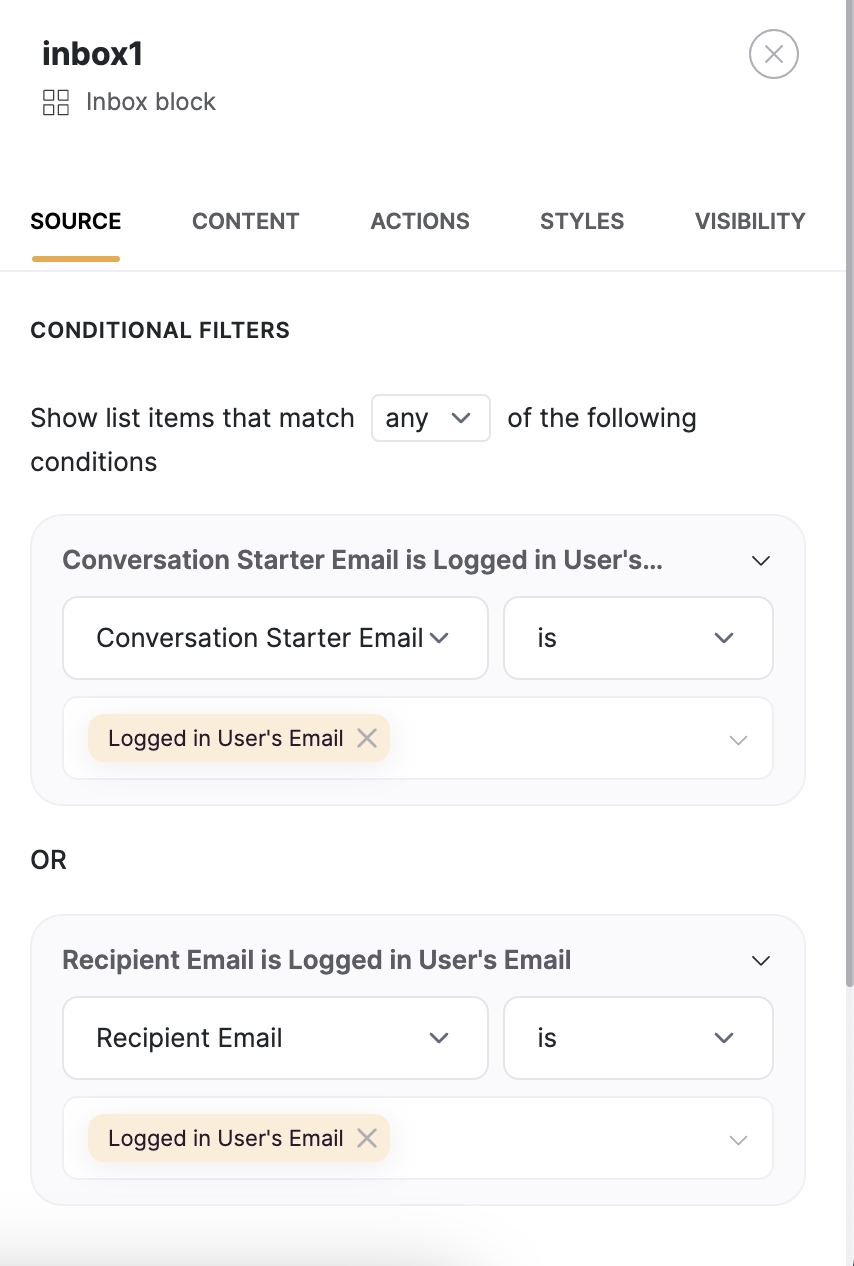 Each conversation contains **Recipient User’s Profile Picture**, the **Conversation ID** (displays the names of the starter and recipient users), L**ast Message** (displays time and date of the last message sent within the given conversation), T**otal Conversation Messages** (calculates the total number of messages exchanged within the given conversation), and an **Open Conversation** button that opens the page with the actual conversation (**Conversation Details** page).
 We’ll take a closer look at how these fields are set up in Airtable in a bit. Now, let’s navigate to the **Conversation Details** page to see how it’s configured.
### Conversation Details
The first block is a List Details that’s linked to the **Conversations** table to indicate which conversation the user is currently on.
We’ll take a closer look at how these fields are set up in Airtable in a bit. Now, let’s navigate to the **Conversation Details** page to see how it’s configured.
### Conversation Details
The first block is a List Details that’s linked to the **Conversations** table to indicate which conversation the user is currently on.
 The block displays the **Conversation ID** field, which is simply a combination of the conversation starter and recipient names.
 Next comes a [Comments](/697c2ac57a3c40a8b5c14cc7bcf8947c) block where the messaging happens. It is connected to the **Messages** table on Airtable.
 As you can see below, the block sends such data as **Commenter ID** (the name of the person initiating the chat), the [record ID](https://support.airtable.com/docs/finding-airtable-record-ids) of the conversation where the messaging happens (**Current record** parameter), the message body text (**Comment field** parameter), as well as the date.
 That’s it for the Softr-side setup, now let’s navigate to the Airtable base of the project and see how the tables we’ve just been discussing are organized.
## Airtable setup
### Users
First comes the **Users** table, where all the user data is stored. It contains such fields as **Name**, **Profile Picture**, and **Email**. Further on, we have three [linked records](https://www.airtable.com/guides/build/connect-data-with-linked-records):
* **Conversations Started:** links to the **Conversations** table, where each conversation record contains data on the user who has started the conversation. As you might remember, this was collected through a hidden field in the **Start Conversation** form.
* **Conversations Received:** links to the **Conversations** table, where each conversation record contains data on the conversation recipient user). This was collected through a hidden field in the same form as well.
* **Messages:** links to the **Messages** table, showing the record ID of the messages that the given user has sent. As we saw in the Softr setup section, when a message was created by the user through the Comments block, it stored the **Commenter ID** in Airtable.
That’s it for the Softr-side setup, now let’s navigate to the Airtable base of the project and see how the tables we’ve just been discussing are organized.
## Airtable setup
### Users
First comes the **Users** table, where all the user data is stored. It contains such fields as **Name**, **Profile Picture**, and **Email**. Further on, we have three [linked records](https://www.airtable.com/guides/build/connect-data-with-linked-records):
* **Conversations Started:** links to the **Conversations** table, where each conversation record contains data on the user who has started the conversation. As you might remember, this was collected through a hidden field in the **Start Conversation** form.
* **Conversations Received:** links to the **Conversations** table, where each conversation record contains data on the conversation recipient user). This was collected through a hidden field in the same form as well.
* **Messages:** links to the **Messages** table, showing the record ID of the messages that the given user has sent. As we saw in the Softr setup section, when a message was created by the user through the Comments block, it stored the **Commenter ID** in Airtable.
 Then, we have the **Total Conversations Started** and **Total Conversations Received** fields, which calculate the number of conversations based on the **Conversations Started** and **Conversations Received** fields that we just reviewed. The last **Total Conversations** field just sums up the value from the two previous fields through a formula.
 ### Conversations
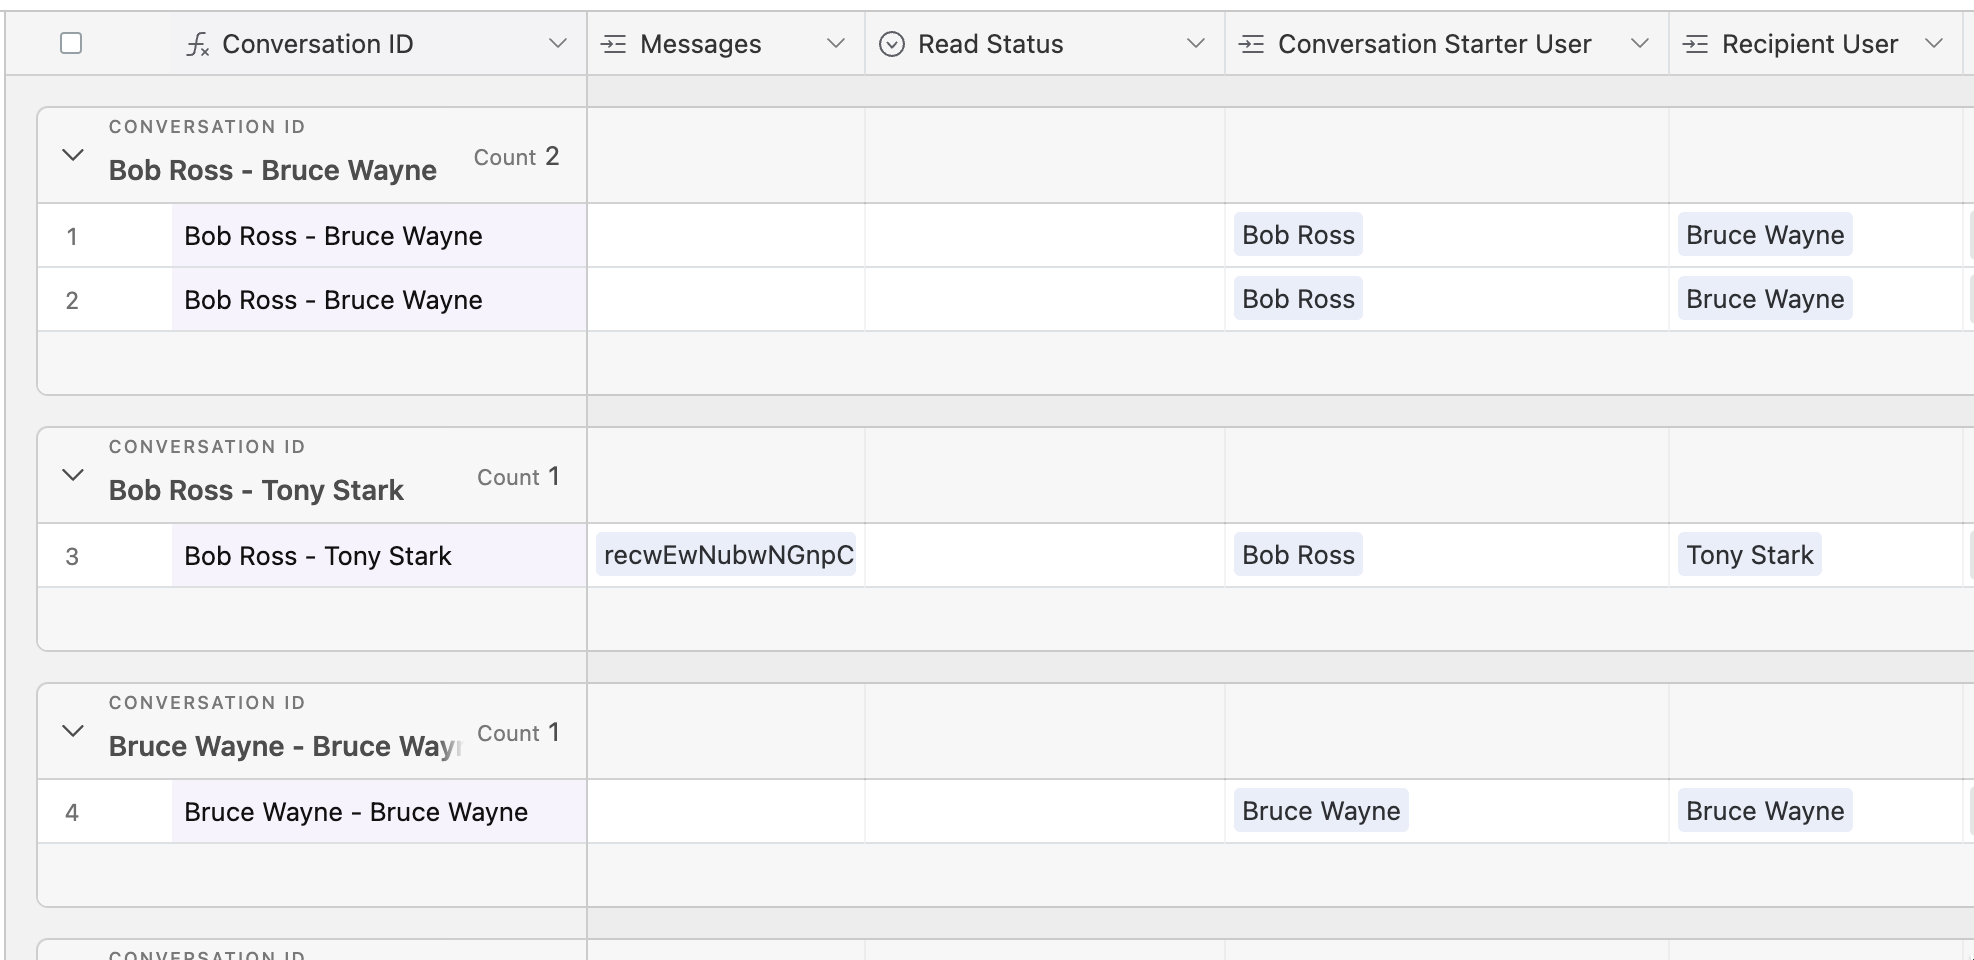 Here, we have the **Conversation Starter User** and **Recipient User** fields (linked records from the **Users** table) and the **Conversation ID** field, which is a [concatenation](https://support.airtable.com/docs/formula-field-reference#text-operators-and-functions) of these two fields. Also, there’s the **Messages** field, which is a linked record from the **Messages** table (as we’ve already discussed, each message is submitted under a specific conversation and is automatically linked to that conversation).
Then, we have a few fields that [look up](https://support.airtable.com/docs/lookup-field-overview) user data from the Users table.
Here, we have the **Conversation Starter User** and **Recipient User** fields (linked records from the **Users** table) and the **Conversation ID** field, which is a [concatenation](https://support.airtable.com/docs/formula-field-reference#text-operators-and-functions) of these two fields. Also, there’s the **Messages** field, which is a linked record from the **Messages** table (as we’ve already discussed, each message is submitted under a specific conversation and is automatically linked to that conversation).
Then, we have a few fields that [look up](https://support.airtable.com/docs/lookup-field-overview) user data from the Users table.
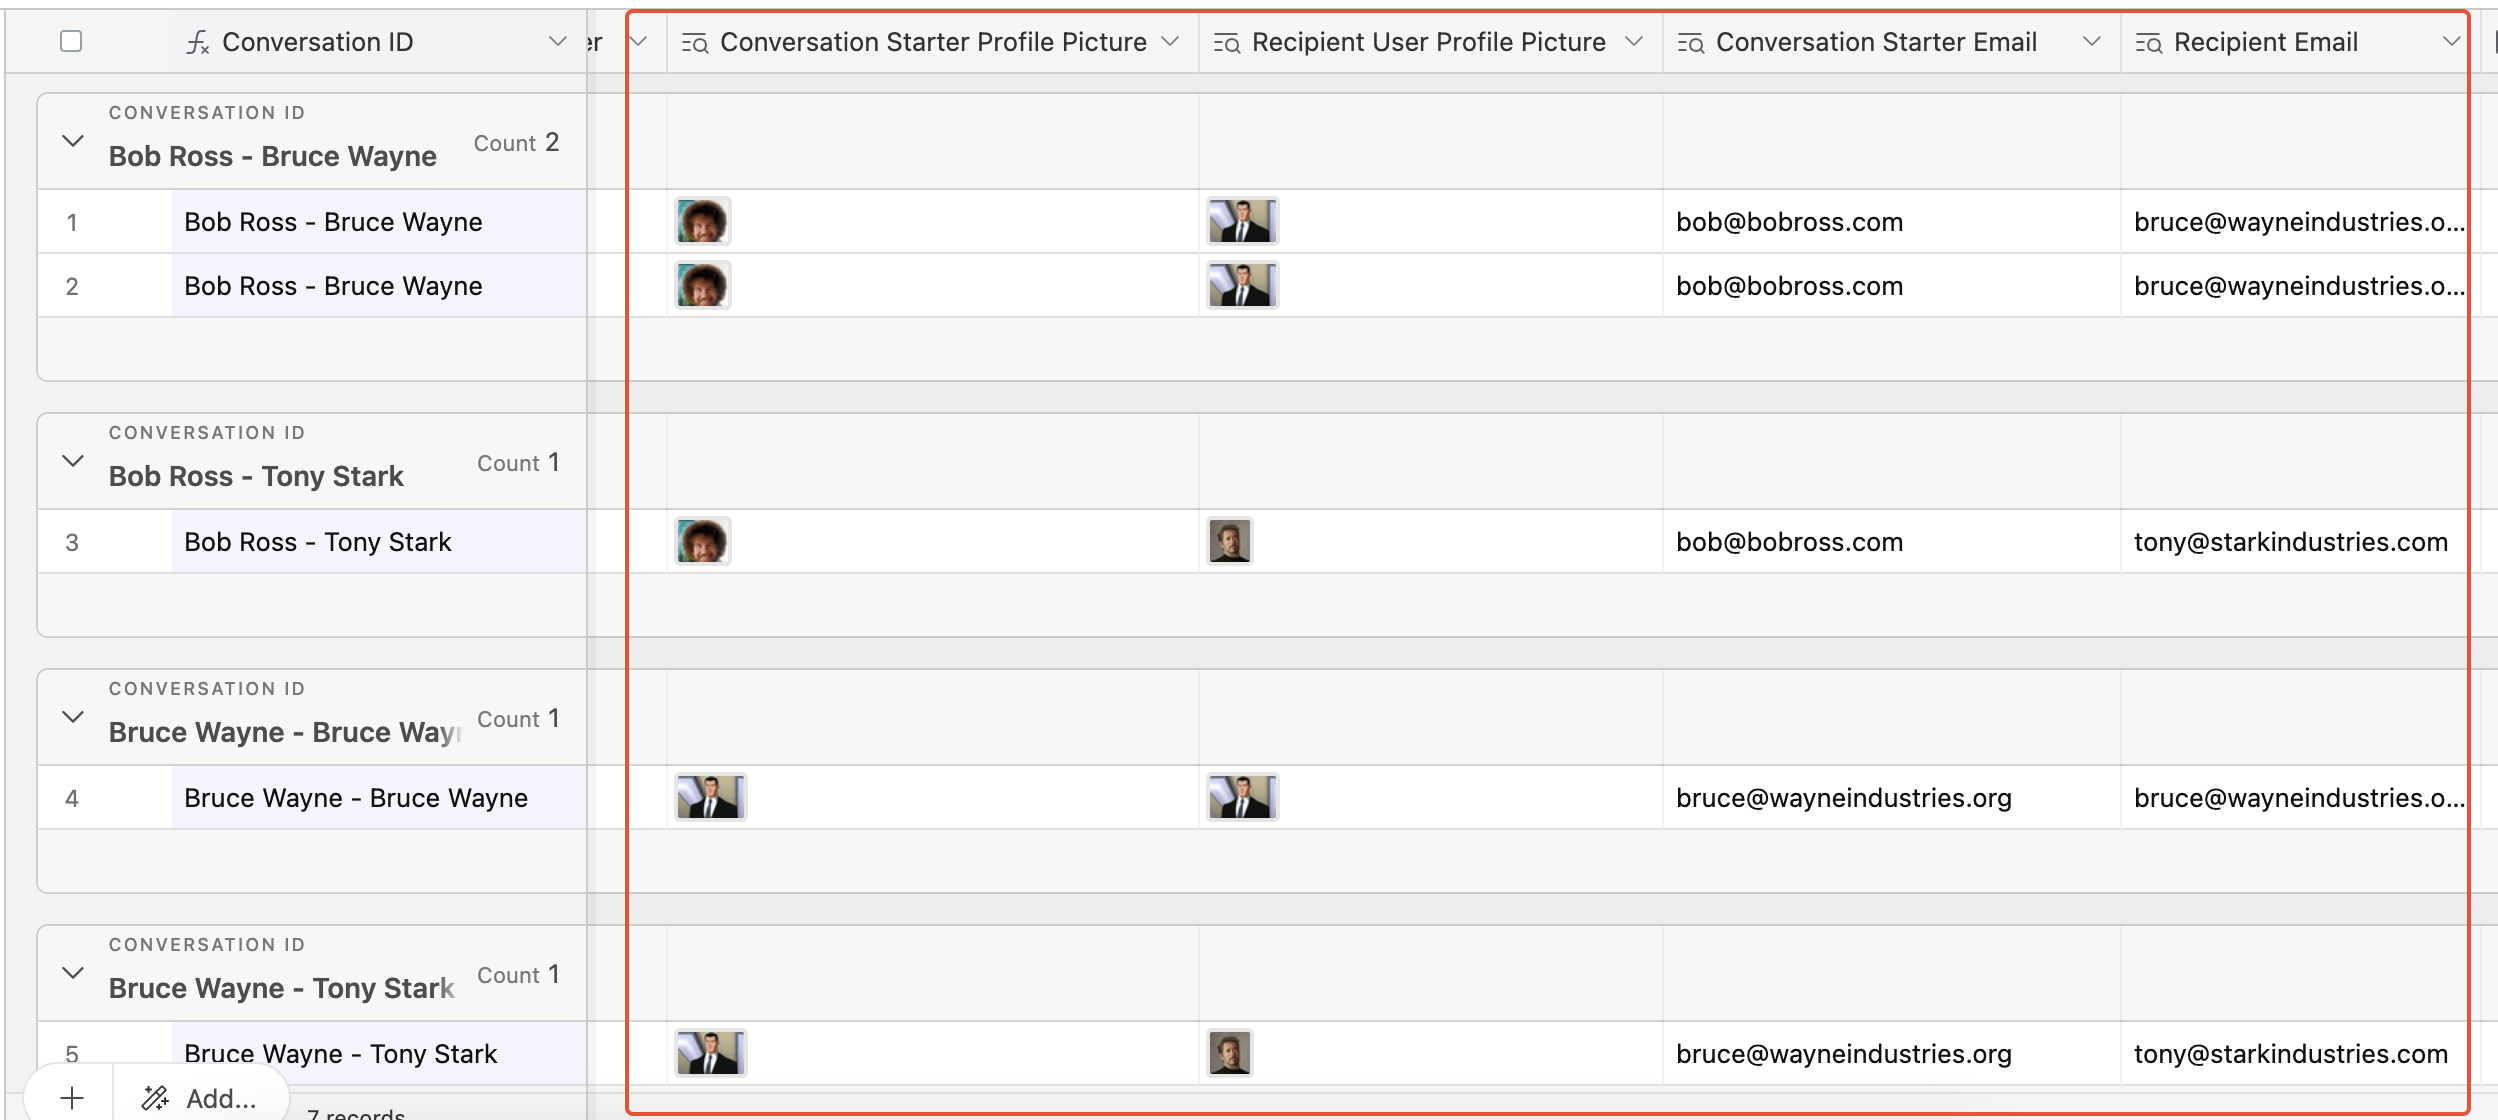 Lastly, there are a few more fields that calculate things like **Total Messages** or **Conversation Age** as well as indicate the **Record ID** of the record through the [RECORD\_ID () formula](https://support.airtable.com/docs/finding-airtable-record-ids).
### Messages
The last table we have in this base is the **Messages** table. Here, we store all the messages linked to their corresponding conversations (**Conversations** field) and senders (the **ID** field).
Lastly, there are a few more fields that calculate things like **Total Messages** or **Conversation Age** as well as indicate the **Record ID** of the record through the [RECORD\_ID () formula](https://support.airtable.com/docs/finding-airtable-record-ids).
### Messages
The last table we have in this base is the **Messages** table. Here, we store all the messages linked to their corresponding conversations (**Conversations** field) and senders (the **ID** field).
 And there you have it. We hope that we’ve been able to provide sufficient detail to let you recreate this (or a similar) setup on your side. Enjoy!