> ## Documentation Index
> Fetch the complete documentation index at: https://docs.softr.io/llms.txt
> Use this file to discover all available pages before exploring further.
# Tutorial: Sending Form Data to a Data Source
> Learn how to send form submissions to a data source
Here, we will go through the process of creating a form within a Softr app and linking it to a [data source](/4230abecf813402aa2926466c313290a) (we’ll use [Airtable](/data-sources/1YYStCJukT15Lh2j93qo9A/airtable/jHX7kfH7QvkVcELQvS3VoX)) to collect form submissions there. We will create a job posting form, where users will be able to submit job announcements along with all the necessary fields such as description, location, type, and others.
## Creating the form
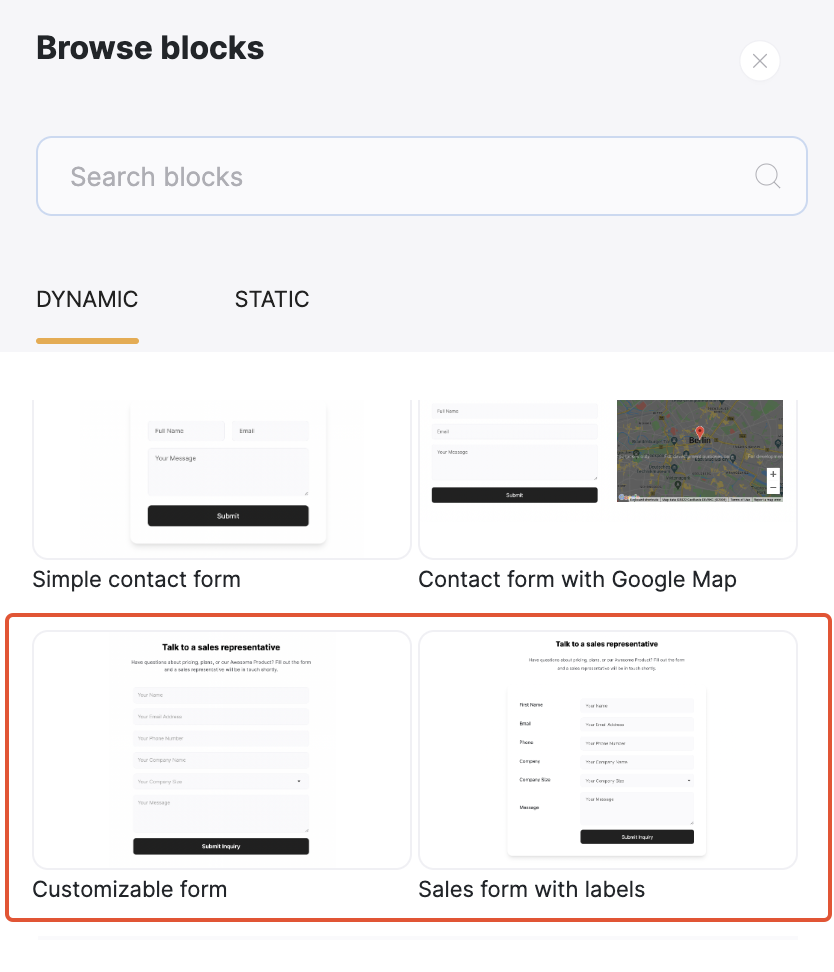
To add a form, we need to add a new block, selecting the [Customizable Form](/building-blocks/vikC2AWEpQGkZd4jGyoVxo/advanced-form-features/jCim5VWZePgZuaRsUZBnpG) or the [Customizable Form with Labels](/building-blocks/vikC2AWEpQGkZd4jGyoVxo/conditional-forms/afyKqnGDXd54U8d4xLNcsR).
 ## Selecting a destination
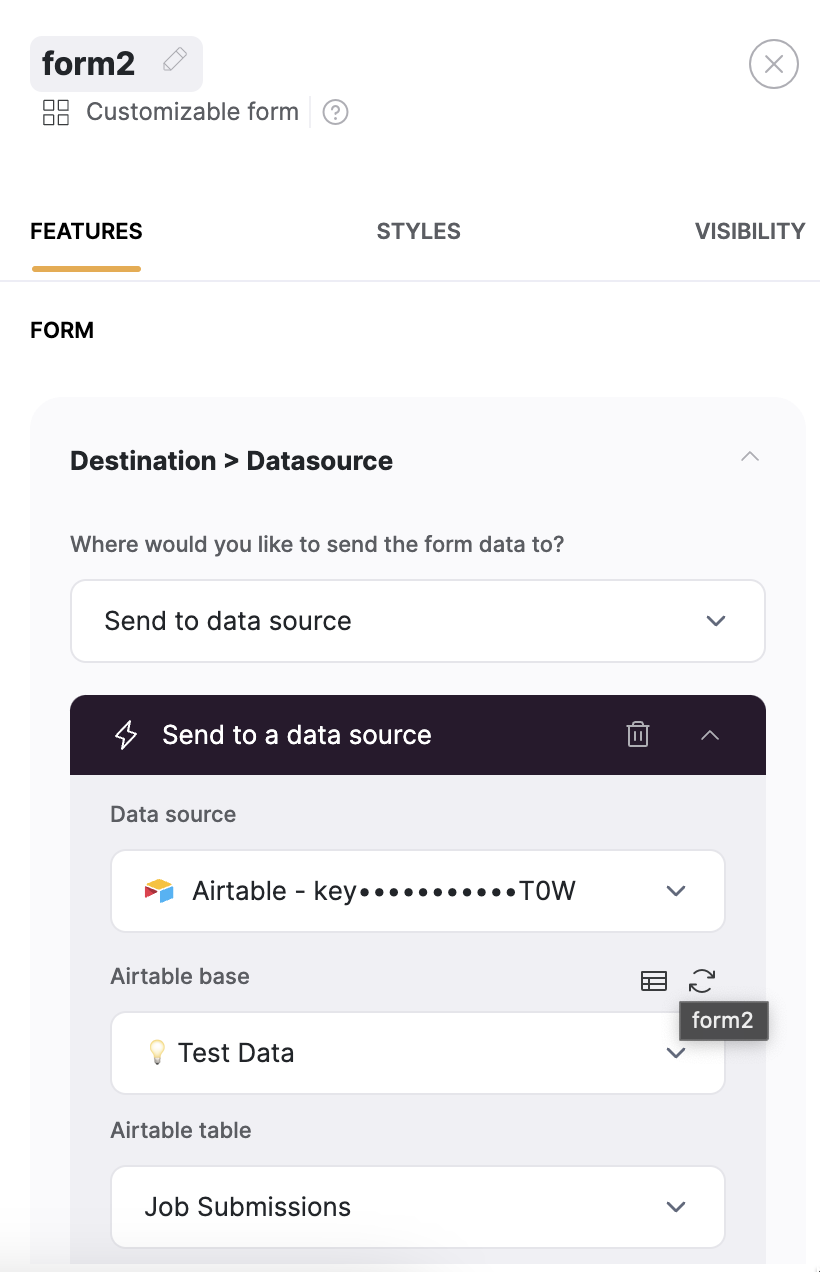
First, we need to choose where the form is going submitted to. The **Destination** is located under the **Features** tab of block’s settings. We’re going to choose the **Send to a data source** option and select Airtable. Afterwards, we also need to select the **Base** and **Table** that needs to be linked to our form.
## Selecting a destination
First, we need to choose where the form is going submitted to. The **Destination** is located under the **Features** tab of block’s settings. We’re going to choose the **Send to a data source** option and select Airtable. Afterwards, we also need to select the **Base** and **Table** that needs to be linked to our form.
 To be able to select a data source you need to connect it from **Settings ⇒ Data Sources**. You can find more info on that in our step-by-step guides for [Airtable](/data-sources/1YYStCJukT15Lh2j93qo9A/airtable/jHX7kfH7QvkVcELQvS3VoX) and [Google Sheets](/data-sources/1YYStCJukT15Lh2j93qo9A/google-sheets/jznC9Jr3Jri224AVmHVn4a).
Now, let’s see how we can customize the form to start getting job announcements.
## **Customizing the Form**
Let’s customize the form to include all the fields necessary for our job postings. In our example, those include such fields as **Company Name**, **Logo**, **Job Description**, and so on.
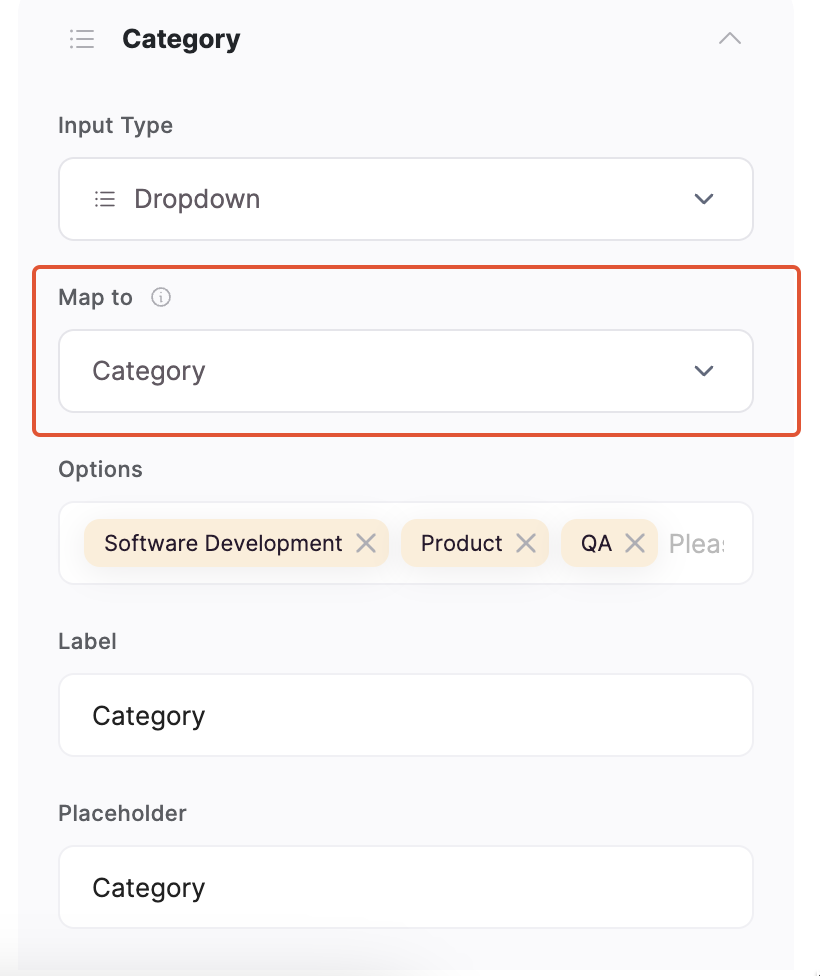
For each field you need to select a relevant **Type**. For fields that require the user to type in the value, you can choose **Single line text** or **Long Text** (suitable for the **Job Description** field in our example). For the fields that require uploading a file (e.g. **Logo**), we will select the **File** type, and for the fields that are going to have a predefined list of options to choose from, we are going to set the type as **Dropdown**. For **Dropdown** fields we are going to add all the available options inside **Options** separated by a semicolon. In the screenshot below you can see the job category field with its options.
To be able to select a data source you need to connect it from **Settings ⇒ Data Sources**. You can find more info on that in our step-by-step guides for [Airtable](/data-sources/1YYStCJukT15Lh2j93qo9A/airtable/jHX7kfH7QvkVcELQvS3VoX) and [Google Sheets](/data-sources/1YYStCJukT15Lh2j93qo9A/google-sheets/jznC9Jr3Jri224AVmHVn4a).
Now, let’s see how we can customize the form to start getting job announcements.
## **Customizing the Form**
Let’s customize the form to include all the fields necessary for our job postings. In our example, those include such fields as **Company Name**, **Logo**, **Job Description**, and so on.
For each field you need to select a relevant **Type**. For fields that require the user to type in the value, you can choose **Single line text** or **Long Text** (suitable for the **Job Description** field in our example). For the fields that require uploading a file (e.g. **Logo**), we will select the **File** type, and for the fields that are going to have a predefined list of options to choose from, we are going to set the type as **Dropdown**. For **Dropdown** fields we are going to add all the available options inside **Options** separated by a semicolon. In the screenshot below you can see the job category field with its options.
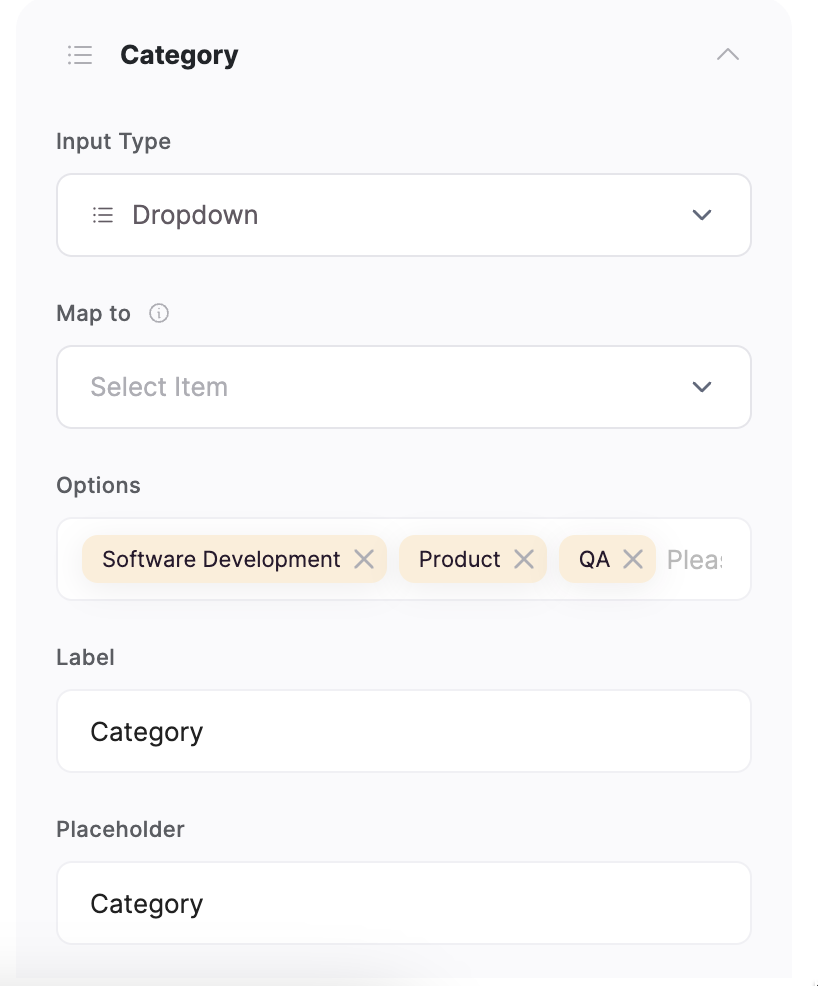 Apart from the field type, we can also add a **Label** and **Placeholder** text. Further on, we need to pay particular attention to the **Map to** field, which indicates the data source field that the give field should be linked to.
Below, you can see how we’ve linked the Category field to its corresponding field on Airtable.
Apart from the field type, we can also add a **Label** and **Placeholder** text. Further on, we need to pay particular attention to the **Map to** field, which indicates the data source field that the give field should be linked to.
Below, you can see how we’ve linked the Category field to its corresponding field on Airtable.
 To be able to map all the fields, we need to have them ready along with their relevant types (there are no field types in Google Sheets, so you can find out how to handle such cases [here](/data-sources/1YYStCJukT15Lh2j93qo9A/google-sheets/jznC9Jr3Jri224AVmHVn4a)), which we’ll look into next.
## Preparing the Airtable database
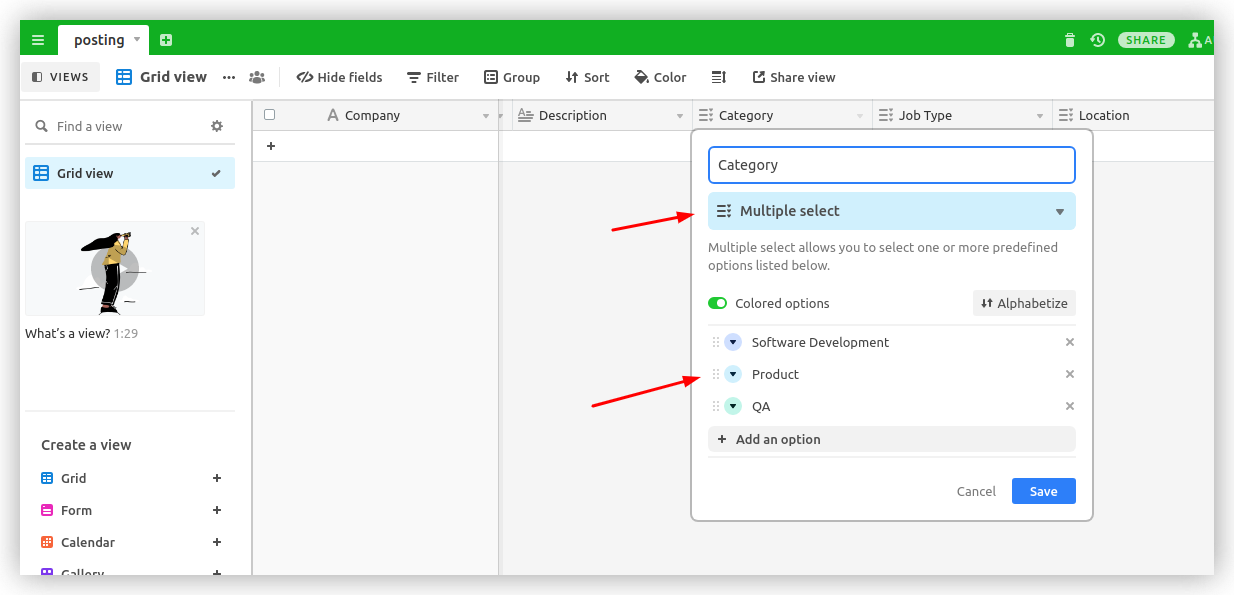
In our Airtable base, the fields (base columns) need to correspond to the form fields in the Softr app. The column name needs to be the same as the field’s tag within the form, and their types need to match as well. In Airtable, we have similar field types:
* **Single line text**
* **Long text**
* **Attachment** (corresponds to **File** in the form)
* **Single select/Multiple select** (correspond to **Dropdown** in the form)
In the following screenshot, you can see the “Category” field along with its field type and available options.
To be able to map all the fields, we need to have them ready along with their relevant types (there are no field types in Google Sheets, so you can find out how to handle such cases [here](/data-sources/1YYStCJukT15Lh2j93qo9A/google-sheets/jznC9Jr3Jri224AVmHVn4a)), which we’ll look into next.
## Preparing the Airtable database
In our Airtable base, the fields (base columns) need to correspond to the form fields in the Softr app. The column name needs to be the same as the field’s tag within the form, and their types need to match as well. In Airtable, we have similar field types:
* **Single line text**
* **Long text**
* **Attachment** (corresponds to **File** in the form)
* **Single select/Multiple select** (correspond to **Dropdown** in the form)
In the following screenshot, you can see the “Category” field along with its field type and available options.
 Thus, as soon as we have our Airtable base ready, we can proceed with linking it to our form by selecting the **Base** and **Table** as described above.
## **Publishing the Form and Testing**
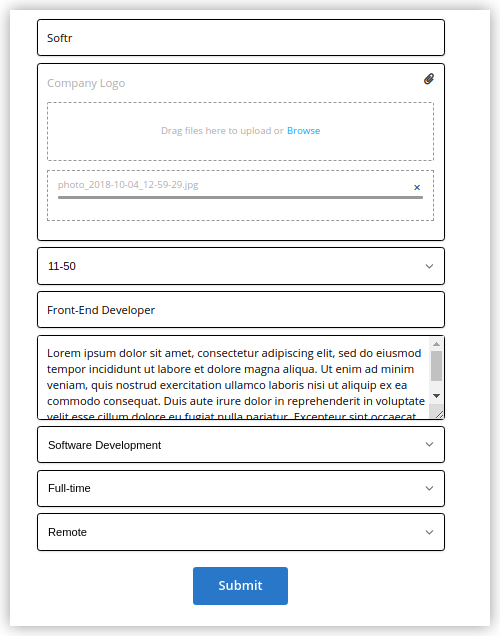
That’s it. Our form is ready, and all we need to do is to publish it and do a test submission. If the test is successful, a new row with the form submission should be added in the connected Airtable base. Below, you can see the test data filled in inside the form and how it looks after being submitted to Airtable.
Thus, as soon as we have our Airtable base ready, we can proceed with linking it to our form by selecting the **Base** and **Table** as described above.
## **Publishing the Form and Testing**
That’s it. Our form is ready, and all we need to do is to publish it and do a test submission. If the test is successful, a new row with the form submission should be added in the connected Airtable base. Below, you can see the test data filled in inside the form and how it looks after being submitted to Airtable.