> ## Documentation Index
> Fetch the complete documentation index at: https://docs.softr.io/llms.txt
> Use this file to discover all available pages before exploring further.
# Pricing
Pricing blocks are drop-in sections for showing plans, tiers, or package prices. They live under the **Static** tab in the block library and cover everything from a simple three-tier layout to a full comparison table or an interactive price calculator.
Every Pricing block is editable two ways, side by side:
Describe what you want in plain English and Softr rewrites the whole block for you — names, descriptions, prices, features, button labels.
Open the **Content** tab and edit any field by hand. This is exactly the same data the AI writes to, so you can switch between the two at any time.
You don't have to pick one approach. Most people use the AI to get 90% of the way there, then polish specific values (a price, a line of copy, a button link) in the settings panel.
 ## Adding a Pricing block
Open the page you want the block on.
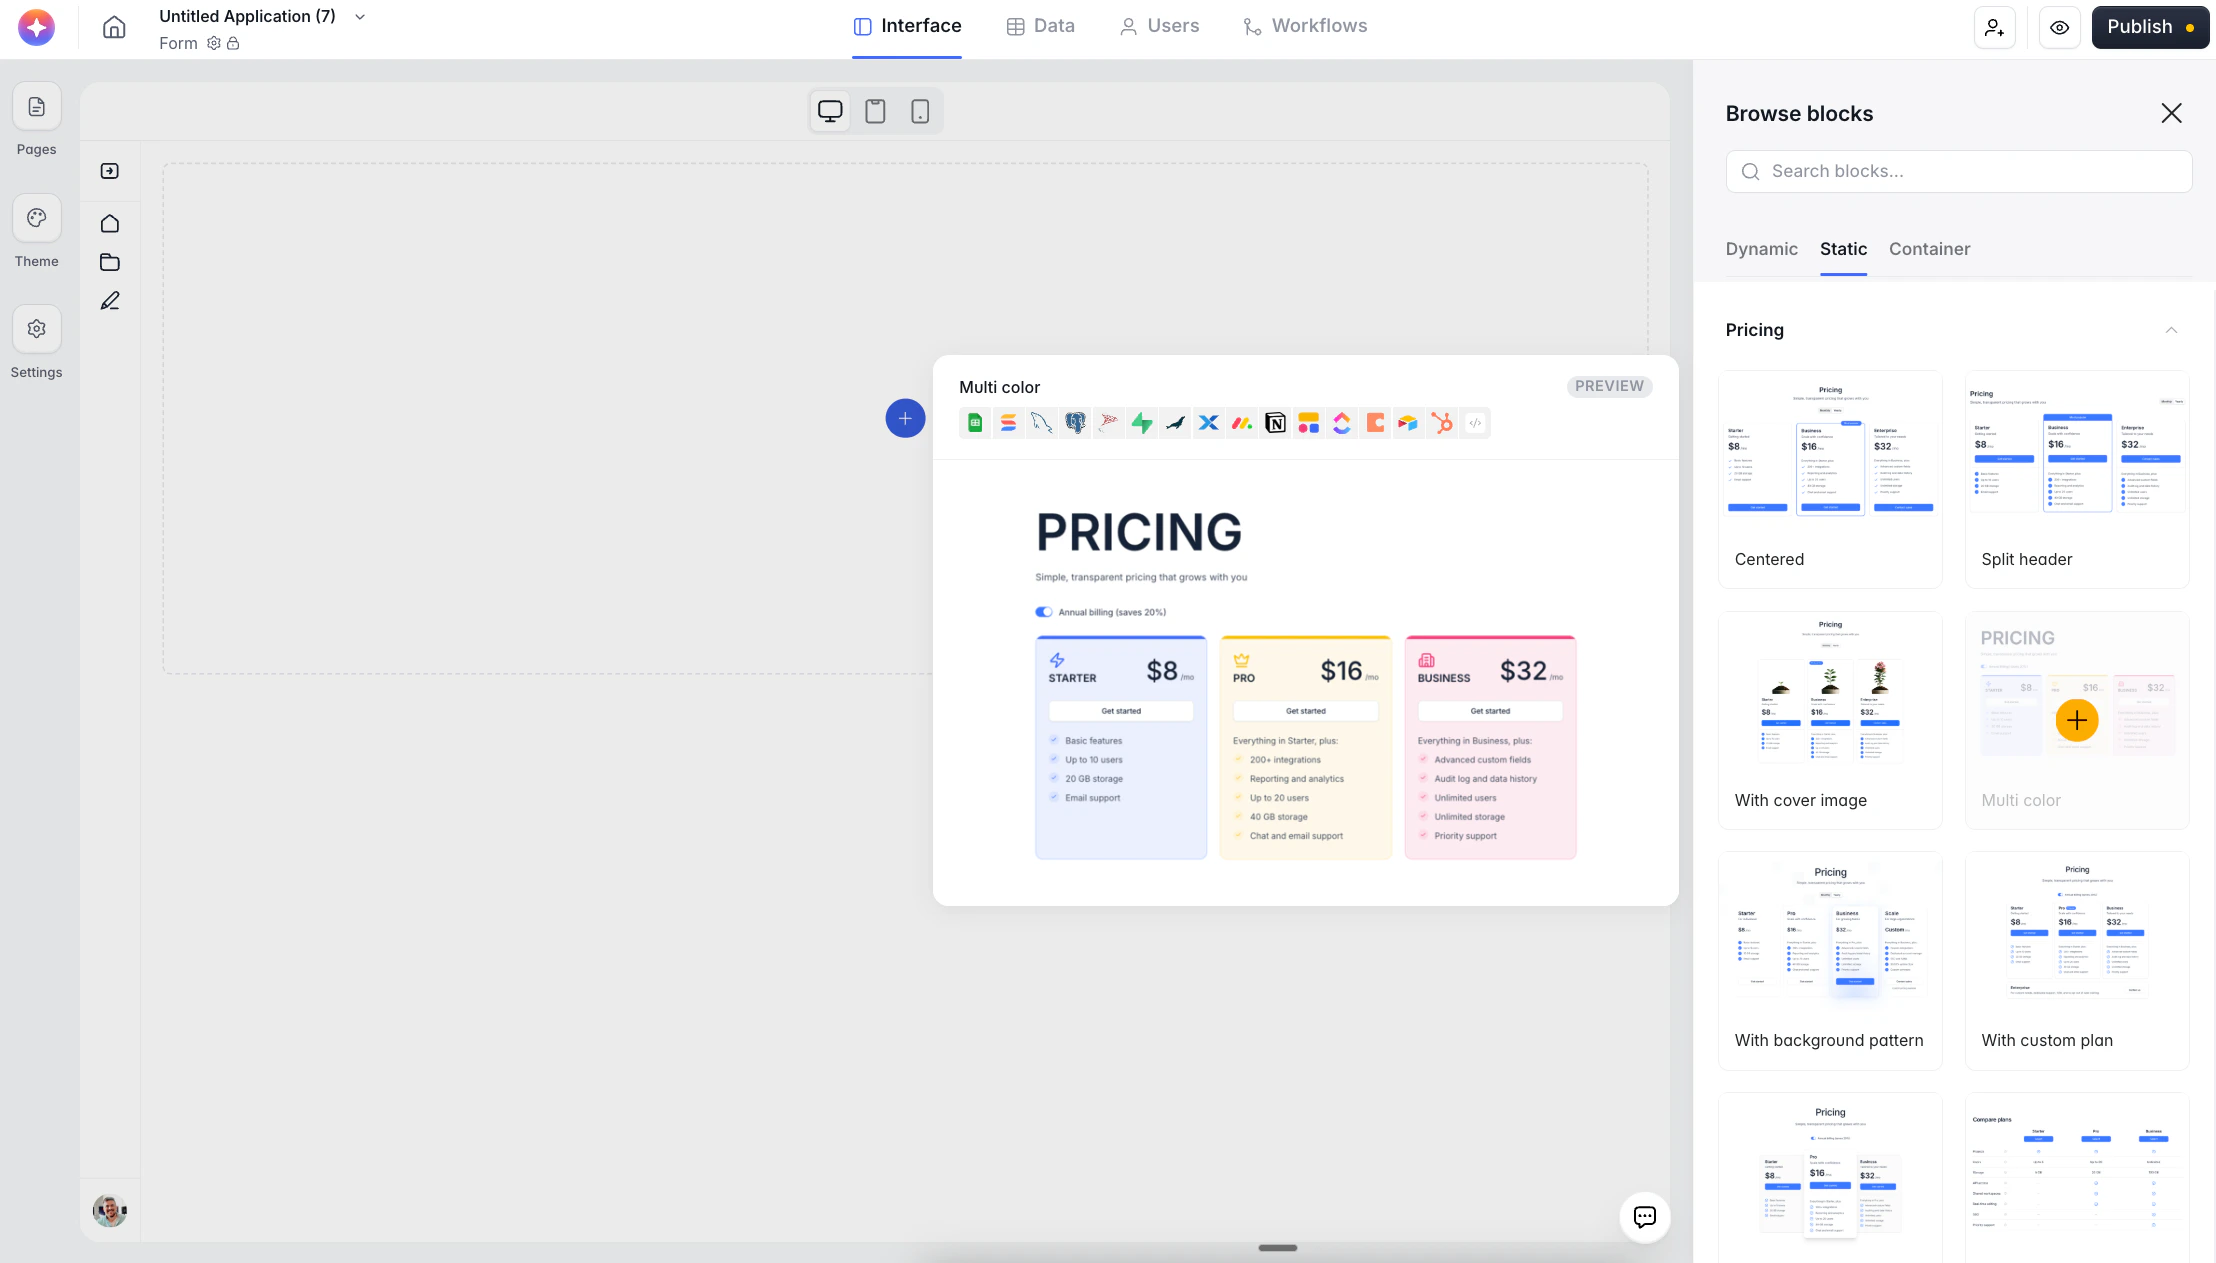
Click an empty area of the canvas (or the **+** between two blocks) to open **Browse blocks**.
The Pricing category lives here, alongside Hero, CTA, Team, Testimonial, and FAQ.
Expand the **Pricing** category and click the variant you want.
## Adding a Pricing block
Open the page you want the block on.
Click an empty area of the canvas (or the **+** between two blocks) to open **Browse blocks**.
The Pricing category lives here, alongside Hero, CTA, Team, Testimonial, and FAQ.
Expand the **Pricing** category and click the variant you want.
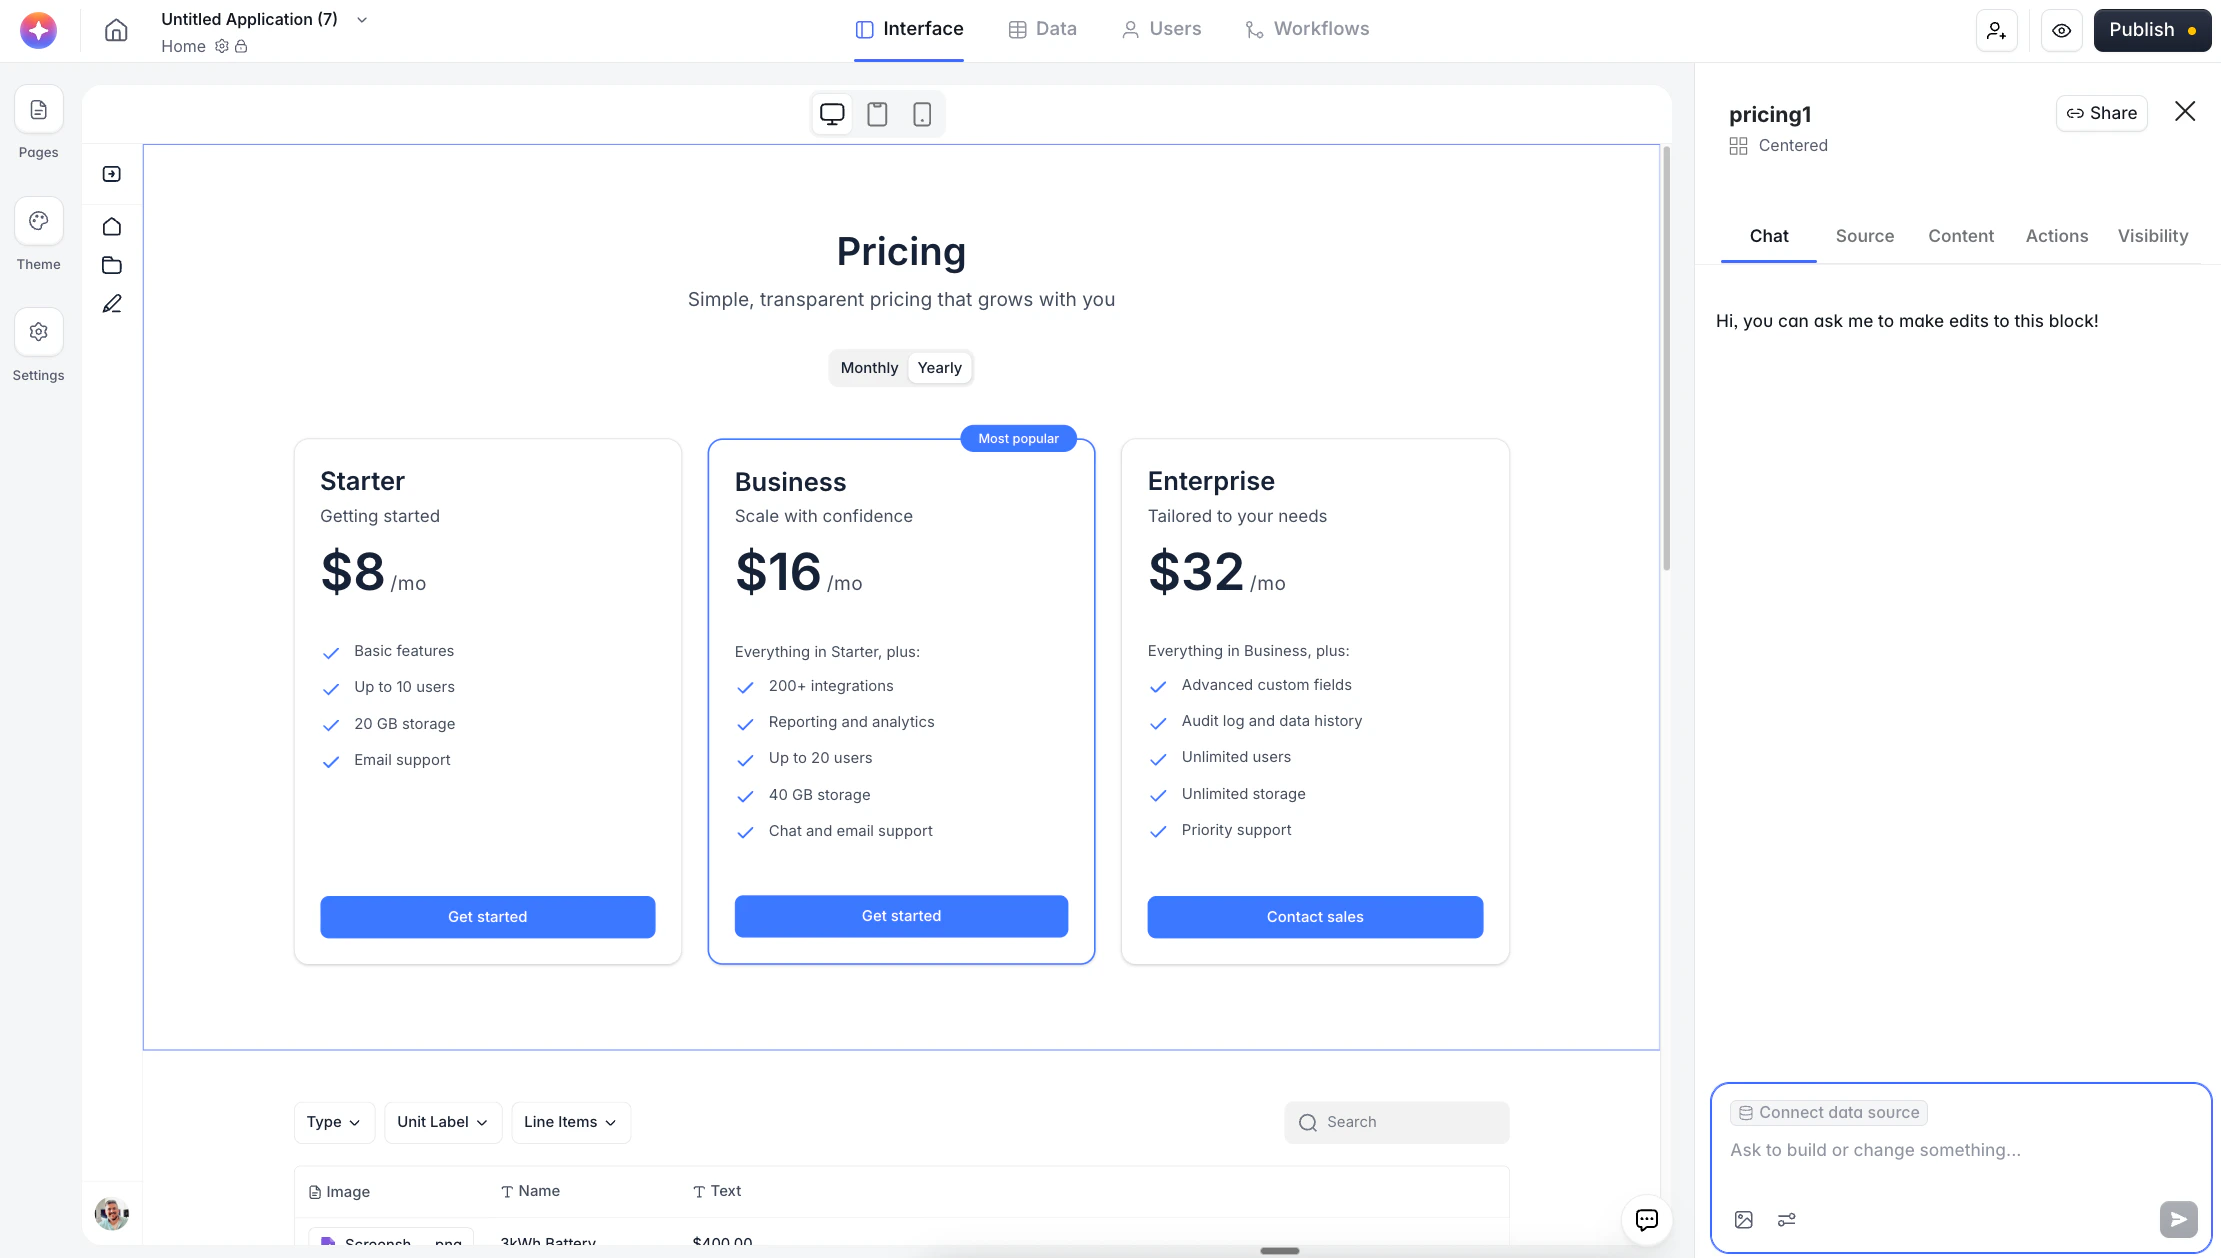
 The block lands on the canvas with placeholder content (three tiers, sample features, sample prices). The settings panel opens on the right with **Chat** already selected so you can start iterating immediately.
### Pricing variants at a glance
Softr ships 11 Pricing variants. They all share the same underlying content model, so switching between them is safe — your plans, prices, and features carry over.
Three-tier layout with a centered header and a highlighted "Most popular" card.
Heading on the left, plans on the right.
Three tiers with illustrated imagery above each card.
Three tiers with distinct colored backgrounds per card.
Three tiers on a decorative patterned background.
Three tiers plus a wider custom/enterprise row underneath.
Three tiers where the middle card lifts on hover.
Comparison table with features in rows and plans in columns.
Feature matrix presented as a grid of cards.
Interactive quiz that recommends a plan based on the visitor's answers.
Slider/input driven calculator that produces a live price estimate.
The first nine variants are purely presentational. **Plan recommender** and **Price calculator** include interactive logic — editable the same way, but with extra settings for the quiz questions or calculator inputs.
## Editing with AI (the Chat tab)
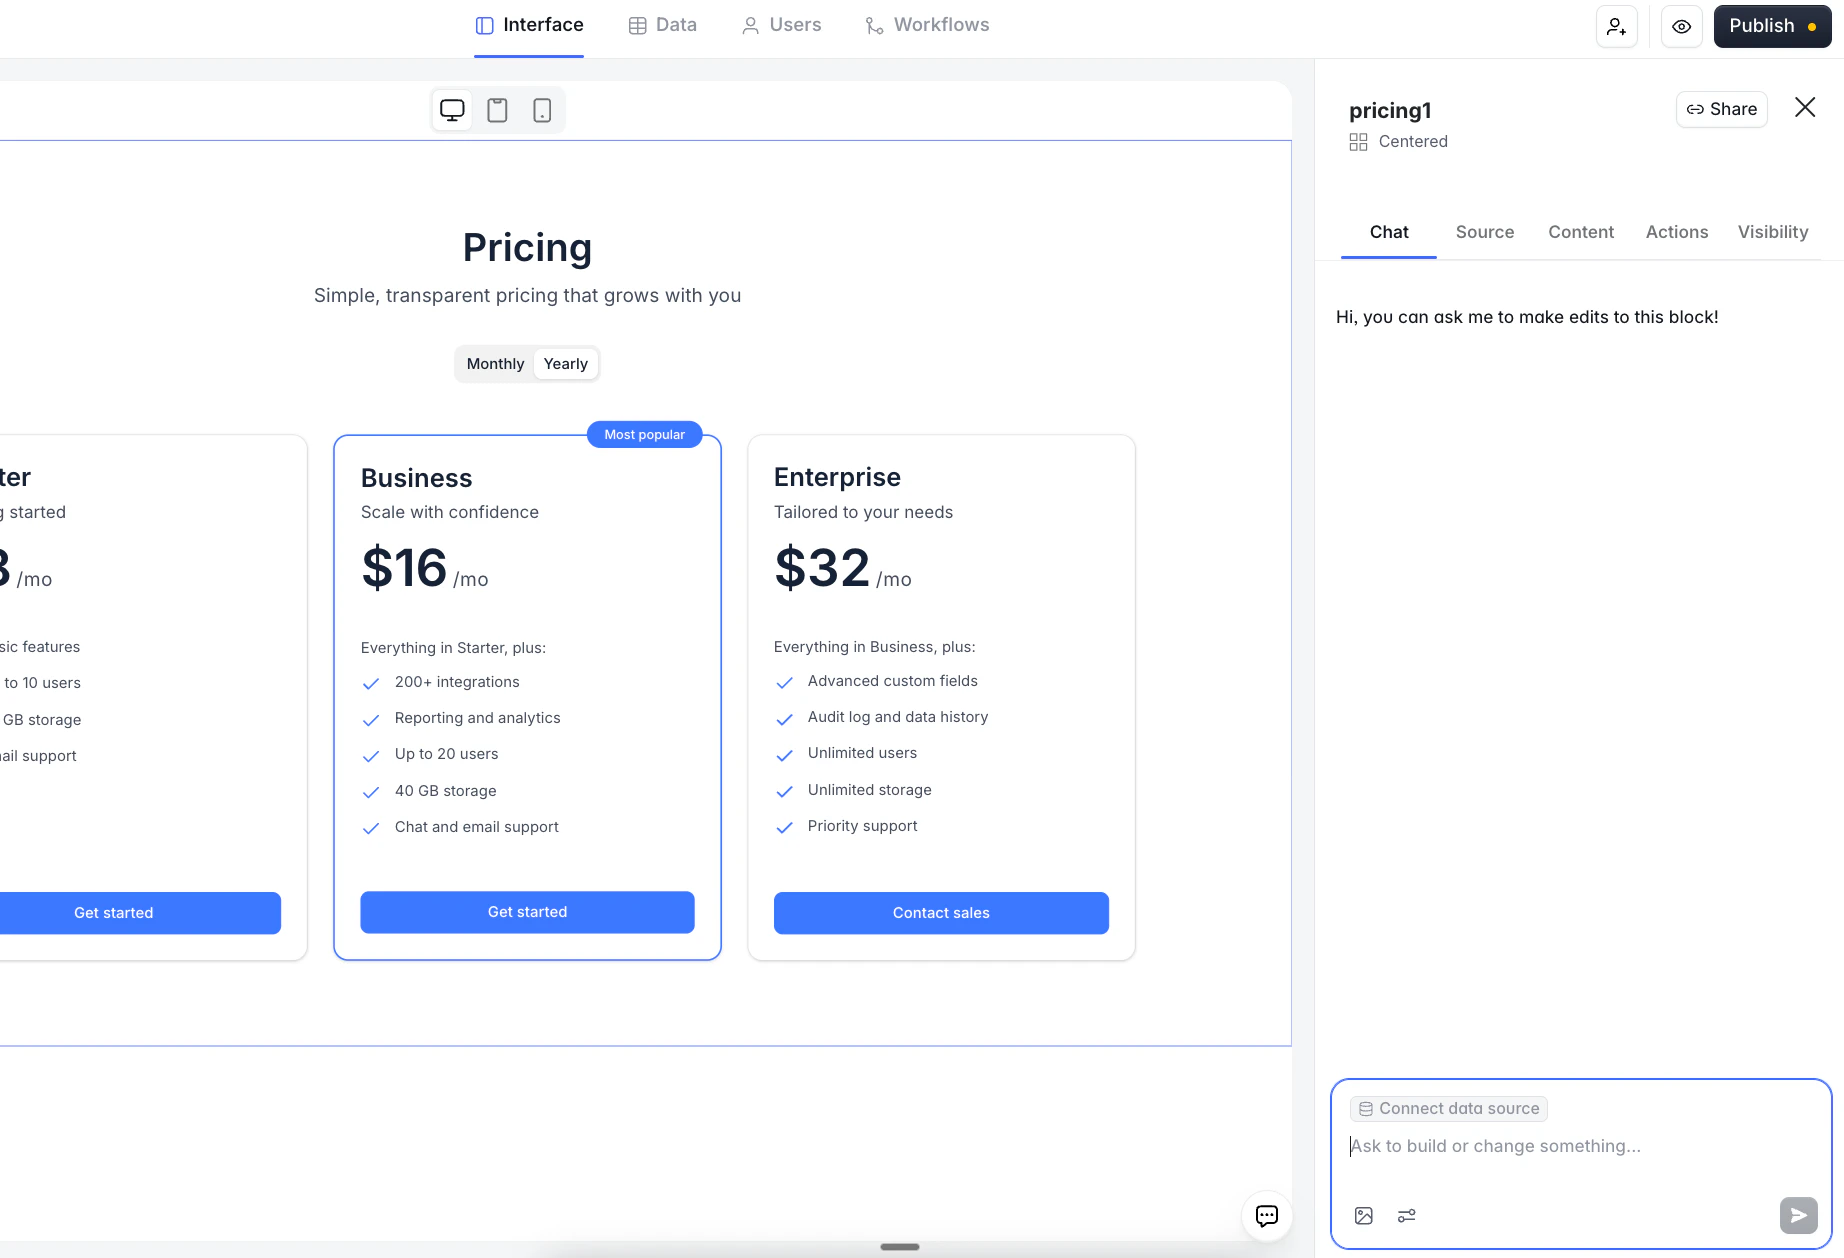
Click the block on the canvas. The right panel opens with **Chat** active and a greeting: *"Hi, you can ask me to make edits to this block!"* Type what you want and hit send.
The block lands on the canvas with placeholder content (three tiers, sample features, sample prices). The settings panel opens on the right with **Chat** already selected so you can start iterating immediately.
### Pricing variants at a glance
Softr ships 11 Pricing variants. They all share the same underlying content model, so switching between them is safe — your plans, prices, and features carry over.
Three-tier layout with a centered header and a highlighted "Most popular" card.
Heading on the left, plans on the right.
Three tiers with illustrated imagery above each card.
Three tiers with distinct colored backgrounds per card.
Three tiers on a decorative patterned background.
Three tiers plus a wider custom/enterprise row underneath.
Three tiers where the middle card lifts on hover.
Comparison table with features in rows and plans in columns.
Feature matrix presented as a grid of cards.
Interactive quiz that recommends a plan based on the visitor's answers.
Slider/input driven calculator that produces a live price estimate.
The first nine variants are purely presentational. **Plan recommender** and **Price calculator** include interactive logic — editable the same way, but with extra settings for the quiz questions or calculator inputs.
## Editing with AI (the Chat tab)
Click the block on the canvas. The right panel opens with **Chat** active and a greeting: *"Hi, you can ask me to make edits to this block!"* Type what you want and hit send.
 ### What the AI can rewrite in one go
A single prompt can set any combination of:
* Block title and description
* Each tier's plan name, tagline, monthly price, and yearly price
* Each tier's feature list (including the "Everything in X, plus:" label on higher tiers)
* The CTA button text and link for each tier
* Which tier is badged **Most popular**
### A worked example
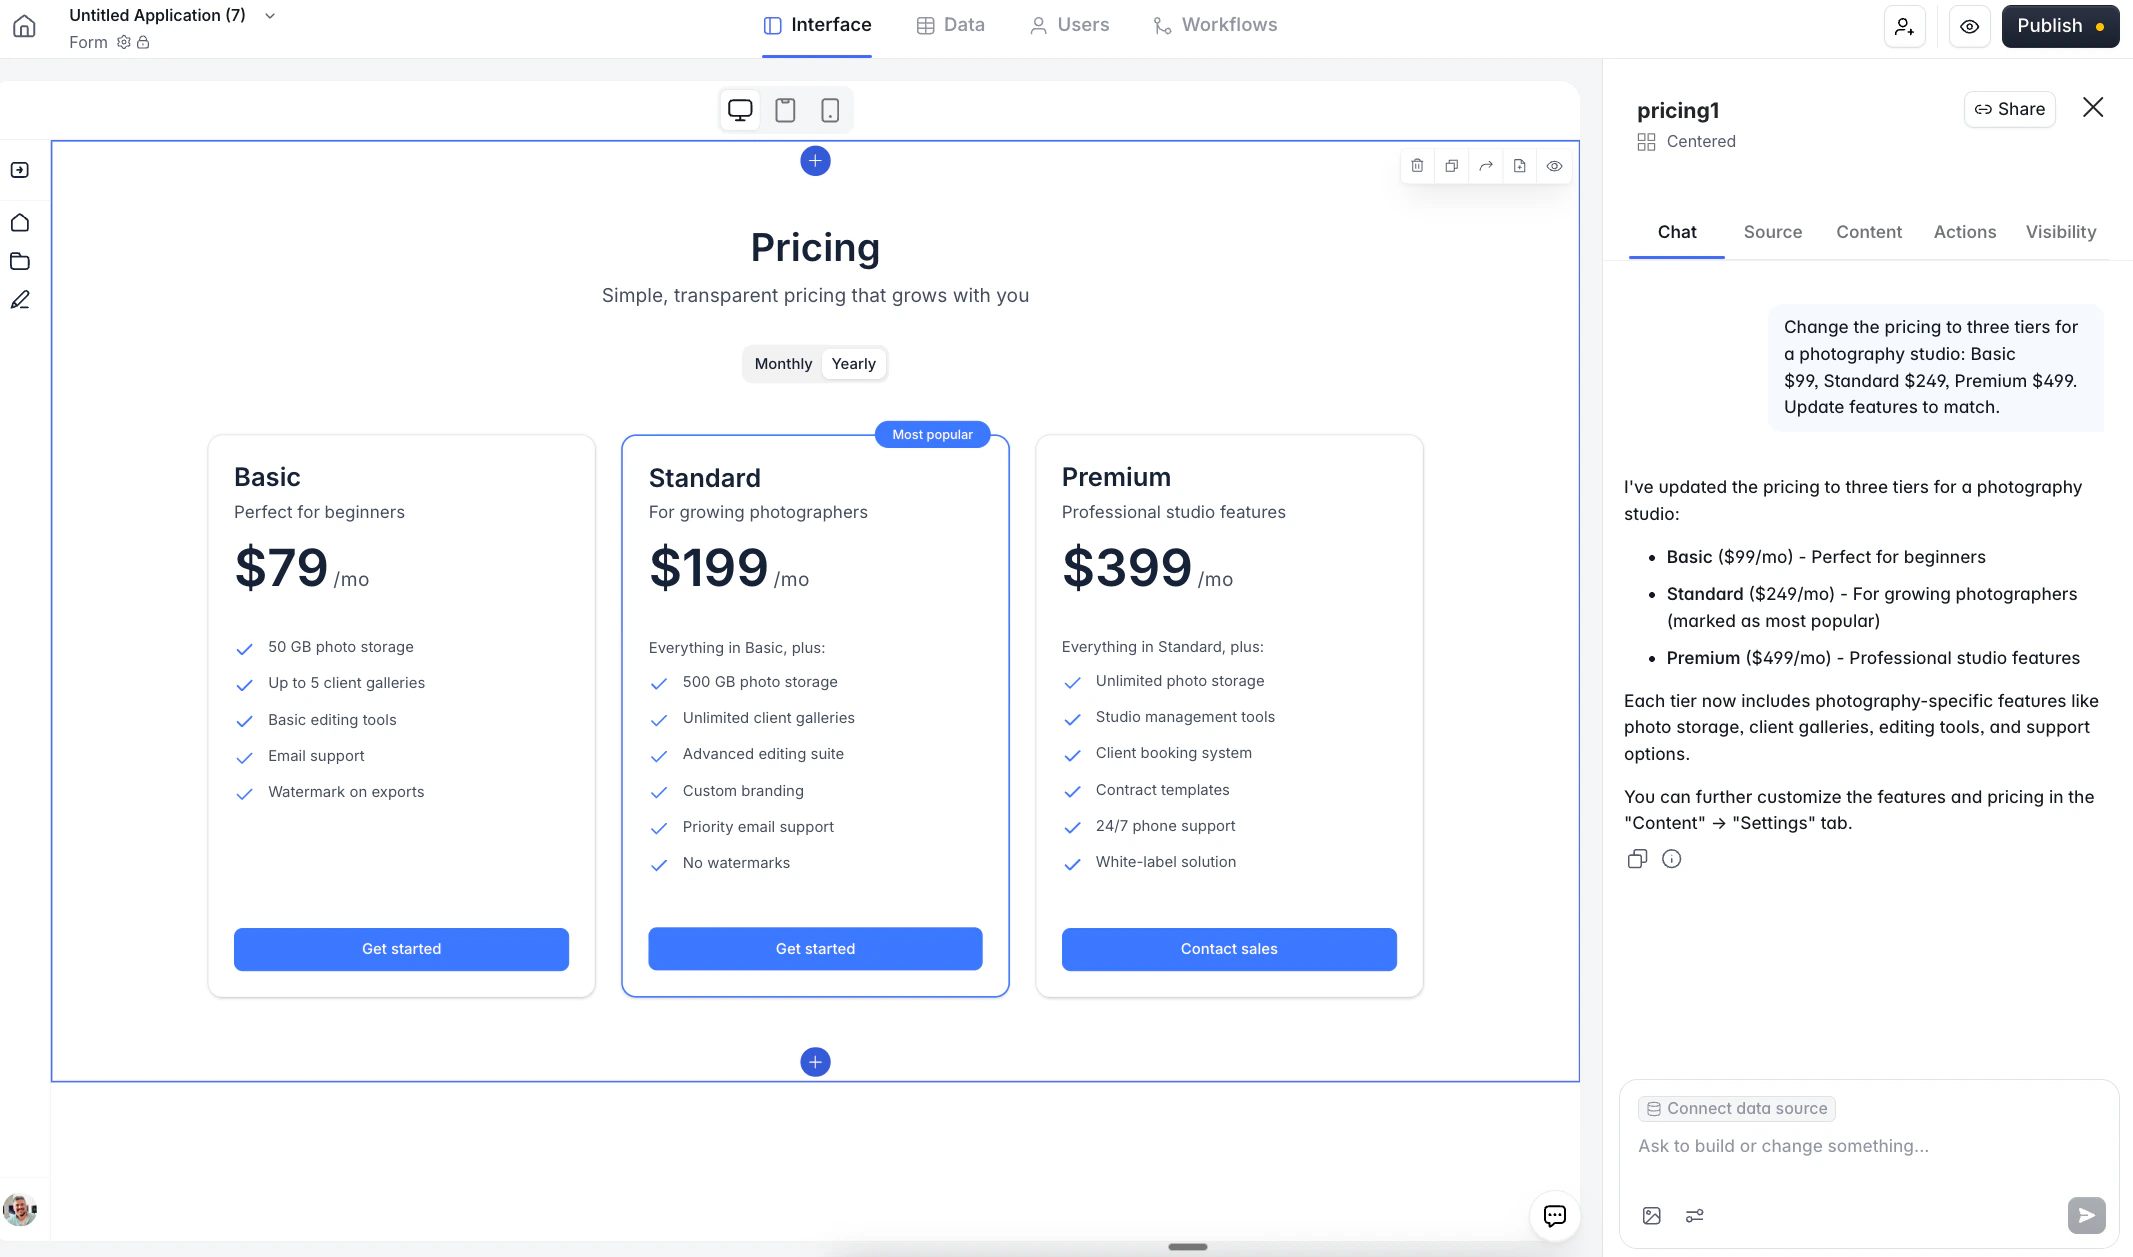
**Prompt:** Change the pricing to three tiers for a photography studio: Basic \$99, Standard \$249, Premium \$499. Update features to match.
Within a few seconds the block renders new tiers — Basic, Standard, Premium — with photography-appropriate features ("1-hour photo session", "Online gallery for 30 days", "Commercial use license") and button labels ("Book now") that match the new context.
### What the AI can rewrite in one go
A single prompt can set any combination of:
* Block title and description
* Each tier's plan name, tagline, monthly price, and yearly price
* Each tier's feature list (including the "Everything in X, plus:" label on higher tiers)
* The CTA button text and link for each tier
* Which tier is badged **Most popular**
### A worked example
**Prompt:** Change the pricing to three tiers for a photography studio: Basic \$99, Standard \$249, Premium \$499. Update features to match.
Within a few seconds the block renders new tiers — Basic, Standard, Premium — with photography-appropriate features ("1-hour photo session", "Online gallery for 30 days", "Commercial use license") and button labels ("Book now") that match the new context.
 ### Iterating with follow-up prompts
The chat is conversational. Use short follow-ups rather than rewriting from scratch:
* *"Make the middle tier not most popular, highlight Premium instead."*
* *"Add a 'Print album included' feature to the Premium tier."*
* *"Change the billing period from monthly to per session."*
* *"Drop the yearly prices, I only offer monthly."*
Each prompt produces a new version — see [Versions and rollback](#versions-and-rollback) below.
**What the AI can't do.** The AI edits the *content* of the block. It doesn't change the structural layout (it won't turn a Centered variant into a Table variant — you switch variants from the block library), and it doesn't wire up payment processing. To take payments, connect the CTA button to a Stripe checkout URL or a custom workflow via the **Actions** tab.
**Attach a reference image.** The composer has a small image icon at the bottom left. Attach a competitor's pricing screenshot or a mood board and ask the AI to "match the tiers and pricing structure from this image" — handy when you're porting pricing over from an existing source.
**Credits.** Every AI edit consumes a small number of AI credits — typically well under one credit per prompt. After the AI replies, a credit cost appears under the message (e.g. *"0.89 credits used"*). Credits are scoped to your workspace plan; tight loops of small follow-up prompts are cheap.
## Editing in the Content tab
Open **Content** to see every field the AI is writing to. Whether you got here after an AI edit or you're starting fresh, the layout is the same.
### Iterating with follow-up prompts
The chat is conversational. Use short follow-ups rather than rewriting from scratch:
* *"Make the middle tier not most popular, highlight Premium instead."*
* *"Add a 'Print album included' feature to the Premium tier."*
* *"Change the billing period from monthly to per session."*
* *"Drop the yearly prices, I only offer monthly."*
Each prompt produces a new version — see [Versions and rollback](#versions-and-rollback) below.
**What the AI can't do.** The AI edits the *content* of the block. It doesn't change the structural layout (it won't turn a Centered variant into a Table variant — you switch variants from the block library), and it doesn't wire up payment processing. To take payments, connect the CTA button to a Stripe checkout URL or a custom workflow via the **Actions** tab.
**Attach a reference image.** The composer has a small image icon at the bottom left. Attach a competitor's pricing screenshot or a mood board and ask the AI to "match the tiers and pricing structure from this image" — handy when you're porting pricing over from an existing source.
**Credits.** Every AI edit consumes a small number of AI credits — typically well under one credit per prompt. After the AI replies, a credit cost appears under the message (e.g. *"0.89 credits used"*). Credits are scoped to your workspace plan; tight loops of small follow-up prompts are cheap.
## Editing in the Content tab
Open **Content** to see every field the AI is writing to. Whether you got here after an AI edit or you're starting fresh, the layout is the same.
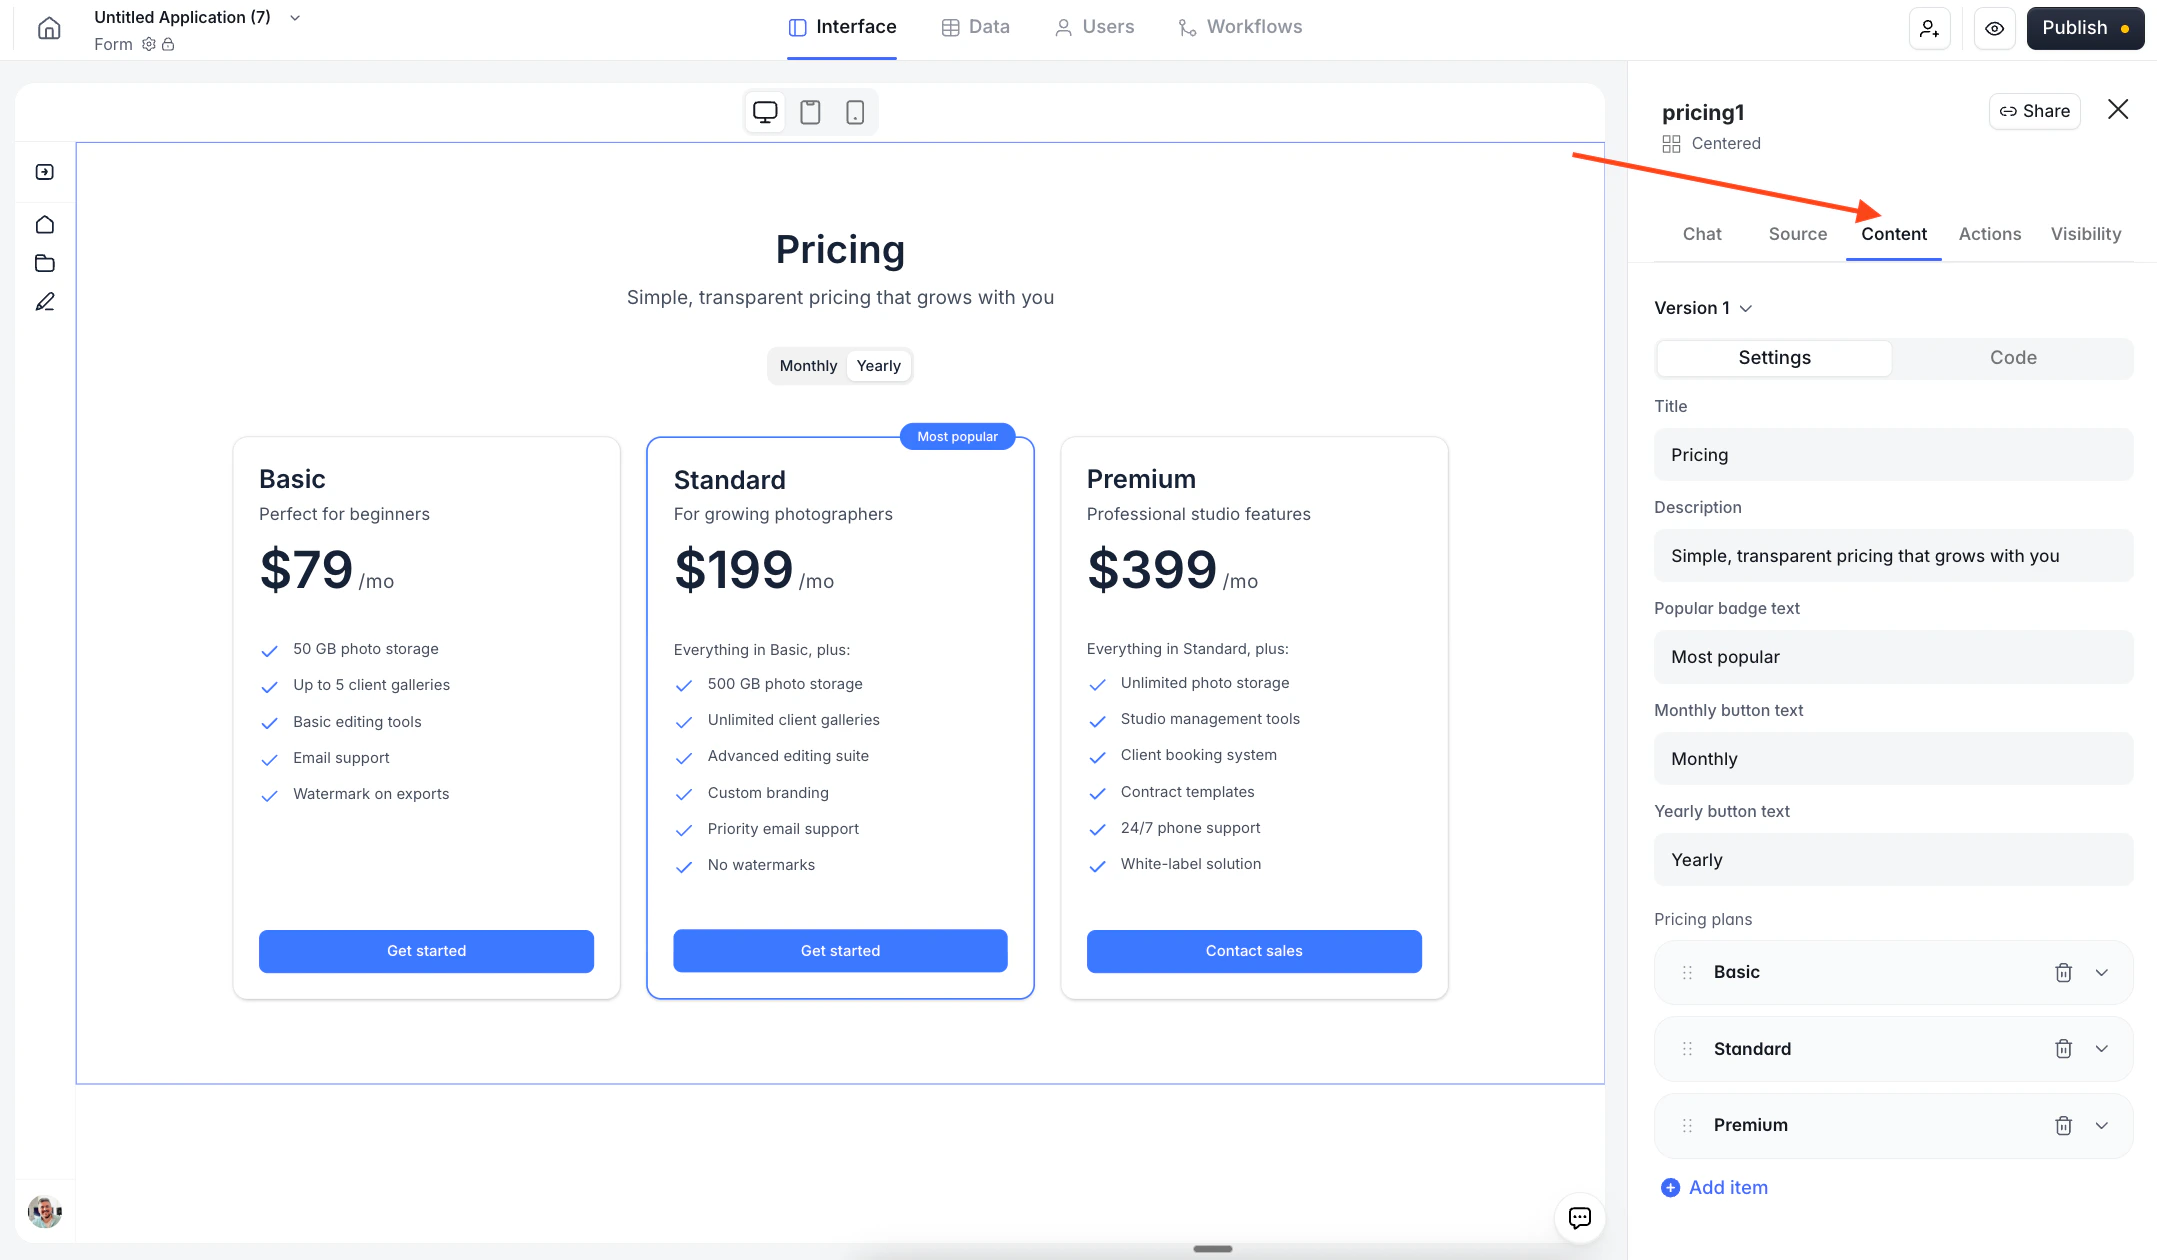 The Content tab has two inner modes:
The structured editor described below. This is what most people use, ***but could change depending on what you prompt the AI***.
The raw JSON for the block. Advanced users can paste a block definition from another project, diff two versions, or hand-craft content that's easier to express as data.
### Block-level fields
At the top of Settings:
* **Title** — big heading at the top of the block (e.g. "Pricing").
* **Description** — smaller subheading below the title.
* **Popular badge text** — text shown on the highlighted plan's badge. Defaults to "Most popular".
* **Monthly button text** / **Yearly button text** — the labels on the billing-period toggle above the plan cards. Edit these if you want different wording (e.g. "Per month" / "Per year") or if you're showing something other than monthly/yearly (e.g. "Per session" / "Per project").
### Pricing plans
Below that, the **Pricing plans** list shows every tier as a draggable, collapsible row. Hover a row to reveal the trash and drag handles. Click the chevron to expand and see the plan's own fields.
The Content tab has two inner modes:
The structured editor described below. This is what most people use, ***but could change depending on what you prompt the AI***.
The raw JSON for the block. Advanced users can paste a block definition from another project, diff two versions, or hand-craft content that's easier to express as data.
### Block-level fields
At the top of Settings:
* **Title** — big heading at the top of the block (e.g. "Pricing").
* **Description** — smaller subheading below the title.
* **Popular badge text** — text shown on the highlighted plan's badge. Defaults to "Most popular".
* **Monthly button text** / **Yearly button text** — the labels on the billing-period toggle above the plan cards. Edit these if you want different wording (e.g. "Per month" / "Per year") or if you're showing something other than monthly/yearly (e.g. "Per session" / "Per project").
### Pricing plans
Below that, the **Pricing plans** list shows every tier as a draggable, collapsible row. Hover a row to reveal the trash and drag handles. Click the chevron to expand and see the plan's own fields.
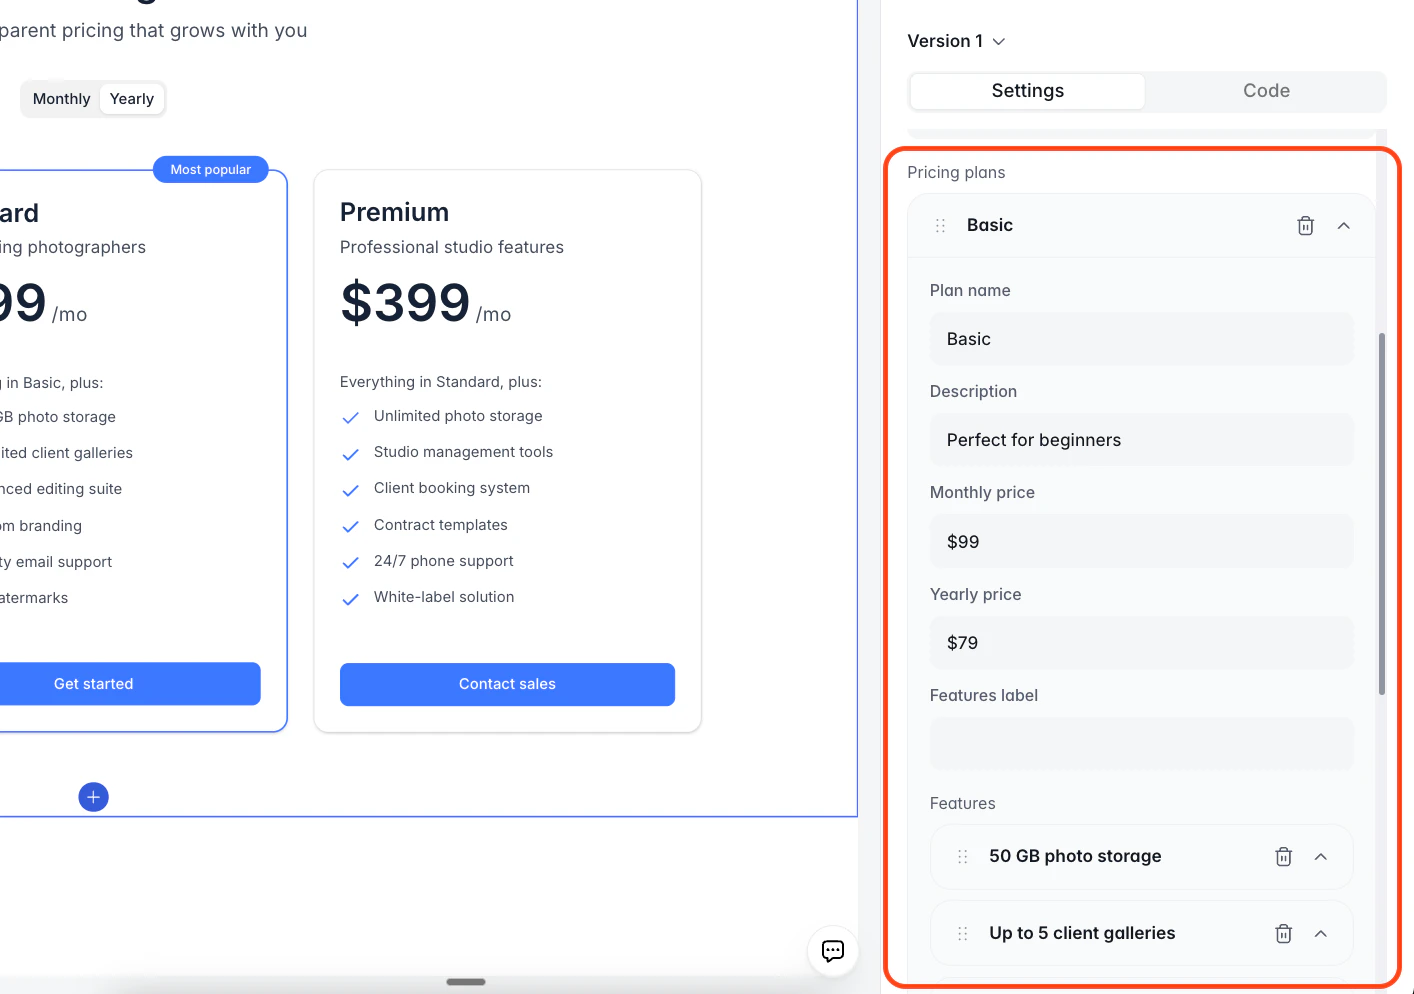 In this case, each plan has:
* **Plan name** — e.g. "Basic", "Standard", "Premium".
* **Description** — one-line tagline under the name (e.g. "Getting started").
* **Monthly price** / **Yearly price** — free-text, so `$99`, `£79`, `€49 + VAT`, or `Contact us` all work.
* **Features label** — the line above the feature list. Leave blank on the first tier; use "Everything in Basic, plus:" style text on higher tiers.
* **Features** — the bullet list. Each feature is its own draggable row with a trash icon. **+ Add item** adds a new one.
* **Is most popular** — a per-plan toggle. Turning it on adds the Most popular badge to that tier. Only one plan should have this enabled at a time.
* **CTA text** — the button label on that card.
* **CTA URL** — where the button goes. Softr shows a dropdown of existing app pages; you can also paste an external URL or connect to a workflow.
To reorder plans, drag a row by its handle. To add a plan, click **+ Add item** at the bottom of the list.
## Versions and rollback
Every AI edit is saved as a version. Above the Settings editor you'll see a **Version 1** dropdown with a chevron — open it to see the history.
In this case, each plan has:
* **Plan name** — e.g. "Basic", "Standard", "Premium".
* **Description** — one-line tagline under the name (e.g. "Getting started").
* **Monthly price** / **Yearly price** — free-text, so `$99`, `£79`, `€49 + VAT`, or `Contact us` all work.
* **Features label** — the line above the feature list. Leave blank on the first tier; use "Everything in Basic, plus:" style text on higher tiers.
* **Features** — the bullet list. Each feature is its own draggable row with a trash icon. **+ Add item** adds a new one.
* **Is most popular** — a per-plan toggle. Turning it on adds the Most popular badge to that tier. Only one plan should have this enabled at a time.
* **CTA text** — the button label on that card.
* **CTA URL** — where the button goes. Softr shows a dropdown of existing app pages; you can also paste an external URL or connect to a workflow.
To reorder plans, drag a row by its handle. To add a plan, click **+ Add item** at the bottom of the list.
## Versions and rollback
Every AI edit is saved as a version. Above the Settings editor you'll see a **Version 1** dropdown with a chevron — open it to see the history.
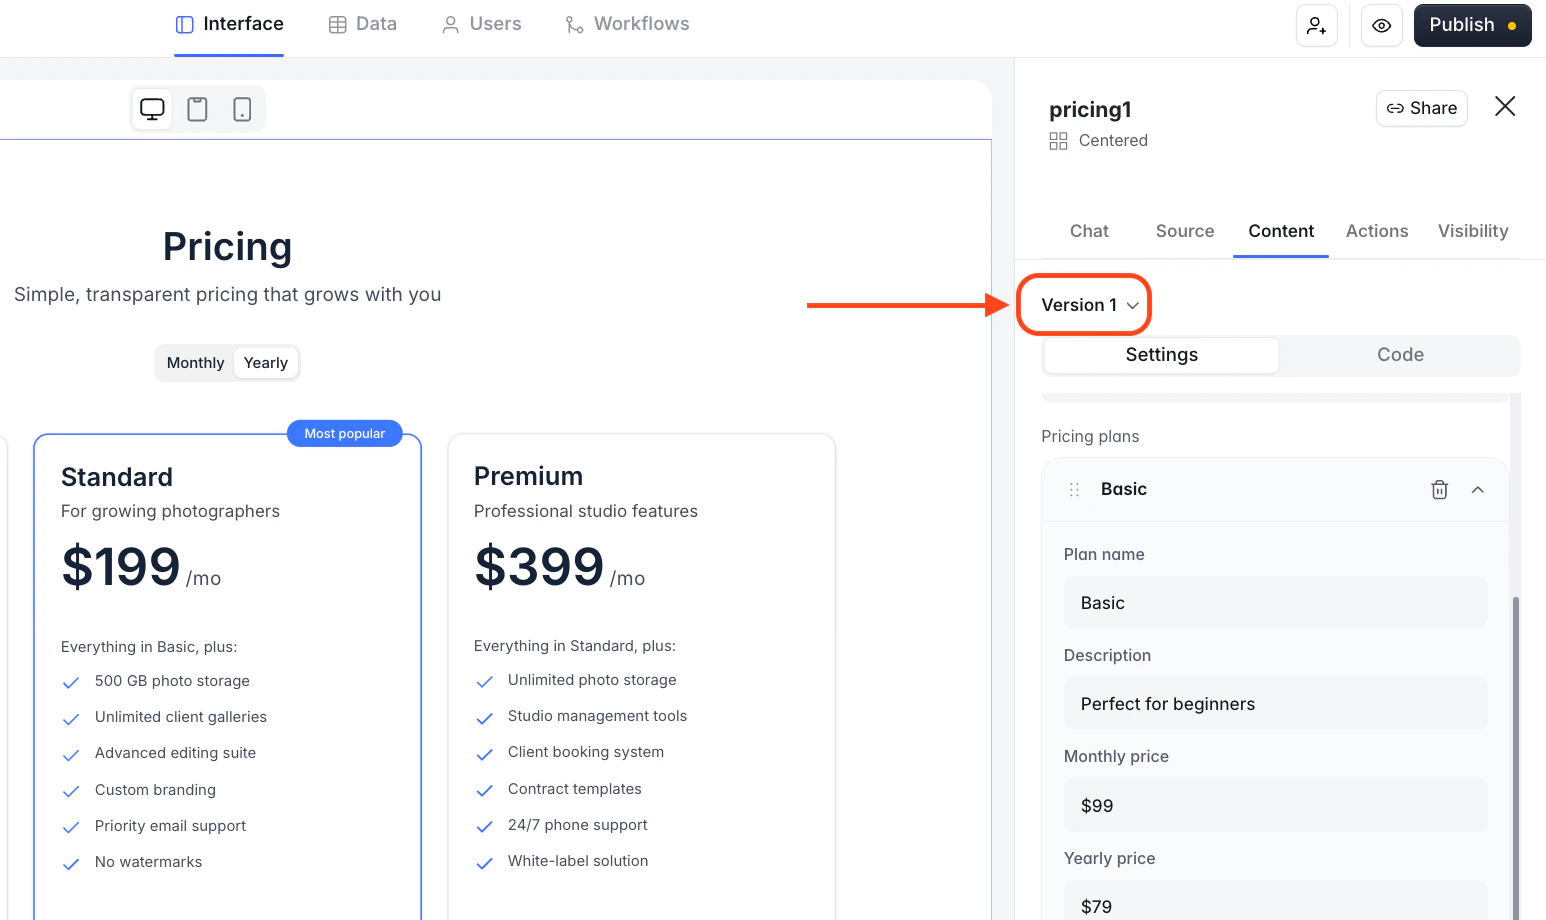 Each version records:
* The prompt that produced it (or "Initial Version Prompt" for the starting template).
* The date and time.
* The label **(Latest)** on the current one.
Pick any version to roll the block back. This is the easiest way to recover from a prompt that didn't go the way you wanted — no undo stack, no copy-paste, just a single click.
## Connecting a data source (optional)
Pricing blocks are static by default — the prices and features live in the block itself, not in a database.
The **Source** tab is there for the one case where you want the block driven by a table: a banner reading *"Data source is optional"* appears at the top, and below it are dropdowns for Source, Database, and Table. Connect a table and each row in that table becomes a plan card.
Use this when your pricing changes often, you have more than \~6 tiers, or you want non-technical teammates to edit pricing by editing a spreadsheet rather than touching the Studio.
## FAQ
It might. The AI rewrites whichever fields your prompt implies are in scope. Narrow prompts ("change the Standard tier price to \$299") touch only that field; broad prompts ("rewrite the whole pricing section for a consulting business") will reset most fields.
If you've made manual tweaks you want to keep, either rely on version history (every AI edit is saved automatically — see [Versions and rollback](#versions-and-rollback)) or include your tweaks in the prompt ("keep the current features on Basic, just change the price").
Each prompt-response pair costs AI credits — usually well under one credit for a single pricing edit. You can see the exact cost under each AI reply via the info icon. Credits are pooled at the workspace level and replenish based on your Softr plan; check **Settings → Billing** for your current allowance.
No. The AI edits content within the current variant. To switch layouts, delete the block and add a different variant from the library, or pick a variant and then re-run your AI prompt — the copy you wrote works the same across variants because they share one content model.
Yes. Monthly price and Yearly price are free-text, so `$49`, `£29.99/mo`, `Contact us`, and `Custom` all render correctly. The billing-period toggle still applies, though — if you only have one price, either set both Monthly and Yearly to the same value, or word the button text to match what you're actually charging for.
Set **CTA URL** to the destination you want — that can be another page in your app, an external URL (e.g. a Stripe Checkout link), or a linked workflow. For logged-in users you can stamp the submission with the user's email or record ID via the **Actions** tab; see the [Mapping Fields for Actions](/actions/mapping-fields-for-actions) doc for the full field-mapping flow.
***
Last updated: April 2026. If something in this doc looks wrong or out of date, please contact support.
Each version records:
* The prompt that produced it (or "Initial Version Prompt" for the starting template).
* The date and time.
* The label **(Latest)** on the current one.
Pick any version to roll the block back. This is the easiest way to recover from a prompt that didn't go the way you wanted — no undo stack, no copy-paste, just a single click.
## Connecting a data source (optional)
Pricing blocks are static by default — the prices and features live in the block itself, not in a database.
The **Source** tab is there for the one case where you want the block driven by a table: a banner reading *"Data source is optional"* appears at the top, and below it are dropdowns for Source, Database, and Table. Connect a table and each row in that table becomes a plan card.
Use this when your pricing changes often, you have more than \~6 tiers, or you want non-technical teammates to edit pricing by editing a spreadsheet rather than touching the Studio.
## FAQ
It might. The AI rewrites whichever fields your prompt implies are in scope. Narrow prompts ("change the Standard tier price to \$299") touch only that field; broad prompts ("rewrite the whole pricing section for a consulting business") will reset most fields.
If you've made manual tweaks you want to keep, either rely on version history (every AI edit is saved automatically — see [Versions and rollback](#versions-and-rollback)) or include your tweaks in the prompt ("keep the current features on Basic, just change the price").
Each prompt-response pair costs AI credits — usually well under one credit for a single pricing edit. You can see the exact cost under each AI reply via the info icon. Credits are pooled at the workspace level and replenish based on your Softr plan; check **Settings → Billing** for your current allowance.
No. The AI edits content within the current variant. To switch layouts, delete the block and add a different variant from the library, or pick a variant and then re-run your AI prompt — the copy you wrote works the same across variants because they share one content model.
Yes. Monthly price and Yearly price are free-text, so `$49`, `£29.99/mo`, `Contact us`, and `Custom` all render correctly. The billing-period toggle still applies, though — if you only have one price, either set both Monthly and Yearly to the same value, or word the button text to match what you're actually charging for.
Set **CTA URL** to the destination you want — that can be another page in your app, an external URL (e.g. a Stripe Checkout link), or a linked workflow. For logged-in users you can stamp the submission with the user's email or record ID via the **Actions** tab; see the [Mapping Fields for Actions](/actions/mapping-fields-for-actions) doc for the full field-mapping flow.
***
Last updated: April 2026. If something in this doc looks wrong or out of date, please contact support.