> ## Documentation Index
> Fetch the complete documentation index at: https://docs.softr.io/llms.txt
> Use this file to discover all available pages before exploring further.
# Advanced Form Features
> Get the most out of your forms with advanced features.
## Destination
In this section, you customize the form and set where it's going to be sent. To start configuring the form fields, you first need to set the form's **Destination**.
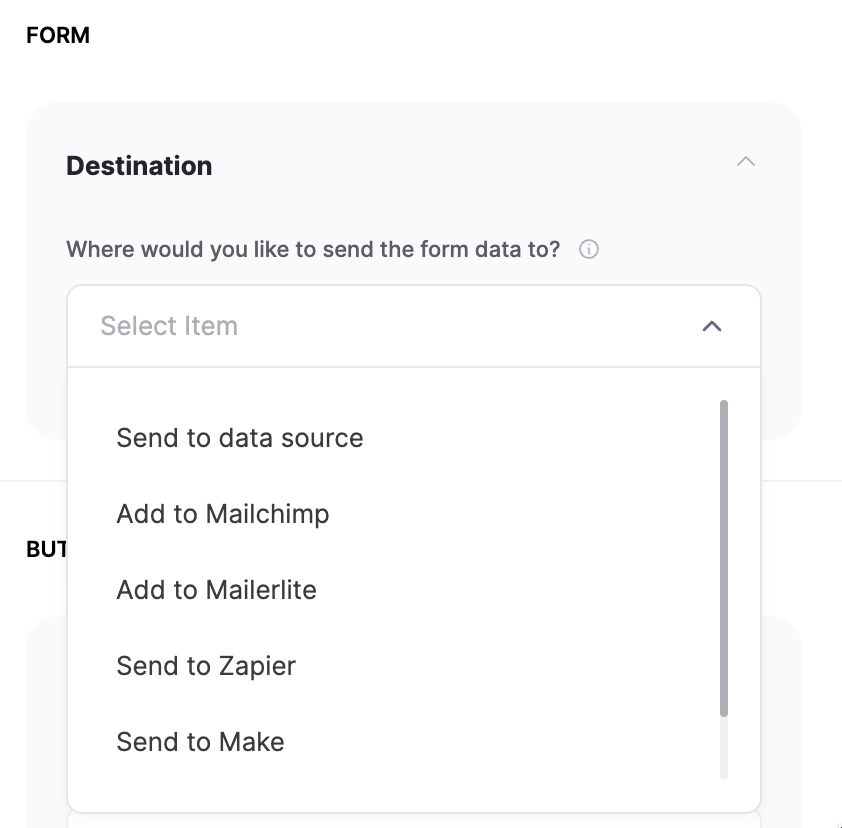 Here, you have the following options:
* [Send to data source](/building-blocks/vikC2AWEpQGkZd4jGyoVxo/tutorial-sending-form-data-to-a-data-source/pgX6BhyR98bLopZtgsXMwU)
* Add to [Mailchimp](/integrations/etS18kJqm1fuD58KCsjC3z/mailchimp/2GvSLRGrgMfe8S3drMWao1)
* Add to [Mailerlite](/integrations/etS18kJqm1fuD58KCsjC3z/mailerlite/i1Ex2KK1HwqsceB1SnYWby)
* Send to [Zapier](/integrations/etS18kJqm1fuD58KCsjC3z/zapier/vFrfgfV12U9F9SNqbrAHLd)
* Send to [Make](/integrations/etS18kJqm1fuD58KCsjC3z/make/dNDFZTp7eeNj7HnaUV6YMa)
* Forward to your email
You can learn more about each option under its respective article (links added above). And you also have the **Forward to your email** option, which simply sends the submission to the specified email address. So, let's select the **Forward to your email** option and go over the fields types and their settings.
## **On Form Submit**
After the form is submitted, you can either display a success message or take the user to a different page.
### **Success Message**
Here, you have the following options:
* [Send to data source](/building-blocks/vikC2AWEpQGkZd4jGyoVxo/tutorial-sending-form-data-to-a-data-source/pgX6BhyR98bLopZtgsXMwU)
* Add to [Mailchimp](/integrations/etS18kJqm1fuD58KCsjC3z/mailchimp/2GvSLRGrgMfe8S3drMWao1)
* Add to [Mailerlite](/integrations/etS18kJqm1fuD58KCsjC3z/mailerlite/i1Ex2KK1HwqsceB1SnYWby)
* Send to [Zapier](/integrations/etS18kJqm1fuD58KCsjC3z/zapier/vFrfgfV12U9F9SNqbrAHLd)
* Send to [Make](/integrations/etS18kJqm1fuD58KCsjC3z/make/dNDFZTp7eeNj7HnaUV6YMa)
* Forward to your email
You can learn more about each option under its respective article (links added above). And you also have the **Forward to your email** option, which simply sends the submission to the specified email address. So, let's select the **Forward to your email** option and go over the fields types and their settings.
## **On Form Submit**
After the form is submitted, you can either display a success message or take the user to a different page.
### **Success Message**
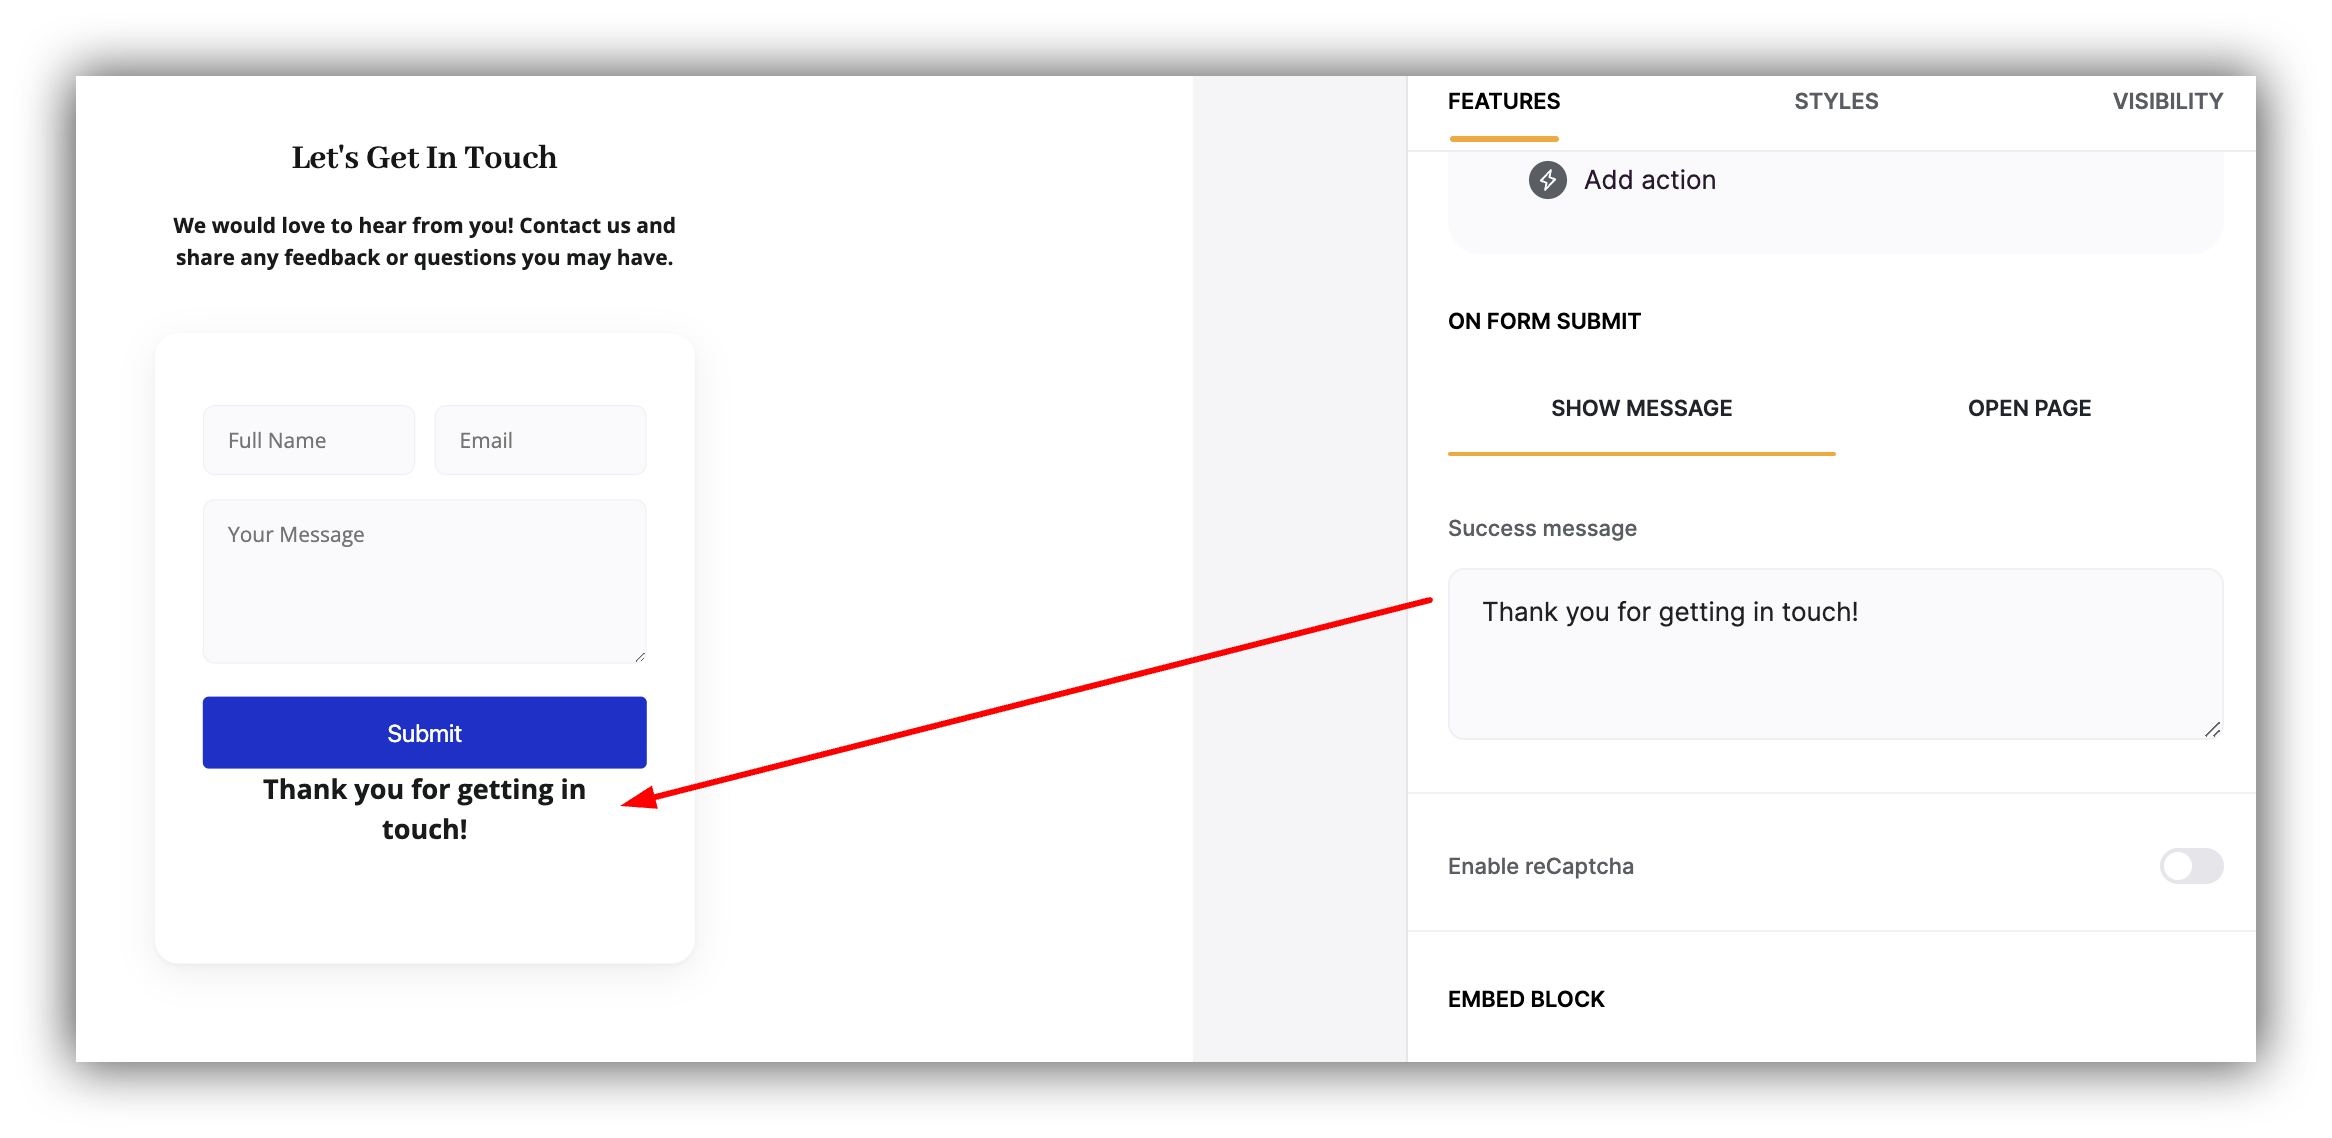 You can customize the message as well as configure styling and formatting.
### **Open Page**
You can customize the message as well as configure styling and formatting.
### **Open Page**
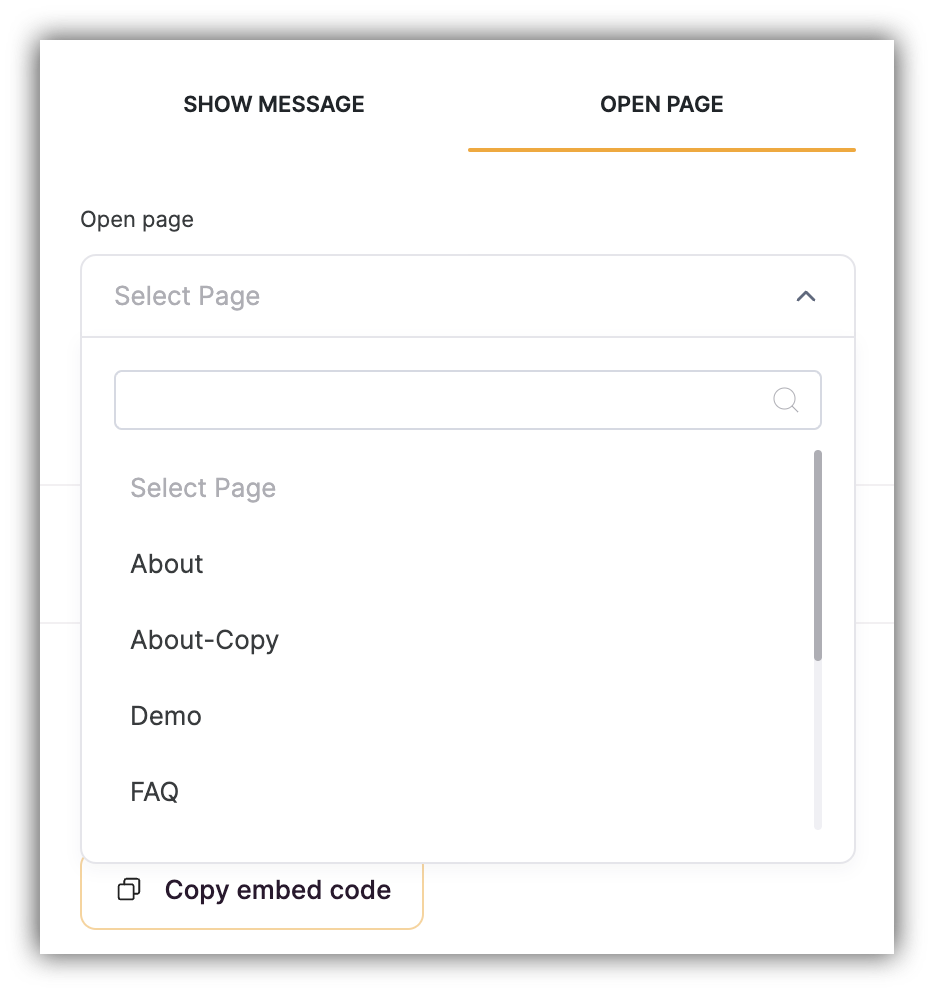 Just select the page, and the user will be taken there after successful submission.
## Field settings
Just select the page, and the user will be taken there after successful submission.
## Field settings
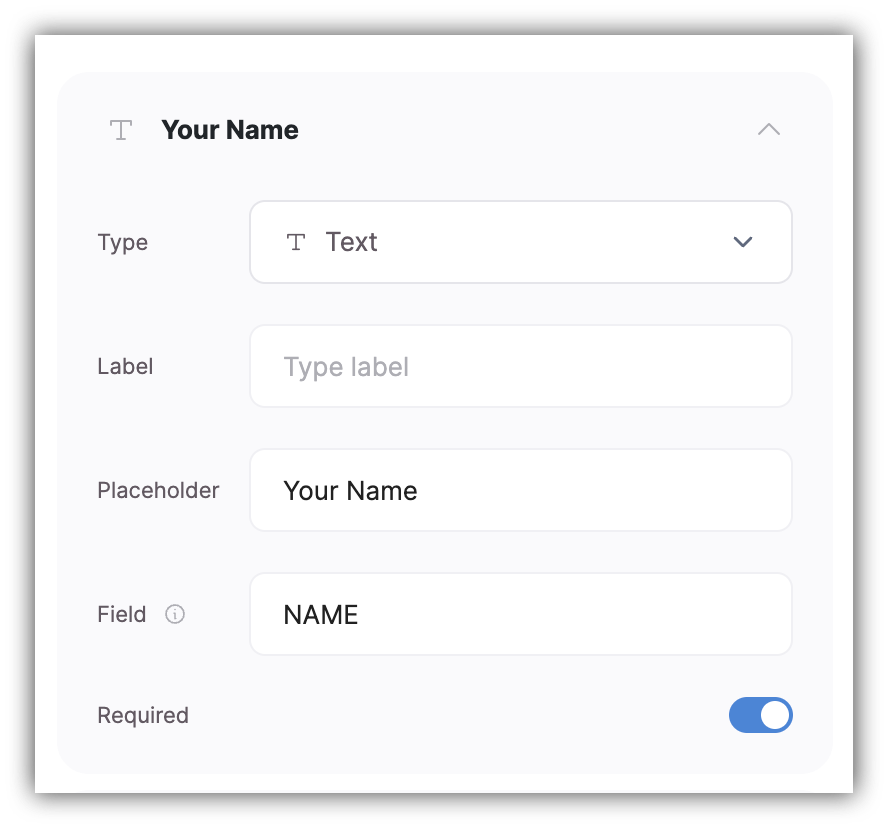 All the field types (apart from **Hidden Fields**, which we'll consider separately), have the following common settings:
* **Label** – a label for the field (appears above or next to the field depending on the form layout)
* **Placeholder** – placeholder text for the field
* **Field** – a unique identifier (i.e. name) for the field
* **Required** - is the user required to fill in the field or not
Now, let's see what field types are available:
* **Email** – a field where users can enter their email address
* **Text/Long text** – for single/multiple line texts
* **URL** – for submitting a URL
* **Phone number** – here users can provide their phone numbers. Please, note that validation is applied on entered phone numbers
* **File** – a field where users can upload files
* **Date** – a date field where users can choose a date from a calendar pop-up
* **DateTime** – allows providing date and time within a single field. Can be mapped to any text type field in Airtable (e.g. Single Line Text)
All the field types (apart from **Hidden Fields**, which we'll consider separately), have the following common settings:
* **Label** – a label for the field (appears above or next to the field depending on the form layout)
* **Placeholder** – placeholder text for the field
* **Field** – a unique identifier (i.e. name) for the field
* **Required** - is the user required to fill in the field or not
Now, let's see what field types are available:
* **Email** – a field where users can enter their email address
* **Text/Long text** – for single/multiple line texts
* **URL** – for submitting a URL
* **Phone number** – here users can provide their phone numbers. Please, note that validation is applied on entered phone numbers
* **File** – a field where users can upload files
* **Date** – a date field where users can choose a date from a calendar pop-up
* **DateTime** – allows providing date and time within a single field. Can be mapped to any text type field in Airtable (e.g. Single Line Text)
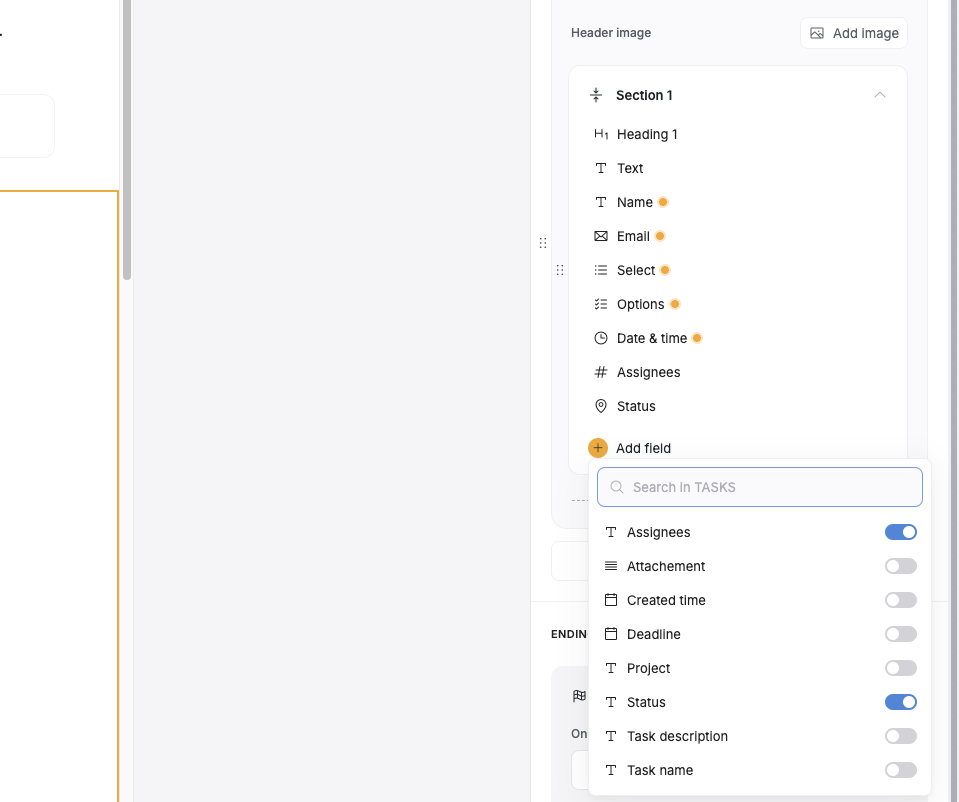 * **Checkbox** - a checkbox field with a yes/no value. If you are mapping the field to Airtable, you need to use a "Checkbox" field type there as well.
* **Rating** - allows submitting a rating (1-5 stars). If you are mapping the field to Airtable, you need to use a "Rating" field type there as well.
* **Address** - this is a regular text field, where users can enter their address, but it also has **address autocomplete**. However, to enable autocomplete, you first need to integrate Google Maps in **Settings => Integrations => Google MAP**. Follow the instructions [here](https://developers.google.com/maps/documentation/javascript/get-api-key), to get the map API key
* **Hidden** - described below separately
* **Number**
* **Dropdown** – a dropdown where users can select one of the provided options. Here, you also have the **Options** parameter, where you can list all the options separated by a semicolon (**without spacing**).
* **Checkbox** - a checkbox field with a yes/no value. If you are mapping the field to Airtable, you need to use a "Checkbox" field type there as well.
* **Rating** - allows submitting a rating (1-5 stars). If you are mapping the field to Airtable, you need to use a "Rating" field type there as well.
* **Address** - this is a regular text field, where users can enter their address, but it also has **address autocomplete**. However, to enable autocomplete, you first need to integrate Google Maps in **Settings => Integrations => Google MAP**. Follow the instructions [here](https://developers.google.com/maps/documentation/javascript/get-api-key), to get the map API key
* **Hidden** - described below separately
* **Number**
* **Dropdown** – a dropdown where users can select one of the provided options. Here, you also have the **Options** parameter, where you can list all the options separated by a semicolon (**without spacing**).
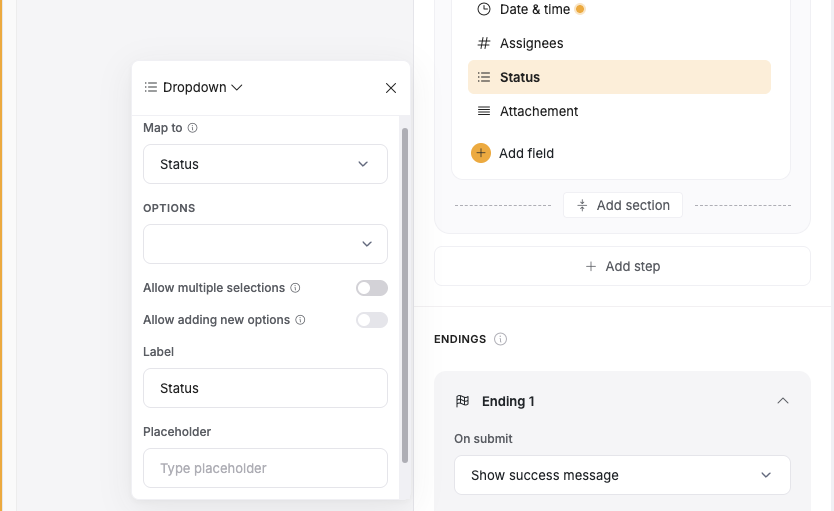 If you’ve mapped the dropdown field to a **single- or multi-select field** in Airtable, a **Sync options with data source** will appear, which lets you sync all the values from Airtable automatically instead of adding them manually.
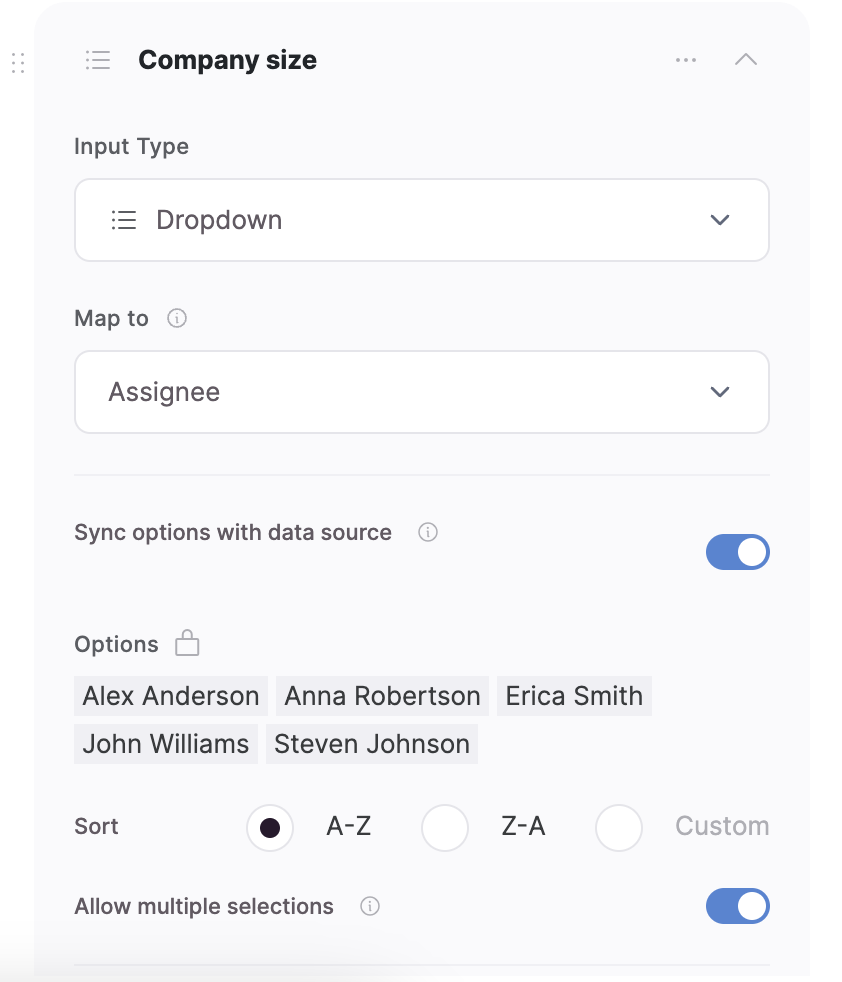 * **Multiselect Dropdown** – similar to **Dropdown** but with the possibility to select more than one option
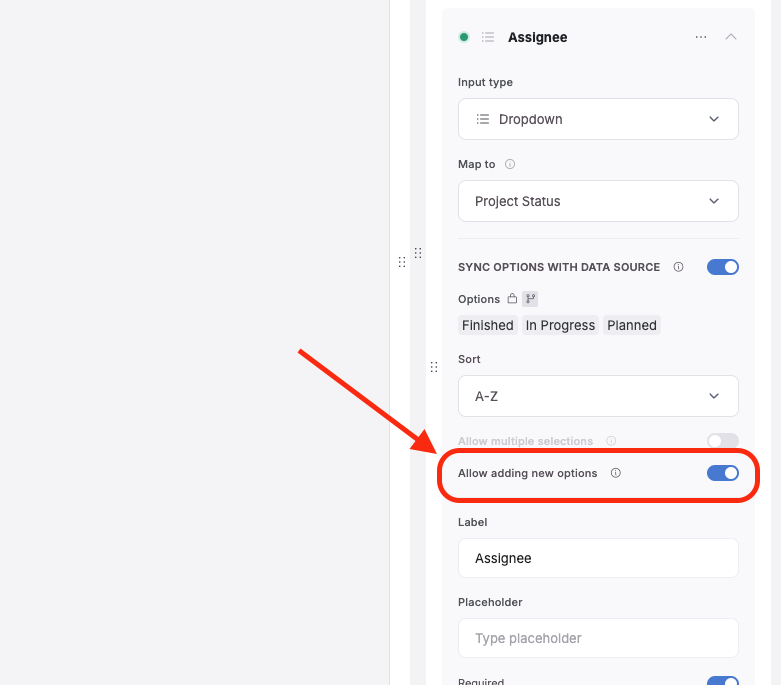
For dropdowns, you can also toggle to enable users to add additional options if the one they are selecting does not exist yet. This is great for adding additional selection options. Note that this is not yet possible for linked records in a dropdown.
* **Multiselect Dropdown** – similar to **Dropdown** but with the possibility to select more than one option
For dropdowns, you can also toggle to enable users to add additional options if the one they are selecting does not exist yet. This is great for adding additional selection options. Note that this is not yet possible for linked records in a dropdown.
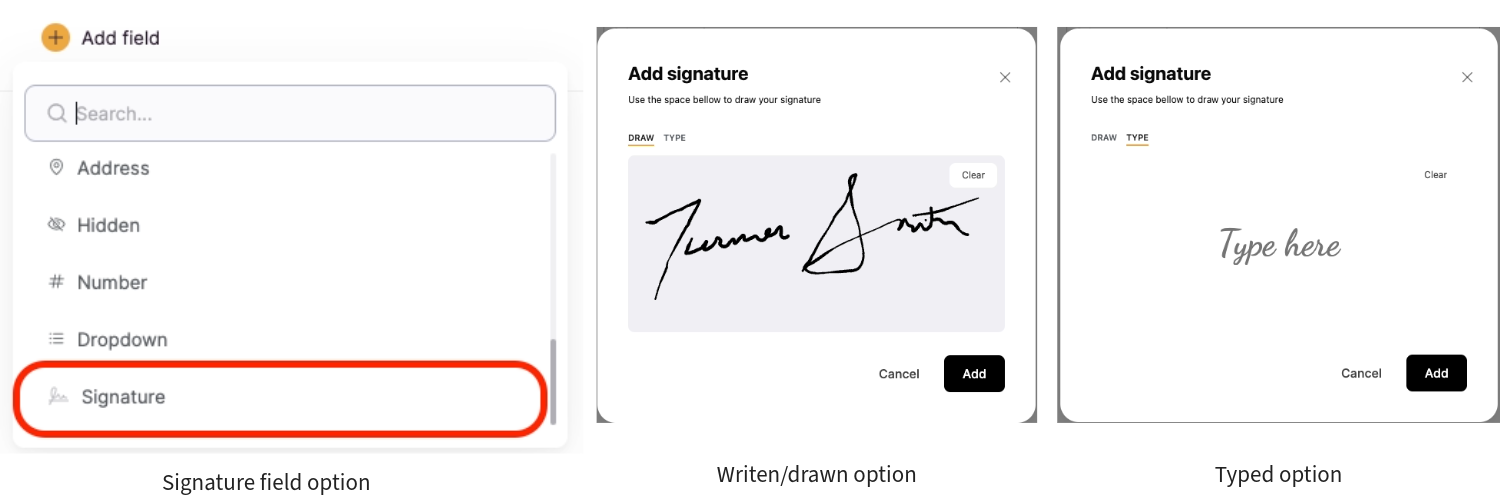
 ### **Signature field**
**eSignature capture** is available for the users on the [Professional plan and above](https://www.softr.io/pricing).
This form field allows users to either type or write their signature (using finger on a touch device or mouse on desktop). The signature is then saved as an image in your data source (e.g. in a File field in Softr Databases, an Attachment field in Airtable, or as an image URL in Google Sheets).
### **Signature field**
**eSignature capture** is available for the users on the [Professional plan and above](https://www.softr.io/pricing).
This form field allows users to either type or write their signature (using finger on a touch device or mouse on desktop). The signature is then saved as an image in your data source (e.g. in a File field in Softr Databases, an Attachment field in Airtable, or as an image URL in Google Sheets).
 Images on the records can serve as a reference for anyone entitled to access that record. It is important to ensure that your record-keeping practices meet any specific legal requirements for your industry and jurisdiction. [Read more](https://www.pandadoc.com/electronic-signature-law/) about electronic signature laws across countries.
### Hidden field
Images on the records can serve as a reference for anyone entitled to access that record. It is important to ensure that your record-keeping practices meet any specific legal requirements for your industry and jurisdiction. [Read more](https://www.pandadoc.com/electronic-signature-law/) about electronic signature laws across countries.
### Hidden field
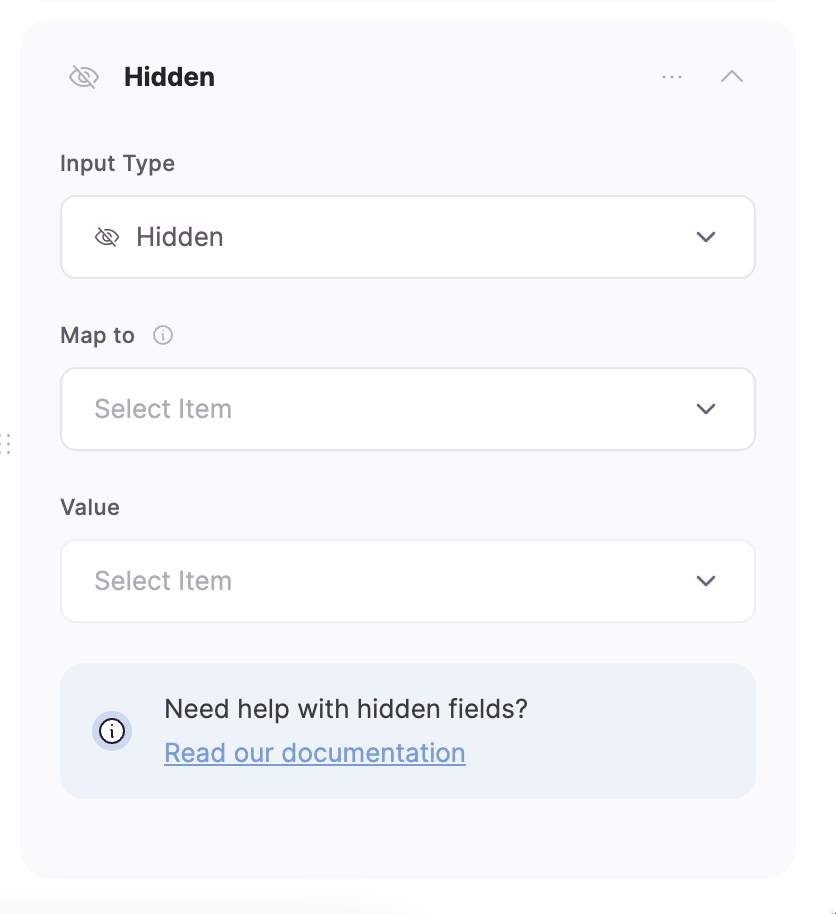 This field type allows sending hidden data that the user doesn't see (you can find a use case [here](https://developers.google.com/maps/documentation/javascript/get-api-key)). There are **4 categories**, so let's examine them one by one.
**1. Logged-in user**
By default, here, you have the following options:
* **Email.** Collects the email address of the logged-in user.
* **Name.** Collects the name of the logged-in user.
* **Record ID.** If you've [connected a data source to your users database](/add-and-manage-users/pxnkp9H3qyEVMF6XUceqnj/syncing-users-with-a-data-source/hshRGygHr4T33EnaLntGf9), you can choose this option to collect the Record ID (you can learn about [Airtable](/data-sources/1YYStCJukT15Lh2j93qo9A/airtable/jHX7kfH7QvkVcELQvS3VoX) Record IDs [here](https://developers.google.com/maps/documentation/javascript/get-api-key), and learn how those work for Google Sheets [here](https://developers.google.com/maps/documentation/javascript/get-api-key)) of the user.
**2. URL Parameter**
Using this option, you can collect any of the page’s URL parameters. Let's consider a specific example to see how that works. For instance, if you've created a job board with Softr, each job announcement will have a **recordId** (you can learn about [Airtable](/data-sources/1YYStCJukT15Lh2j93qo9A/airtable/jHX7kfH7QvkVcELQvS3VoX) Record IDs [here](https://developers.google.com/maps/documentation/javascript/get-api-key), and learn how those work for Google Sheets [here](https://developers.google.com/maps/documentation/javascript/get-api-key)) in its page URL, indicating the [data source](/4230abecf813402aa2926466c313290a) record corresponding to that particular job. So, if you have a form on that page to receive job applications, you can set a hidden field to collect the **recordId** to identify which job announcement the application has been submitted for.
Your page URL will look something like **yoursite.com/job-details/senior-product-manager?recordId=rec7HcXAgKmlk8inf**, so if you set your hidden field value as “**recordId,”** it will collect the value of **recordId** ("rec7HcXAgKmlk8inf" in this case).
**3. Page URL**
This parameter allows to get **the full URL of the page** the form has been submitted from.
**4. Custom value**
Here’ you can collect any custom value that you’re not able to collect using the previous options. For instance, you can use it to collect a custom text along with the submission. This can be useful is you have the same form on different pages, and want to mark each of the forms distinctively.
Another important use case is collecting additional logged-in user parameters. If you've [synced your users database with a data source](/add-and-manage-users/pxnkp9H3qyEVMF6XUceqnj/syncing-users-with-a-data-source/hshRGygHr4T33EnaLntGf9), you can use this option to collect any of the field values corresponding to the user. Here, the value has the following format:**\{LOGGED\_IN\_USER:FIELD:'field name'}** ('field name'is replaced with the actual name of the field).
Let's say you have connected an [Airtable](/data-sources/1YYStCJukT15Lh2j93qo9A/airtable/jHX7kfH7QvkVcELQvS3VoX) data source and have a **Status** field in your users base as shown below.
This field type allows sending hidden data that the user doesn't see (you can find a use case [here](https://developers.google.com/maps/documentation/javascript/get-api-key)). There are **4 categories**, so let's examine them one by one.
**1. Logged-in user**
By default, here, you have the following options:
* **Email.** Collects the email address of the logged-in user.
* **Name.** Collects the name of the logged-in user.
* **Record ID.** If you've [connected a data source to your users database](/add-and-manage-users/pxnkp9H3qyEVMF6XUceqnj/syncing-users-with-a-data-source/hshRGygHr4T33EnaLntGf9), you can choose this option to collect the Record ID (you can learn about [Airtable](/data-sources/1YYStCJukT15Lh2j93qo9A/airtable/jHX7kfH7QvkVcELQvS3VoX) Record IDs [here](https://developers.google.com/maps/documentation/javascript/get-api-key), and learn how those work for Google Sheets [here](https://developers.google.com/maps/documentation/javascript/get-api-key)) of the user.
**2. URL Parameter**
Using this option, you can collect any of the page’s URL parameters. Let's consider a specific example to see how that works. For instance, if you've created a job board with Softr, each job announcement will have a **recordId** (you can learn about [Airtable](/data-sources/1YYStCJukT15Lh2j93qo9A/airtable/jHX7kfH7QvkVcELQvS3VoX) Record IDs [here](https://developers.google.com/maps/documentation/javascript/get-api-key), and learn how those work for Google Sheets [here](https://developers.google.com/maps/documentation/javascript/get-api-key)) in its page URL, indicating the [data source](/4230abecf813402aa2926466c313290a) record corresponding to that particular job. So, if you have a form on that page to receive job applications, you can set a hidden field to collect the **recordId** to identify which job announcement the application has been submitted for.
Your page URL will look something like **yoursite.com/job-details/senior-product-manager?recordId=rec7HcXAgKmlk8inf**, so if you set your hidden field value as “**recordId,”** it will collect the value of **recordId** ("rec7HcXAgKmlk8inf" in this case).
**3. Page URL**
This parameter allows to get **the full URL of the page** the form has been submitted from.
**4. Custom value**
Here’ you can collect any custom value that you’re not able to collect using the previous options. For instance, you can use it to collect a custom text along with the submission. This can be useful is you have the same form on different pages, and want to mark each of the forms distinctively.
Another important use case is collecting additional logged-in user parameters. If you've [synced your users database with a data source](/add-and-manage-users/pxnkp9H3qyEVMF6XUceqnj/syncing-users-with-a-data-source/hshRGygHr4T33EnaLntGf9), you can use this option to collect any of the field values corresponding to the user. Here, the value has the following format:**\{LOGGED\_IN\_USER:FIELD:'field name'}** ('field name'is replaced with the actual name of the field).
Let's say you have connected an [Airtable](/data-sources/1YYStCJukT15Lh2j93qo9A/airtable/jHX7kfH7QvkVcELQvS3VoX) data source and have a **Status** field in your users base as shown below.
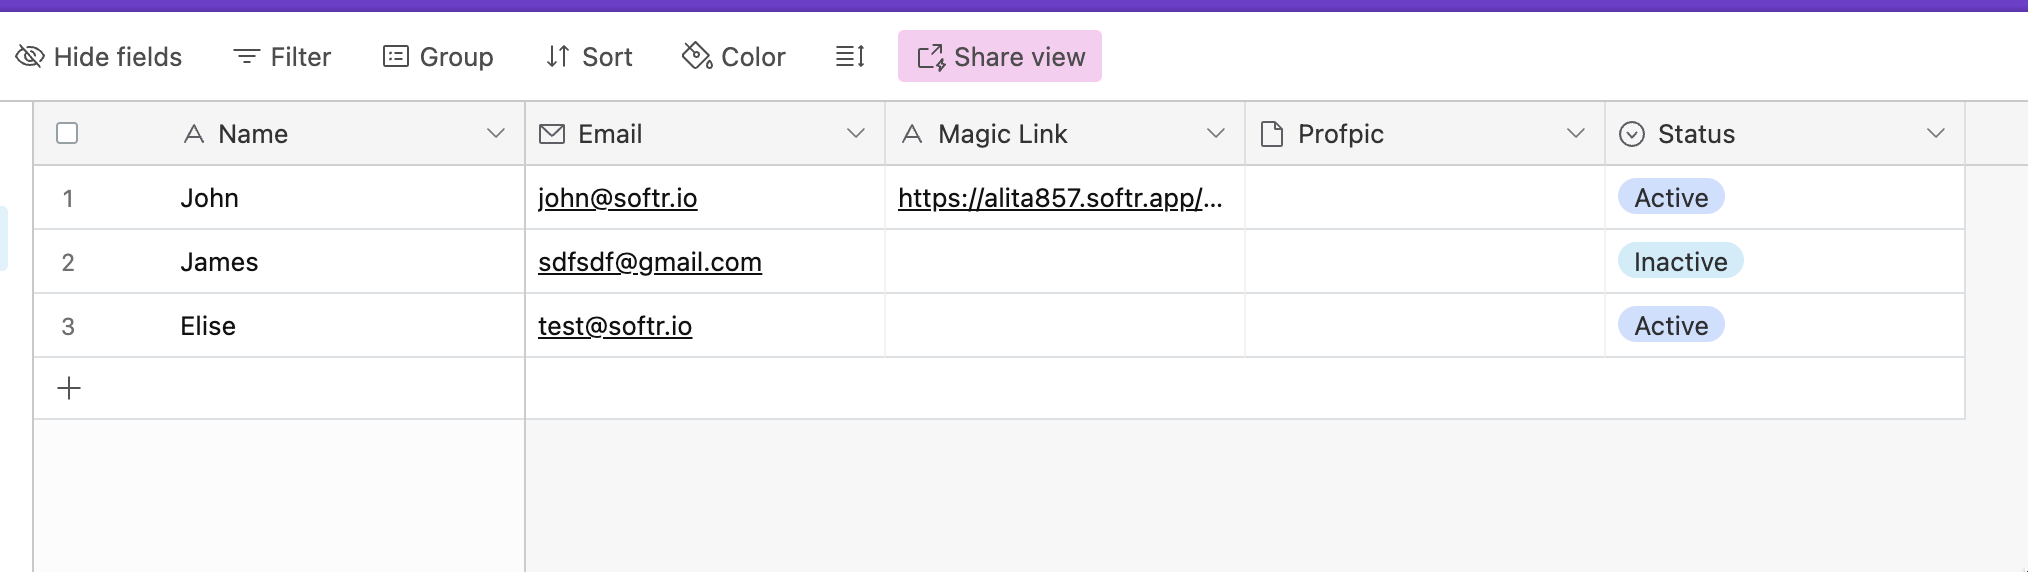 So, if you set your hidden field's value as **Status,** the values of the **Status** field will be collected for each user submitting the form (e.g. for Elise it will be "Active").
## Form Prefill
Using this feature, you can send your Softr form to others with one or more fields prefilled with values. Let's see how that works.
Let's say your form URL is **yourdomain.com/form**. To prefill a certain field for this form, you need to add a parameter to your form URL and assign a value to it in the following format:
> **?prefill\_tagname=value**
If it's the first parameter in your URL (e.g. you could already have other parameters not related to the prefill), it needs to start with "?." However, if you already have other parameters in the form URL, attach the new ones using "&" at the beginning: **\&prefill\_tagname=value**
For instance, if you have a text field with a **Tag** "NAME," and you want to prefill it with "John," your URL will look as follows:
> **yourdomain.com/form?prefill\_NAME=John**
So, if you set your hidden field's value as **Status,** the values of the **Status** field will be collected for each user submitting the form (e.g. for Elise it will be "Active").
## Form Prefill
Using this feature, you can send your Softr form to others with one or more fields prefilled with values. Let's see how that works.
Let's say your form URL is **yourdomain.com/form**. To prefill a certain field for this form, you need to add a parameter to your form URL and assign a value to it in the following format:
> **?prefill\_tagname=value**
If it's the first parameter in your URL (e.g. you could already have other parameters not related to the prefill), it needs to start with "?." However, if you already have other parameters in the form URL, attach the new ones using "&" at the beginning: **\&prefill\_tagname=value**
For instance, if you have a text field with a **Tag** "NAME," and you want to prefill it with "John," your URL will look as follows:
> **yourdomain.com/form?prefill\_NAME=John**
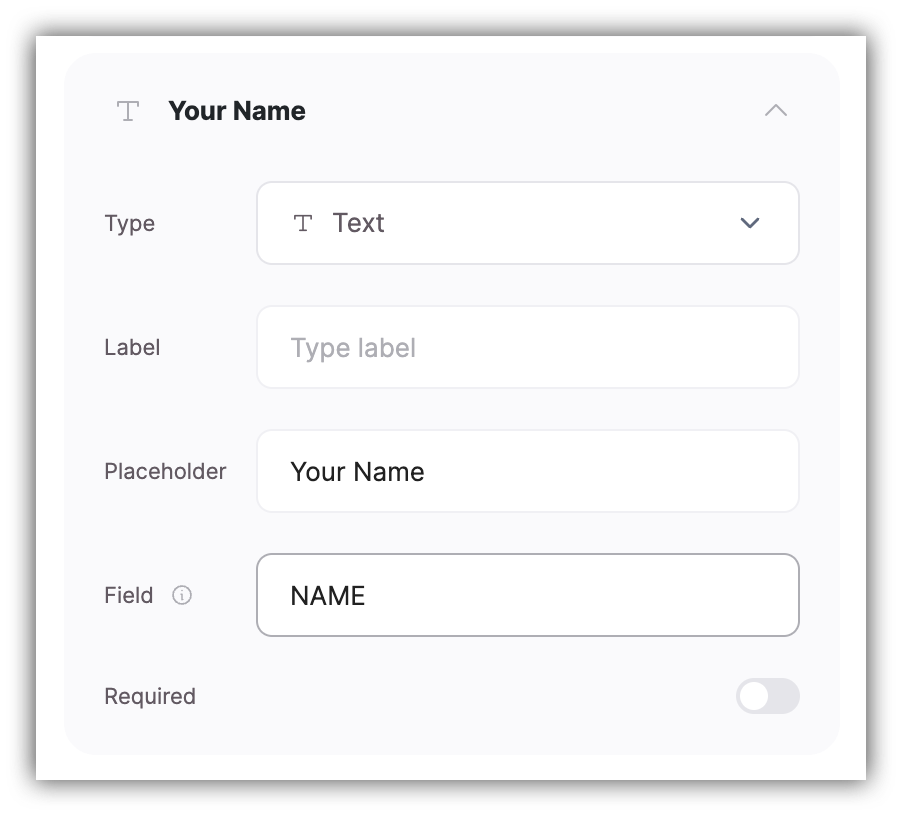 Please, note that the **Tag** value is case-sensitive and should match exactly the value in your field settings.
Below, you can see what we described in action.
Please, note that the **Tag** value is case-sensitive and should match exactly the value in your field settings.
Below, you can see what we described in action.
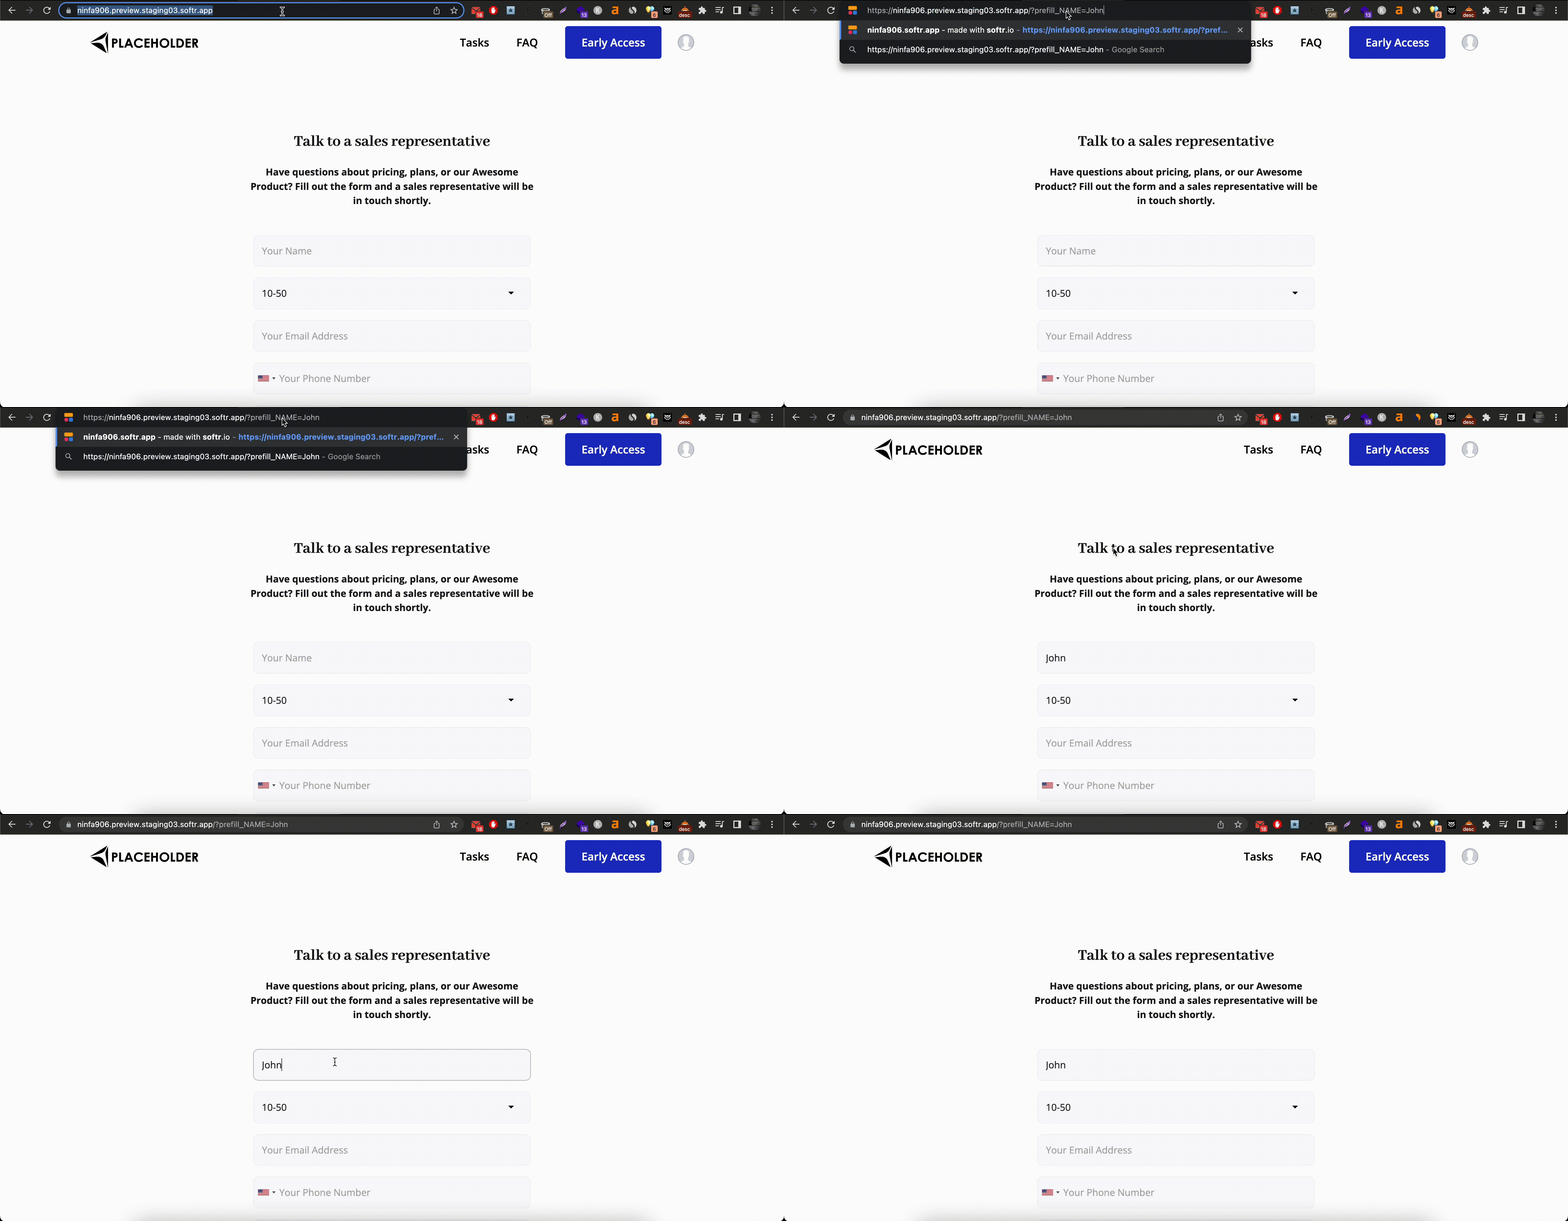 If the field type receives a single value and doesn't have any special formatting involved, it can be prefilled in a similar way. **Hidden fields** work the same way as well.
Please, note that the **File** field type is not supported.
Further on, if you need to prefill **multiple fields**, just add the new values next to each other as shown below:
> **?prefill\_NAME=John\&prefill\_Email=[john@softr.io](mailto:john@softr.io)**
Now, let's see how prefill works for the field types that receive their values differently.
### **Multi-select Dropdown**
Here, you need to list all the preselected values separated by a comma:
> **prefill\_Option=X\&prefill\_Option=Y**
### ****Date and DateTime****
You can use a date like `?prefill_date=2024.10.25`. But it’s not limited to this format; since we’re using [JavaScript’s Date](https://developer.mozilla.org/en-US/docs/Web/JavaScript/Reference/Global_Objects/Date) object, you have a broad range of formats to choose from, like `2024/10/25` or even `October 25, 2024`. You can also pre-fill with date and time, like `prefill_date=2024.10.25 15:30`. If the pre-filled date or datetime is invalid, nothing will be displayed. Some examples:
> **?prefill\_datefield=dd/mm/yyyy
If the field type receives a single value and doesn't have any special formatting involved, it can be prefilled in a similar way. **Hidden fields** work the same way as well.
Please, note that the **File** field type is not supported.
Further on, if you need to prefill **multiple fields**, just add the new values next to each other as shown below:
> **?prefill\_NAME=John\&prefill\_Email=[john@softr.io](mailto:john@softr.io)**
Now, let's see how prefill works for the field types that receive their values differently.
### **Multi-select Dropdown**
Here, you need to list all the preselected values separated by a comma:
> **prefill\_Option=X\&prefill\_Option=Y**
### ****Date and DateTime****
You can use a date like `?prefill_date=2024.10.25`. But it’s not limited to this format; since we’re using [JavaScript’s Date](https://developer.mozilla.org/en-US/docs/Web/JavaScript/Reference/Global_Objects/Date) object, you have a broad range of formats to choose from, like `2024/10/25` or even `October 25, 2024`. You can also pre-fill with date and time, like `prefill_date=2024.10.25 15:30`. If the pre-filled date or datetime is invalid, nothing will be displayed. Some examples:
> **?prefill\_datefield=dd/mm/yyyy
> ?prefill\_datetimefield=mm-dd-yy HH:MM**
Since the time picker has fixed values available for selection (e.g. 01:30 or 16:00), you should use the same values when setting the prefill for the DateTime field.
### **Checkbox**
For the checkbox type, you can set the value as "true" (use lowercase only) if you want it to be pre-checked:
> **?prefill\_checkbox=true**
That's it. Now, you should be able to send your form URL to your users with any of the fields prefilled with your preferred values.
Email marketing services (e.g. [Mailchimp](/integrations/etS18kJqm1fuD58KCsjC3z/mailchimp/2GvSLRGrgMfe8S3drMWao1)) often provide variables that you can use as values in your prefill configuration to be able to send the form URL to a group of users at once so that each user has his/her own info (e.g. Name, Email, etc.) prefilled.
## **Enable reCaptcha**
By adding reCaptcha authentication to your form, you'll protect it from getting spammed or misused.
Please, note that Softr only supports [reCaptcha v3](https://developers.google.com/recaptcha/docs/versions).
For reCaptcha to be enabled the app needs to be published.
To set up reCaptcha, you need to go to [https://www.google.com/recaptcha/admin/create](https://www.google.com/recaptcha/admin/create)
and enter your site details as shown below.
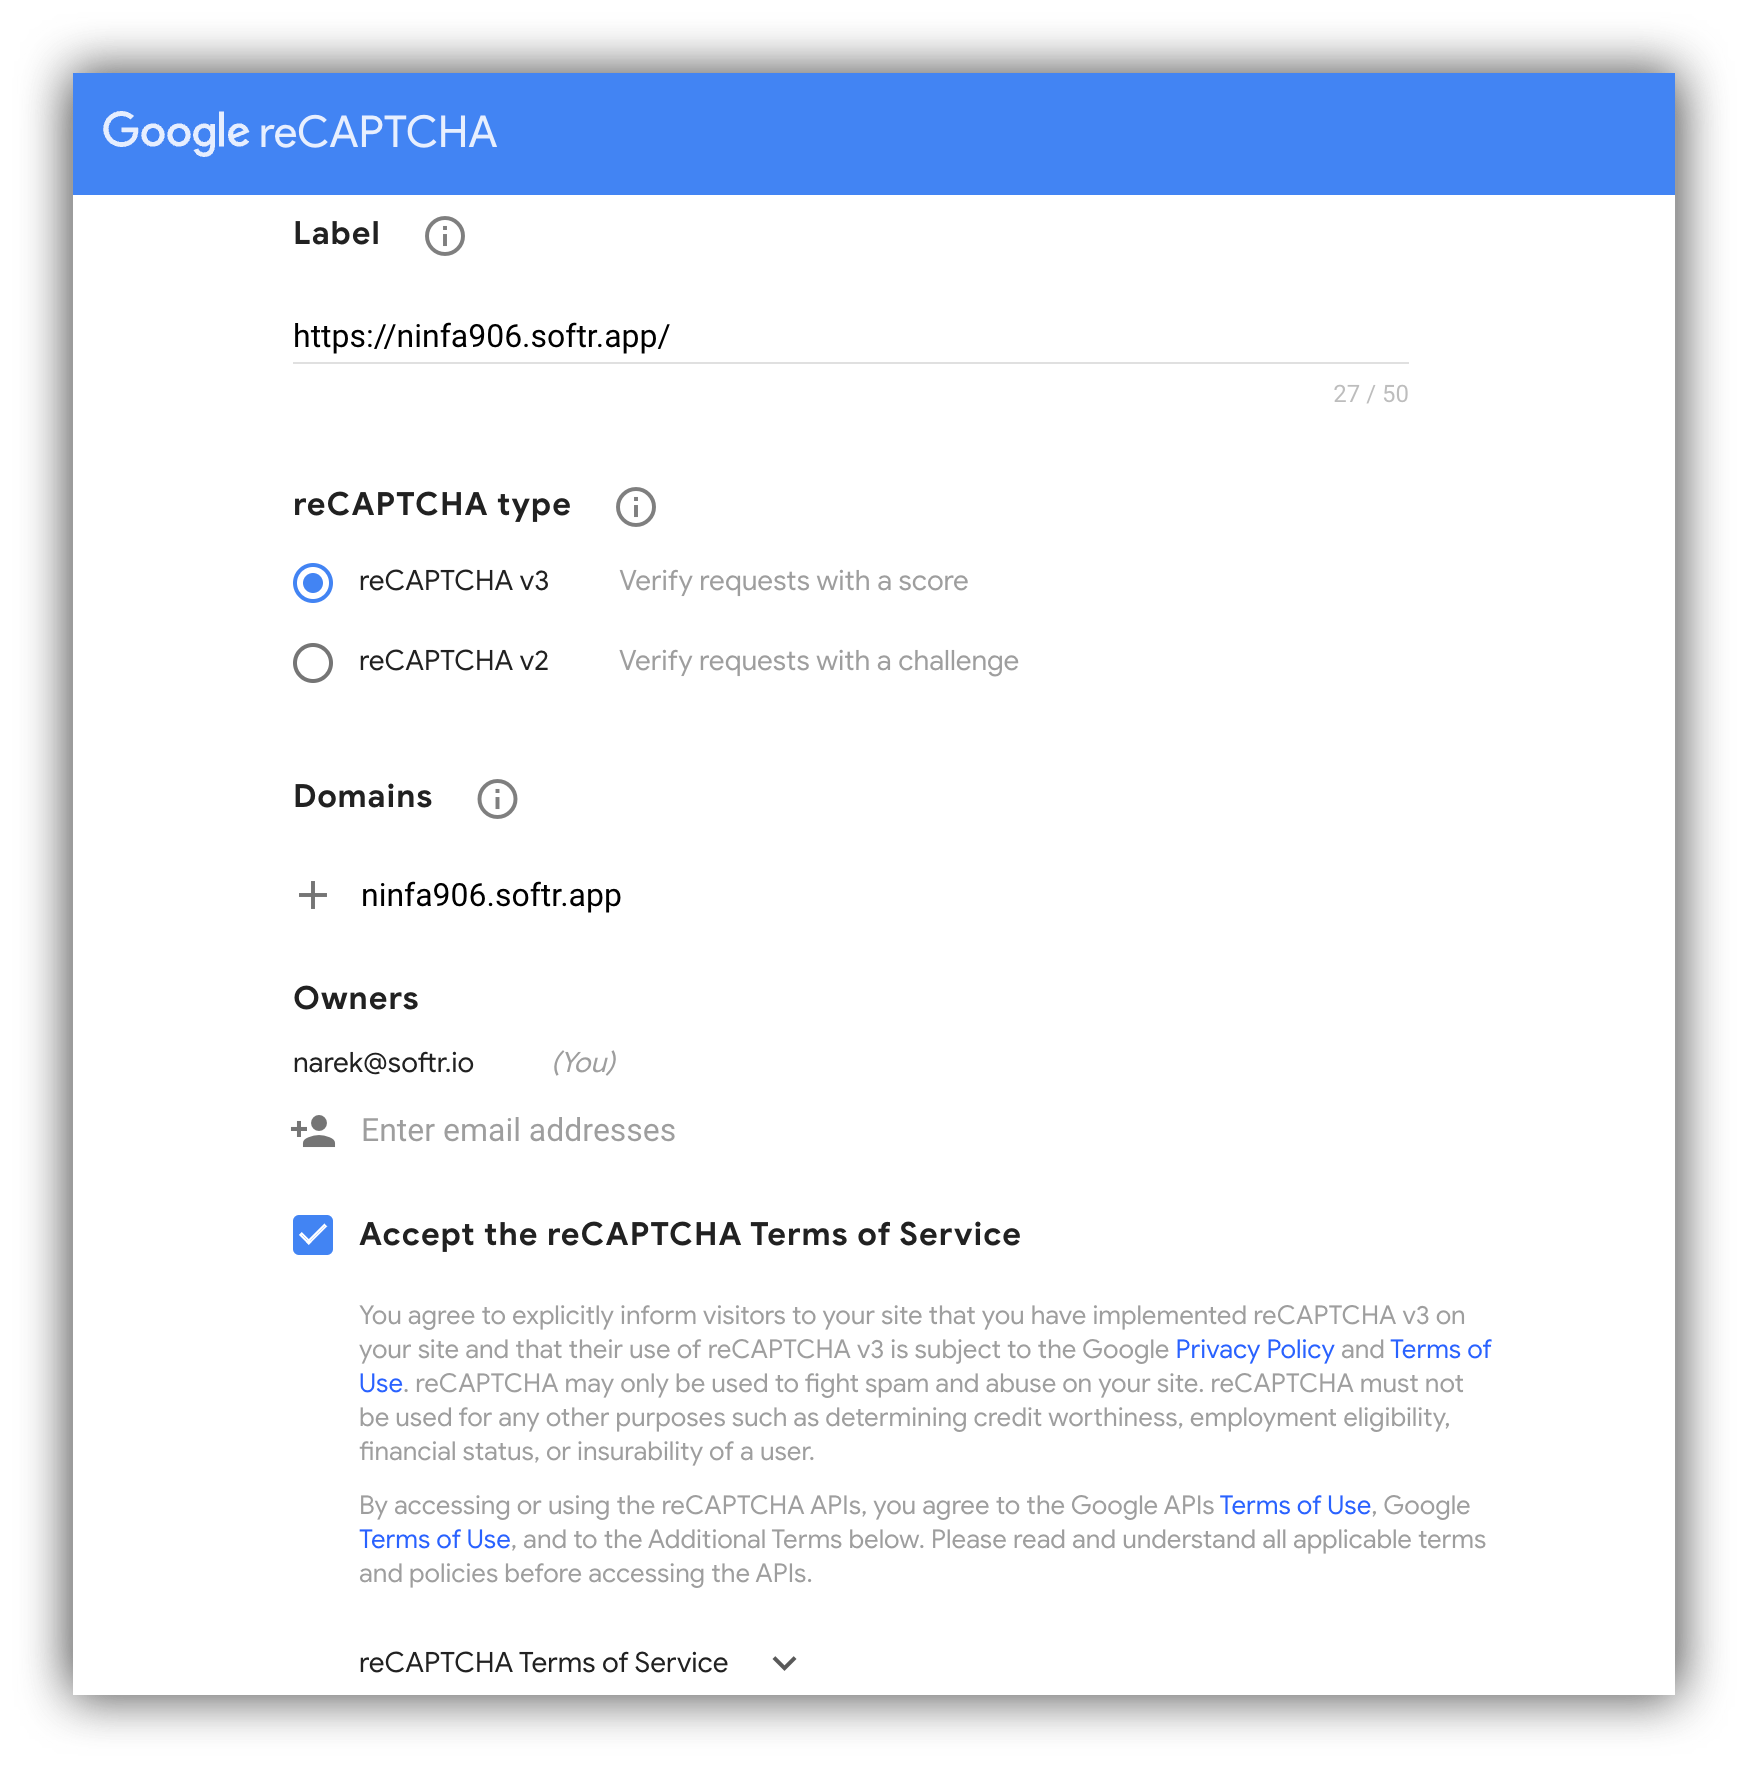 In the next screen, you just need to copy the **Site Key** and **Secret Key.**
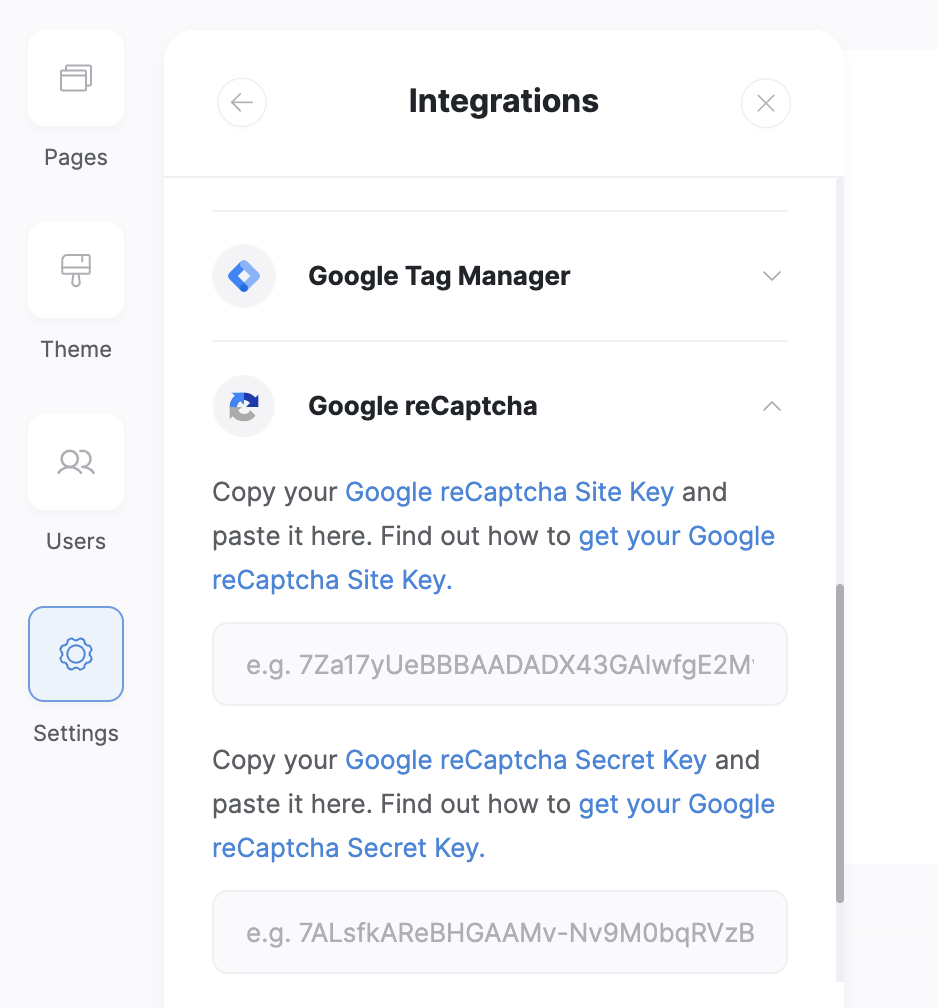
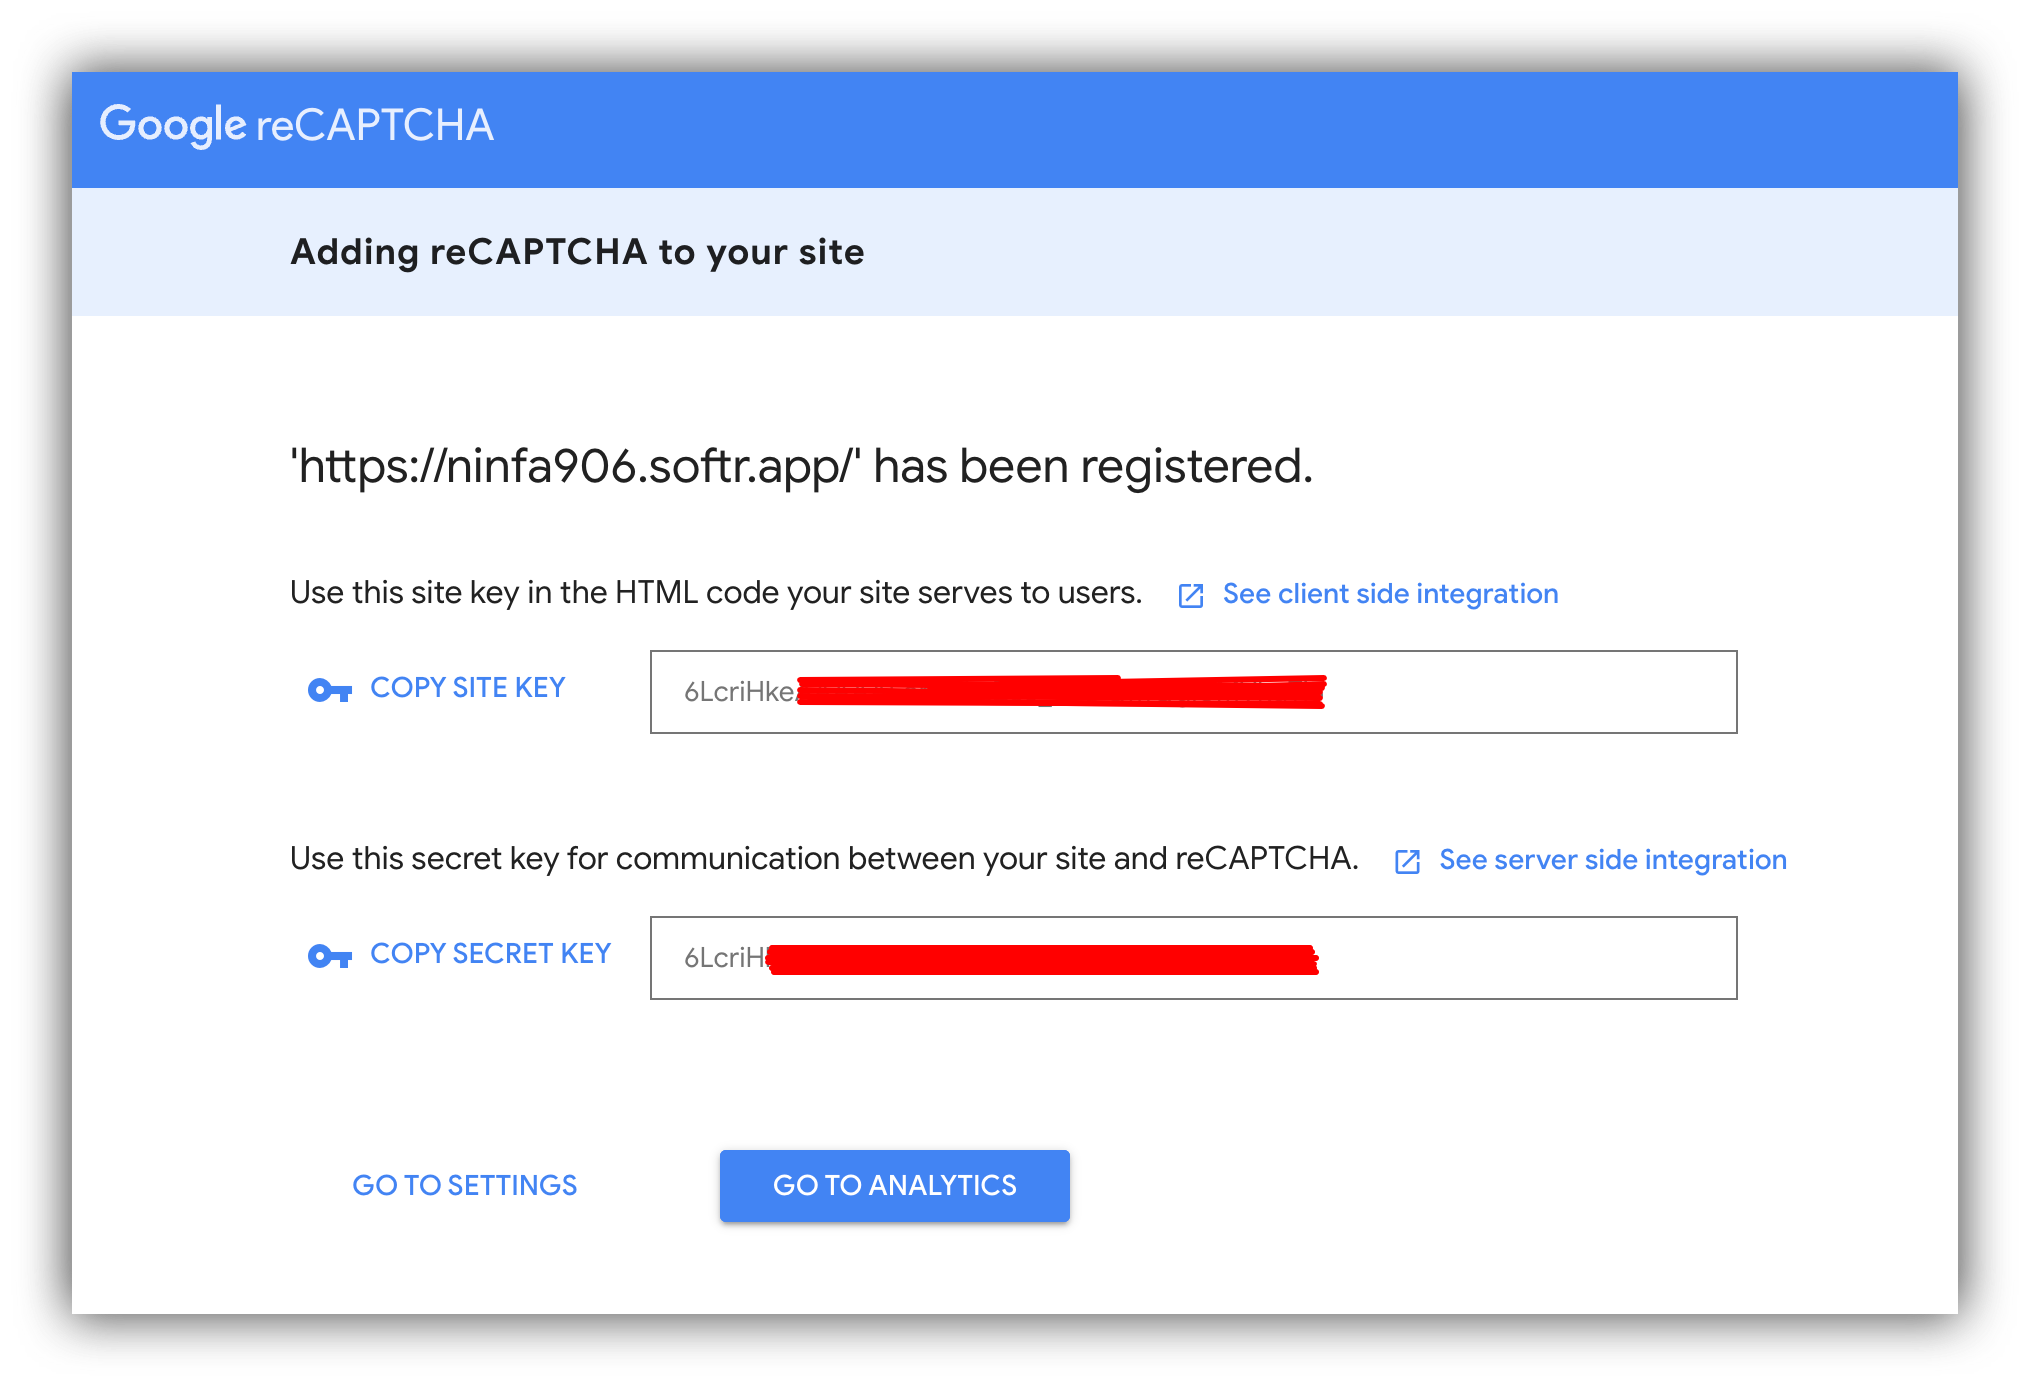 To finalize the setup, paste the Site Key and Secret Key in your Softr app's **Settings => Integrations => Google reCaptcha.**
 ## **Using Forms on Details Pages**
Conditional forms can be particularly powerful when used on details pages, where the form's behavior can depend on specific data from a list details record. To ensure that these forms operate correctly, special attention must be given to how data fields are mapped and utilized within the form.
### **Setting up Forms on Details Pages**
When adding a conditional form to a details page in Softr, the form can interact dynamically with the data displayed on that page. This setup allows you to create forms that respond and adapt based on the specific details of the record being viewed.
### **Field mapping and conditions**
To utilize record-specific data in your conditional logic:
1. **Data mapping**: Ensure that any field used in the form’s conditions is corresponds to a mapped field in the list details block. This mapping is crucial because it allows the form to access the relevant data to evaluate conditions correctly.
2. **Configure conditions**: When setting up conditions in your form that depend on list details, refer directly to the mapped fields. For example, if you have a form on a real estate listing page that should display additional questions about mortgage options only if the property price is above a certain value, you must map the property price field from the list details to the form.
3. **Validate field mapping**: Verify that the fields used in your conditions are not only mapped but also correctly pulling data from the list details. If the field isn’t mapped, the conditional logic based on that field will not function, potentially causing the form to behave unexpectedly.
### **Testing and troubleshooting**
* **Testing**: Thoroughly test the form by navigating through different records on the details page to ensure that the conditional logic triggers as expected for different data scenarios.
* **Troubleshooting**: If a condition doesn’t work, double-check the field mappings and the logical statements used in your conditions. Ensure there are no discrepancies between the field names in the database and those referenced in your form settings.
## **Using Forms on Details Pages**
Conditional forms can be particularly powerful when used on details pages, where the form's behavior can depend on specific data from a list details record. To ensure that these forms operate correctly, special attention must be given to how data fields are mapped and utilized within the form.
### **Setting up Forms on Details Pages**
When adding a conditional form to a details page in Softr, the form can interact dynamically with the data displayed on that page. This setup allows you to create forms that respond and adapt based on the specific details of the record being viewed.
### **Field mapping and conditions**
To utilize record-specific data in your conditional logic:
1. **Data mapping**: Ensure that any field used in the form’s conditions is corresponds to a mapped field in the list details block. This mapping is crucial because it allows the form to access the relevant data to evaluate conditions correctly.
2. **Configure conditions**: When setting up conditions in your form that depend on list details, refer directly to the mapped fields. For example, if you have a form on a real estate listing page that should display additional questions about mortgage options only if the property price is above a certain value, you must map the property price field from the list details to the form.
3. **Validate field mapping**: Verify that the fields used in your conditions are not only mapped but also correctly pulling data from the list details. If the field isn’t mapped, the conditional logic based on that field will not function, potentially causing the form to behave unexpectedly.
### **Testing and troubleshooting**
* **Testing**: Thoroughly test the form by navigating through different records on the details page to ensure that the conditional logic triggers as expected for different data scenarios.
* **Troubleshooting**: If a condition doesn’t work, double-check the field mappings and the logical statements used in your conditions. Ensure there are no discrepancies between the field names in the database and those referenced in your form settings.