> ## Documentation Index
> Fetch the complete documentation index at: https://docs.softr.io/llms.txt
> Use this file to discover all available pages before exploring further.
# General Settings
> How to configure the Settings in your Softr app.
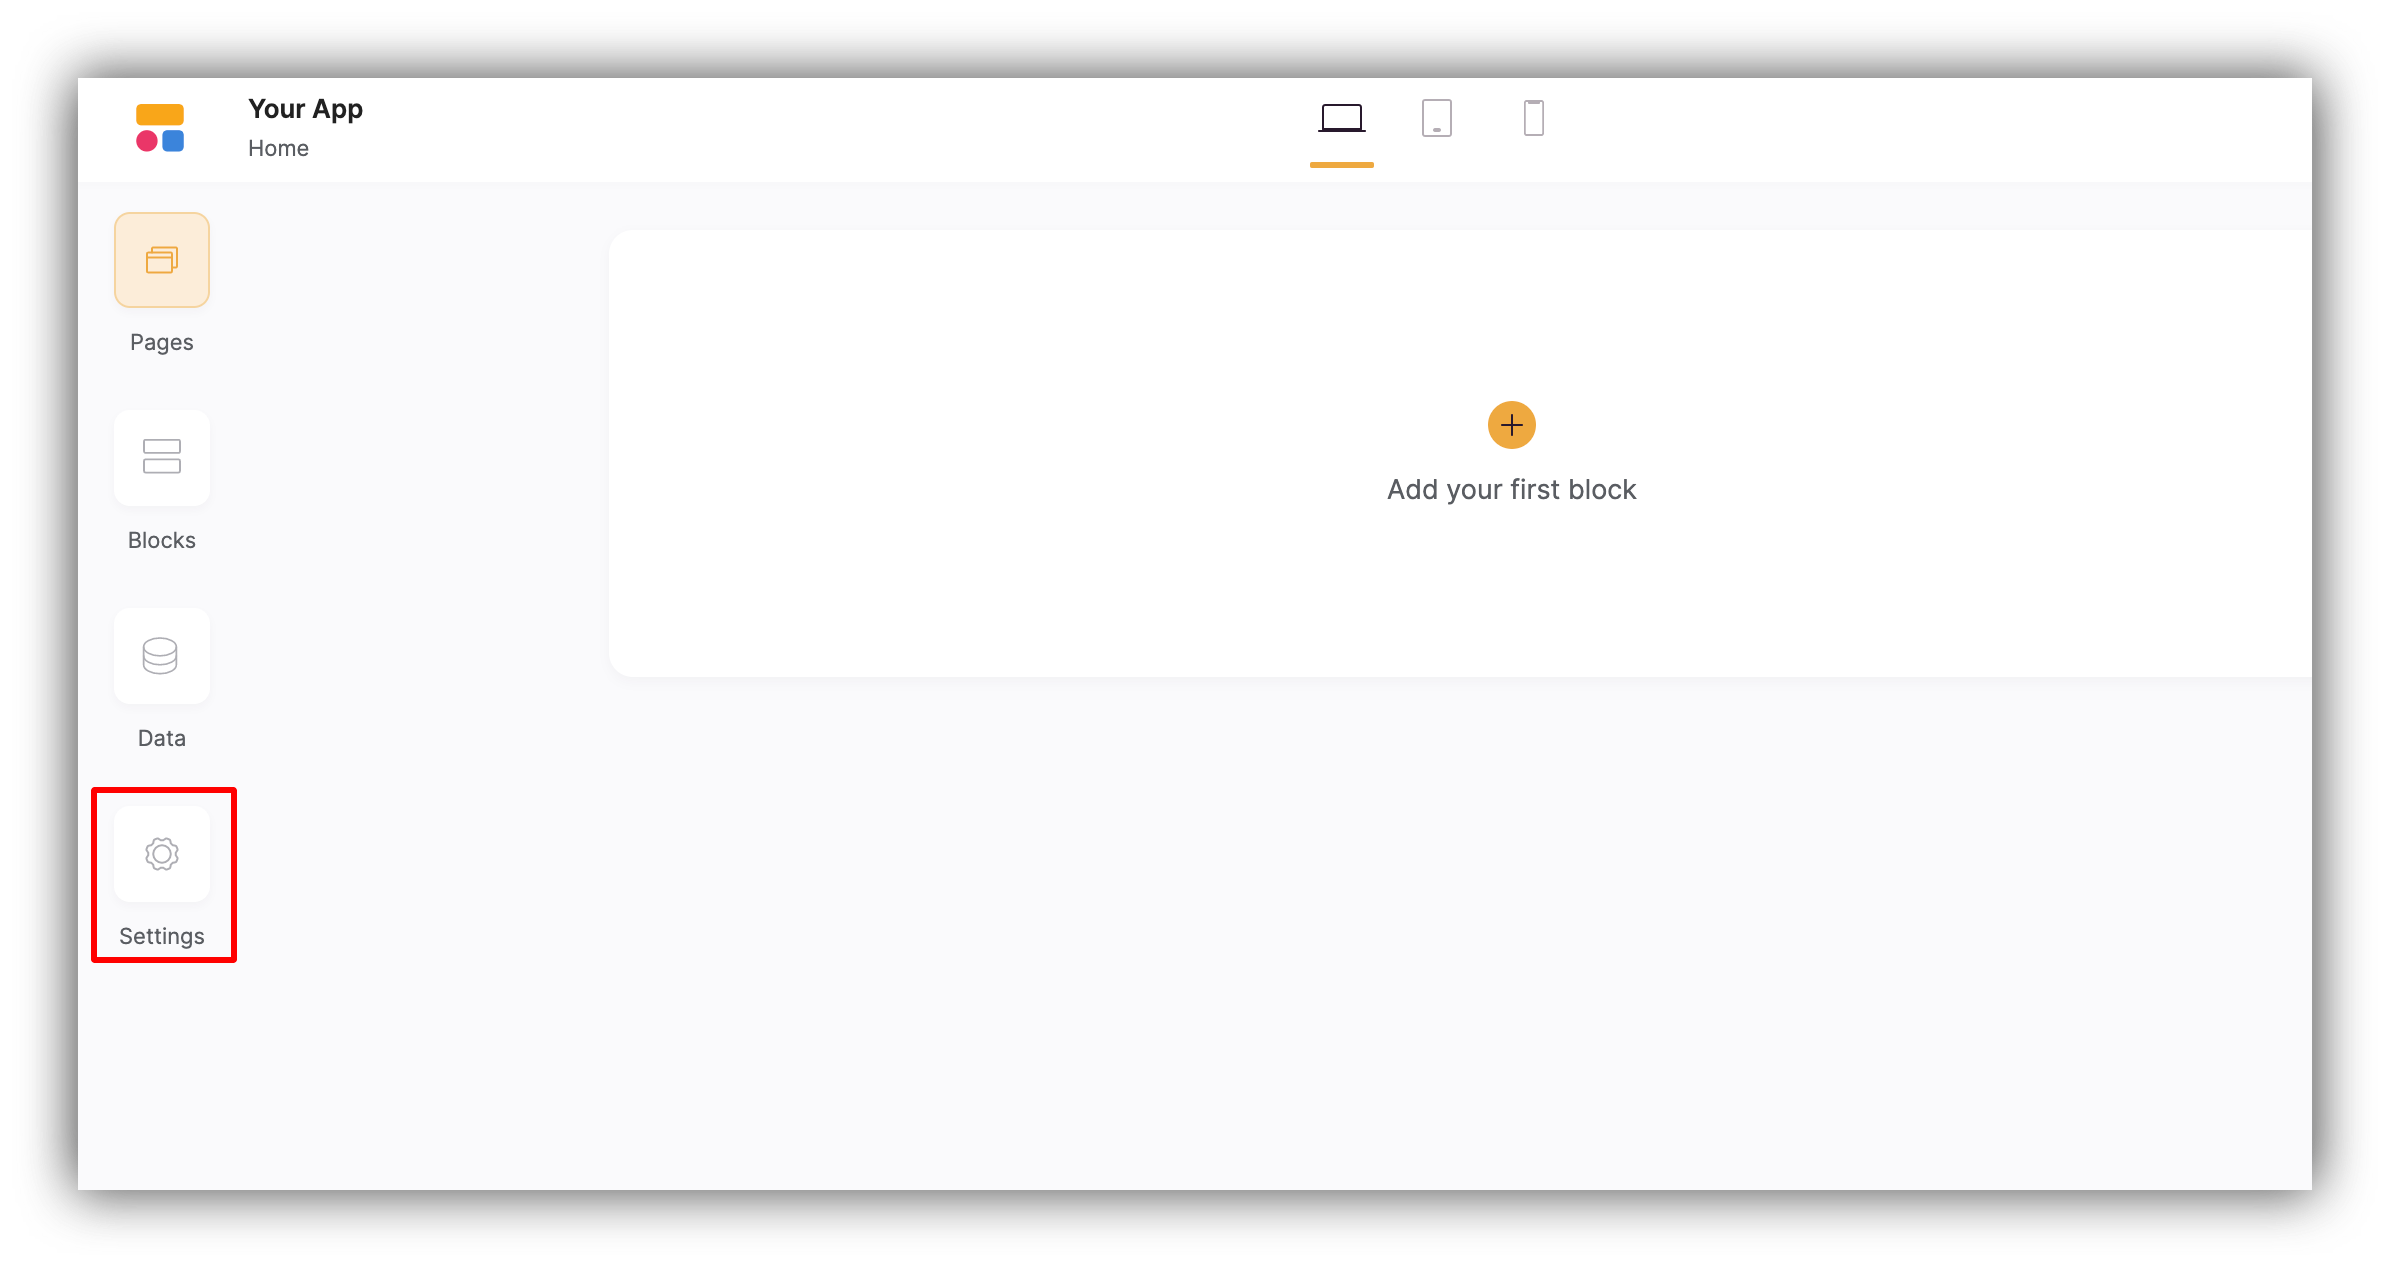
Before starting to build your site, you might want to check the application **Settings** to apply some general configurations. The settings can be accessed from the left-side toolbar as shown in the following screenshot.
 So, let’s go through the sections one by one.
## General
So, let’s go through the sections one by one.
## General
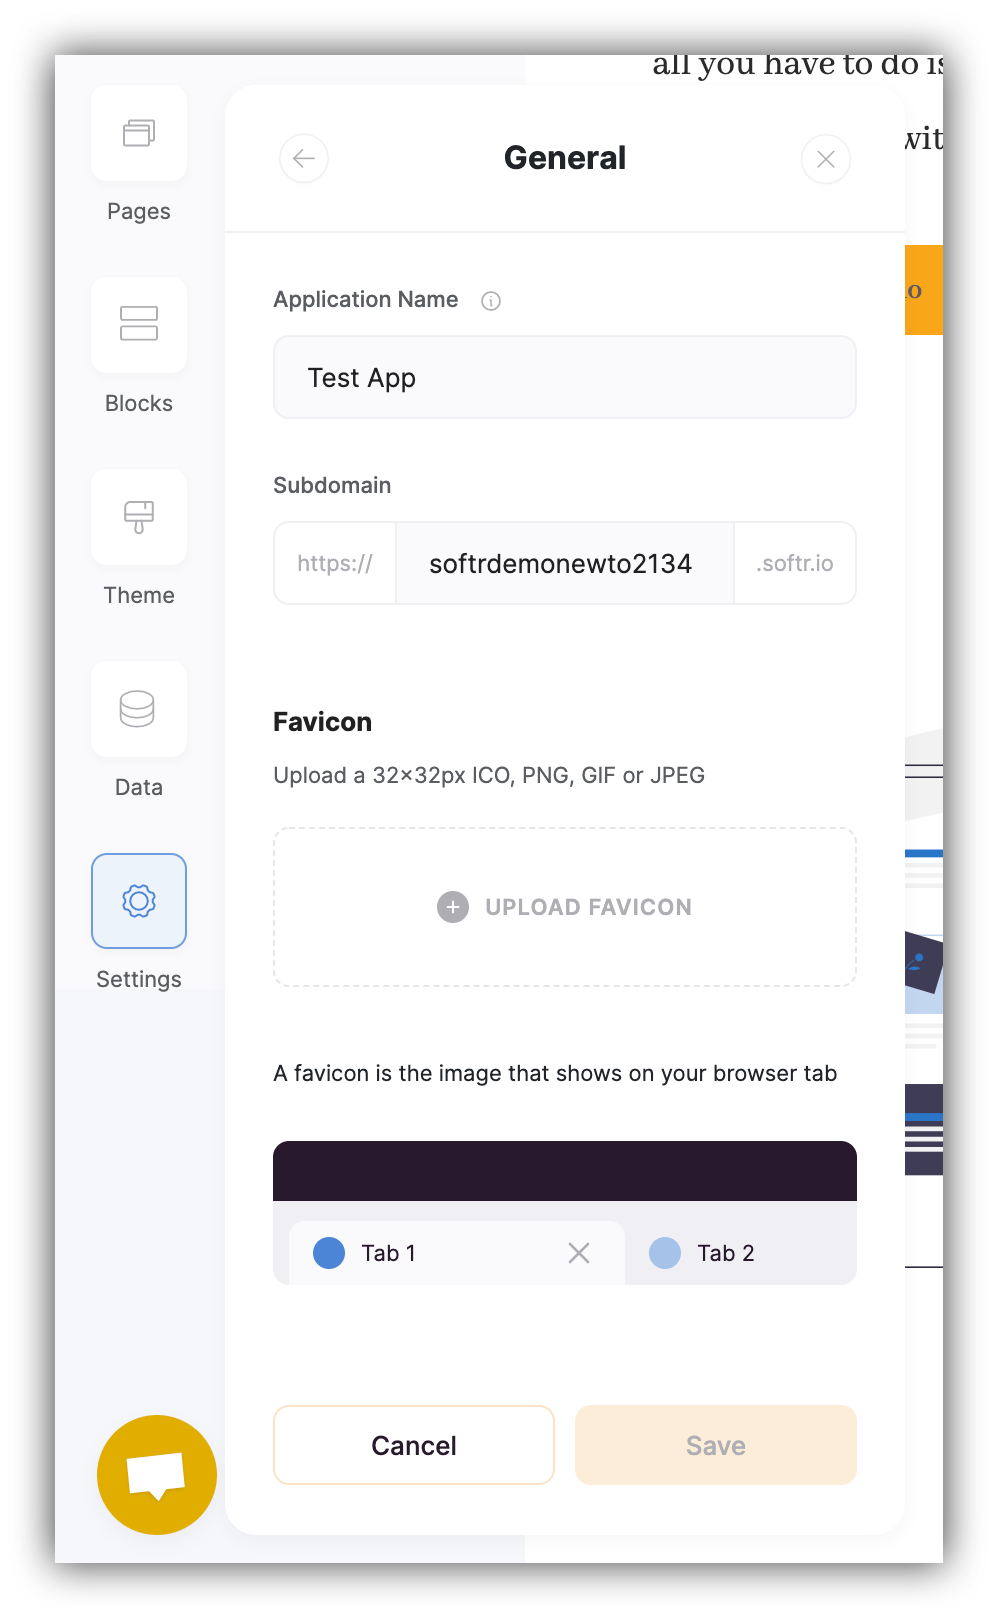 When you create your application a random name and subdomain are automatically assigned to it, which can be customized in this section. The **Application Name** is for your own reference and will not appear anywhere after publishing the app. Next, you can customize your subdomain as follows: **https\://\.softr.io**. You can also use a [custom domain.](/publishing/9qTmU2Lj8Gnpr1Ue6dEAkX/add-a-custom-domain-to-your-app/93K5bLJN3n91MRo9uRGdAf)
Next, you have the option of adding a **favicon**. Please, follow the provided size and format recommendations. There are numerous services (e.g. [https://favicon.io/](https://favicon.io/)), that you can use to generate a favicon of the required format and size.
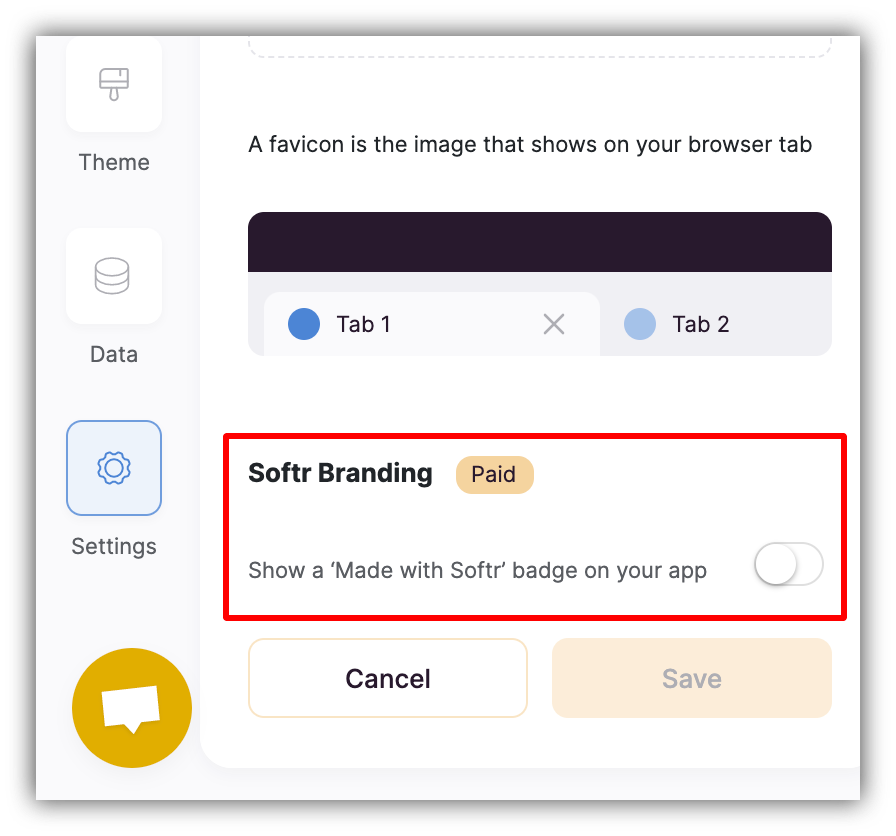
Lastly, you have the **Softr branding** toggle, which allows you to enable/disable the "Made with Softr" badge on your site.
Disabling Softr badge is available for users on the [Professional plan and above](https://www.softr.io/pricing).
When you create your application a random name and subdomain are automatically assigned to it, which can be customized in this section. The **Application Name** is for your own reference and will not appear anywhere after publishing the app. Next, you can customize your subdomain as follows: **https\://\.softr.io**. You can also use a [custom domain.](/publishing/9qTmU2Lj8Gnpr1Ue6dEAkX/add-a-custom-domain-to-your-app/93K5bLJN3n91MRo9uRGdAf)
Next, you have the option of adding a **favicon**. Please, follow the provided size and format recommendations. There are numerous services (e.g. [https://favicon.io/](https://favicon.io/)), that you can use to generate a favicon of the required format and size.
Lastly, you have the **Softr branding** toggle, which allows you to enable/disable the "Made with Softr" badge on your site.
Disabling Softr badge is available for users on the [Professional plan and above](https://www.softr.io/pricing).
 ## Custom Domain
[General Settings](/application-settings/n3K2UEfpC9BpHgakMzUU5Y/general-settings/7YdGy1J8X2tjJSv8BGvWQU)
Here you can use your own custom domain to run your website or web-application on. More detailed info on configuring a custom domain can be found [here](/publishing/9qTmU2Lj8Gnpr1Ue6dEAkX/add-a-custom-domain-to-your-app/93K5bLJN3n91MRo9uRGdAf).
## Integrations
In this section you have the list of all the available integrations that can be connected to your app. Check out the **Integrations** section of this library to find more info on each option.
## SEO
Here you can configure general SEO settings, while SEO details for individual pages can be set in **page settings**.
### **Google Site Verification**
In the **Google Site Verification** field you need to add your ID to verify your ownership of the website and link it to Google Search Console.
To get the ID, on your Google Search Console dashboard, go to **Settings => Ownership Verification,** choose the **HTML tag** option, and copy the value of **content** as shown below.
## Custom Domain
[General Settings](/application-settings/n3K2UEfpC9BpHgakMzUU5Y/general-settings/7YdGy1J8X2tjJSv8BGvWQU)
Here you can use your own custom domain to run your website or web-application on. More detailed info on configuring a custom domain can be found [here](/publishing/9qTmU2Lj8Gnpr1Ue6dEAkX/add-a-custom-domain-to-your-app/93K5bLJN3n91MRo9uRGdAf).
## Integrations
In this section you have the list of all the available integrations that can be connected to your app. Check out the **Integrations** section of this library to find more info on each option.
## SEO
Here you can configure general SEO settings, while SEO details for individual pages can be set in **page settings**.
### **Google Site Verification**
In the **Google Site Verification** field you need to add your ID to verify your ownership of the website and link it to Google Search Console.
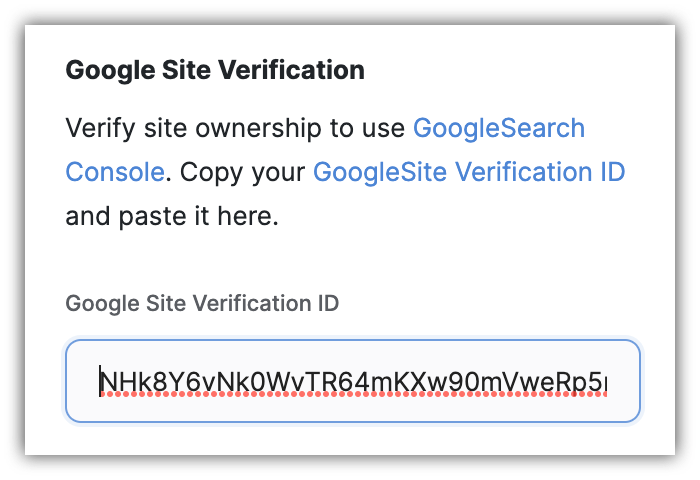
To get the ID, on your Google Search Console dashboard, go to **Settings => Ownership Verification,** choose the **HTML tag** option, and copy the value of **content** as shown below.
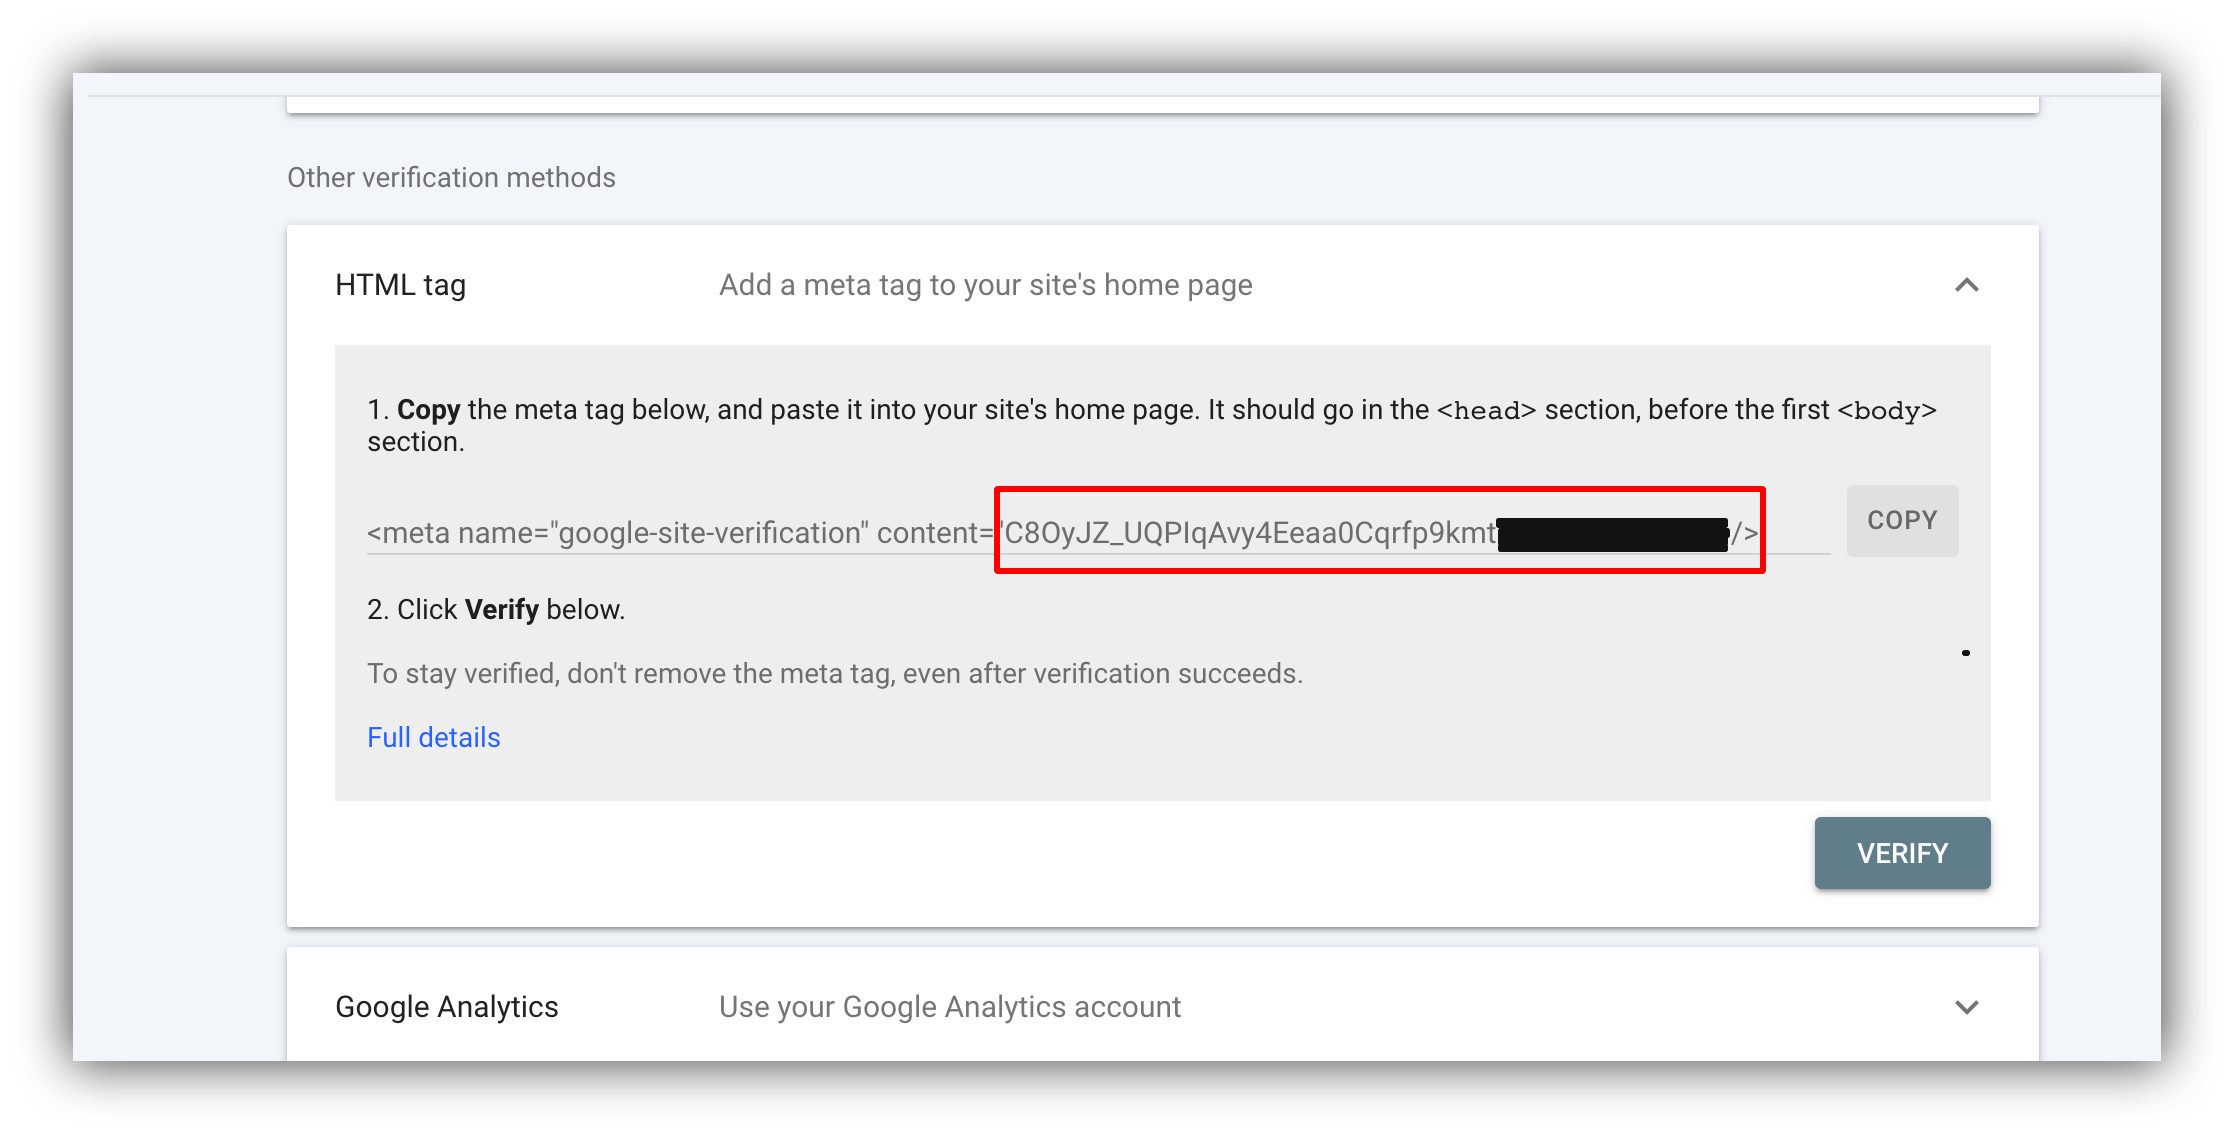 Lastly, you need to paste the code inside corresponding field, and hit **Save**. Don't forget to **publish** your Softr app afterwards.
 ### **robots.txt**
Further on, you can fill in the **robots.txt** file to provide some instructions for web crawler. You can find more info on **robots.txt** [here](/publishing/9qTmU2Lj8Gnpr1Ue6dEAkX/add-a-custom-domain-to-your-app/93K5bLJN3n91MRo9uRGdAf).
### **URL redirects**
Using this option, you can apply 301 redirects within your Softr app. To add a new redirect rule or edit the existing ones, you need to click on the **Edit** button.
### **robots.txt**
Further on, you can fill in the **robots.txt** file to provide some instructions for web crawler. You can find more info on **robots.txt** [here](/publishing/9qTmU2Lj8Gnpr1Ue6dEAkX/add-a-custom-domain-to-your-app/93K5bLJN3n91MRo9uRGdAf).
### **URL redirects**
Using this option, you can apply 301 redirects within your Softr app. To add a new redirect rule or edit the existing ones, you need to click on the **Edit** button.
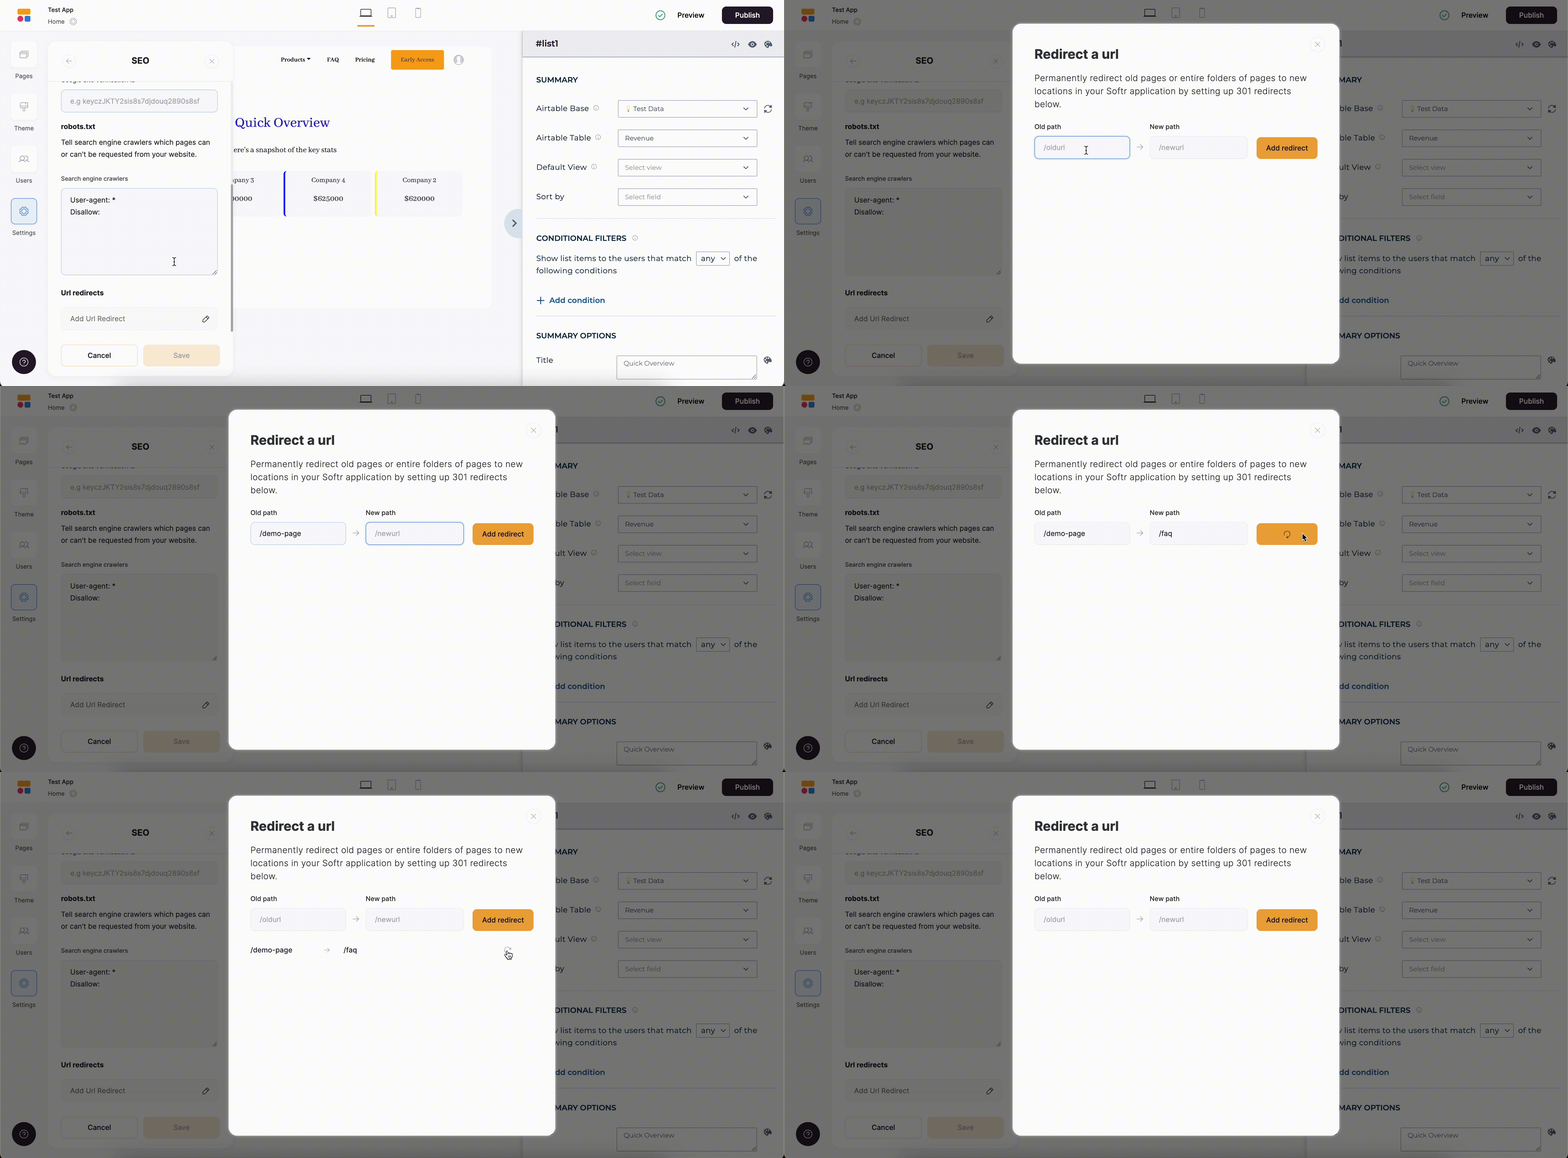
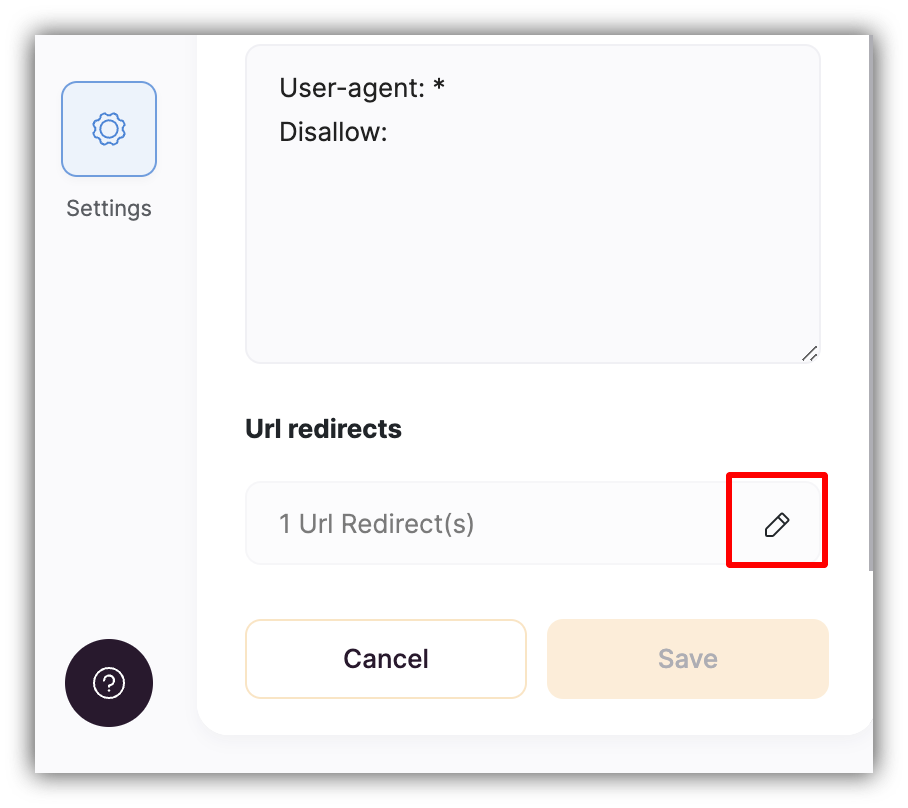 Next, you'll see a pop-up with the list of all the existing redirects. To add a new redirect rule, you need to define the page that needs to be redirected (**Old Path**) and the destination page (**New Path**).
 **Wildcard redirects**
You can apply wildcard redirects using an asterisk in your path. Let's consider a few examples:
**{"/old-folder/* => /new-destination"}** - This means that all the paths under "**/old-folder"** (such as "/old-folder/path1" or "/old-folder/path2") will be redirected to the same single destination.
## Custom Code
In this section, you can add custom code to your app header and footer. The first one will be applied before the **{""}** tag, and the second one will be applied before the **{""}** element and is meant for adding scripts.
### **Custom Code use case**
Let's suppose we want to add a Facebook Messenger to our Softr app, so that users can contact our Facebook Page.
**Getting the Code**
In the Page Settings, we are going to navigate to **Messaging**, and select **Add Messenger to your website**, as shown below.
**Wildcard redirects**
You can apply wildcard redirects using an asterisk in your path. Let's consider a few examples:
**{"/old-folder/* => /new-destination"}** - This means that all the paths under "**/old-folder"** (such as "/old-folder/path1" or "/old-folder/path2") will be redirected to the same single destination.
## Custom Code
In this section, you can add custom code to your app header and footer. The first one will be applied before the **{""}** tag, and the second one will be applied before the **{""}** element and is meant for adding scripts.
### **Custom Code use case**
Let's suppose we want to add a Facebook Messenger to our Softr app, so that users can contact our Facebook Page.
**Getting the Code**
In the Page Settings, we are going to navigate to **Messaging**, and select **Add Messenger to your website**, as shown below.
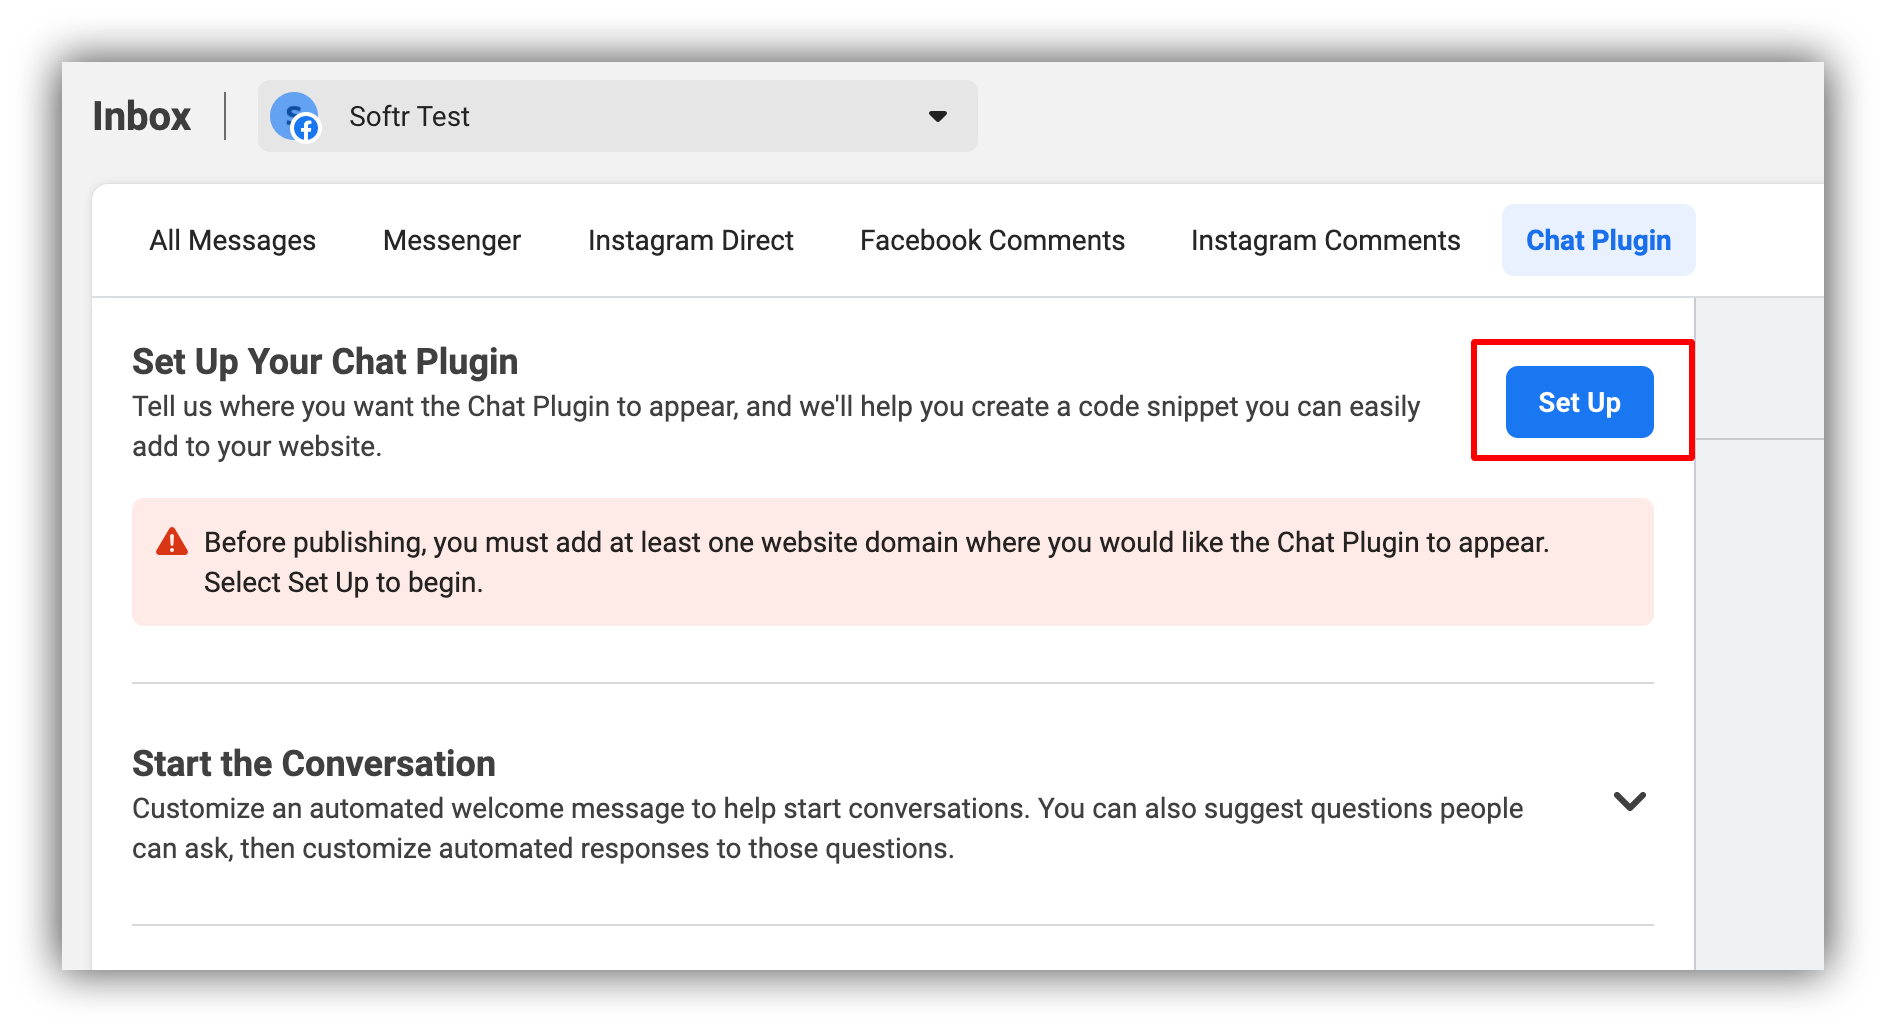
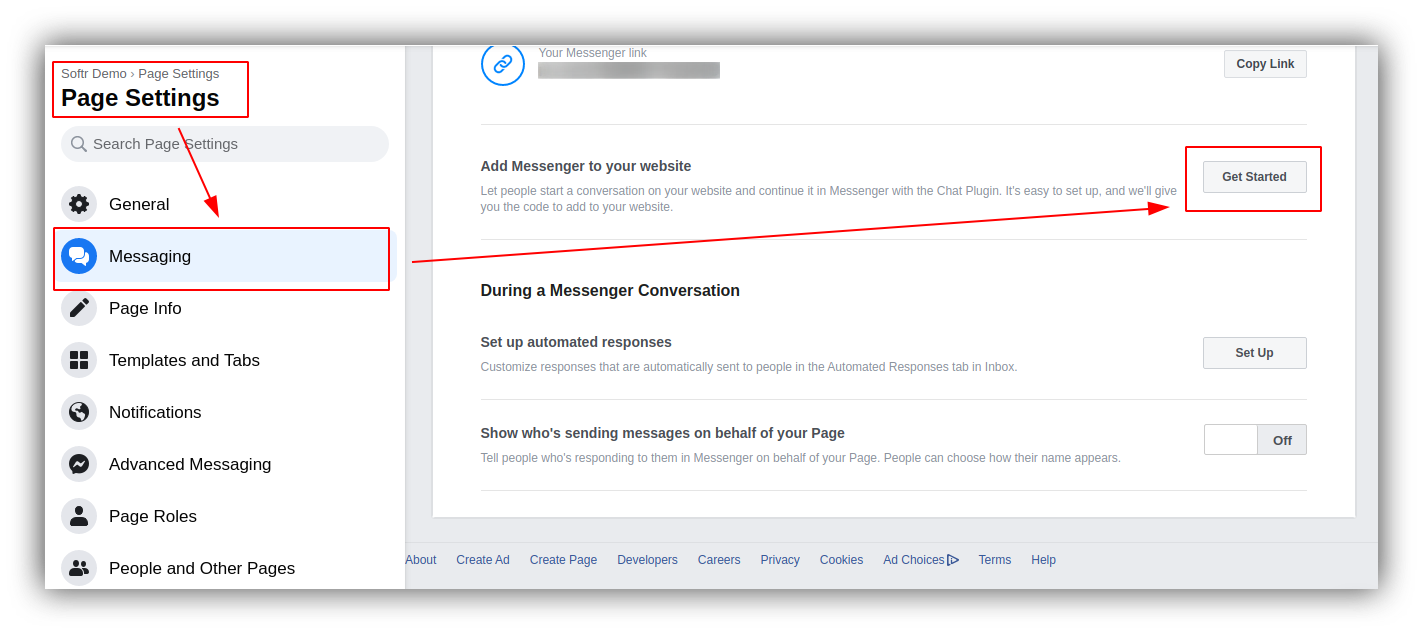 In the next page, we need to hit **Set Up** and configure the chat plugin.
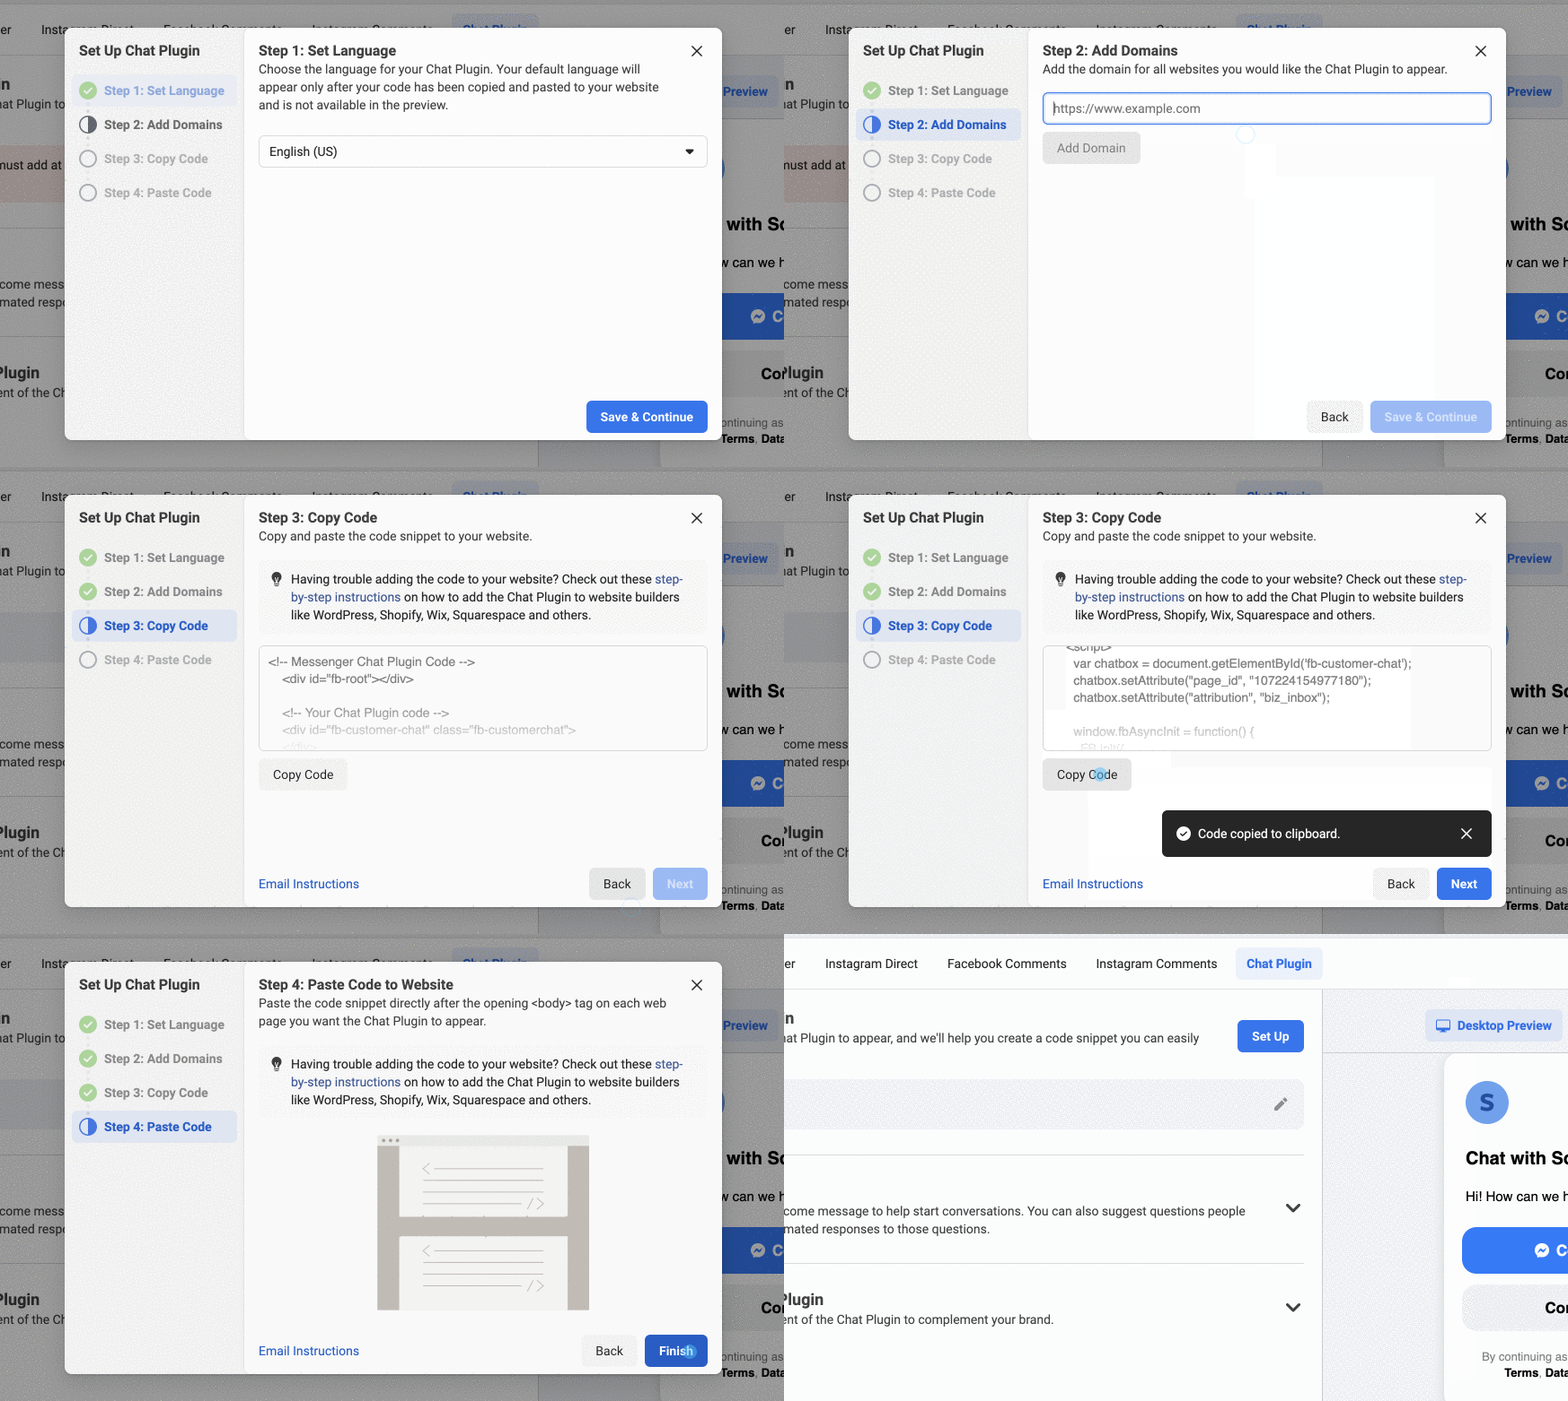
 In the pop-up that appears next, you need to set your chat language, add domain and get the chat widget code as shown below.
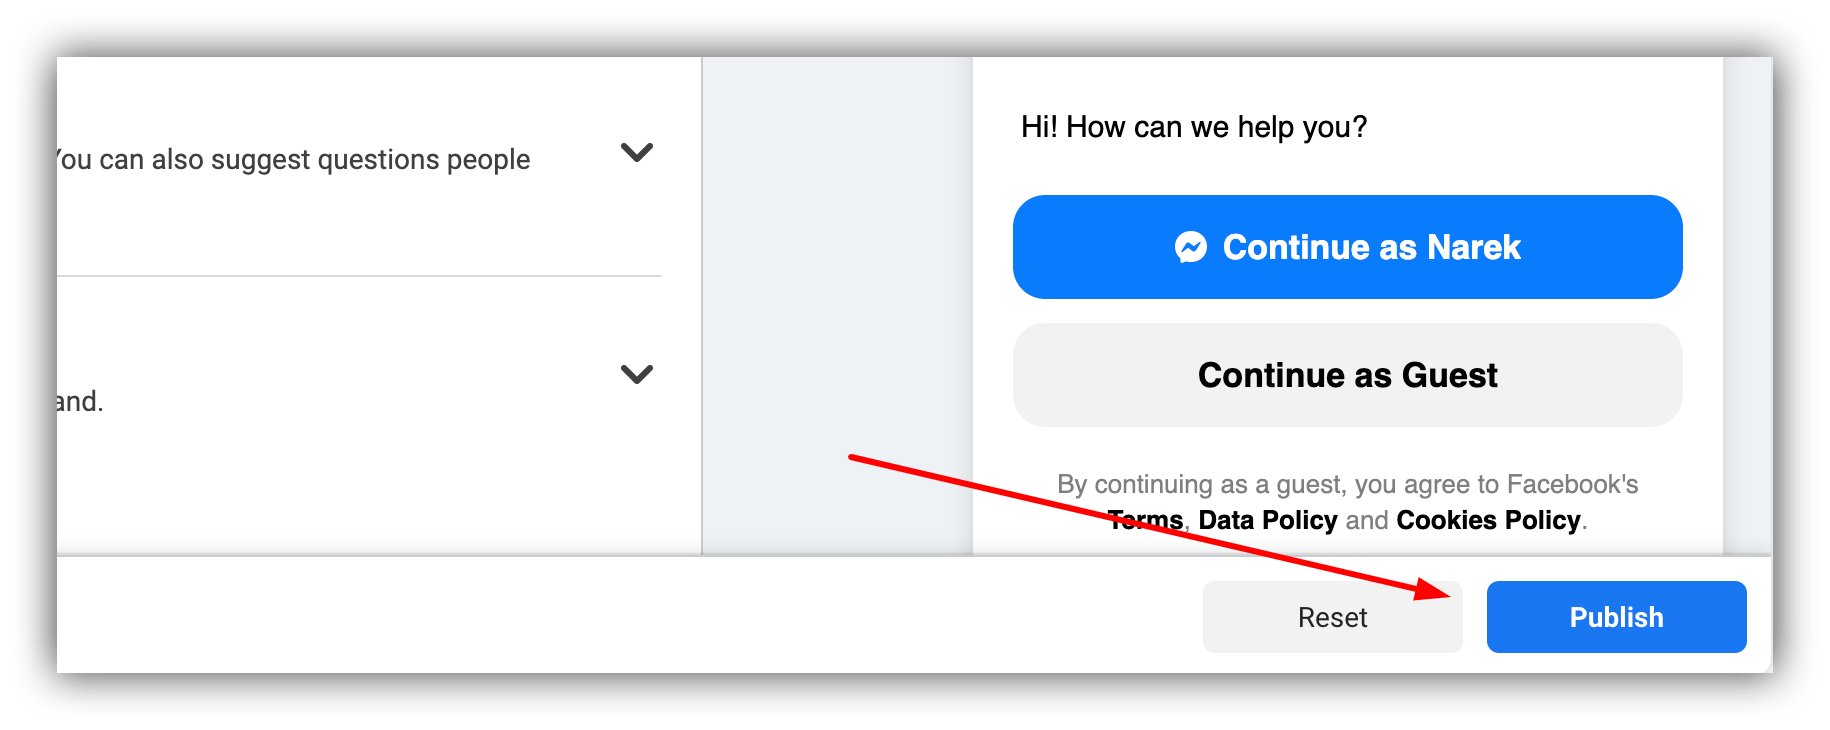
 When you're done with configuring the plugin, hit Publish in the bottom right corner of the screen and you're all set.
 **Applying the Code**
Lastly, we'll go back to our Softr app's **Settings** and paste the chat plugin code into the footer area. Below you can see the process of adding the code and viewing the chat widget on the website.
**Applying the Code**
Lastly, we'll go back to our Softr app's **Settings** and paste the chat plugin code into the footer area. Below you can see the process of adding the code and viewing the chat widget on the website.
 ## User groups and permissions
Learn how to create and apply user groups to blocks/pages [here](/publishing/9qTmU2Lj8Gnpr1Ue6dEAkX/add-a-custom-domain-to-your-app/93K5bLJN3n91MRo9uRGdAf).
The greyed out Softr informational text cannot be changed or removed. This is to protect email recipients and legitimate Softr users. If you wish to send more customized emails, consider using automation software (Make, Zapier) and a transactional email service provider such as Mailersend, SendGrid, Mandrill, or Brevo.
## Date & Time
In this section you can set the default date and time settings for your app such as default Timezone and Date and Time formatting. Access it in the Settings panel.
## User groups and permissions
Learn how to create and apply user groups to blocks/pages [here](/publishing/9qTmU2Lj8Gnpr1Ue6dEAkX/add-a-custom-domain-to-your-app/93K5bLJN3n91MRo9uRGdAf).
The greyed out Softr informational text cannot be changed or removed. This is to protect email recipients and legitimate Softr users. If you wish to send more customized emails, consider using automation software (Make, Zapier) and a transactional email service provider such as Mailersend, SendGrid, Mandrill, or Brevo.
## Date & Time
In this section you can set the default date and time settings for your app such as default Timezone and Date and Time formatting. Access it in the Settings panel.
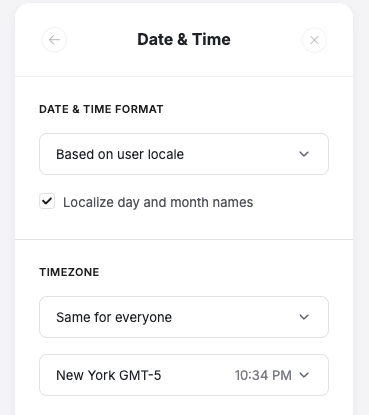
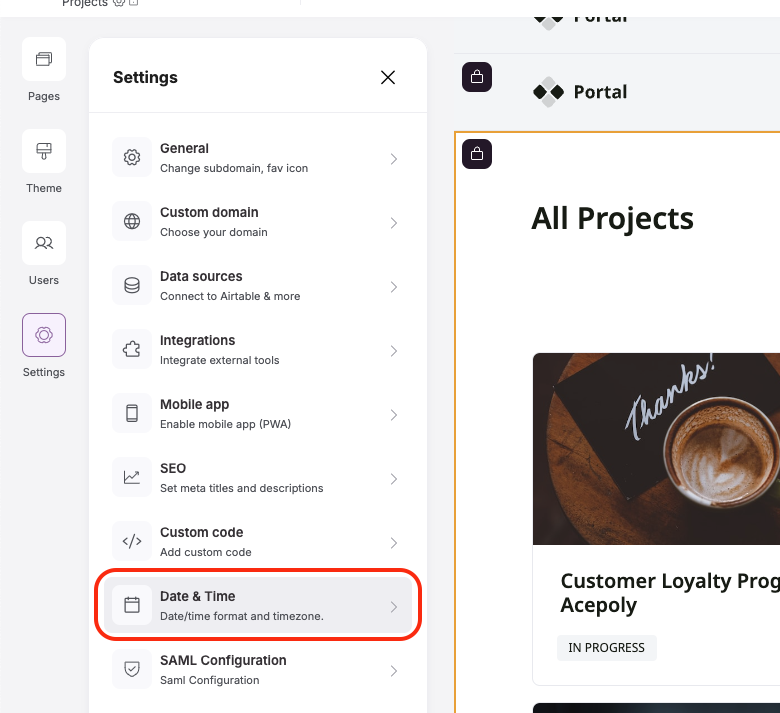 You have two options to choose from:
* **Date and Time Format** - Here you can choose whether you want the date and time formatting to be the same for everyone or based on each Logged-in User’s local formatting preferences. Additionally, use the checkbox to Localize the day and month names to the local language.
* **Timezone** - Choose to either keep the timezone the same for everyone or localize it for each user. If you choose to use the same timezone for everyone, you’ll be asked to set the timezone.
You have two options to choose from:
* **Date and Time Format** - Here you can choose whether you want the date and time formatting to be the same for everyone or based on each Logged-in User’s local formatting preferences. Additionally, use the checkbox to Localize the day and month names to the local language.
* **Timezone** - Choose to either keep the timezone the same for everyone or localize it for each user. If you choose to use the same timezone for everyone, you’ll be asked to set the timezone.
 ## SAML Configuration
See how to configure SAML on your Softr app [here](/publishing/9qTmU2Lj8Gnpr1Ue6dEAkX/add-a-custom-domain-to-your-app/93K5bLJN3n91MRo9uRGdAf).
## OpenId Settings
You can find how to configure OpenId settings [here](/publishing/9qTmU2Lj8Gnpr1Ue6dEAkX/add-a-custom-domain-to-your-app/93K5bLJN3n91MRo9uRGdAf).
## SAML Configuration
See how to configure SAML on your Softr app [here](/publishing/9qTmU2Lj8Gnpr1Ue6dEAkX/add-a-custom-domain-to-your-app/93K5bLJN3n91MRo9uRGdAf).
## OpenId Settings
You can find how to configure OpenId settings [here](/publishing/9qTmU2Lj8Gnpr1Ue6dEAkX/add-a-custom-domain-to-your-app/93K5bLJN3n91MRo9uRGdAf).
"}** tag. Within the **{"