> ## Documentation Index
> Fetch the complete documentation index at: https://docs.softr.io/llms.txt
> Use this file to discover all available pages before exploring further.
# Single Sign-on Overview
> How SSO works in Softr apps, when to use it, and how to configure SAML or OpenID with any identity provider.
Single Sign-on (SSO) lets the people who use your Softr app log in with the account they already have at work — their Microsoft, Google Workspace, Okta, or other identity provider account — instead of creating a separate Softr password. Your IT team stays in control of who has access, and your users get one less password to manage.
This page explains how SSO works in Softr and walks through the configuration that is the same for every identity provider. Once you understand this flow, the provider-specific guides only tell you where to click inside that provider.
SSO (SAML and OpenID) is available on the [Enterprise plan](https://www.softr.io/pricing). If you are on another plan, [contact sales](https://www.softr.io/contact-sales) to discuss enabling it.
**This page is about SSO for the users of your app.** If you want the *collaborators who build apps* in your Softr workspace to log in to Softr Studio through your identity provider, that is a separate feature — see [SSO for Softr Studio](/security/sso-for-softr-studio).
## How SSO works in Softr
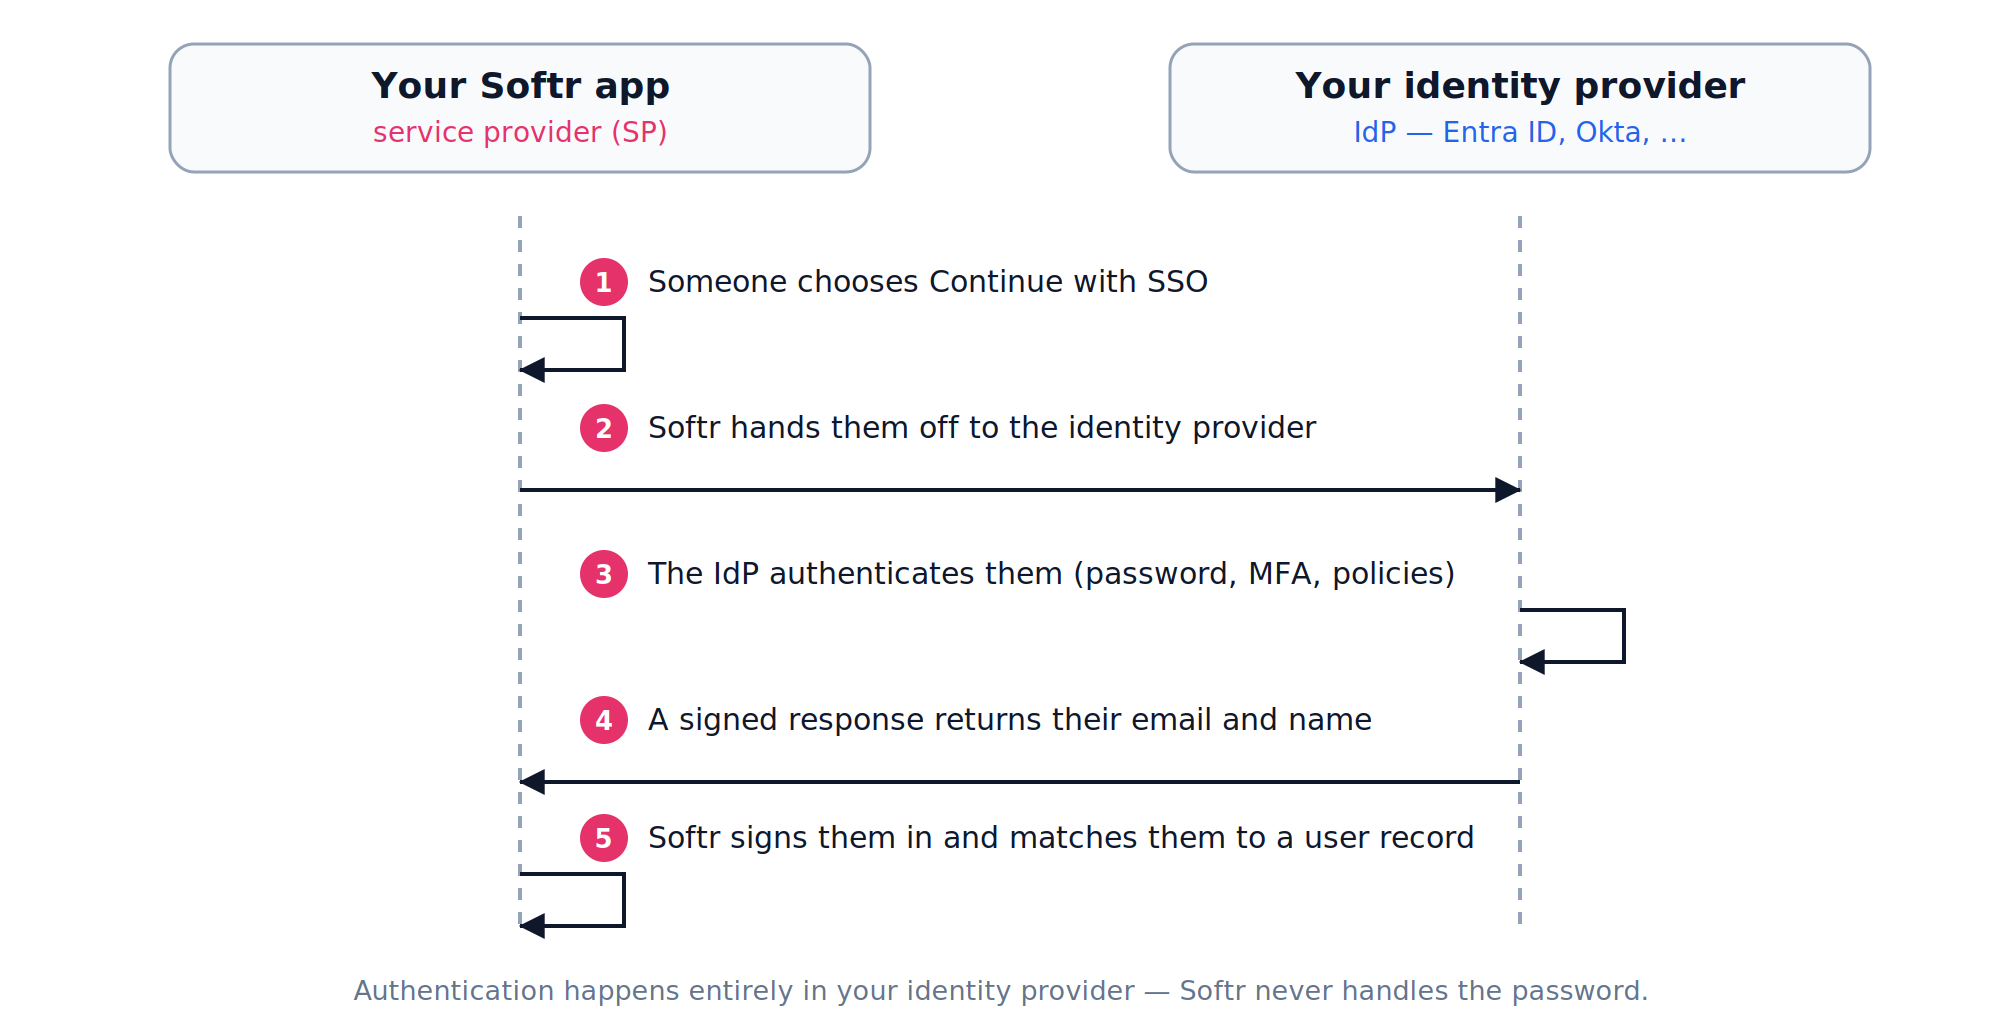
In SSO terms your Softr app is the **service provider (SP)** and your identity provider (**IdP**) is the system that actually holds the accounts and checks the credentials. When someone signs in:
1. They open your app and choose **Continue with SSO** on the login screen.
2. Softr hands them off to your identity provider.
3. The identity provider authenticates them — including any MFA, conditional access, or device policy you enforce there.
4. The identity provider sends Softr a signed response containing the person's email and name.
5. Softr signs them in and matches them to a user record in your app. Because step 3 happens entirely on your side, everything your IT team already enforces — MFA, session policy, deprovisioning when someone leaves — applies to your Softr app too, without Softr ever handling a password.
 ## SAML or OpenID?
Softr supports both of the standards that identity providers use, and you pick one per app. Most providers support both, so if you have no preference, use whichever your provider's documentation treats as the default path.
| | SAML | OpenID (OIDC) |
| ------------------------------ | ------------------------------------------------------------------------------------- | -------------------------------------------------------------------------------- |
| What it is | An XML-based standard for exchanging authentication assertions | An identity layer on top of OAuth 2.0 |
| What you give your IdP | **ACS URL** and **Audience URL** | **Callback URL** |
| What you paste back into Softr | **Metadata.xml**, plus the **Email**, **First name** and **Last name** attribute keys | **Provider URL**, **Token service URL**, **Client ID**, **Client secret** |
| Typical providers | Microsoft Entra ID (Azure AD), Okta, OneLogin, Google Workspace, Shibboleth, Keycloak | Outseta, Auth0, Keycloak, and any provider publishing an OIDC discovery endpoint |
If your provider offers a pre-built catalog entry for SAML apps, you will usually get there faster with SAML: the provider generates the metadata for you and you paste a single XML document into Softr.
## Before you start
Have these ready — the configuration screen asks for all of them and you will be switching between two browser tabs:
You need to be able to create a new application (sometimes called an app integration, enterprise application, or OAuth client) in your IdP, and to configure which attributes it sends.
See the comparison above. You can change it later, but you will have to redo the setup on the provider side.
For example `acme.com` and `acme.co.uk`. These are optional, but setting them changes how the login screen behaves — see [Routing users to SSO automatically](#routing-users-to-sso-automatically).
SSO controls *who can get in*. It does not by itself decide what each person can see. Plan how signed-in users map to [user groups](/user-groups-and-permissions/user-groups) before you roll SSO out.
## Configure SSO
In Softr Studio, open your app and go to the **Users** tab, then the **Authentication** sub-tab. This is where every login method for the app is managed.
## SAML or OpenID?
Softr supports both of the standards that identity providers use, and you pick one per app. Most providers support both, so if you have no preference, use whichever your provider's documentation treats as the default path.
| | SAML | OpenID (OIDC) |
| ------------------------------ | ------------------------------------------------------------------------------------- | -------------------------------------------------------------------------------- |
| What it is | An XML-based standard for exchanging authentication assertions | An identity layer on top of OAuth 2.0 |
| What you give your IdP | **ACS URL** and **Audience URL** | **Callback URL** |
| What you paste back into Softr | **Metadata.xml**, plus the **Email**, **First name** and **Last name** attribute keys | **Provider URL**, **Token service URL**, **Client ID**, **Client secret** |
| Typical providers | Microsoft Entra ID (Azure AD), Okta, OneLogin, Google Workspace, Shibboleth, Keycloak | Outseta, Auth0, Keycloak, and any provider publishing an OIDC discovery endpoint |
If your provider offers a pre-built catalog entry for SAML apps, you will usually get there faster with SAML: the provider generates the metadata for you and you paste a single XML document into Softr.
## Before you start
Have these ready — the configuration screen asks for all of them and you will be switching between two browser tabs:
You need to be able to create a new application (sometimes called an app integration, enterprise application, or OAuth client) in your IdP, and to configure which attributes it sends.
See the comparison above. You can change it later, but you will have to redo the setup on the provider side.
For example `acme.com` and `acme.co.uk`. These are optional, but setting them changes how the login screen behaves — see [Routing users to SSO automatically](#routing-users-to-sso-automatically).
SSO controls *who can get in*. It does not by itself decide what each person can see. Plan how signed-in users map to [user groups](/user-groups-and-permissions/user-groups) before you roll SSO out.
## Configure SSO
In Softr Studio, open your app and go to the **Users** tab, then the **Authentication** sub-tab. This is where every login method for the app is managed.
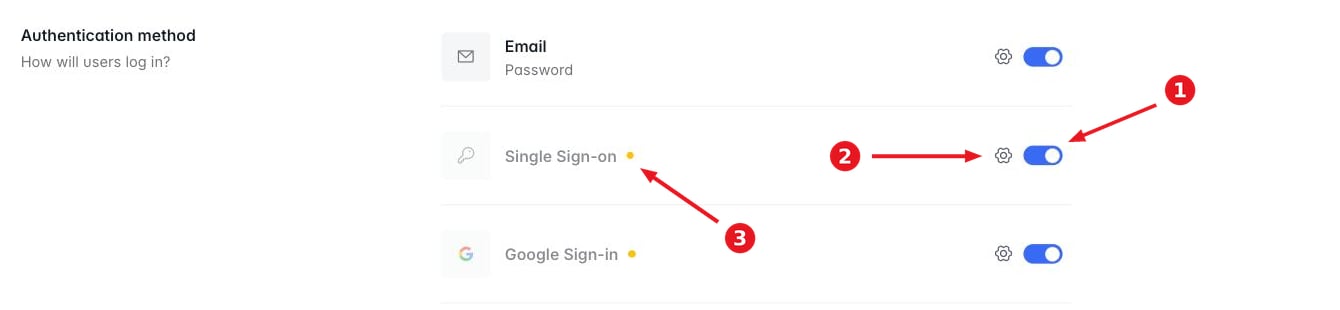
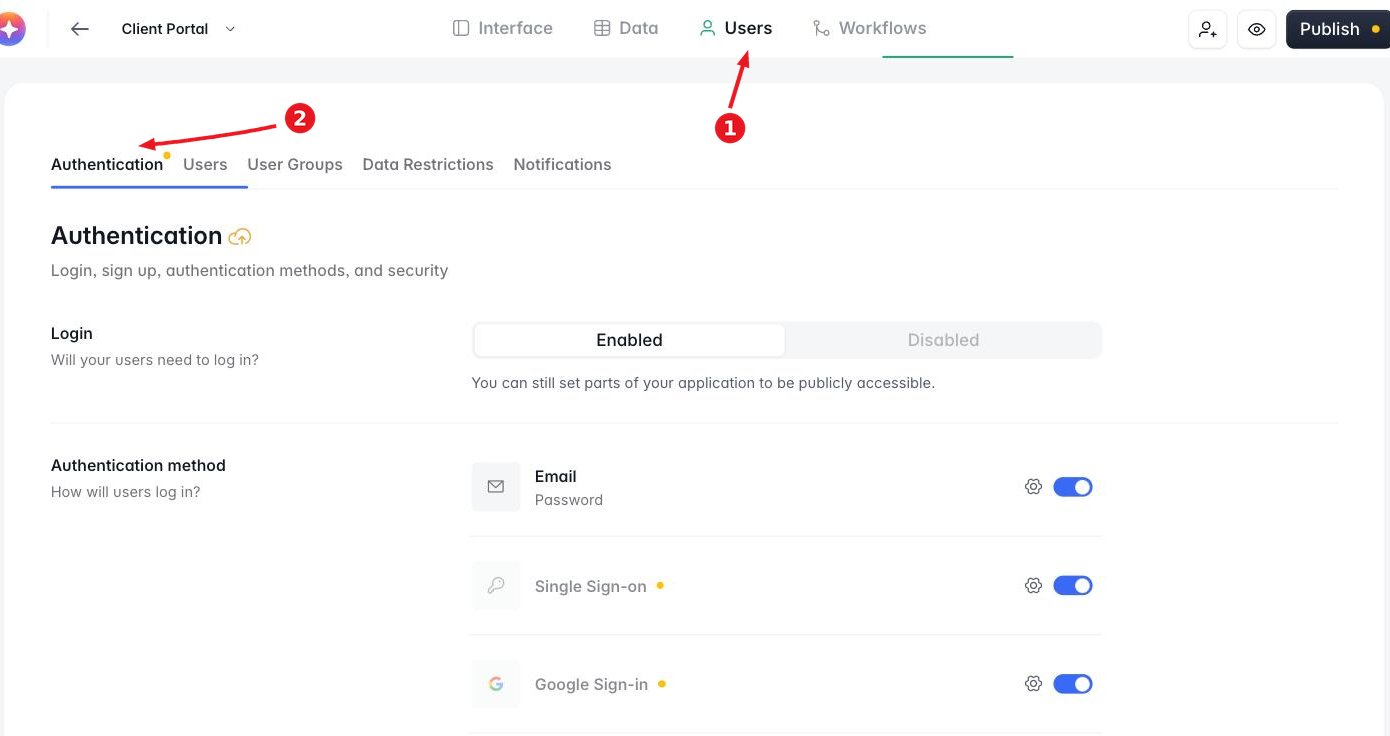 In the **Authentication method** list, switch the **Single Sign-on** toggle on. The **Single sign-on** configuration window opens straight away. Once the method is on, a gear icon appears next to it — use that to reopen the configuration at any time. An amber dot next to **Single Sign-on** means the method is enabled but not yet fully configured.
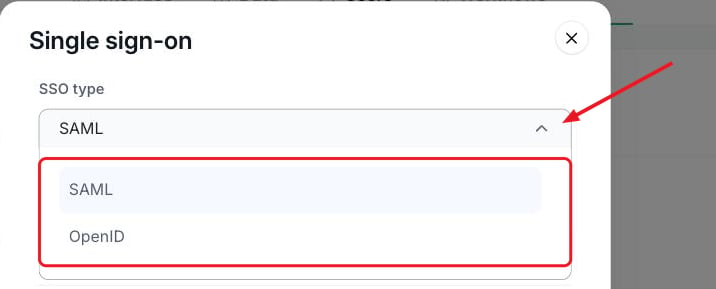
 At the top of the window, set **SSO type** to **SAML** or **OpenID**. The fields below change to match your choice.
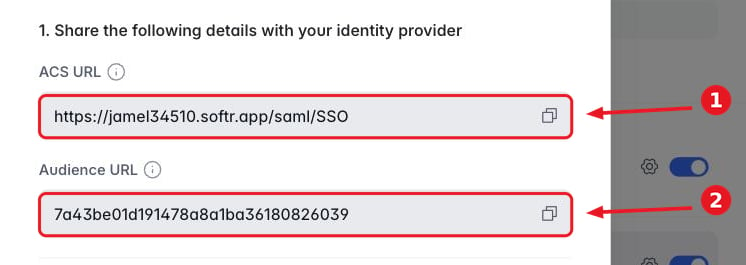
 Under **1. Share the following details with your identity provider**, Softr shows the values your IdP needs in order to trust your app. Copy each one with the button at the end of the field.
* **ACS URL** — the Assertion Consumer Service sign-in URL, in the form `https://.softr.app/saml/SSO`. Your identity provider posts its response here. Some providers call this the *Reply URL*, *Recipient*, or *Single sign-on URL*.
* **Audience URL** — the entity ID, a unique identifier for your app. Providers may label this *Audience (EntityID)*, *Identifier*, or *SP Entity ID*.
* **Callback URL** — the redirect URI, in the form `https://.softr.app/open-id/code`. Providers may label this *Redirect URI*, *Sign-in redirect URI*, or *Callback URI*.
Under **1. Share the following details with your identity provider**, Softr shows the values your IdP needs in order to trust your app. Copy each one with the button at the end of the field.
* **ACS URL** — the Assertion Consumer Service sign-in URL, in the form `https://.softr.app/saml/SSO`. Your identity provider posts its response here. Some providers call this the *Reply URL*, *Recipient*, or *Single sign-on URL*.
* **Audience URL** — the entity ID, a unique identifier for your app. Providers may label this *Audience (EntityID)*, *Identifier*, or *SP Entity ID*.
* **Callback URL** — the redirect URI, in the form `https://.softr.app/open-id/code`. Providers may label this *Redirect URI*, *Sign-in redirect URI*, or *Callback URI*.
 If your app uses a [custom domain](/publishing/add-a-custom-domain-to-your-app), confirm which hostname these URLs use before you register them with your provider — the values Softr shows here are the ones your provider must trust.
Switch to your identity provider and create a new application, pasting in the URLs from the previous step. Then configure what the provider sends back:
* **For SAML**, add attributes for the user's email, first name, and last name, and make sure each is included in the SAML assertion. Note the exact attribute names — you need them in the next step.
* **For OpenID**, note the **Client ID** and **Client secret** the provider generates, along with its authorization and token endpoints.
The provider-specific guides at the bottom of this page cover this step in detail. If your provider is not listed yet, its own documentation for adding a custom SAML or OIDC application will use the same values.
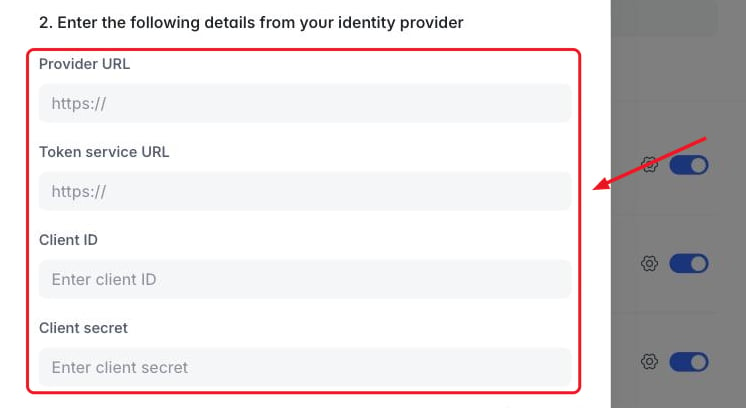
Back in the **Single sign-on** window, fill in **2. Enter the following details from your identity provider**.
* **Metadata.xml** — paste the full metadata XML document from your provider.
* **Email key** / **First name key** / **Last name key** — the exact attribute names you configured in your IdP, so Softr knows which claim holds which value.
* **Provider URL** — your provider's OpenID Connect issuer or authorization URL.
* **Token service URL** — the endpoint Softr calls to exchange the authorization code for tokens.
* **Client ID** and **Client secret** — the credentials generated when you created the OAuth client.
If your app uses a [custom domain](/publishing/add-a-custom-domain-to-your-app), confirm which hostname these URLs use before you register them with your provider — the values Softr shows here are the ones your provider must trust.
Switch to your identity provider and create a new application, pasting in the URLs from the previous step. Then configure what the provider sends back:
* **For SAML**, add attributes for the user's email, first name, and last name, and make sure each is included in the SAML assertion. Note the exact attribute names — you need them in the next step.
* **For OpenID**, note the **Client ID** and **Client secret** the provider generates, along with its authorization and token endpoints.
The provider-specific guides at the bottom of this page cover this step in detail. If your provider is not listed yet, its own documentation for adding a custom SAML or OIDC application will use the same values.
Back in the **Single sign-on** window, fill in **2. Enter the following details from your identity provider**.
* **Metadata.xml** — paste the full metadata XML document from your provider.
* **Email key** / **First name key** / **Last name key** — the exact attribute names you configured in your IdP, so Softr knows which claim holds which value.
* **Provider URL** — your provider's OpenID Connect issuer or authorization URL.
* **Token service URL** — the endpoint Softr calls to exchange the authorization code for tokens.
* **Client ID** and **Client secret** — the credentials generated when you created the OAuth client.
 In **SSO email domains**, list the domains your workforce signs in with, separated by commas — for example `acme.com, acme.co.uk`. If your app offers other login methods as well, anyone whose email address matches one of these domains is always sent to SSO instead. See [Routing users to SSO automatically](#routing-users-to-sso-automatically).
Click **Save**. Then open the **Log in** utility page to check that **Continue with SSO** now appears, and publish your app so the change reaches your users.
## What your users see
You do not add an SSO block to a page. Softr's login screen is a built-in **utility page** called **Log in** (at `/login`), and enabling Single Sign-on adds a **Continue with SSO** button to it automatically.
In **SSO email domains**, list the domains your workforce signs in with, separated by commas — for example `acme.com, acme.co.uk`. If your app offers other login methods as well, anyone whose email address matches one of these domains is always sent to SSO instead. See [Routing users to SSO automatically](#routing-users-to-sso-automatically).
Click **Save**. Then open the **Log in** utility page to check that **Continue with SSO** now appears, and publish your app so the change reaches your users.
## What your users see
You do not add an SSO block to a page. Softr's login screen is a built-in **utility page** called **Log in** (at `/login`), and enabling Single Sign-on adds a **Continue with SSO** button to it automatically.
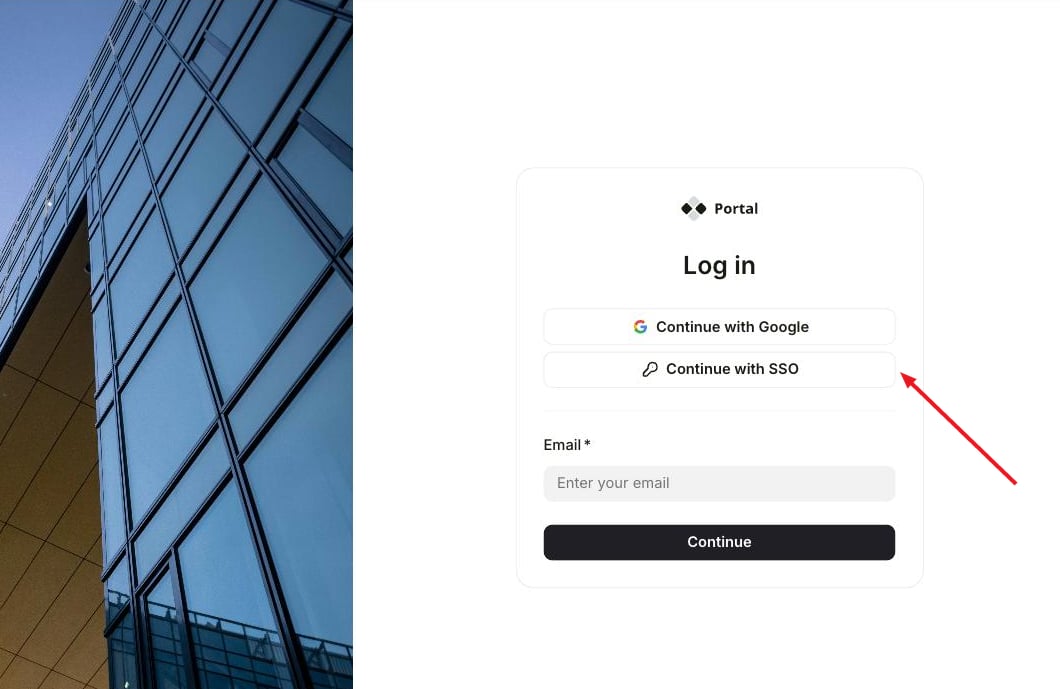 Select the login card in Studio to open the **Sign In** block settings, where you can adjust:
* **Logo**, **Title & subtitle**, and the **Side section** (background image, heading, text, image) to brand the screen.
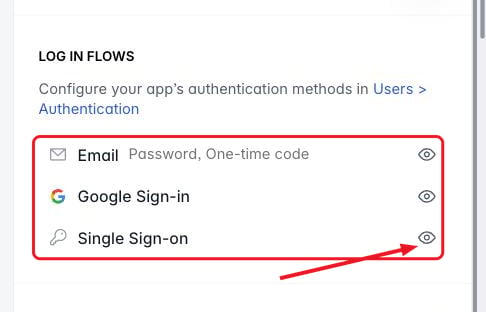
* **Log in flows** — every authentication method enabled for the app is listed here with a visibility control, so you can hide a method on this screen without disabling it for the app.
* **Consent message**, **Redirect to sign up**, and **reCAPTCHA**.
Select the login card in Studio to open the **Sign In** block settings, where you can adjust:
* **Logo**, **Title & subtitle**, and the **Side section** (background image, heading, text, image) to brand the screen.
* **Log in flows** — every authentication method enabled for the app is listed here with a visibility control, so you can hide a method on this screen without disabling it for the app.
* **Consent message**, **Redirect to sign up**, and **reCAPTCHA**.
 ### Routing users to SSO automatically
The **SSO email domains** field decides how much choice your users get:
* **Left empty** — the login screen shows every enabled method side by side, and each person picks one.
* **Filled in** — anyone whose email address matches a listed domain is always directed to log in with SSO, even if other methods are available. Use this when your workforce must go through the identity provider while, say, external clients continue to use email.
## How SSO users appear in your app
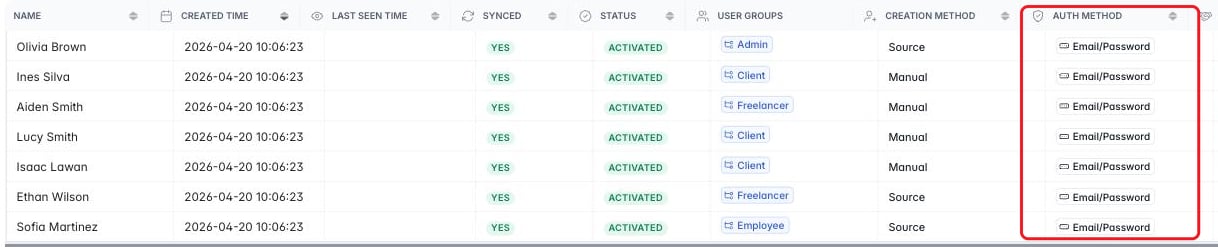
Signed-in users show up under **Users → Users** like any other user. The **Auth method** column records how each person authenticates, so you can tell SSO users apart from those using email and password.
### Routing users to SSO automatically
The **SSO email domains** field decides how much choice your users get:
* **Left empty** — the login screen shows every enabled method side by side, and each person picks one.
* **Filled in** — anyone whose email address matches a listed domain is always directed to log in with SSO, even if other methods are available. Use this when your workforce must go through the identity provider while, say, external clients continue to use email.
## How SSO users appear in your app
Signed-in users show up under **Users → Users** like any other user. The **Auth method** column records how each person authenticates, so you can tell SSO users apart from those using email and password.
 Authentication is only half of access control. Once someone is signed in, what they can see is governed by [user groups](/user-groups-and-permissions/user-groups), [page visibility](/user-groups-and-permissions/page-visibility), and [record filters](/user-groups-and-permissions/record-filters). Configure those before inviting your users in.
If you want the identity provider to create, update and deactivate Softr user records automatically rather than relying on people signing in, look at [SCIM User Provisioning](/add-and-manage-users/scim-provisioning), which is also on the Enterprise plan.
## Using SSO alongside other login methods
SSO does not have to be the only way in. Each method in the **Authentication method** list is independent, so a single app can offer SSO for employees and email login for external clients. Two things to keep in mind:
* **SSO email domains** override the choice for matching addresses, as described above.
* Hiding a method under **Log in flows** only changes that screen. To remove a method for the whole app, switch it off in **Users → Authentication**.
## Turning SSO off
Switching **Single Sign-on** off asks you to type `Remove Single Sign-on` to confirm, because it can lock people out.
Removing SSO as an authentication method means anyone who only ever signed in through your identity provider may no longer be able to log in. Make sure those users have another way in (or that you intend to revoke their access) before you confirm.
## Good to know
* **Softr is the service provider, never the identity provider.** You can let your identity provider log people in to Softr; you cannot use a Softr login to sign people in to other platforms.
* **One SSO configuration per app.** The configuration window holds a single identity provider. The **SSO email domains** field accepts several domains for that one provider — it does not connect several providers to the same app.
* **The configuration is per app**, not per workspace. An app you duplicate does not inherit a working SSO setup; register the new app's ACS/Callback URLs with your provider separately.
## Provider guides
The SAML setup walked through end to end.
Connecting Microsoft Entra ID (Azure AD).
The OpenID Connect setup, using Outseta as the example.
A lighter-weight alternative for Google accounts.
Your identity provider's own documentation is the authority on its half of the setup. Useful starting points:
* Microsoft Entra ID — [Enable SAML single sign-on for an enterprise application](https://learn.microsoft.com/en-us/entra/identity/enterprise-apps/add-application-portal-setup-sso)
* Okta — [Create SAML app integrations](https://help.okta.com/en-us/content/topics/apps/apps_app_integration_wizard_saml.htm)
* Google Workspace — [Set up your own custom SAML app](https://support.google.com/a/answer/6087519)
* OneLogin — [SAML Custom Connector (Advanced)](https://support.onelogin.com/kb/4266907/saml-custom-connector-advanced)
* Auth0 — [Configure applications with OIDC Discovery](https://auth0.com/docs/get-started/applications/configure-applications-with-oidc-discovery)
* Outseta — [Log users into multiple products with OpenID Connect SSO](https://go.outseta.com/support/kb/articles/amRZYjmJ/log-users-into-multiple-products-with-openid-connect-single-sign-on-sso)
## Related
How authentication works in Softr apps.
Provision and deprovision users from your identity provider.
SSO for the collaborators who build your apps.
How Softr secures published apps.
Authentication is only half of access control. Once someone is signed in, what they can see is governed by [user groups](/user-groups-and-permissions/user-groups), [page visibility](/user-groups-and-permissions/page-visibility), and [record filters](/user-groups-and-permissions/record-filters). Configure those before inviting your users in.
If you want the identity provider to create, update and deactivate Softr user records automatically rather than relying on people signing in, look at [SCIM User Provisioning](/add-and-manage-users/scim-provisioning), which is also on the Enterprise plan.
## Using SSO alongside other login methods
SSO does not have to be the only way in. Each method in the **Authentication method** list is independent, so a single app can offer SSO for employees and email login for external clients. Two things to keep in mind:
* **SSO email domains** override the choice for matching addresses, as described above.
* Hiding a method under **Log in flows** only changes that screen. To remove a method for the whole app, switch it off in **Users → Authentication**.
## Turning SSO off
Switching **Single Sign-on** off asks you to type `Remove Single Sign-on` to confirm, because it can lock people out.
Removing SSO as an authentication method means anyone who only ever signed in through your identity provider may no longer be able to log in. Make sure those users have another way in (or that you intend to revoke their access) before you confirm.
## Good to know
* **Softr is the service provider, never the identity provider.** You can let your identity provider log people in to Softr; you cannot use a Softr login to sign people in to other platforms.
* **One SSO configuration per app.** The configuration window holds a single identity provider. The **SSO email domains** field accepts several domains for that one provider — it does not connect several providers to the same app.
* **The configuration is per app**, not per workspace. An app you duplicate does not inherit a working SSO setup; register the new app's ACS/Callback URLs with your provider separately.
## Provider guides
The SAML setup walked through end to end.
Connecting Microsoft Entra ID (Azure AD).
The OpenID Connect setup, using Outseta as the example.
A lighter-weight alternative for Google accounts.
Your identity provider's own documentation is the authority on its half of the setup. Useful starting points:
* Microsoft Entra ID — [Enable SAML single sign-on for an enterprise application](https://learn.microsoft.com/en-us/entra/identity/enterprise-apps/add-application-portal-setup-sso)
* Okta — [Create SAML app integrations](https://help.okta.com/en-us/content/topics/apps/apps_app_integration_wizard_saml.htm)
* Google Workspace — [Set up your own custom SAML app](https://support.google.com/a/answer/6087519)
* OneLogin — [SAML Custom Connector (Advanced)](https://support.onelogin.com/kb/4266907/saml-custom-connector-advanced)
* Auth0 — [Configure applications with OIDC Discovery](https://auth0.com/docs/get-started/applications/configure-applications-with-oidc-discovery)
* Outseta — [Log users into multiple products with OpenID Connect SSO](https://go.outseta.com/support/kb/articles/amRZYjmJ/log-users-into-multiple-products-with-openid-connect-single-sign-on-sso)
## Related
How authentication works in Softr apps.
Provision and deprovision users from your identity provider.
SSO for the collaborators who build your apps.
How Softr secures published apps.