> ## Documentation Index
> Fetch the complete documentation index at: https://docs.softr.io/llms.txt
> Use this file to discover all available pages before exploring further.
# OpenId Single Sign-on
> Setting up authentication with OpenId.
OpenId Single Sign-on (SSO) is available for users on the [Enterprise plan](https://www.softr.io/pricing).
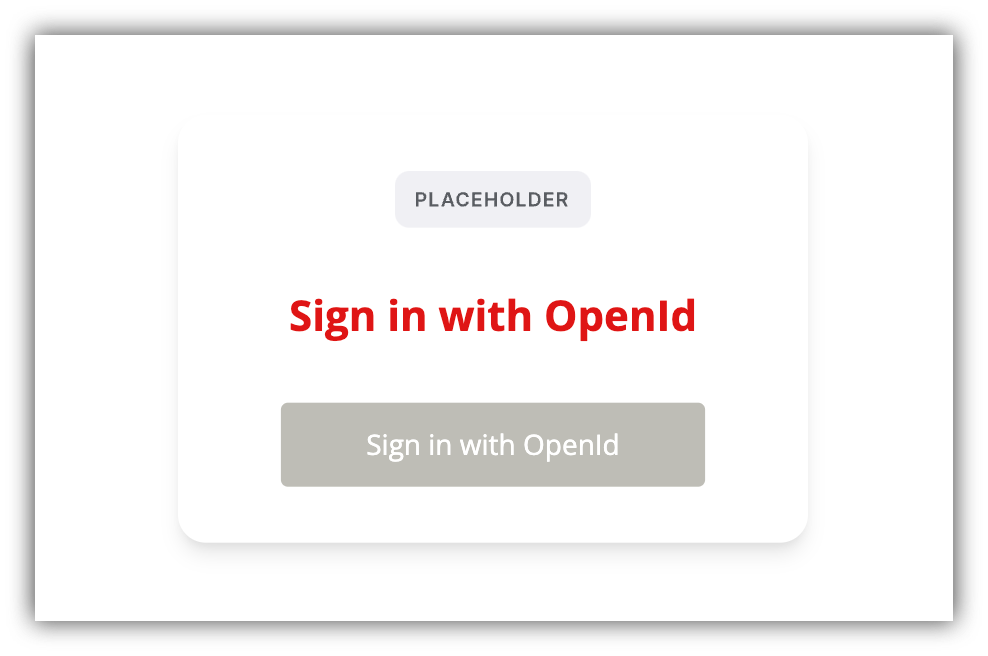 Using this block, you can enable your users to sign in with their OpenId credentials. To be able to use the block, you first need to integrate the OpenId platform that you use for user management and authentication. We’ll find out how to do that next.
## Configuring OpenId settings
[OpenID Connect (OIDC)](https://openid.net/connect/) is an open authentication protocol that extends the [OAuth 2.0](https://oauth.net/2/) protocol, adding an identity layer to it. There are a number of services that use the OpenId technology. Softr can be integrated with any platform using the OpenID standard. One such platform is Outseta membership software. Let’s use Outseta as an example for how to setup OpenID in your Softr app.
If you use Outseta as your user management and authentication solution, you can integrate it with Softr, allowing your users to log into your Softr app with their Outseta credentials. The integration steps are pretty simple and straightforward, so let's start.
### **Getting the Callback URL**
First, let's copy the **Callback URL** from our OpenId Settings. We are going to use it in our Outseta account, so let's switch there for a moment.
### **Adding an OAuth Client in Outseta**
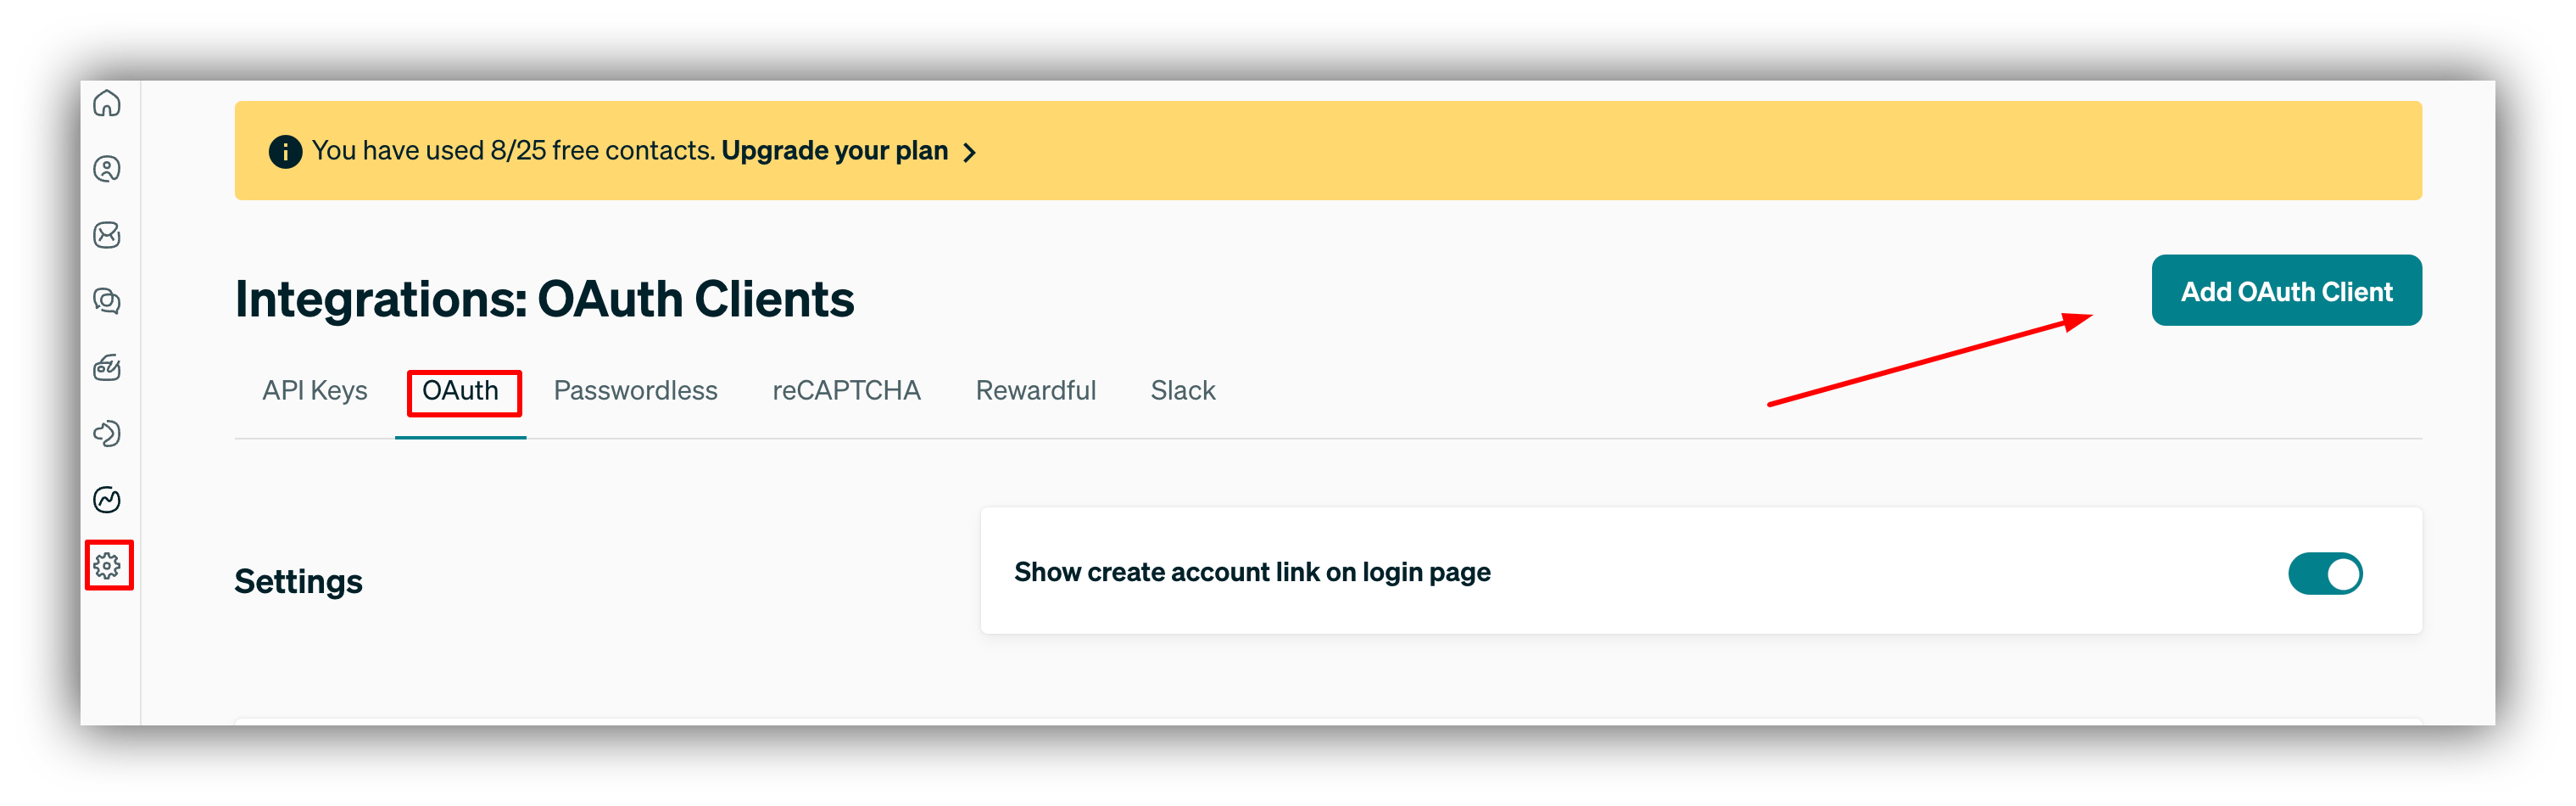
First, we need to add an OAuth Client in our Outseta account. To do that, we need to navigate to **Settings => Integrations => OAuth** and hit **Add OAuth Client.**
Using this block, you can enable your users to sign in with their OpenId credentials. To be able to use the block, you first need to integrate the OpenId platform that you use for user management and authentication. We’ll find out how to do that next.
## Configuring OpenId settings
[OpenID Connect (OIDC)](https://openid.net/connect/) is an open authentication protocol that extends the [OAuth 2.0](https://oauth.net/2/) protocol, adding an identity layer to it. There are a number of services that use the OpenId technology. Softr can be integrated with any platform using the OpenID standard. One such platform is Outseta membership software. Let’s use Outseta as an example for how to setup OpenID in your Softr app.
If you use Outseta as your user management and authentication solution, you can integrate it with Softr, allowing your users to log into your Softr app with their Outseta credentials. The integration steps are pretty simple and straightforward, so let's start.
### **Getting the Callback URL**
First, let's copy the **Callback URL** from our OpenId Settings. We are going to use it in our Outseta account, so let's switch there for a moment.
### **Adding an OAuth Client in Outseta**
First, we need to add an OAuth Client in our Outseta account. To do that, we need to navigate to **Settings => Integrations => OAuth** and hit **Add OAuth Client.**
 In the pop-up that follows, we are going to add a **Name** for the client, paste the Callback ID we had copied earlier from our Softr app։ The Logout Redirect URL can be left blank.
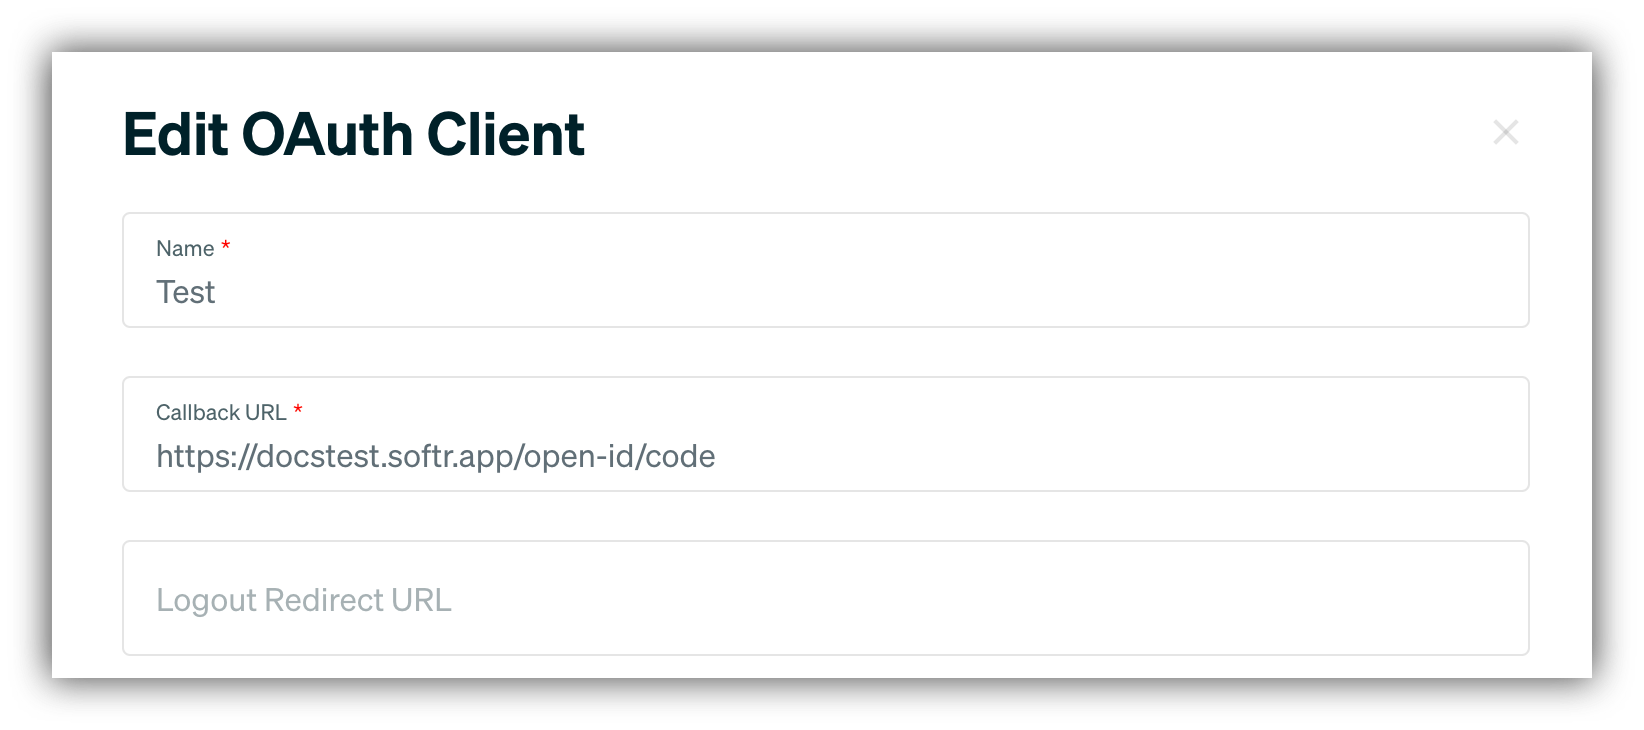 After completing those, click Add, and the pop-up will expand, showing your **Integration Details**.
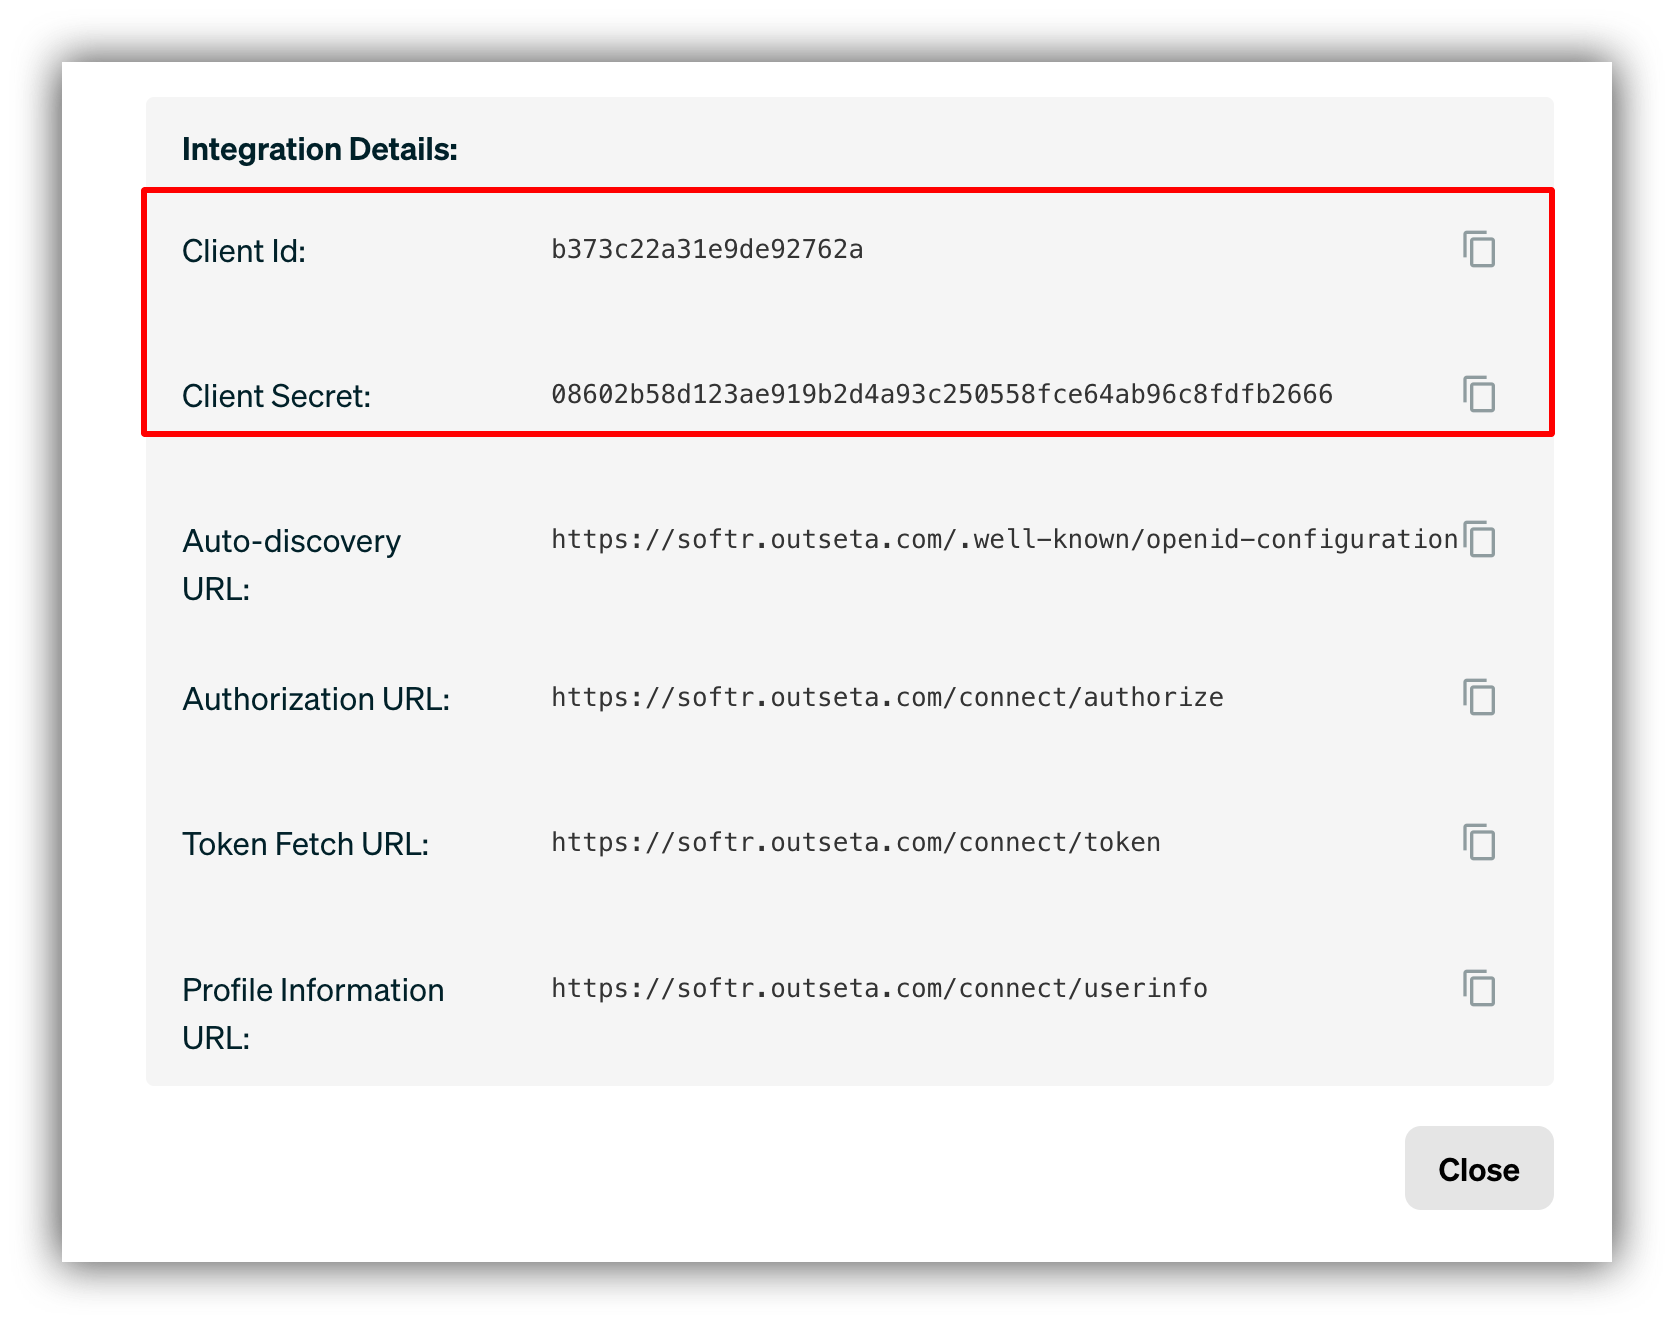 Here, you need the **Client Id** and **Client Secret** values.
### **Adding Client Id and Secret on Softr**
Now we are going to add the **Client Id** and **Client Secret** values, which we obtained in the previous step, in our Softr app's **OpenId Settings**.
Here, you need the **Client Id** and **Client Secret** values.
### **Adding Client Id and Secret on Softr**
Now we are going to add the **Client Id** and **Client Secret** values, which we obtained in the previous step, in our Softr app's **OpenId Settings**.
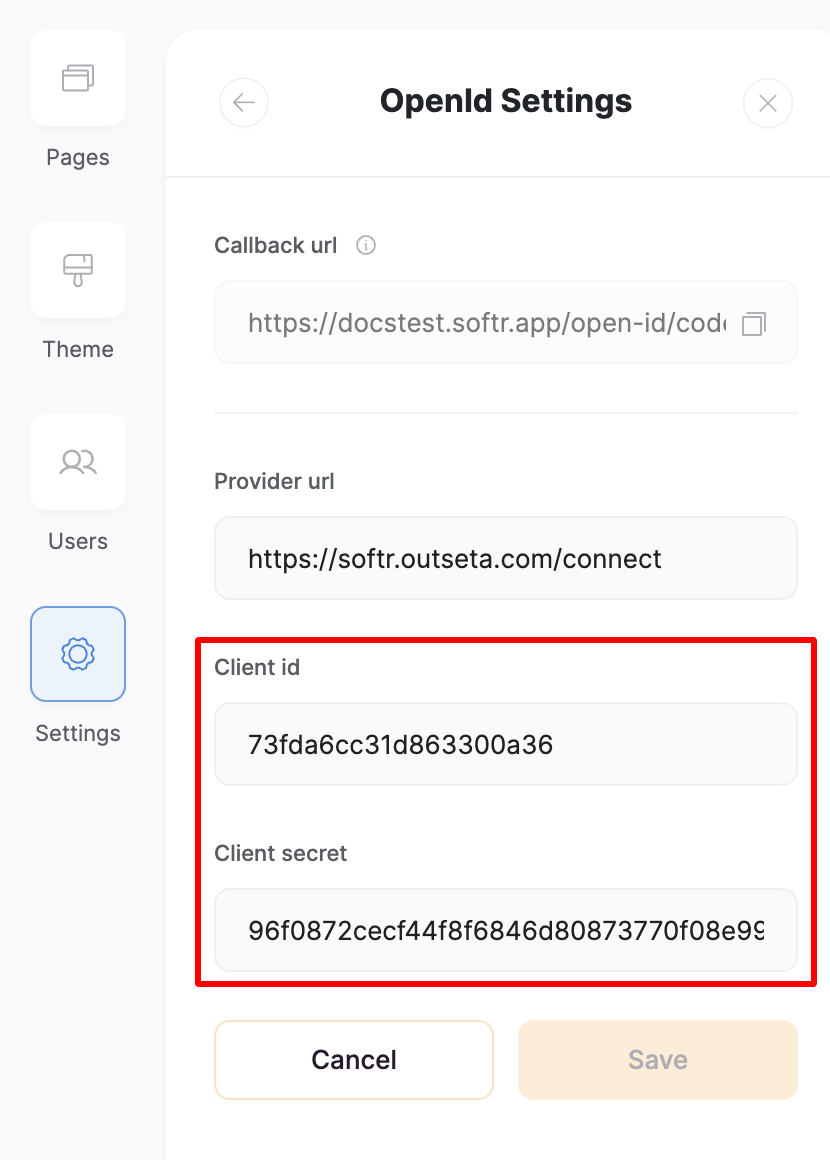 As you can notice, we've added **[https://softr.outseta.com/connect](https://softr.outseta.com/connect)** under **Provider URL**. In your case, the URL will have a similar structure, but "softr.outseta.com" will be replaced with your own Outseta domain: **[https://yourname.outseta.com/connect](https://yourname.outseta.com/connect)**
After completing this, Save your settings, and you're done. Now, you can use the **OpenId SSO Softr block** to allow your users log in with their Outseta credentials.
### **Testing the Integration**
Let's pick a user from our Outseta contacts and try logging with this user's credentials on Softr. You can learn about user authentication, how users can sign up and create passwords, and more [here](https://www.outseta.com/authentication).
Below, you can see a contact that has passed authentication and has a password.
As you can notice, we've added **[https://softr.outseta.com/connect](https://softr.outseta.com/connect)** under **Provider URL**. In your case, the URL will have a similar structure, but "softr.outseta.com" will be replaced with your own Outseta domain: **[https://yourname.outseta.com/connect](https://yourname.outseta.com/connect)**
After completing this, Save your settings, and you're done. Now, you can use the **OpenId SSO Softr block** to allow your users log in with their Outseta credentials.
### **Testing the Integration**
Let's pick a user from our Outseta contacts and try logging with this user's credentials on Softr. You can learn about user authentication, how users can sign up and create passwords, and more [here](https://www.outseta.com/authentication).
Below, you can see a contact that has passed authentication and has a password.
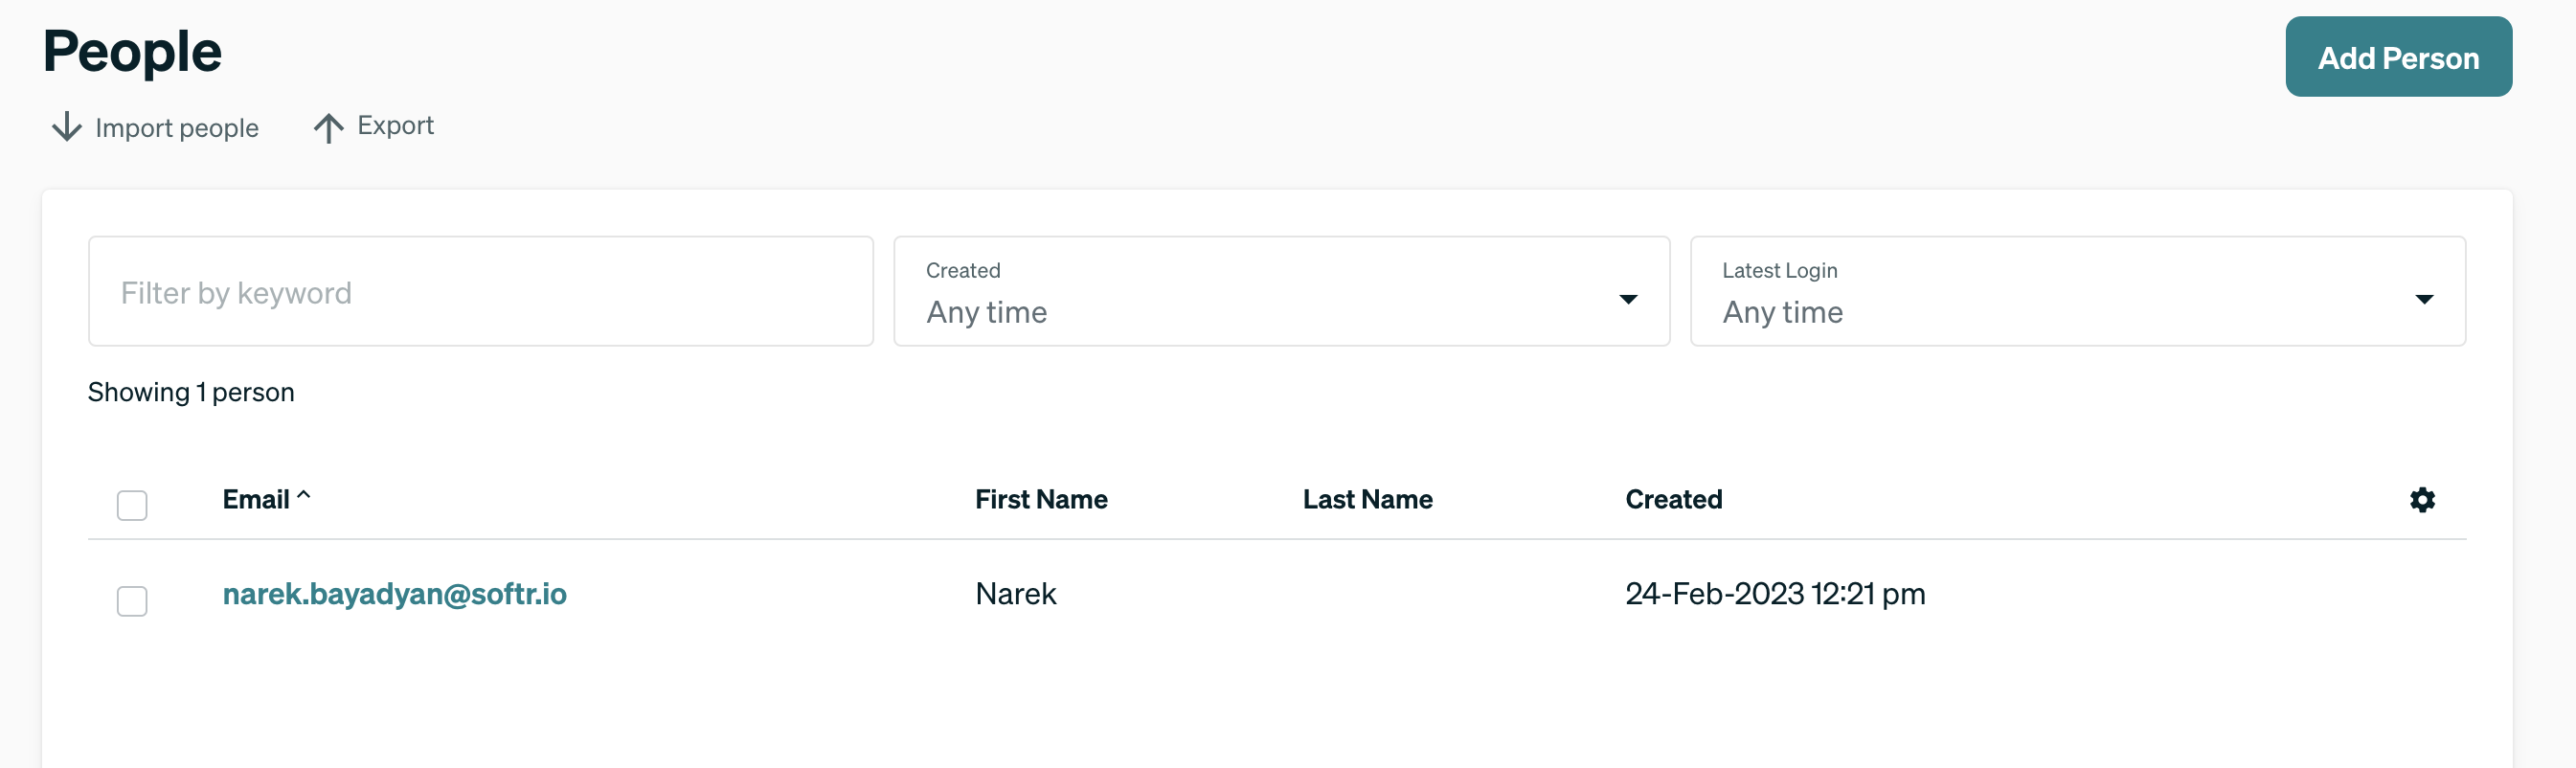 Now, we can use this contact’s email and password to log into our Softr app through the OpenId login block. First, let’s set up the OpenId block.
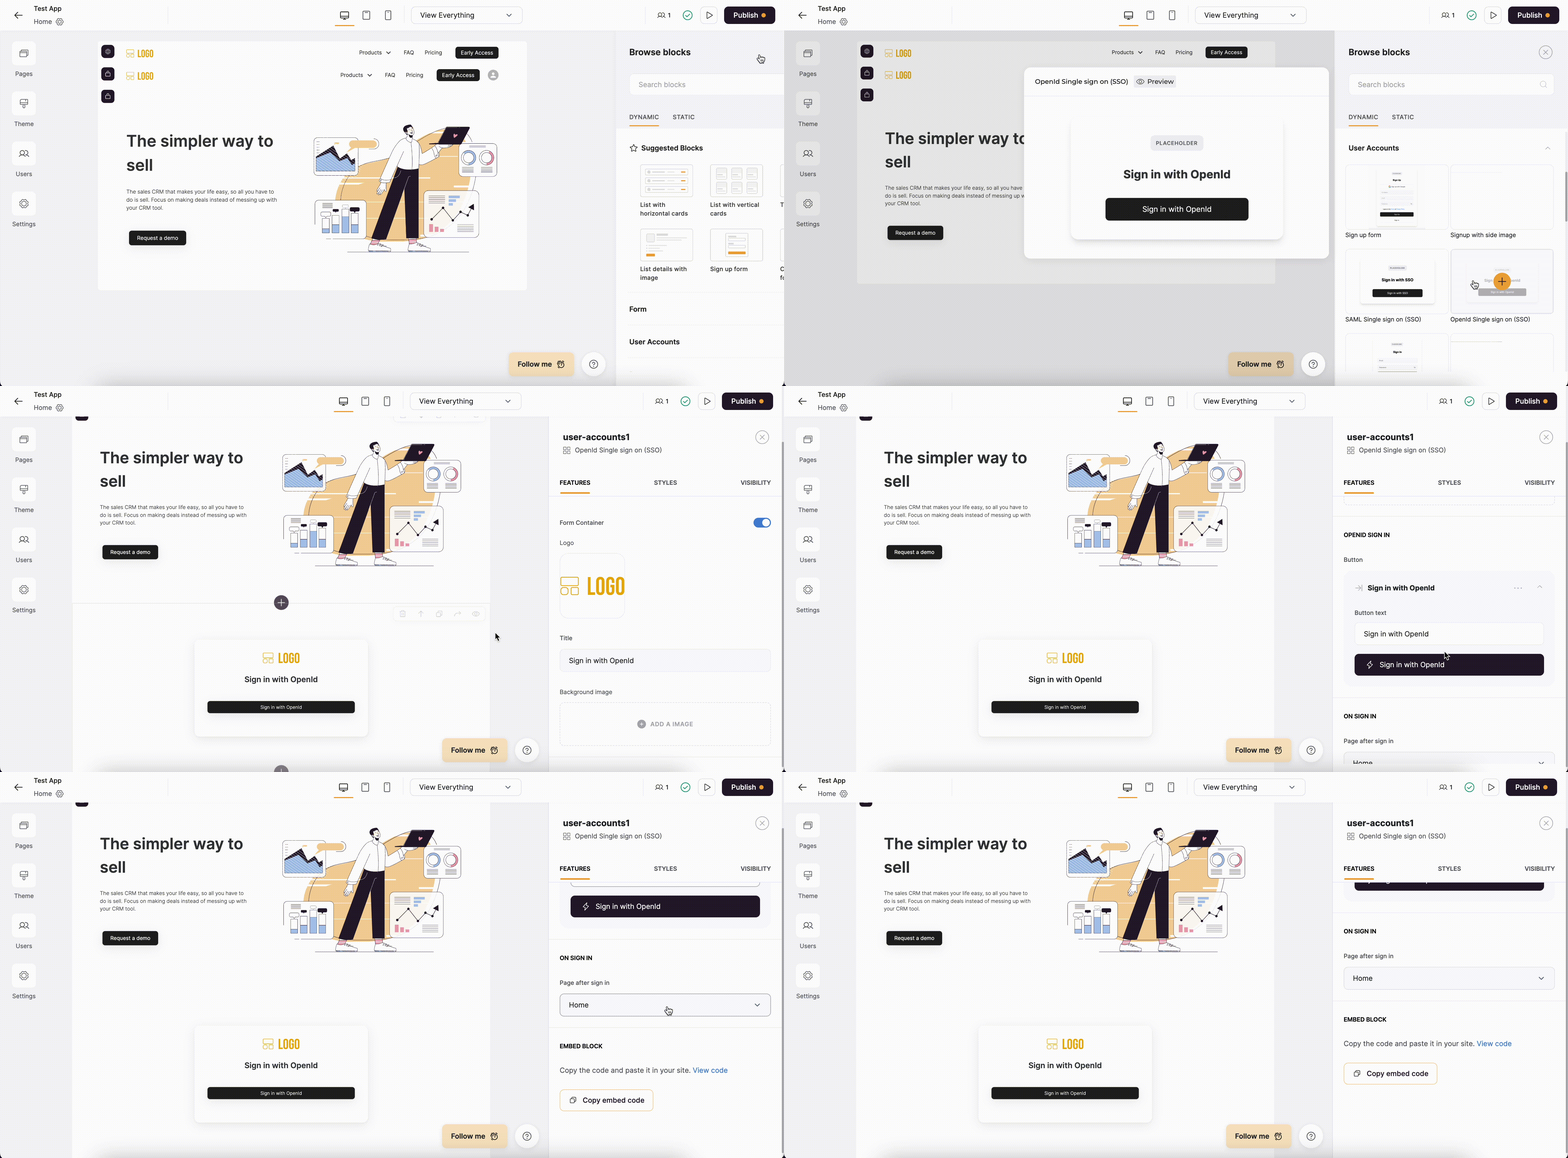 We can modify the layout of the block as well as change the page after signin, but we are going to leave it as it is. Now, let’s publish our app and try logging in with the Outseta user we mentioned earlier.
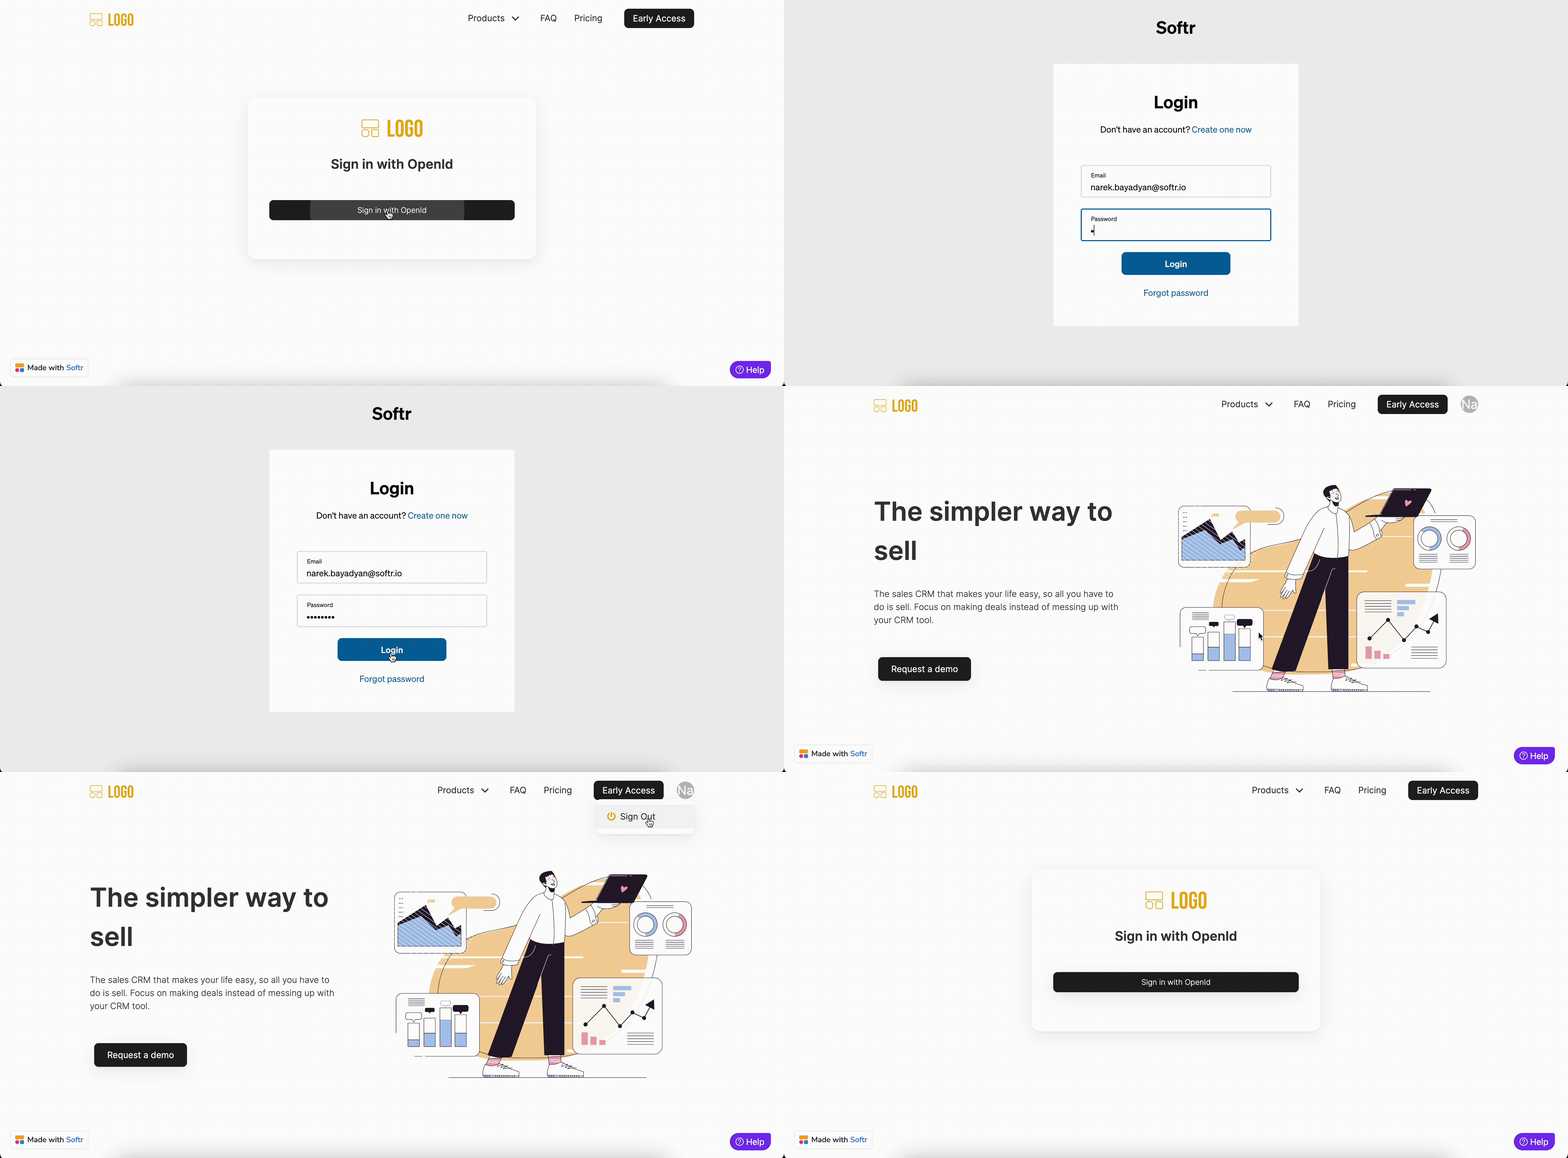 As you can see, we’re able to log in and out successfully.
As soon as the user signs in with his/her Outseta credentials, a new [user is created](/add-and-manage-users/pxnkp9H3qyEVMF6XUceqnj/users-menu/5JTzjtbvp8Skemd26A9ho9) in your Softr app.
As you can see, we’re able to log in and out successfully.
As soon as the user signs in with his/her Outseta credentials, a new [user is created](/add-and-manage-users/pxnkp9H3qyEVMF6XUceqnj/users-menu/5JTzjtbvp8Skemd26A9ho9) in your Softr app.